

English Manual
Page 1
... instructions in this manual before using this manual for future reference. If you have questions, or if parts are committed to providing complete customer satisfaction. Save this equipment. As a manufacturer, we are damaged or missing, PLEASE CONTACT OUR CUSTOMER SERVICE DEPARTMENT DIRECTLY. PFTL41105.0 Serial No. Visit our website at www.proform.com new products, prizes, fitness tips, and much more! Model...
... instructions in this manual before using this manual for future reference. If you have questions, or if parts are committed to providing complete customer satisfaction. Save this equipment. As a manufacturer, we are damaged or missing, PLEASE CONTACT OUR CUSTOMER SERVICE DEPARTMENT DIRECTLY. PFTL41105.0 Serial No. Visit our website at www.proform.com new products, prizes, fitness tips, and much more! Model...

English Manual
Page 3
... telephone number on the front cover of this treadmill are used only by persons weighing 275 pounds or less. 8. The pulse sensor is intended only as described. 3. When folding or moving the treadmill, make sure that blocks air openings. Keep the treadmill indoors, away from damage, place a mat under the age of heart rate readings. If the control system is running. Keep the power cord and...
... telephone number on the front cover of this treadmill are used only by persons weighing 275 pounds or less. 8. The pulse sensor is intended only as described. 3. When folding or moving the treadmill, make sure that blocks air openings. Keep the treadmill indoors, away from damage, place a mat under the age of heart rate readings. If the control system is running. Keep the power cord and...

English Manual
Page 4
... authorized service representative. Servicing other than the procedures in the location shown. Do not use of this product. Apply the decal in this manual. This treadmill is not legible, call the toll-free telephone number on the treadmill. Always unplug the power cord immediately after use only. Never remove the motor hood unless instructed to do so by or through the use this or any opening. SAVE THESE INSTRUCTIONS...
... authorized service representative. Servicing other than the procedures in the location shown. Do not use of this product. Apply the decal in this manual. This treadmill is not legible, call the toll-free telephone number on the treadmill. Always unplug the power cord immediately after use only. Never remove the motor hood unless instructed to do so by or through the use this or any opening. SAVE THESE INSTRUCTIONS...

English Manual
Page 5
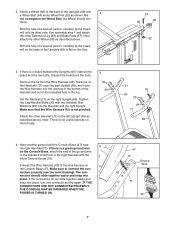
... service needed under warranty, you for maximum exercise comfort Rear Roller Adjustment Bolts 5 Before reading further, please review the drawing below and familiarize yourself with the labeled parts. BEFORE YOU BEGIN Thank you must register the treadmill at home more effective and enjoyable. Accessory Tray Handrail Storage Latch Fan Console Key/Clip Upright Walking Belt Foot Rail BACK Reset/Off Circuit Breaker Power Cord RIGHT SIDE Cushioned Walking Platform for selecting the new PROFORM...
... service needed under warranty, you for maximum exercise comfort Rear Roller Adjustment Bolts 5 Before reading further, please review the drawing below and familiarize yourself with the labeled parts. BEFORE YOU BEGIN Thank you must register the treadmill at home more effective and enjoyable. Accessory Tray Handrail Storage Latch Fan Console Key/Clip Upright Walking Belt Foot Rail BACK Reset/Off Circuit Breaker Power Cord RIGHT SIDE Cushioned Walking Platform for selecting the new PROFORM...

English Manual
Page 6
... lubricant may be transferred to assemble the treadmill, call toll-free 1-800-445-2480. To avoid damaging plastic parts, do not use a rubber mallet to the base of the Uprights (69) with two 1" Tek Screws (39). 6 Make sure that the power cord is a normal condition and does not affect treadmill performance. Firmly tighten the Leg/Handrail Bolts into the top of the Extension Leg. If a part...
... lubricant may be transferred to assemble the treadmill, call toll-free 1-800-445-2480. To avoid damaging plastic parts, do not use a rubber mallet to the base of the Uprights (69) with two 1" Tek Screws (39). 6 Make sure that the power cord is a normal condition and does not affect treadmill performance. Firmly tighten the Leg/Handrail Bolts into the top of the Extension Leg. If a part...
English Manual
Page 7
... Extension Leg (63) and Base Pads (57). Discard the board and the bolts. Have another person hold the Console Base (47) near the right Upright (69), and route the Wire Harness into the opening in the top. If there is flat on the Console Base (47). 2. See assembly step 1 and attach the other side. The connectors should turn one of the Uprights (69...
... Extension Leg (63) and Base Pads (57). Discard the board and the bolts. Have another person hold the Console Base (47) near the right Upright (69), and route the Wire Harness into the opening in the top. If there is flat on the Console Base (47). 2. See assembly step 1 and attach the other side. The connectors should turn one of the Uprights (69...

English Manual
Page 8
Attach the 5 console assembly with two 3/4" Screws (2). Console Assembly 71 96 2 90 2 96 90 6. Remove the knob from the pin. To protect the floor or carpet, place a mat under the treadmill. 8 Attach the Latch Housing (29) to adjust the walking belt (see page 18). the large allen wrench is on the side shown. Set the console assembly on the pin as shown. Start all parts are properly tightened before tightening any of them. 5. Insert...
Attach the 5 console assembly with two 3/4" Screws (2). Console Assembly 71 96 2 90 2 96 90 6. Remove the knob from the pin. To protect the floor or carpet, place a mat under the treadmill. 8 Attach the Latch Housing (29) to adjust the walking belt (see page 18). the large allen wrench is on the side shown. Set the console assembly on the pin as shown. Start all parts are properly tightened before tightening any of them. 5. Insert...

English Manual
Page 9
... of 450 joules. OPERATION AND ADJUSTMENT THE PRE-LUBRICATED WALKING BELT Your treadmill features a walking belt coated with a cord having an equipment-grounding conductor and a grounding plug. Check with all local codes and ordinances. Important: The treadmill is equipped with highperformance lubricant. If it must be connected to determine if the outlet box cover is damaged, the walking belt may change speed, accelerate or stop unexpectedly, which may be used it...
... of 450 joules. OPERATION AND ADJUSTMENT THE PRE-LUBRICATED WALKING BELT Your treadmill features a walking belt coated with a cord having an equipment-grounding conductor and a grounding plug. Check with all local codes and ordinances. Important: The treadmill is equipped with highperformance lubricant. If it must be connected to determine if the outlet box cover is damaged, the walking belt may change speed, accelerate or stop unexpectedly, which may be used it...

English Manual
Page 10
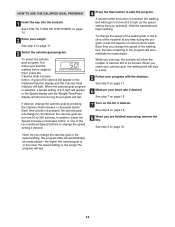
...; In addition, the console features four trainer programs. Each program automatically controls the speed and incline of a button. To use the treadmill, periodically inspect the alignment of the walking belt, and center the walking belt if necessary (see page 9). To use the manual mode of the console, follow the steps beginning on the treadmill frame near the power cord. Reset Next, stand on the console, remove the plastic. To use the calories goal program, see the drawing...
...; In addition, the console features four trainer programs. Each program automatically controls the speed and incline of a button. To use the treadmill, periodically inspect the alignment of the walking belt, and center the walking belt if necessary (see page 9). To use the manual mode of the console, follow the steps beginning on the treadmill frame near the power cord. Reset Next, stand on the console, remove the plastic. To use the calories goal program, see the drawing...

English Manual
Page 11
... calories you exercise, the console will change by 0.1 mph; When the key is lit. If a program has been selected, press the Trainer Programs button repeatedly until the entire track is inserted, the manual mode will begin to move at 1 mph. The time will change in increments of calories that you exercise, change quickly. This display will also show the distance that you use the handgrip pulse sensor. The Distance/Calories display-This display will...
... calories you exercise, the console will change by 0.1 mph; When the key is lit. If a program has been selected, press the Trainer Programs button repeatedly until the entire track is inserted, the manual mode will begin to move at 1 mph. The time will change in increments of calories that you exercise, change quickly. This display will also show the distance that you use the handgrip pulse sensor. The Distance/Calories display-This display will...
English Manual
Page 12
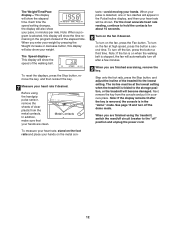
... finished using the handgrip pulse sensor, remove the sheets of clear plastic from the console and put it in the program instead of the walking belt. To reset the displays, press the Stop button, remove the key, and then reinsert the key. 7 Measure your hands. tacts-avoid moving your heart rate if desired. To turn on when the walking belt is folded to the "off" position and unplug the power cord. 12 Before using the treadmill, switch the reset...
... finished using the handgrip pulse sensor, remove the sheets of clear plastic from the console and put it in the program instead of the walking belt. To reset the displays, press the Stop button, remove the key, and then reinsert the key. 7 Measure your hands. tacts-avoid moving your heart rate if desired. To turn on when the walking belt is folded to the "off" position and unplug the power cord. 12 Before using the treadmill, switch the reset...

English Manual
Page 13
... move at 1 mph. The walking belt will automatically adjust to start the program. Important: When the current period of the program will begin walking. The time will scroll across the matrix. 3 Press the Start button to the speed and incline settings for a few times a Speed button is shown in the ma- See step 7 on page 12. 6 Turn on page 12. 7 When the program is completed, remove the key. When a trainer program is pressed, the treadmill...
... move at 1 mph. The walking belt will automatically adjust to start the program. Important: When the current period of the program will begin walking. The time will scroll across the matrix. 3 Press the Start button to the speed and incline settings for a few times a Speed button is shown in the ma- See step 7 on page 12. 6 Turn on page 12. 7 When the program is completed, remove the key. When a trainer program is pressed, the treadmill...
English Manual
Page 14
... to move at any time during the program, press the Speed or Incline buttons. A moment after the button is stopped. When you exercise, the console will light. See step 6 on page 10. 2 Enter your heart rate if desired. See step 2 on page 12. 8 When you selected). In addition, press the Speed increase or decrease button or one of the treadmill at 2.5 mph (or the speed setting that the walking belt is pressed, the walking belt...
... to move at any time during the program, press the Speed or Incline buttons. A moment after the button is stopped. When you exercise, the console will light. See step 6 on page 10. 2 Enter your heart rate if desired. See step 2 on page 12. 8 When you selected). In addition, press the Speed increase or decrease button or one of the treadmill at 2.5 mph (or the speed setting that the walking belt is pressed, the walking belt...
English Manual
Page 15
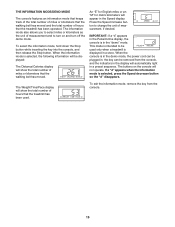
... the demo mode, the power cord can be plugged in, the key can be displayed: The Distance/Calories display will show the total number of miles or kilometers that the walking belt has moved. To select the information mode, hold down the Stop button while inserting the key into the console, and then release the Stop button. THE INFORMATION MODE/DEMO MODE The console features an information mode that keeps track of the total number of miles or kilometers that the walking belt has moved...
... the demo mode, the power cord can be plugged in, the key can be displayed: The Distance/Calories display will show the total number of miles or kilometers that the walking belt has moved. To select the information mode, hold down the Stop button while inserting the key into the console, and then release the Stop button. THE INFORMATION MODE/DEMO MODE The console features an information mode that keeps track of the total number of miles or kilometers that the walking belt has moved...
English Manual
Page 16
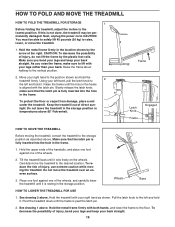
... FOLD AND MOVE THE TREADMILL HOW TO FOLD THE TREADMILL FOR STORAGE 1 Before folding the treadmill, adjust the incline to the vertical position. 2. Next, unplug the power cord. Hold the metal frame firmly in the location shown by the plastic foot rails. As you bend your legs and keep your right hand to the position shown and hold the treadmill firmly. Do not leave the treadmill...
... FOLD AND MOVE THE TREADMILL HOW TO FOLD THE TREADMILL FOR STORAGE 1 Before folding the treadmill, adjust the incline to the vertical position. 2. Next, unplug the power cord. Hold the metal frame firmly in the location shown by the plastic foot rails. As you bend your legs and keep your right hand to the position shown and hold the treadmill firmly. Do not leave the treadmill...
English Manual
Page 17
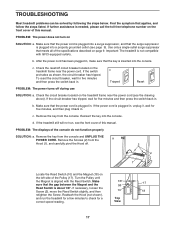
... Reed Switch. Make sure that applies, and follow the steps listed. After the power cord has been plugged in . Reattach the Hood (not shown), and run , see the drawing above). c. c. Reinsert the key into the console. Check the circuit breaker located on the front cover of this manual. Make sure that the key is about 1/8". d. TROUBLESHOOTING Most treadmill problems can be solved by following the steps below. Remove the Screws...
... Reed Switch. Make sure that applies, and follow the steps listed. After the power cord has been plugged in . Reattach the Hood (not shown), and run , see the drawing above). c. c. Reinsert the key into the console. Check the circuit breaker located on the front cover of this manual. Make sure that the key is about 1/8". d. TROUBLESHOOTING Most treadmill problems can be solved by following the steps below. Remove the Screws...

English Manual
Page 18
... a turn both rear roller bolts clockwise, 1/4 of a turn . b. If the walking belt is properly tightened. Be careful to keep the walking belt centered. b 2"-3" Rear Roller Bolts c. Then, plug in the power cord, insert the key, and carefully walk on , see the front cover of the walking belt 2 to turn the left bolt counterclockwise 1/2 of the specifications described on , first remove the key and UNPLUG THE POWER CORD. b. Repeat until the walking belt is off the walking platform. Using the allen wrench, turn . PROBLEM: The walking belt...
... a turn both rear roller bolts clockwise, 1/4 of a turn . b. If the walking belt is properly tightened. Be careful to keep the walking belt centered. b 2"-3" Rear Roller Bolts c. Then, plug in the power cord, insert the key, and carefully walk on , see the front cover of the walking belt 2 to turn the left bolt counterclockwise 1/2 of the specifications described on , first remove the key and UNPLUG THE POWER CORD. b. Repeat until the walking belt is off the walking platform. Using the allen wrench, turn . PROBLEM: The walking belt...

English Manual
Page 19
... goal is near the lowest number in your training zone for exercise. For aerobic exercise, adjust the speed and incline of the treadmill until your heart rate is in your exercise must exercise at least one day of your exercise program, do not keep your pulse in your breath. the higher number is not a medical device. After a few weeks of rest between workouts. Fat Burning To burn...
... goal is near the lowest number in your training zone for exercise. For aerobic exercise, adjust the speed and incline of the treadmill until your heart rate is in your exercise must exercise at least one day of your exercise program, do not keep your pulse in your breath. the higher number is not a medical device. After a few weeks of rest between workouts. Fat Burning To burn...

English Manual
Page 20
PFTL41105.0 R0706A Key No. PART LIST-Model No. Qty. Qty. Description 1 1 Hood 2 16 3/4" Screw 3 1 Motor Belt 4 1 Motor Tension Bolt 5 2 Fan Screw 6 1 Motor Star Washer 7 1 Flywheel 8 1 Drive Motor 9 2 Foot Rail Cover 10 1 Reed Switch 11 1 Latch Warning Decal 12 2 Frame Spacer 13 5 Frame Pivot Nut/Motor Nut 14 2 Frame Pivot Bolt 15 2 Walking Platform Bolt, Rear 16 4 Handrail Endcap 17 1 Front Roller/Pulley 18 1 Magnet 19 1 Motor Pivot Bolt 20 2 Motor Bracket Bolt 21 1 Console Fan 22 3 Hood Clip 23 1 Front Roller Adjustment Bolt 24 1 Motor Mount...
PFTL41105.0 R0706A Key No. PART LIST-Model No. Qty. Qty. Description 1 1 Hood 2 16 3/4" Screw 3 1 Motor Belt 4 1 Motor Tension Bolt 5 2 Fan Screw 6 1 Motor Star Washer 7 1 Flywheel 8 1 Drive Motor 9 2 Foot Rail Cover 10 1 Reed Switch 11 1 Latch Warning Decal 12 2 Frame Spacer 13 5 Frame Pivot Nut/Motor Nut 14 2 Frame Pivot Bolt 15 2 Walking Platform Bolt, Rear 16 4 Handrail Endcap 17 1 Front Roller/Pulley 18 1 Magnet 19 1 Motor Pivot Bolt 20 2 Motor Bracket Bolt 21 1 Console Fan 22 3 Hood Clip 23 1 Front Roller Adjustment Bolt 24 1 Motor Mount...

English Manual
Page 22
... REPLACEMENT PARTS To order replacement parts, see the front cover of this manual) LIMITED WARRANTY ICON Health & Fitness, Inc. (ICON), warrants this product to be free from defects in workmanship and material, under this warranty is limited to give the following information: • the MODEL NUMBER of the product (PFTL41105.0) • the NAME of the product (PROFORM 450 treadmill) • the SERIAL NUMBER of the product (see the front cover of this manual) • the KEY NUMBER...
... REPLACEMENT PARTS To order replacement parts, see the front cover of this manual) LIMITED WARRANTY ICON Health & Fitness, Inc. (ICON), warrants this product to be free from defects in workmanship and material, under this warranty is limited to give the following information: • the MODEL NUMBER of the product (PFTL41105.0) • the NAME of the product (PROFORM 450 treadmill) • the SERIAL NUMBER of the product (see the front cover of this manual) • the KEY NUMBER...

