
Owners Manual
Page 1
PRO•FORM three series Model No. MST N SE ra OWNER'S MANUAL: The trained technicians on our Customer Hot Line will guarantee you . TO AVOID UNNECESSARY DELAYS, PLEASE CALL DIRECT TO OUR TOLL-FREE CUSTOMER HOT LINE. Serial Number Decal QUESTIONS? As a manufacturer, we are committed to providing complete customer satisfaction.If you tions, or find that there are missing or damaged parts, we...
PRO•FORM three series Model No. MST N SE ra OWNER'S MANUAL: The trained technicians on our Customer Hot Line will guarantee you . TO AVOID UNNECESSARY DELAYS, PLEASE CALL DIRECT TO OUR TOLL-FREE CUSTOMER HOT LINE. Serial Number Decal QUESTIONS? As a manufacturer, we are committed to providing complete customer satisfaction.If you tions, or find that there are missing or damaged parts, we...

Owners Manual
Page 2
... OR USE, COSTS OF REMOVAL INSTALLATION OR OTHER CONSEQUENTIAL DAMAGES OF WHATSOEVER NATURE. ICON HEALTH & FITNESS, INC., 1500 S. 1000 W., LOGAN UT 84321-9813 2 LIMITED WARRANTY ICON Health & Fitness, Inc. ("ICON"), warrants this warranty is limited to freight damage, abuse, misuse, improper or abnormal usage or repairs not provided by an ICON authorized service center, for products used for commercial or rental purposes, or for products used as store display models. ACCORDINGLY...
... OR USE, COSTS OF REMOVAL INSTALLATION OR OTHER CONSEQUENTIAL DAMAGES OF WHATSOEVER NATURE. ICON HEALTH & FITNESS, INC., 1500 S. 1000 W., LOGAN UT 84321-9813 2 LIMITED WARRANTY ICON Health & Fitness, Inc. ("ICON"), warrants this warranty is limited to freight damage, abuse, misuse, improper or abnormal usage or repairs not provided by an ICON authorized service center, for products used for commercial or rental purposes, or for products used as store display models. ACCORDINGLY...

Owners Manual
Page 3
?RUIND- ORM three series TABLE OF CONTENTS IMPORTANT PRECAUTIONS BEFORE YOU BEGIN ASSEMBLY OPERATION AND ADJUSTMENT TROUBLE-SHOOTING AND STORAGE CONDITIONING GUIDELINES PART LIST EXPLODED DRAWING ORDERING REPLACEMENT PARTS SE 4 5 6 7 10 12 14 15 Back Cover „,. 3
?RUIND- ORM three series TABLE OF CONTENTS IMPORTANT PRECAUTIONS BEFORE YOU BEGIN ASSEMBLY OPERATION AND ADJUSTMENT TROUBLE-SHOOTING AND STORAGE CONDITIONING GUIDELINES PART LIST EXPLODED DRAWING ORDERING REPLACEMENT PARTS SE 4 5 6 7 10 12 14 15 Back Cover „,. 3

Owners Manual
Page 4
... walking belt. Never start the treadmill while you are recommended for longer than 1hour. • Clft94,-.SfoP the power cord!Way from damage, place a mat women. Do not place the treadmill near water, out- It is not In use the treadmill with at stockings or in sandals. that all users of all warnings and precautions. rrtili. OOrlre# cerepresentative only ,:: ..... • 4 informed...
... walking belt. Never start the treadmill while you are recommended for longer than 1hour. • Clft94,-.SfoP the power cord!Way from damage, place a mat women. Do not place the treadmill near water, out- It is not In use the treadmill with at stockings or in sandals. that all users of all warnings and precautions. rrtili. OOrlre# cerepresentative only ,:: ..... • 4 informed...
Owners Manual
Page 5
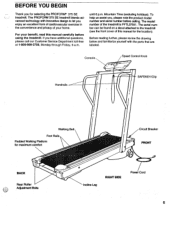
... an excellent form of cardiovascular exercise in the convenience and privacy of your benefit, read this manual for the location). Before reading further, please review the drawing below and familiarize yourself with innovative design to the treadmill (see the front cover of the treadmill is PFTL37551. Console Speed Control Knob Handrails SAFEKEY/Clip Walking Belt Foot Rails Padded Walking Platform 4, 5 for selecting the PROFORM® 375 SE treadmill. Mountain...
... an excellent form of cardiovascular exercise in the convenience and privacy of your benefit, read this manual for the location). Before reading further, please review the drawing below and familiarize yourself with innovative design to the treadmill (see the front cover of the treadmill is PFTL37551. Console Speed Control Knob Handrails SAFEKEY/Clip Walking Belt Foot Rails Padded Walking Platform 4, 5 for selecting the PROFORM® 375 SE treadmill. Mountain...
Owners Manual
Page 6
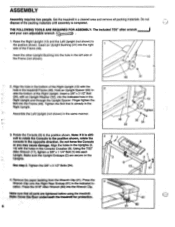
... Console (8) to the position shown. Insert a 3/8" x 3 1/2" Bolt (34), with an Upright Washer (32), into the Frame (48). Press the 4 Wrench Clip onto the Right Rear Endcap (61) in the same manner. 3. ASSEMBLY Assembly requires two people. Do not dispose of the Right Upright. Set the treadmill in the Right Upright. Insert an Upright Bushing (31) into each Upright Make sure the Upright Endcaps (2) are tightened...
... Console (8) to the position shown. Insert a 3/8" x 3 1/2" Bolt (34), with an Upright Washer (32), into the Frame (48). Press the 4 Wrench Clip onto the Right Rear Endcap (61) in the same manner. 3. ASSEMBLY Assembly requires two people. Do not dispose of the Right Upright. Set the treadmill in the Right Upright. Insert an Upright Bushing (31) into each Upright Make sure the Upright Endcaps (2) are tightened...
Owners Manual
Page 7
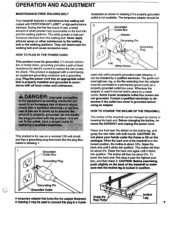
... incline of the treadmill to a 2-pole Grasp the Rear Roller Incline Leg 7 The incline will deteriorate the walking belt and cause excessive wear. CAUTION: Before exercising, push slightly on the foot rails and the walking platform. OPERATION AND ADJUSTMENT MAINTENANCE-FREE WALKING BELT Your treadmill features a maintenance-free walking belt coated with all local codes and ordinances. They will then be installed by a metal screw. If it should be 2 Grounded Outlet Box Adapter 0 0 Grounding Pin Grounding 0 0 Plug...
... incline of the treadmill to a 2-pole Grasp the Rear Roller Incline Leg 7 The incline will deteriorate the walking belt and cause excessive wear. CAUTION: Before exercising, push slightly on the foot rails and the walking platform. OPERATION AND ADJUSTMENT MAINTENANCE-FREE WALKING BELT Your treadmill features a maintenance-free walking belt coated with all local codes and ordinances. They will then be installed by a metal screw. If it should be 2 Grounded Outlet Box Adapter 0 0 Grounding Pin Grounding 0 0 Plug...
Owners Manual
Page 8
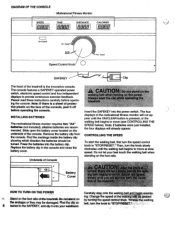
... feet touch the walking belt when standing on by turningthe speedMita knob. Z., Max. The console features a SAFEKEY-operated power switch, electronic speed control and four independent displays to move (see CONTROLLING THE SPEED below). Press the batteries into the power switch. Do not let your waistband. Remove the battery clip from the console. The four displays of the motivational fitness monitor will already appear. trOglit • HOW TO TURN ON THE POWER Carefully step onto the...
... feet touch the walking belt when standing on by turningthe speedMita knob. Z., Max. The console features a SAFEKEY-operated power switch, electronic speed control and four independent displays to move (see CONTROLLING THE SPEED below). Press the batteries into the power switch. Do not let your waistband. Remove the battery clip from the console. The four displays of the motivational fitness monitor will already appear. trOglit • HOW TO TURN ON THE POWER Carefully step onto the...

Owners Manual
Page 9
... SAFEKEY in a secure location. CALORIES-This display shows the approximate number of the motivational fitness monitor will remain on the following page. SPEED-This display shows the current speed of the motivational fitness monitor -provide continuous exercise feedback. THE MOTIVATIONAL FITNESS MONITOR The four displays of the walking belt, in miles per hour. The displays can be reset and will darken, although the power will be reset by pressing the ON/CLEAR button.
... SAFEKEY in a secure location. CALORIES-This display shows the approximate number of the motivational fitness monitor will remain on the following page. SPEED-This display shows the current speed of the motivational fitness monitor -provide continuous exercise feedback. THE MOTIVATIONAL FITNESS MONITOR The four displays of the walking belt, in miles per hour. The displays can be reset and will darken, although the power will be reset by pressing the ON/CLEAR button.

Owners Manual
Page 10
... in the console. (See INSTALLING BATTERIES on the treadmill near the power cord. TROUBLE-SHOOTING AND STORAGE Most treadmill problems can be solved by following the simple steps below. If the circuit breaker has tripped (see the drawing above), wait for five minutes and then press the switch back in , make sure that applies, and follow the steps listed. Repeat until 6 p.m. If the walking belt still slows...
... in the console. (See INSTALLING BATTERIES on the treadmill near the power cord. TROUBLE-SHOOTING AND STORAGE Most treadmill problems can be solved by following the simple steps below. If the circuit breaker has tripped (see the drawing above), wait for five minutes and then press the switch back in , make sure that applies, and follow the steps listed. Repeat until 6 p.m. If the walking belt still slows...
Owners Manual
Page 11
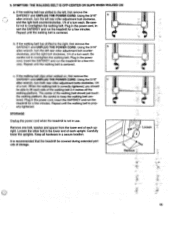
... lower end of the walking belt 3-4 inches off the walking platform. Repeat until the walking belt is not in a secure location. b. STORAGE Unplug the power cord when the treadmill is properly tightened. It is centered. Carefully lower the uprights. 5. If the walking belt has shifted to overtighten the walking belt. Be careful not to the left rear roller adjustment bolt counterclockwise, and the right bolt clbckwise, 1/4 of a turn each side of each upright. Plug in the power cord...
... lower end of the walking belt 3-4 inches off the walking platform. Repeat until the walking belt is not in a secure location. b. STORAGE Unplug the power cord when the treadmill is properly tightened. It is centered. Carefully lower the uprights. 5. If the walking belt has shifted to overtighten the walking belt. Be careful not to the left rear roller adjustment bolt counterclockwise, and the right bolt clbckwise, 1/4 of a turn each side of each upright. Plug in the power cord...
Owners Manual
Page 12
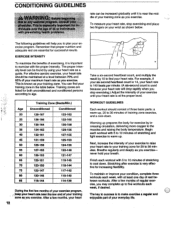
... regular exercise, you exercise. Warming up prepares the body for exercise by 10 to warm up. To maintain or improve your training zone in the table below . After a few months of stretching and light exercise to find your condition, complete three workouts each week, if desired. CONDITIONING GUIDELINES .101000;. To measure your heart rate, stop exercising.) Adjust the intensity of your exercise program, .__keepyour...
... regular exercise, you exercise. Warming up prepares the body for exercise by 10 to warm up. To maintain or improve your training zone in the table below . After a few months of stretching and light exercise to find your condition, complete three workouts each week, if desired. CONDITIONING GUIDELINES .101000;. To measure your heart rate, stop exercising.) Adjust the intensity of your exercise program, .__keepyour...

Owners Manual
Page 13
... as far as possible. Repeat 3 times. Hold for 15 counts, then relax. Stretches: Hamstrings, lower back and groin. Bend your front leg, lean forward and move your knees outward. Repeat 3 times for both legs. To cause further stretching of your feet together and your hips toward the wall. Bring your heel... against the inner thigh of knees and back. Bring the sole of the other hand. Hold for both legs. Move slowly as possible. Hold for 15 counts, then relax. Correct form for each stretch is shown in front of the opposite foot toward you stretch-never bounce. Hold for 15...
... as far as possible. Repeat 3 times. Hold for 15 counts, then relax. Stretches: Hamstrings, lower back and groin. Bend your front leg, lean forward and move your knees outward. Repeat 3 times for both legs. To cause further stretching of your feet together and your hips toward the wall. Bring your heel... against the inner thigh of knees and back. Bring the sole of the other hand. Hold for both legs. Move slowly as possible. Hold for 15 counts, then relax. Correct form for each stretch is shown in front of the opposite foot toward you stretch-never bounce. Hold for 15...

Owners Manual
Page 14
... Harness Speed Control Knob Console Console Crossbar 12" Cable Loom Screw 24" Cable Loom Right Upright Pulley Cover Endcap Screw Endcap U-Nut 7/32" Allen Wrench Pulley Cover Bracket Power Cord Front Roller/Pulley Wrench Clip Reed Switch Wire Clip Extension Wire Circuit Breaker Grommet Safety Cover Plug Front Roller Adjustment Bolt Roller Adjustment Washer Front Right Endcap Upright Bushing Upright Washer Upright Spacer 3/8" x 31/2" Bolt Screw 8" Wire Tie 4" Wire Tie Controller Choke Screw/Plate Screw Controller Plate Wheel Bolt Front Wheel Nut Belt Guide Safety Cover Safety Cover Screw Key No...
... Harness Speed Control Knob Console Console Crossbar 12" Cable Loom Screw 24" Cable Loom Right Upright Pulley Cover Endcap Screw Endcap U-Nut 7/32" Allen Wrench Pulley Cover Bracket Power Cord Front Roller/Pulley Wrench Clip Reed Switch Wire Clip Extension Wire Circuit Breaker Grommet Safety Cover Plug Front Roller Adjustment Bolt Roller Adjustment Washer Front Right Endcap Upright Bushing Upright Washer Upright Spacer 3/8" x 31/2" Bolt Screw 8" Wire Tie 4" Wire Tie Controller Choke Screw/Plate Screw Controller Plate Wheel Bolt Front Wheel Nut Belt Guide Safety Cover Safety Cover Screw Key No...
Owners Manual
Page 16
... information: • The MODEL NUMBER of the product (PFTL37551). • The NAME of the product (PROFORM® 375 SE treadmill). • The SERIAL NUMBER of the product (see the front cover of this manual). • The KEY NUMBER of the part(s) (see page 14 of this manual). • The DESCRIPTION of the part(s) (see page 14 of this manual). ORDERING REPLACEMENT PARTS To order replacement parts, call our Customer Service Department toll-free...
... information: • The MODEL NUMBER of the product (PFTL37551). • The NAME of the product (PROFORM® 375 SE treadmill). • The SERIAL NUMBER of the product (see the front cover of this manual). • The KEY NUMBER of the part(s) (see page 14 of this manual). • The DESCRIPTION of the part(s) (see page 14 of this manual). ORDERING REPLACEMENT PARTS To order replacement parts, call our Customer Service Department toll-free...

