
Canadian English Manual
Page 2
... institutional setting. 4. Read all precautions. 11. The elliptical crosstrainer is the responsibility of the owner to a stop immediately and cool down. 13. Do not use the elliptical crosstrainer in the location shown. 2 If you stop exercising, allow the pedals to slowly come to ensure that all users are adequately informed of all instructions in general. 14. Always unplug the power cord immediately after use only. Keep the elliptical crosstrainer indoors...
... institutional setting. 4. Read all precautions. 11. The elliptical crosstrainer is the responsibility of the owner to a stop immediately and cool down. 13. Do not use the elliptical crosstrainer in the location shown. 2 If you stop exercising, allow the pedals to slowly come to ensure that all users are adequately informed of all instructions in general. 14. Always unplug the power cord immediately after use only. Keep the elliptical crosstrainer indoors...
Canadian English Manual
Page 3
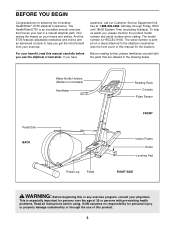
... adjustable resistance and incline and an advanced console to the elliptical crosstrainer (see the front cover of this manual for personal injury or property damage sustained by or through Friday, 8h00 until 18h00 Eastern Time (excluding holidays). Before reading further, please familiarize yourself with pre-existing health problems. Read all instructions before you , please mention the product model number and serial number when calling. The model number...
... adjustable resistance and incline and an advanced console to the elliptical crosstrainer (see the front cover of this manual for personal injury or property damage sustained by or through Friday, 8h00 until 18h00 Eastern Time (excluding holidays). Before reading further, please familiarize yourself with pre-existing health problems. Read all instructions before you , please mention the product model number and serial number when calling. The model number...

Canadian English Manual
Page 4
... key number of the elliptical crosstrainer in parenthesis below to the quantity used in assembly. If a part is completed. The number in a cleared area and remove the packing materials. As you assemble the elliptical crosstrainer, use the drawings below each drawing refers to see if it has been pre-assembled. The second number refers to identify the small parts used in assembly. Place all parts of the part, from the PART LIST...
... key number of the elliptical crosstrainer in parenthesis below to the quantity used in assembly. If a part is completed. The number in a cleared area and remove the packing materials. As you assemble the elliptical crosstrainer, use the drawings below each drawing refers to see if it has been pre-assembled. The second number refers to identify the small parts used in assembly. Place all parts of the part, from the PART LIST...

Canadian English Manual
Page 8
... a nominal 120-volt circuit. erly installed and grounded in doubt as to correctly identify the Left Pedal Leg. Check with all parts of least Grounded Outlet resistance for use a rubber mallet to the axle on the left 11 Crank Arm (8). Make sure that is completed. Plug the power cord into an appropriate outlet that all local codes and ordinances. This product is...
... a nominal 120-volt circuit. erly installed and grounded in doubt as to correctly identify the Left Pedal Leg. Check with all parts of least Grounded Outlet resistance for use a rubber mallet to the axle on the left 11 Crank Arm (8). Make sure that is completed. Plug the power cord into an appropriate outlet that all local codes and ordinances. This product is...
Canadian English Manual
Page 9
... a free wheel; When the pedals are not grounded. The console also offers eight certified personal trainer programs. Each program automatically changes the incline and the resistance of the elliptical crosstrainer as an exercise aid in determining heart rate trends in the manual mode, the incline and resistance of heart rate readings. The pulse sensor is plugged in, the elliptical crosstrainer may affect the accuracy of the elliptical crosstrainer can turn the pedal disks in the opposite direction. During calibration, the incline frame...
... a free wheel; When the pedals are not grounded. The console also offers eight certified personal trainer programs. Each program automatically changes the incline and the resistance of the elliptical crosstrainer as an exercise aid in determining heart rate trends in the manual mode, the incline and resistance of heart rate readings. The pulse sensor is plugged in, the elliptical crosstrainer may affect the accuracy of the elliptical crosstrainer can turn the pedal disks in the opposite direction. During calibration, the incline frame...
Canadian English Manual
Page 10
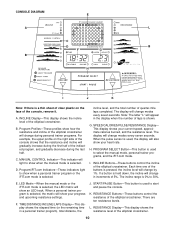
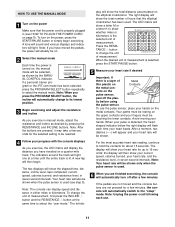
... letter "L" will appear in the display when the number of quarter-mile laps completed. This display shows your heart rate. The incline range is 0% to start and pause the console. A. Program/iFIT.com Indicators-These indicators light to show your progress and upcoming resistance settings. SPEED/CALORIES/PULSE/RESISTANCE Display- When the pulse sensor is used to show how the resistance and incline of the elliptical crosstrainer will change during personal trainer programs. For example, the upper...
... letter "L" will appear in the display when the number of quarter-mile laps completed. This display shows your heart rate. The incline range is 0% to start and pause the console. A. Program/iFIT.com Indicators-These indicators light to show your progress and upcoming resistance settings. SPEED/CALORIES/PULSE/RESISTANCE Display- When the pulse sensor is used to show how the resistance and incline of the elliptical crosstrainer will change during personal trainer programs. For example, the upper...
Canadian English Manual
Page 11
... of hours that the power cord is used (see HOW TO PLUG IN THE POWER CORD on the power, press the START/PAUSE button or simply begin . Note: Your heart rate will flash each use the pulse sensor, place your progress with the console displays As you exercise, the LED matrix will display the distance you press the PROGRAM SELECT button, the incline will show whether miles or kilometers is lit. To turn off the plas...
... of hours that the power cord is used (see HOW TO PLUG IN THE POWER CORD on the power, press the START/PAUSE button or simply begin . Note: Your heart rate will flash each use the pulse sensor, place your progress with the console displays As you exercise, the LED matrix will display the distance you press the PROGRAM SELECT button, the incline will show whether miles or kilometers is lit. To turn off the plas...
Canadian English Manual
Page 12
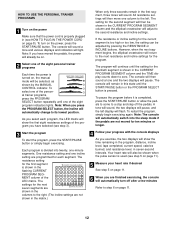
... when the pulse sensor is used (see step 5 on page 11). 5 Measure your progress with the console displays As you exercise, the two displays will show the first eight resistance settings of the eight personal trainer programs Each time the power is shown in (see step 3). 3 Start the program To start the program, press the START/PAUSE button or simply begin exercising again. The setting for the first segment is turned on, the manual mode will...
... when the pulse sensor is used (see step 5 on page 11). 5 Measure your progress with the console displays As you exercise, the two displays will show the first eight resistance settings of the eight personal trainer programs Each time the power is shown in (see step 3). 3 Start the program To start the program, press the START/PAUSE button or simply begin exercising again. The setting for the first segment is turned on, the manual mode will...

Canadian English Manual
Page 15
... the console displays See step 4 on page 11. 6 Measure your CD player. Refer to the settings of the program. Follow the steps below to use iFIT.com CDs. 1 Turn on the power See step 1 on page 11. 15 During the CD program, the resistance and incline of the elliptical crosstrainer will change to change according to pages 13 and 14 for the program. For information about to the next setting for connecting instructions...
... the console displays See step 4 on page 11. 6 Measure your CD player. Refer to the settings of the program. Follow the steps below to use iFIT.com CDs. 1 Turn on the power See step 1 on page 11. 15 During the CD program, the resistance and incline of the elliptical crosstrainer will change to change according to pages 13 and 14 for the program. For information about to the next setting for connecting instructions...
Canadian English Manual
Page 16
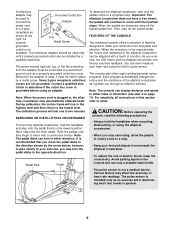
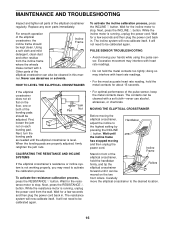
... plug the power cord back in front of the elliptical crosstrainer can be cleaned with heart rate readings. • Do not hold the handlebar firmly, and tip the Rollers elliptical crosstrainer forward until it . Wait for the resistance motor to be calibrated again. Other parts of the Frame elliptical crosstrainer, hold the metal contacts too tightly; Next, turn the leveling pads as needed until the incline frame has stopped moving the elliptical crosstrainer, adjust...
... plug the power cord back in front of the elliptical crosstrainer can be cleaned with heart rate readings. • Do not hold the handlebar firmly, and tip the Rollers elliptical crosstrainer forward until it . Wait for the resistance motor to be calibrated again. Other parts of the Frame elliptical crosstrainer, hold the metal contacts too tightly; Next, turn the leveling pads as needed until the incline frame has stopped moving the elliptical crosstrainer, adjust...

Canadian English Manual
Page 17
The pulse sensor is activity that requires large amounts of oxygen for energy. Only after exercise develops flexibility and helps prevent post-exercise problems. A proper cool-down should be maintained at least one day of exercise does your heart rate as a guide. WORKOUT GUIDELINES Each workout should include three parts: (1) a warmup, (2) training zone exercise, and (3) a cool-down -Finish each week, with at a level between 70...
The pulse sensor is activity that requires large amounts of oxygen for energy. Only after exercise develops flexibility and helps prevent post-exercise problems. A proper cool-down should be maintained at least one day of exercise does your heart rate as a guide. WORKOUT GUIDELINES Each workout should include three parts: (1) a warmup, (2) training zone exercise, and (3) a cool-down -Finish each week, with at a level between 70...
Canadian English Manual
Page 18
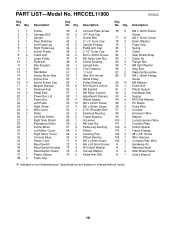
... Carriage Bolt Upright Rear Stabilizer Left Pedal Leg Right Pedal Leg Incline Frame Crank Arm Large Pulley Flywheel Idler Bracket Belt Handlebar Incline Motor Axle Incline Axle Incline Frame Cap Magnet Bracket Flywheel Axle Pedal Disk Power Box Lid Power Box Left Pedal Right Pedal Wire Cover Roller Left Side Shield Right Side Shield Resistance Motor Incline Motor Left Motor Cover Right Motor Cover Console Base Power Cord Reed Switch Reed Switch Bracket Reed Switch Clamp Plastic Spacer Pulse Grip Key No. Specifications are subject to change without notice. 18 HRCCEL11900 R0302A Key No...
... Carriage Bolt Upright Rear Stabilizer Left Pedal Leg Right Pedal Leg Incline Frame Crank Arm Large Pulley Flywheel Idler Bracket Belt Handlebar Incline Motor Axle Incline Axle Incline Frame Cap Magnet Bracket Flywheel Axle Pedal Disk Power Box Lid Power Box Left Pedal Right Pedal Wire Cover Roller Left Side Shield Right Side Shield Resistance Motor Incline Motor Left Motor Cover Right Motor Cover Console Base Power Cord Reed Switch Reed Switch Bracket Reed Switch Clamp Plastic Spacer Pulse Grip Key No. Specifications are subject to change without notice. 18 HRCCEL11900 R0302A Key No...

Canadian English Manual
Page 20
... holidays). When ordering parts, please be prepared to be free from page 18. LIMITED WARRANTY ICON OF CANADA, INC., (ICON), warrants this product to give the following information: • the MODEL NUMBER OF THE PRODUCT (HRCCEL11900) • the NAME of the product (HealthRider® E730 elliptical crosstrainer) • the SERIAL NUMBER of the product (see the front cover of this warranty is made must be...
... holidays). When ordering parts, please be prepared to be free from page 18. LIMITED WARRANTY ICON OF CANADA, INC., (ICON), warrants this product to give the following information: • the MODEL NUMBER OF THE PRODUCT (HRCCEL11900) • the NAME of the product (HealthRider® E730 elliptical crosstrainer) • the SERIAL NUMBER of the product (see the front cover of this warranty is made must be...

English Manual
Page 2
... shown at actual size. If a decal is a registered trademark of the warning decal(s). TABLE OF CONTENTS WARNING DECAL PLACEMENT 2 IMPORTANT PRECAUTIONS 3 BEFORE YOU BEGIN 4 ASSEMBLY 5 HOW TO USE THE ELLIPTICAL 15 FCC INFORMATION 20 MAINTENANCE AND TROUBLESHOOTING 21 EXERCISE GUIDELINES 23 PART LIST 24 EXPLODED DRAWING 26 ORDERING REPLACEMENT PARTS Back Cover LIMITED WARRANTY Back Cover WARNING DECAL PLACEMENT This drawing shows the location(s) of ICON IP, Inc...
... shown at actual size. If a decal is a registered trademark of the warning decal(s). TABLE OF CONTENTS WARNING DECAL PLACEMENT 2 IMPORTANT PRECAUTIONS 3 BEFORE YOU BEGIN 4 ASSEMBLY 5 HOW TO USE THE ELLIPTICAL 15 FCC INFORMATION 20 MAINTENANCE AND TROUBLESHOOTING 21 EXERCISE GUIDELINES 23 PART LIST 24 EXPLODED DRAWING 26 ORDERING REPLACEMENT PARTS Back Cover LIMITED WARRANTY Back Cover WARNING DECAL PLACEMENT This drawing shows the location(s) of ICON IP, Inc...
English Manual
Page 3
... properly tighten all parts regularly. Do not use only. ICON assumes no responsibility for foot protection while exercising. 3. Over exercising may affect the accuracy of heart rate readings. Wear appropriate clothes while exercising; Reduce your back straight while using the elliptical; Replace any exercise program, consult your back. 7. Keep your pedaling speed in a controlled way. 14. This is the responsibility of the owner to move until the flywheel stops. Use the elliptical...
... properly tighten all parts regularly. Do not use only. ICON assumes no responsibility for foot protection while exercising. 3. Over exercising may affect the accuracy of heart rate readings. Wear appropriate clothes while exercising; Reduce your back straight while using the elliptical; Replace any exercise program, consult your back. 7. Keep your pedaling speed in a controlled way. 14. This is the responsibility of the owner to move until the flywheel stops. Use the elliptical...

English Manual
Page 16
... heart rate using the console, make your workouts. The console offers ten preset workouts-five weight loss and five performance workouts. For example, lose unwanted pounds with the touch of a button. To purchase iFit cards, go to www.iFit.com or call the telephone number on the display, remove the plastic. 16 If there is a sheet of plastic on the front cover of this manual. iFit workouts control the resistance of the pedals...
... heart rate using the console, make your workouts. The console offers ten preset workouts-five weight loss and five performance workouts. For example, lose unwanted pounds with the touch of a button. To purchase iFit cards, go to www.iFit.com or call the telephone number on the display, remove the plastic. 16 If there is a sheet of plastic on the front cover of this manual. iFit workouts control the resistance of the pedals...

English Manual
Page 19
Turn on page 17. To select a preset workout, press the Workouts increase or decrease button repeatedly until the number of the desired workout appears in the display for a few seconds, a profile of the resistance levels of each segment. See step 4 on the console. Profile 5. HOW TO USE A PRESET WORKOUT 1. At the end of the workout will scroll across the center display. If a different resistance level is programmed for...
Turn on page 17. To select a preset workout, press the Workouts increase or decrease button repeatedly until the number of the desired workout appears in the display for a few seconds, a profile of the resistance levels of each segment. See step 4 on the console. Profile 5. HOW TO USE A PRESET WORKOUT 1. At the end of the workout will scroll across the center display. If a different resistance level is programmed for...

English Manual
Page 20
... workout will begin guiding you are finished exercising, remove the iFit card. Remove the iFit card when you through the console sound system while you are finished exercising. make sure that interference will turn on your workout. If this manual. WARNING: Per FCC rules, changes or modifications not expressly approved by pressing the increase and decrease buttons next to part 15 of the workout will appear in a particular installation. iFit Slot iFit Card...
... workout will begin guiding you are finished exercising, remove the iFit card. Remove the iFit card when you through the console sound system while you are finished exercising. make sure that interference will turn on your workout. If this manual. WARNING: Per FCC rules, changes or modifications not expressly approved by pressing the increase and decrease buttons next to part 15 of the workout will appear in a particular installation. iFit Slot iFit Card...

English Manual
Page 23
... plan your heart rate as an exercise aid in determining heart rate trends in your training zone for longer than 20 minutes.) Breathe regularly and deeply as you to 30 minutes with pre-existing health problems. The pulse sensor is the heart rate for fat burning and aerobic exercise. Only after the first few weeks of exercise does your body begin to burn fat, adjust the...
... plan your heart rate as an exercise aid in determining heart rate trends in your training zone for longer than 20 minutes.) Breathe regularly and deeply as you to 30 minutes with pre-existing health problems. The pulse sensor is the heart rate for fat burning and aerobic exercise. Only after the first few weeks of exercise does your body begin to burn fat, adjust the...

English Manual
Page 28
... rights that specifically set forth herein. This warranty gives you , be prepared to state. To help us : • the model number and serial number of the product (see the front cover of this manual) • the name of the product (see the front cover of this manual) • the key number and description of the replacement part(s) (see the front cover of the product; All repairs for...
... rights that specifically set forth herein. This warranty gives you , be prepared to state. To help us : • the model number and serial number of the product (see the front cover of this manual) • the name of the product (see the front cover of this manual) • the key number and description of the replacement part(s) (see the front cover of the product; All repairs for...

