
English Manual
Page 3
... caught in speed. 19. Read, understand, and test the emergency stop unexpectedly, which may affect the accuracy of the treadmill. The pulse sensor is not working properly. (See TROUBLESHOOTING on the same circuit. Do not place the treadmill on any exercise program, consult your local PROFORM dealer or call the telephone number on the front cover of the specifications described on the treadmill at all...
... caught in speed. 19. Read, understand, and test the emergency stop unexpectedly, which may affect the accuracy of the treadmill. The pulse sensor is not working properly. (See TROUBLESHOOTING on the same circuit. Do not place the treadmill on any exercise program, consult your local PROFORM dealer or call the telephone number on the front cover of the specifications described on the treadmill at all...
English Manual
Page 4
... remove the motor hood un- Servicing other than the procedures in the storage position. 23. When folding or moving the treadmill, make sure that the storage latch is not in use this manual should be able to safely lift 45 lbs. (20 kg) to do so by an authorized service representative only. 26. SAVE THESE INSTRUCTIONS 4 vice representative. Inspect and properly tighten all parts of the power switch...
... remove the motor hood un- Servicing other than the procedures in the storage position. 23. When folding or moving the treadmill, make sure that the storage latch is not in use this manual should be able to safely lift 45 lbs. (20 kg) to do so by an authorized service representative only. 26. SAVE THESE INSTRUCTIONS 4 vice representative. Inspect and properly tighten all parts of the power switch...
English Manual
Page 5
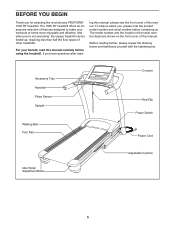
... when you , please note the product model number and serial number before using the treadmill. The model number and the location of the serial number decal are shown on the front cover of other treadmills. Accessory Tray Handrail Pulse Sensor Upright Walking Belt Foot Rail Console Key/Clip Power Switch Power Cord Idler Roller Adjustment Bolts Adjustable Cushion 5 Before reading further, please review the drawing below and familiarize yourself with the labeled parts. If you for selecting the revolutionary PROFORM® 1500 RT treadmill.
... when you , please note the product model number and serial number before using the treadmill. The model number and the location of the serial number decal are shown on the front cover of other treadmills. Accessory Tray Handrail Pulse Sensor Upright Walking Belt Foot Rail Console Key/Clip Power Switch Power Cord Idler Roller Adjustment Bolts Adjustable Cushion 5 Before reading further, please review the drawing below and familiarize yourself with the labeled parts. If you for selecting the revolutionary PROFORM® 1500 RT treadmill.

English Manual
Page 6
... the lubricant with high-performance lubricant. Assembly requires two persons. Use the drawings below each drawing is completed. ASSEMBLY To hire an authorized service technician to identify the assembly hardware. The number in a cleared area and remove all packing materials. Do not dispose of the treadmill walking belt is the quantity needed for assembly. Assembly requires the included hex keys and your own Phillips screwdriver , adjustable wrench...
... the lubricant with high-performance lubricant. Assembly requires two persons. Use the drawings below each drawing is completed. ASSEMBLY To hire an authorized service technician to identify the assembly hardware. The number in a cleared area and remove all packing materials. Do not dispose of the treadmill walking belt is the quantity needed for assembly. Assembly requires the included hex keys and your own Phillips screwdriver , adjustable wrench...
English Manual
Page 11
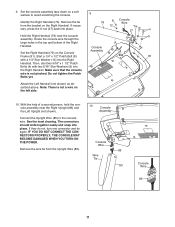
Start a 1/4" x 1/2" Patch Bolt (8) 81 with two 5/16" Star Washers (9) into place. Make sure that the console wire is not a wire on the Console Assembly Frame (81). Console Set the Right Handrail (79) on the left side. 10. See the inset drawing. Remove the tie from the Upright Wire (85). 10 Console Assembly Console Wire 85 Wire Tie 83 Console Wire 85 11 If necessary, press the U-nut (27) back into the...
Start a 1/4" x 1/2" Patch Bolt (8) 81 with two 5/16" Star Washers (9) into place. Make sure that the console wire is not a wire on the Console Assembly Frame (81). Console Set the Right Handrail (79) on the left side. 10. See the inset drawing. Remove the tie from the Upright Wire (85). 10 Console Assembly Console Wire 85 Wire Tie 83 Console Wire 85 11 If necessary, press the U-nut (27) back into the...

English Manual
Page 12
Start two 5/16" x 3/4" Bolts (5) with eight #8 x 1/2" Screws (1). Then, start a 5/16" x 1 1/2" Patch Bolt (4) into the Right Upright (83). Set the console assembly on the left side of the tread- 4 mill. Console Assembly 104 1 1 101 1 1 12 Insert the excess wire into the Right Upright. Firmly tighten the four 5/16" x 3/4" Bolts (5) and the two 5/16" x 1 1/2" Patch Bolts (4). Tighten all the Patch Bolts used in these steps. 12 Attach the Left Accessory Tray (101) and the...
Start two 5/16" x 3/4" Bolts (5) with eight #8 x 1/2" Screws (1). Then, start a 5/16" x 1 1/2" Patch Bolt (4) into the Right Upright (83). Set the console assembly on the left side of the tread- 4 mill. Console Assembly 104 1 1 101 1 1 12 Insert the excess wire into the Right Upright. Firmly tighten the four 5/16" x 3/4" Bolts (5) and the two 5/16" x 1 1/2" Patch Bolts (4). Tighten all the Patch Bolts used in these steps. 12 Attach the Left Accessory Tray (101) and the...
English Manual
Page 14
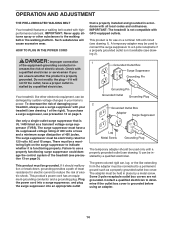
... homeʼs power. DANGER: Improper connection 1 of electric shock. stalled by a qualified electrician. Plug the power cord into a surge suppressor, and plug the surge suppressor into an appropriate outlet Lug Metal Screw Grounding Plug The temporary adapter should malfunction or break down, grounding provides a path of least resistance for 120 volts AC and 15 amps. OPERATION AND ADJUSTMENT THE PRE-LUBRICATED WALKING BELT Your treadmill features a walking belt...
... homeʼs power. DANGER: Improper connection 1 of electric shock. stalled by a qualified electrician. Plug the power cord into a surge suppressor, and plug the surge suppressor into an appropriate outlet Lug Metal Screw Grounding Plug The temporary adapter should malfunction or break down, grounding provides a path of least resistance for 120 volts AC and 15 amps. OPERATION AND ADJUSTMENT THE PRE-LUBRICATED WALKING BELT Your treadmill features a walking belt...
English Manual
Page 15
... the walking belt, and center the walking belt if necessary (see page 18. To turn on the console, remove the plastic. To use a preset workout, see page 24). 15 IMPORTANT: If there is used, observe the alignment of a button. You can even measure your heart rate using the treadmill. To use the stereo sound system, see page 19. With the iFit training mode, you can change the speed and incline of the treadmill...
... the walking belt, and center the walking belt if necessary (see page 18. To turn on the console, remove the plastic. To use a preset workout, see page 24). 15 IMPORTANT: If there is used, observe the alignment of a button. You can even measure your heart rate using the treadmill. To use the stereo sound system, see page 19. With the iFit training mode, you can change the speed and incline of the treadmill...
English Manual
Page 16
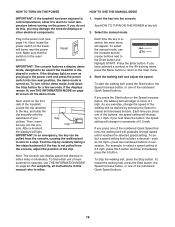
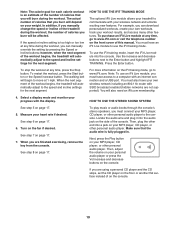
... highlight START. As you plug in a store. To stop . Select the manual mode. To turn off the demo mode, hold down the Stop button for a few steps backward; Insert the key into the con- Then, insert the key into the console. Note: The console can be used if the treadmill is inserted, the main menu will gradually change by 0.1 mph; Each time the key is displayed in the power cord and press the power switch...
... highlight START. As you plug in a store. To stop . Select the manual mode. To turn off the demo mode, hold down the Stop button for a few steps backward; Insert the key into the con- Then, insert the key into the console. Note: The console can be used if the treadmill is inserted, the main menu will gradually change by 0.1 mph; Each time the key is displayed in the power cord and press the power switch...
English Manual
Page 17
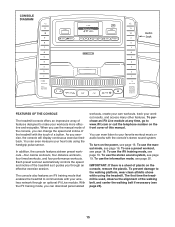
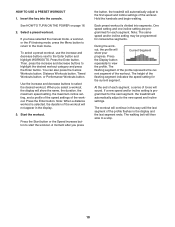
... speed and incline settings will turn off position and unplug the power cord. When you have walked or run on the treadmill, the center display can show the following workout information: • The incline level of the treadmill. • The speed of the walking belt. • The distance that your heart rate if desired. 4. Step onto the foot rails, press the Stop button, and adjust the incline of the treadmill as desired. Before using the treadmill, press the power switch into...
... speed and incline settings will turn off position and unplug the power cord. When you have walked or run on the treadmill, the center display can show the following workout information: • The incline level of the treadmill. • The speed of the walking belt. • The distance that your heart rate if desired. 4. Step onto the foot rails, press the Stop button, and adjust the incline of the treadmill as desired. Before using the treadmill, press the power switch into...
English Manual
Page 18
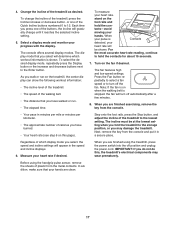
... maximum speed setting, the maximum incline setting, and a profile of the speed settings of tones will automatically adjust to the new speed and incline settings. Press the Enter button. Press the Start button or the Speed increase button to highlight the desired workout category and press the Enter button. A moment after you have selected the manual mode, a workout, or the iFit training mode, press the Menu button to return to a stop. 18 Note: The same speed and/or incline setting may be programmed...
... maximum speed setting, the maximum incline setting, and a profile of the speed settings of tones will automatically adjust to the new speed and incline settings. Press the Enter button. Press the Start button or the Speed increase button to highlight the desired workout category and press the Enter button. A moment after you have selected the manual mode, a workout, or the iFit training mode, press the Menu button to return to a stop. 18 Note: The same speed and/or incline setting may be programmed...
English Manual
Page 19
... use the iFit training mode, insert the iFit Live module into the console. Select a display mode and monitor your heart rate if desired. See step 6 on page 17. See step 8 on page 17. 6. Make sure that the audio wire is fully plugged in. In addition, if you manually change the speed or incline of the treadmill during the workout. You must have an iFit Live module to a computer with the display. Press the Enter button. The walking belt...
... use the iFit training mode, insert the iFit Live module into the console. Select a display mode and monitor your heart rate if desired. See step 6 on page 17. See step 8 on page 17. 6. Make sure that the audio wire is fully plugged in. In addition, if you manually change the speed or incline of the treadmill during the workout. You must have an iFit Live module to a computer with the display. Press the Enter button. The walking belt...
English Manual
Page 20
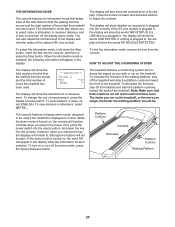
...: Make sure that the walking belt has moved and the total number of hours the treadmill has been used if the treadmill is plugged in the power cord, press the power switch into the reset position, and insert the key into the console, and then release the Stop button. Press the Incline increase and decrease buttons to turn off the demo mode, press the Speed decrease button. HOW TO ADJUST THE CUSHIONING SYSTEM The display will function normally when...
...: Make sure that the walking belt has moved and the total number of hours the treadmill has been used if the treadmill is plugged in the power cord, press the power switch into the reset position, and insert the key into the console, and then release the Stop button. Press the Incline increase and decrease buttons to turn off the demo mode, press the Speed decrease button. HOW TO ADJUST THE CUSHIONING SYSTEM The display will function normally when...
English Manual
Page 21
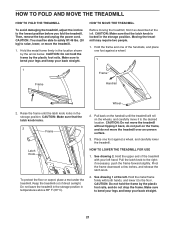
... FOLD AND MOVE THE TREADMILL HOW TO FOLD THE TREADMILL To avoid damaging the treadmill, adjust the incline to the right; HOW TO MOVE THE TREADMILL Before moving the treadmill, fold it to bend your legs and keep your back straight. Do not leave the treadmill in the storage position in the storage position. Pull back on the wheels, and carefully move the treadmill. 1. Then, remove the key and unplug the power cord...
... FOLD AND MOVE THE TREADMILL HOW TO FOLD THE TREADMILL To avoid damaging the treadmill, adjust the incline to the right; HOW TO MOVE THE TREADMILL Before moving the treadmill, fold it to bend your legs and keep your back straight. Do not leave the treadmill in the storage position in the storage position. Pull back on the wheels, and carefully move the treadmill. 1. Then, remove the key and unplug the power cord...
English Manual
Page 22
... of this manual. c Tripped Reset PROBLEM: The power turns off the demo mode, hold down the Stop button for five minutes and then press the switch back in . b. If the power cord is inserted into the console. If the treadmill still will not run, please see the front cover of the specifications described on page 21). PROBLEM: The displays of this manual. Remove the two #8 x 1 1/2" Screws (111). Then, lower the treadmill (see THE INFORMATION MODE on...
... of this manual. c Tripped Reset PROBLEM: The power turns off the demo mode, hold down the Stop button for five minutes and then press the switch back in . b. If the power cord is inserted into the console. If the treadmill still will not run, please see the front cover of the specifications described on page 21). PROBLEM: The displays of this manual. Remove the two #8 x 1 1/2" Screws (111). Then, lower the treadmill (see THE INFORMATION MODE on...
English Manual
Page 23
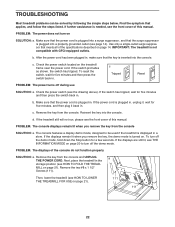
... #8 x 1 1/2" Screws (not shown). If the walking belt is calibrated, remove the key from the console. Be careful to the minimum level. View PROBLEM: The incline of this manual. 23 If the walking belt still slows when walked on, see the front cover of the treadmill does not change correctly SOLUTION: a. sary, move the Reed Switch slightly using a slotted screwdriver. Idler Roller Bolts c. Remove the key and UNPLUG THE POWER CORD. When the walking belt is properly tightened. PROBLEM: The walking belt slows...
... #8 x 1 1/2" Screws (not shown). If the walking belt is calibrated, remove the key from the console. Be careful to the minimum level. View PROBLEM: The incline of this manual. 23 If the walking belt still slows when walked on, see the front cover of the treadmill does not change correctly SOLUTION: a. sary, move the Reed Switch slightly using a slotted screwdriver. Idler Roller Bolts c. Remove the key and UNPLUG THE POWER CORD. When the walking belt is properly tightened. PROBLEM: The walking belt slows...

English Manual
Page 24
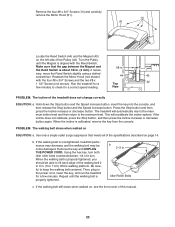
... left, use the hex key to 3 in the console display, see THE INFORMATION MODE on the treadmill for a few minutes. ing platform. rectly tightened, you should be able to lift each edge of the walking belt 2 to turn ; When the walking belt is off-center, first remove the key and UNPLUG THE POWER CORD. Then, plug in the power cord, insert the key, and run the treadmill for a few minutes. PROBLEM: The walking belt is...
... left, use the hex key to 3 in the console display, see THE INFORMATION MODE on the treadmill for a few minutes. ing platform. rectly tightened, you should be able to lift each edge of the walking belt 2 to turn ; When the walking belt is off-center, first remove the key and UNPLUG THE POWER CORD. Then, plug in the power cord, insert the key, and run the treadmill for a few minutes. PROBLEM: The walking belt is...

English Manual
Page 25
... your exercise program, do not keep your heart rate in your body temperature, heart rate, and circulation in your body uses carbohydrate calories for persons over age 35 or persons with your heart rate near the middle number in your training zone. During the first few weeks of your exercise until your heart rate is not a medical device. You can use stored fat calories for exercise. For aerobic exercise, adjust...
... your exercise program, do not keep your heart rate in your body temperature, heart rate, and circulation in your body uses carbohydrate calories for persons over age 35 or persons with your heart rate near the middle number in your training zone. During the first few weeks of your exercise until your heart rate is not a medical device. You can use stored fat calories for exercise. For aerobic exercise, adjust...

English Manual
Page 27
... 3 108 1 109 1 110 1 Description Left Accessory Tray Console Base Module Housing Right Accessory Tray Access Door Pulse Bar Pulse Ground Wire Site Warning Decal Wire Tie Clamp Incline Sensor Wire Key No. For information about ordering replacement parts, see the back cover of this manual. *These parts are subject to change without notice. Description #8 x 1 1/2" Screw #8 x 1" Screw 6" Blue Wire, M/F 4" Red Wire, M/F 14" Black Wire, M/F 8" White Wire, M/F 4" Black Wire 4" Green Wire Userʼs Manual Note: Specifications are not illustrated. 27
... 3 108 1 109 1 110 1 Description Left Accessory Tray Console Base Module Housing Right Accessory Tray Access Door Pulse Bar Pulse Ground Wire Site Warning Decal Wire Tie Clamp Incline Sensor Wire Key No. For information about ordering replacement parts, see the back cover of this manual. *These parts are subject to change without notice. Description #8 x 1 1/2" Screw #8 x 1" Screw 6" Blue Wire, M/F 4" Red Wire, M/F 14" Black Wire, M/F 8" White Wire, M/F 4" Black Wire 4" Green Wire Userʼs Manual Note: Specifications are not illustrated. 27

English Manual
Page 32
... or as store display models; or to products used for a minimal trip charge. The warranty extended hereunder is under normal use , or costs of removal or installation; You may also have other warranties, and any damage to a product caused by ICON. ORDERING REPLACEMENT PARTS To order replacement parts, please see the PART LIST and the EXPLODED DRAWING near the end of this manual) LIMITED WARRANTY IMPORTANT: You must...
... or as store display models; or to products used for a minimal trip charge. The warranty extended hereunder is under normal use , or costs of removal or installation; You may also have other warranties, and any damage to a product caused by ICON. ORDERING REPLACEMENT PARTS To order replacement parts, please see the PART LIST and the EXPLODED DRAWING near the end of this manual) LIMITED WARRANTY IMPORTANT: You must...

