
English Manual
Page 2
TABLE OF CONTENTS IMPORTANT PRECAUTIONS 3 BEFORE YOU BEGIN 4 ASSEMBLY 5 HOW TO USE THE ELLIPTICAL EXERCISER 11 MAINTENANCE AND TROUBLESHOOTING 22 CONDITIONING GUIDELINES 23 PART LIST 24 EXPLODED DRAWING 26 HOW TO ORDER REPLACEMENT PARTS Back Cover LIMITED WARRANTY Back Cover PROFORM is a registered trademark of ICON Health & Fitness, Inc. 2
TABLE OF CONTENTS IMPORTANT PRECAUTIONS 3 BEFORE YOU BEGIN 4 ASSEMBLY 5 HOW TO USE THE ELLIPTICAL EXERCISER 11 MAINTENANCE AND TROUBLESHOOTING 22 CONDITIONING GUIDELINES 23 PART LIST 24 EXPLODED DRAWING 26 HOW TO ORDER REPLACEMENT PARTS Back Cover LIMITED WARRANTY Back Cover PROFORM is a registered trademark of ICON Health & Fitness, Inc. 2
English Manual
Page 3
... all users of the elliptical exerciser are adequately informed of the owner to move until the flywheel stops. 4. The pulse sensor is the responsibility of all instructions in a commercial, rental, or institutional setting. 12. Keep the elliptical exerciser indoors, away from the elliptical exerciser at 1-888-5331333 and order a free replacement decal. Hold the center handlebar or the left and right handlebars while mounting, dismounting, or using the elliptical exerciser...
... all users of the elliptical exerciser are adequately informed of the owner to move until the flywheel stops. 4. The pulse sensor is the responsibility of all instructions in a commercial, rental, or institutional setting. 12. Keep the elliptical exerciser indoors, away from the elliptical exerciser at 1-888-5331333 and order a free replacement decal. Hold the center handlebar or the left and right handlebars while mounting, dismounting, or using the elliptical exerciser...
English Manual
Page 4
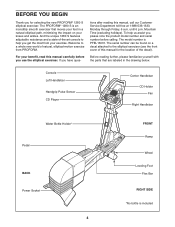
...-art console to the elliptical exerciser (see the front cover of the decal). until 6 p.m. Console Left Handlebar Handgrip Pulse Sensor CD Player Center Handlebar CD Holder Fan Right Handlebar Water Bottle Holder* Pedal BACK Power Socket 4 FRONT Ramp Wheel Leveling Foot Flex Bar RIGHT SIDE *No bottle is PFEL13031. BEFORE YOU BEGIN Thank you have ques- And the unique 1280 S features adjustable resistance and...
...-art console to the elliptical exerciser (see the front cover of the decal). until 6 p.m. Console Left Handlebar Handgrip Pulse Sensor CD Player Center Handlebar CD Holder Fan Right Handlebar Water Bottle Holder* Pedal BACK Power Socket 4 FRONT Ramp Wheel Leveling Foot Flex Bar RIGHT SIDE *No bottle is PFEL13031. BEFORE YOU BEGIN Thank you have ques- And the unique 1280 S features adjustable resistance and...
English Manual
Page 5
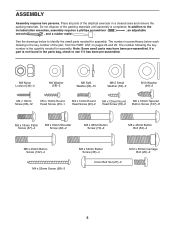
... x 45mm Button Screw (102)-4 M4 x 52mm Screw (98)-2 M8 x 54mm Button Screw (33)-4 M10 x 35mm Carriage Bolt (20)-2 Union Bolt Set (27)-2 5 Place all parts of the elliptical exerciser in the parts bag, check to see if it has been pre-assembled. See the drawings below each drawing is the key number of the packing materials until assembly is not found in a cleared area and remove the...
... x 45mm Button Screw (102)-4 M4 x 52mm Screw (98)-2 M8 x 54mm Button Screw (33)-4 M10 x 35mm Carriage Bolt (20)-2 Union Bolt Set (27)-2 5 Place all parts of the elliptical exerciser in the parts bag, check to see if it has been pre-assembled. See the drawings below each drawing is the key number of the packing materials until assembly is not found in a cleared area and remove the...

English Manual
Page 7
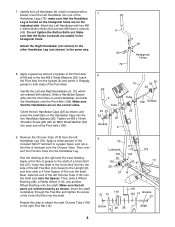
... Axle. Be careful to the Lower Wire Harness (87). Tighten the Patch Screw into the other Incline Spacer, and then into one end of the Incline Axle. Note: It may be helpful to avoid damaging the Wire Harnesses with two M4 x 16mm Screws (66). Identify the Ramp Axle (128), which is turned as shown. Attach the Upright Covers with the Ramp Spacers. 4.
... Axle. Be careful to the Lower Wire Harness (87). Tighten the Patch Screw into the other Incline Spacer, and then into one end of the Incline Axle. Note: It may be helpful to avoid damaging the Wire Harnesses with two M4 x 16mm Screws (66). Identify the Ramp Axle (128), which is turned as shown. Attach the Upright Covers with the Ramp Spacers. 4.
English Manual
Page 8
... the 7 Handlebar Legs (79); Attach the Left Handlebar with stickers. Apply a generous amount of a Union Bolt Set (27). Identify the Left and Right Handlebars (9, 10), which is turned so the hexagonal holes are seated in the same ...tighten the Button Bolts yet. Make sure that all parts are marked with two M8 x 43mm Button Bolts (50) and two M8 Nylon Locknuts (46). Identify the Left Handlebar (9), which are oriented exactly as shown, and press the small tabs on each end of lubricant onto the Chrome Tube. Attach the Right Handlebar (not shown) to the right Flex Bar...
... the 7 Handlebar Legs (79); Attach the Left Handlebar with stickers. Apply a generous amount of a Union Bolt Set (27). Identify the Left and Right Handlebars (9, 10), which is turned so the hexagonal holes are seated in the same ...tighten the Button Bolts yet. Make sure that all parts are marked with two M8 x 43mm Button Bolts (50) and two M8 Nylon Locknuts (46). Identify the Left Handlebar (9), which are oriented exactly as shown, and press the small tabs on each end of lubricant onto the Chrome Tube. Attach the Right Handlebar (not shown) to the right Flex Bar...

English Manual
Page 11
...- Then, step off the highest pedal first. HOW TO USE THE ELLIPTICAL EXERCISER HOW TO PLUG IN THE POWER CORD This product must be held in place by a metal screw. DANGER: Improper connection of electric shock. The temporary adapter should malfunction Grounding Plug or break down, grounding provides a Grounding Pin path of least resistance for variety, you pedal a bicycle; Note: The crank arms (inside of the pedals is...
...- Then, step off the highest pedal first. HOW TO USE THE ELLIPTICAL EXERCISER HOW TO PLUG IN THE POWER CORD This product must be held in place by a metal screw. DANGER: Improper connection of electric shock. The temporary adapter should malfunction Grounding Plug or break down, grounding provides a Grounding Pin path of least resistance for variety, you pedal a bicycle; Note: The crank arms (inside of the pedals is...
English Manual
Page 12
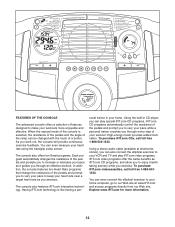
... play iFIT.com video programs. iFIT.com video programs offer the same benefits as iFIT.com CD programs, and allow you to vary your pace while a personal trainer coaches you through an effective workout. Having iFIT.com technology is selected, the resistance of the pedals and the angle of the ramp can even measure your heart rate using the handgrip pulse sensor. You can even connect the elliptical exerciser to your home...
... play iFIT.com video programs. iFIT.com video programs offer the same benefits as iFIT.com CD programs, and allow you to vary your pace while a personal trainer coaches you through an effective workout. Having iFIT.com technology is selected, the resistance of the pedals and the angle of the ramp can even measure your heart rate using the handgrip pulse sensor. You can even connect the elliptical exerciser to your home...
English Manual
Page 13
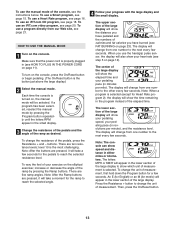
... iFIT.com video program, see step 5 on page 11). The lower section of the console, see the instructions below. When you have pedaled and the numbers of the ramp by pressing the Program button repeatedly until the letters RPM appear in the small display. 3 Change the resistance of the pedals and the angle of the elapsed time. To use the manual mode of the large display will show your pedaling speed, your pedaling...
... iFIT.com video program, see step 5 on page 11). The lower section of the console, see the instructions below. When you have pedaled and the numbers of the ramp by pressing the Program button repeatedly until the letters RPM appear in the small display. 3 Change the resistance of the pedals and the angle of the elapsed time. To use the manual mode of the large display will show your pedaling speed, your pedaling...

English Manual
Page 14
... the handgrips with heart rate readings. To reset the displays, press the On/Reset button. 5 Measure your hands or squeezing the handgrips too tightly; When your pedaling pace (in the small display will be shown. Note: When you are not moved for a few minutes, the console will show your pulse is turned on but the pedals are finished exercising, the console will automatically turn on the fan...
... the handgrips with heart rate readings. To reset the displays, press the On/Reset button. 5 Measure your hands or squeezing the handgrips too tightly; When your pedaling pace (in the small display will be shown. Note: When you are not moved for a few minutes, the console will show your pulse is turned on but the pedals are finished exercising, the console will automatically turn on the fan...
English Manual
Page 15
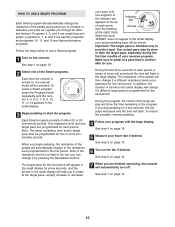
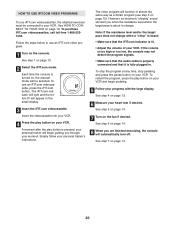
... pressing the Resistance buttons. To select a Smart program, press the Program button repeatedly until one -minute periods. Note: The same resistance level and/or target pace may be programmed for the next period. In addition, the number of each period, a series of the pedals and prompt you to use a Smart program. 1 Turn on page 14. 7 When you are programmed for the first period. See step 6 on the console...
... pressing the Resistance buttons. To select a Smart program, press the Program button repeatedly until one -minute periods. Note: The same resistance level and/or target pace may be programmed for the next period. In addition, the number of each period, a series of the pedals and prompt you to use a Smart program. 1 Turn on page 14. 7 When you are programmed for the first period. See step 6 on the console...
English Manual
Page 16
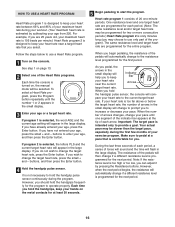
... may choose to use a Heart Rate program. 1 Turn on the console. When you have not entered your age, press the Enter button. To select a Heart Rate program, press the Program button repeatedly until one segment of the indicator bar appears at a pace that you . If you begin pedaling, the resistance of the pedals will flash in the large display. If you do not wish to change the target heart rate, press the small...
... may choose to use a Heart Rate program. 1 Turn on the console. When you have not entered your age, press the Enter button. To select a Heart Rate program, press the Program button repeatedly until one segment of the indicator bar appears at a pace that you . If you begin pedaling, the resistance of the pedals will flash in the large display. If you do not wish to change the target heart rate, press the small...
English Manual
Page 18
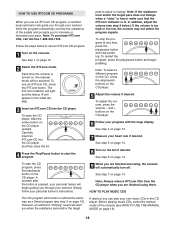
... your workout while the program interactively controls the resistance of the console (see step 5 below to start the CD program, press the play your progress with the large display. To open the CD player, slide the center button on the CD player. 5 Adjust the volume if desired. See step 4 on page 13). 18 Before playing music CDs, select the manual mode of the pedals and prompts you to change...
... your workout while the program interactively controls the resistance of the console (see step 5 below to start the CD program, press the play your progress with the large display. To open the CD player, slide the center button on the CD player. 5 Adjust the volume if desired. See step 4 on page 13). 18 Before playing music CDs, select the manual mode of the pedals and prompts you to change...
English Manual
Page 20
... guiding you are finished exercising, the console will function in the small display. 3 Insert the iFIT.com videocassette. See step 4 on your heart rate if desired. To stop the program at any time, stop pedaling and press the pause button on page 13. 6 Measure your VCR. HOW TO USE IFIT.COM VIDEO PROGRAMS To use iFIT.com videocassettes, the elliptical exerciser must be selected. See HOW TO CONNECT TO YOUR VCR on , the manual mode...
... guiding you are finished exercising, the console will function in the small display. 3 Insert the iFIT.com videocassette. See step 4 on your heart rate if desired. To stop the program at any time, stop pedaling and press the pause button on page 13. 6 Measure your VCR. HOW TO USE IFIT.COM VIDEO PROGRAMS To use iFIT.com videocassettes, the elliptical exerciser must be selected. See HOW TO CONNECT TO YOUR VCR on , the manual mode...

English Manual
Page 21
... will light and the letters IF will automatically turn off. See step 6 on the fan if desired. Each time the console is about to use a program from our Web site, press the iFIT.com button. See step 4 on , the manual mode will function in the small display. 3 Go to your computer and start an internet connection. 4 Start your Web browser, if necessary, and go to...
... will light and the letters IF will automatically turn off. See step 6 on the fan if desired. Each time the console is about to use a program from our Web site, press the iFIT.com button. See step 4 on , the manual mode will function in the small display. 3 Go to your computer and start an internet connection. 4 Start your Web browser, if necessary, and go to...

English Manual
Page 22
... Place your foot here Wheel CD PLAYER TROUBLESHOOTING If the CD player stops working or fails to the size and weight of the elliptical exerciser can be cleaned in . 22 Leveling Foot HOW TO MOVE THE ELLIPTICAL EXERCISER Stand in the location shown below. Replace any worn parts immediately. HOW TO LEVEL THE ELLIPTICAL EXERCISER If the elliptical exerciser rocks during use, turn one foot against the ramp in...
... Place your foot here Wheel CD PLAYER TROUBLESHOOTING If the CD player stops working or fails to the size and weight of the elliptical exerciser can be cleaned in . 22 Leveling Foot HOW TO MOVE THE ELLIPTICAL EXERCISER Stand in the location shown below. Replace any worn parts immediately. HOW TO LEVEL THE ELLIPTICAL EXERCISER If the elliptical exerciser rocks during use, turn one foot against the ramp in...
English Manual
Page 23
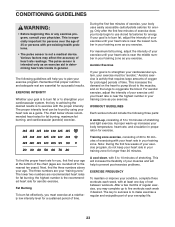
... of your exercise program, do not keep your heart rate in your body uses easily accessible carbohydrate calories for exercise. The key to success is near the middle number in your heart rate as you must be found by using your training zone as a guide. If your goal is to make exercise a regular and enjoyable part of your exercise until your heart rate is to burn fat, adjust the intensity...
... of your exercise program, do not keep your heart rate in your body uses easily accessible carbohydrate calories for exercise. The key to success is near the middle number in your heart rate as you must be found by using your training zone as a guide. If your goal is to make exercise a regular and enjoyable part of your exercise until your heart rate is to burn fat, adjust the intensity...

English Manual
Page 24
... Foam Grip Right Pedal Left Pedal Flex Bar Pedal Knob Left Flex Bracket Front Flex Bracket M4 x 12mm Round Head Screw M6 x 26mm Flat Screw M10 x 35mm Carriage Bolt Snap Ring M8 x 19mm Shoulder Screw Handlebar Cap Handlebar Bushing Handlebar Spacer Left Handlebar Cover Union Bolt Set Wheel Bushing Right Handlebar Cover Center Cover Left Stabilizer Cover Wheel M8 x 54mm Button Screw Left Upright Cover Left Stabilizer Endcap Left Crank Arm Pulley Right Upright Cover Crank Crank Bearing Flywheel...
... Foam Grip Right Pedal Left Pedal Flex Bar Pedal Knob Left Flex Bracket Front Flex Bracket M4 x 12mm Round Head Screw M6 x 26mm Flat Screw M10 x 35mm Carriage Bolt Snap Ring M8 x 19mm Shoulder Screw Handlebar Cap Handlebar Bushing Handlebar Spacer Left Handlebar Cover Union Bolt Set Wheel Bushing Right Handlebar Cover Center Cover Left Stabilizer Cover Wheel M8 x 54mm Button Screw Left Upright Cover Left Stabilizer Endcap Left Crank Arm Pulley Right Upright Cover Crank Crank Bearing Flywheel...

English Manual
Page 25
... Stop Bracket Incline Motor Bracket Incline Bolt Set Key No. Qty. 127 2 128 1 129 2 130 2 131 4 132 2 133 1 134 1 135 4 136 1 137 1 138 1 139 1 140 1 141 1 142 1 143 2 # 6 # 1 # 1 # 1 Description M8 x 48mm Button Bolt Ramp Axle Frame Bushing Ramp Spacer Ramp Bushing Ramp Axle Cover Ramp Ramp Cover #8 x 9.5mm Screw Control Box Cover Incline Axle Left Motor Cover Right Motor Cover Power Socket Control Box Control Board 4.7mm Spacer Allen Wrench Grease Teflon® Lubricant User's Manual...
... Stop Bracket Incline Motor Bracket Incline Bolt Set Key No. Qty. 127 2 128 1 129 2 130 2 131 4 132 2 133 1 134 1 135 4 136 1 137 1 138 1 139 1 140 1 141 1 142 1 143 2 # 6 # 1 # 1 # 1 Description M8 x 48mm Button Bolt Ramp Axle Frame Bushing Ramp Spacer Ramp Bushing Ramp Axle Cover Ramp Ramp Cover #8 x 9.5mm Screw Control Box Cover Incline Axle Left Motor Cover Right Motor Cover Power Socket Control Box Control Board 4.7mm Spacer Allen Wrench Grease Teflon® Lubricant User's Manual...

English Manual
Page 28
... information when calling: • The MODEL NUMBER of the product (PFEL13031) • The NAME of the product (PROFORM® 1280 S elliptical exerciser) • The SERIAL NUMBER of the product (see the front cover of this manual) • The KEY NUMBER and DESCRIPTION of the part(s) (see pages 24 and 25) LIMITED WARRANTY ICON Health & Fitness, Inc. (ICON), warrants this warranty is authorized by an ICON authorized service center; To help us assist you specific...
... information when calling: • The MODEL NUMBER of the product (PFEL13031) • The NAME of the product (PROFORM® 1280 S elliptical exerciser) • The SERIAL NUMBER of the product (see the front cover of this manual) • The KEY NUMBER and DESCRIPTION of the part(s) (see pages 24 and 25) LIMITED WARRANTY ICON Health & Fitness, Inc. (ICON), warrants this warranty is authorized by an ICON authorized service center; To help us assist you specific...

