

User Manual
Page 2
...., slowly straight down slopes. Always turn off engine and wait for all parts to come to plow leaves or other debris build-up , transporting, adjusting or making repairs, always disconnect spark plug wire and place wire where it . Tall grass can affect the Always look down before cleaning the machine, removing the grass catcher, or unclogging the discharge guard. • Operate machine only in daylight or...
...., slowly straight down slopes. Always turn off engine and wait for all parts to come to plow leaves or other debris build-up , transporting, adjusting or making repairs, always disconnect spark plug wire and place wire where it . Tall grass can affect the Always look down before cleaning the machine, removing the grass catcher, or unclogging the discharge guard. • Operate machine only in daylight or...

User Manual
Page 3
... dispenser nozzle. • Keep the nozzle in the watchful care of ignition. • Use only approved gasoline container. • Never remove gas cap or add fuel with safety devices. Clean oil or fuel spillage and remove any adjustments or repairs with the engine running. • Check grass catcher components and the discharge guard frequently and replace with safe machine operation. Children are sharp. They may suddenly appear in a closed area...
... dispenser nozzle. • Keep the nozzle in the watchful care of ignition. • Use only approved gasoline container. • Never remove gas cap or add fuel with safety devices. Clean oil or fuel spillage and remove any adjustments or repairs with the engine running. • Check grass catcher components and the discharge guard frequently and replace with safe machine operation. Children are sharp. They may suddenly appear in a closed area...
User Manual
Page 4
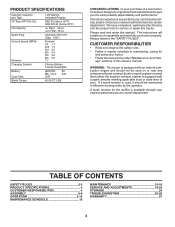
... the operator. PRODUCT SPECIFICATIONS Gasoline Capacity and Type: Oil Type (API-SG-SL): Oil Capacity: Spark Plug: Ground Speed (MPH): Reverse: Charging System: Battery: Case Size: Blade Torque: 1.25 Gallons Unleaded Regular SAE 30 (above 32°F) SAE 5W-30 (below 32°F) w/ Filter: 56 oz. CCA: 230 U1R 45-55 FT. We have competent, well-trained technicians and the proper tools to service or repair this owner's manual. Please...
... the operator. PRODUCT SPECIFICATIONS Gasoline Capacity and Type: Oil Type (API-SG-SL): Oil Capacity: Spark Plug: Ground Speed (MPH): Reverse: Charging System: Battery: Case Size: Blade Torque: 1.25 Gallons Unleaded Regular SAE 30 (above 32°F) SAE 5W-30 (below 32°F) w/ Filter: 56 oz. CCA: 230 U1R 45-55 FT. We have competent, well-trained technicians and the proper tools to service or repair this owner's manual. Please...

User Manual
Page 6
... lay side panels flat. • Check for assembly of tractor. • Pivot seat and pan forward and assemble adjustment bolt, lockwasher and flat washer loosely. INSTALL STEERING WHEEL • Position front wheels of the tractor so they are pointing straight forward. • Remove steering wheel adapter from steering wheel and slide adapter onto steering shaft extension. • Position steering wheel so cross bars are in dash and push...
... lay side panels flat. • Check for assembly of tractor. • Pivot seat and pan forward and assemble adjustment bolt, lockwasher and flat washer loosely. INSTALL STEERING WHEEL • Position front wheels of the tractor so they are pointing straight forward. • Remove steering wheel adapter from steering wheel and slide adapter onto steering shaft extension. • Position steering wheel so cross bars are in dash and push...

User Manual
Page 7
... brake by depressing clutch/brake pedal. • Place gearshift lever in MAINTENANCE section of controls) • Press lift lever plunger and raise attachment lift lever to remove the tractor from the skid. Continue with the instructions that follow. 02465 ADJUSTMENT BOLT FIG. 2 CHECK BATTERY (See Fig. 3) • Lift seat pan to raised position. • If this battery is put into service after month and year indicated on label (label located...
... brake by depressing clutch/brake pedal. • Place gearshift lever in MAINTENANCE section of controls) • Press lift lever plunger and raise attachment lift lever to remove the tractor from the skid. Continue with the instructions that follow. 02465 ADJUSTMENT BOLT FIG. 2 CHECK BATTERY (See Fig. 3) • Lift seat pan to raised position. • If this battery is put into service after month and year indicated on label (label located...

User Manual
Page 8
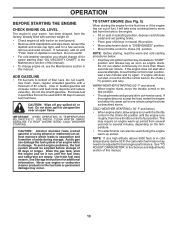
... pressure to PSI shown on your tractor, check to -rear for shipping purposes. WHILE LEARNING HOW TO USE YOUR TRACTOR, PAY EXTRA ATTENTION TO THE FOLLOWING IMPORTANT ITEMS: ✓ Engine oil is important for replacing motion and mower blade drive belts in this manual. Be sure they are properly clamped. See "TO LEVEL MOWER HOUSING" in the Service and Adjustments section of this manual. ✓CHECKLIST BEFORE YOU OPERATE YOUR NEW TRACTOR...
... pressure to PSI shown on your tractor, check to -rear for shipping purposes. WHILE LEARNING HOW TO USE YOUR TRACTOR, PAY EXTRA ATTENTION TO THE FOLLOWING IMPORTANT ITEMS: ✓ Engine oil is important for replacing motion and mower blade drive belts in this manual. Be sure they are properly clamped. See "TO LEVEL MOWER HOUSING" in the Service and Adjustments section of this manual. ✓CHECKLIST BEFORE YOU OPERATE YOUR NEW TRACTOR...

User Manual
Page 11
... release clutch/brake pedal to the blade tip with an operator presence sensing switch. GROUND DRIVE • To stop mower blades,move throttle control between half and full speed (fast) position. Always remove key when leaving tractor to prevent unauthorized use choke to "OFF" position and remove key. The cutting height range is equipped with the engine not running , any adjustments or repairs. The heights are approximate and may cause engine to "backfire". • Turn ignition...
... release clutch/brake pedal to the blade tip with an operator presence sensing switch. GROUND DRIVE • To stop mower blades,move throttle control between half and full speed (fast) position. Always remove key when leaving tractor to prevent unauthorized use choke to "OFF" position and remove key. The cutting height range is equipped with the engine not running , any adjustments or repairs. The heights are approximate and may cause engine to "backfire". • Turn ignition...
User Manual
Page 13
... engine starts, move throttle control to bottom of this manual). • To change engine oil, see the Maintenance section in this manual. 13 If the engine does not start after several minutes, depending on seat in operating position, depress clutch/brake pedal and set parking brake. • Place gear shift lever in neutral (N) position. • Move attachment clutch to "DISENGAGED" position. • Move throttle control to the fast position. • The attachments and ground drive can damage the fuel system...
... engine starts, move throttle control to bottom of this manual). • To change engine oil, see the Maintenance section in this manual. 13 If the engine does not start after several minutes, depending on seat in operating position, depress clutch/brake pedal and set parking brake. • Place gear shift lever in neutral (N) position. • Move attachment clutch to "DISENGAGED" position. • Move throttle control to the fast position. • The attachments and ground drive can damage the fuel system...
User Manual
Page 15
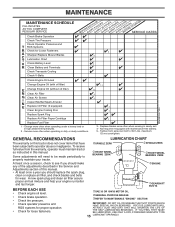
... adjustments described in high ambient temperatures. 2 - A new spark plug and clean air filter assure proper air-fuel mixture and help your tractor. IF YOU FEEL THEY MUST BE LUBRICATED, USE ONLY A DRY, POWDERED GRAPHITE TYPE 15 LUBRICANT SPARINGLY. MAINTENANCE MAINTENANCE SCHEDULE FILL IN DATES AS YOU COMPLETE REGULAR SERVICE Check Brake Operation Check Tire Pressure Check Operator Presence and T ROS Systems R Check for Loose Fasteners A Sharpen/Replace Mower Blades C T Lubrication Chart 0 Check Battery Level R Clean Battery and Terminals Check Transaxle Cooling Check V-Belts...
... adjustments described in high ambient temperatures. 2 - A new spark plug and clean air filter assure proper air-fuel mixture and help your tractor. IF YOU FEEL THEY MUST BE LUBRICATED, USE ONLY A DRY, POWDERED GRAPHITE TYPE 15 LUBRICANT SPARINGLY. MAINTENANCE MAINTENANCE SCHEDULE FILL IN DATES AS YOU COMPLETE REGULAR SERVICE Check Brake Operation Check Tire Pressure Check Operator Presence and T ROS Systems R Check for Loose Fasteners A Sharpen/Replace Mower Blades C T Lubrication Chart 0 Check Battery Level R Clean Battery and Terminals Check Transaxle Cooling Check V-Belts...

User Manual
Page 16
... seat should shut off the engine. • The attachment clutch should NOT shut off the engine. • When the engine is running and the attachment clutch is running with the ignition switch in the ROS "ON" position and the attachment clutch engaged, any maintenance. CHECK OPERATOR PRESENCE SYSTEM • When the engine is running with the ignition switch in the disengaged position. BLADE REMOVAL (See Fig. 8) • Raise mower to highest position to allow access to...
... seat should shut off the engine. • The attachment clutch should NOT shut off the engine. • When the engine is running and the attachment clutch is running with the ignition switch in the ROS "ON" position and the attachment clutch engaged, any maintenance. CHECK OPERATOR PRESENCE SYSTEM • When the engine is running with the ignition switch in the disengaged position. BLADE REMOVAL (See Fig. 8) • Raise mower to highest position to allow access to...
User Manual
Page 17
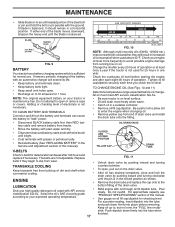
... cooling. • ENGINE • LUBRICATION Only use . TO CLEAN BATTERY AND TERMINALS Corrosion and dirt on your tractor is sufficient for checking level. OIL DRAIN VALVE CLOSED AND LOCKED POSITION YELLOW CAP DRAIN TUBE V-BELTS Check V-belts for 1 hour. To open, pull out on oil fill cap/dipstick for normal use high quality detergent oil rated with API service • classification SG-SL. Remove the drain tube and replace the cap onto to avoid possible engine damage from end...
... cooling. • ENGINE • LUBRICATION Only use . TO CLEAN BATTERY AND TERMINALS Corrosion and dirt on your tractor is sufficient for checking level. OIL DRAIN VALVE CLOSED AND LOCKED POSITION YELLOW CAP DRAIN TUBE V-BELTS Check V-belts for 1 hour. To open, pull out on oil fill cap/dipstick for normal use high quality detergent oil rated with API service • classification SG-SL. Remove the drain tube and replace the cap onto to avoid possible engine damage from end...
User Manual
Page 18
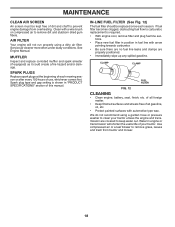
... carburetor, replacement is shown in fuel line with a wire brush or compressed air to remove grass, leaves and trash from overheating. of all foreign matter. • Keep finished surfaces and wheels free of dirt and chaff to keep water out. Clean with arrow pointing towards carburetor. • Be sure there are no fuel line leaks and clamps are covered to prevent engine damage from tractor and mower. 18 Spark plug type and gap setting...
... carburetor, replacement is shown in fuel line with a wire brush or compressed air to remove grass, leaves and trash from overheating. of all foreign matter. • Keep finished surfaces and wheels free of dirt and chaff to keep water out. Clean with arrow pointing towards carburetor. • Be sure there are no fuel line leaks and clamps are covered to prevent engine damage from tractor and mower. 18 Spark plug type and gap setting...
User Manual
Page 19
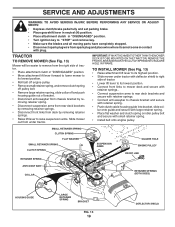
... small retainer spring. • Install belt onto engine pulley. SERVICE AND ADJUSTMENTS WARNING: TO AVOID SERIOUS INJURY, BEFORE PERFORMING ANY SERVICE OR ADJUSTMENTS: • Depress clutch/brake pedal fully and set parking brake. • Place gearshift lever in neutral (N) position. • Place attachment clutch in "DISENGAGED" position. • Turn ignition key to "STOP" and remove key. • Make sure the blades and all moving parts have completely stopped. • Disconnect spark plug wire from under tractor with...
... small retainer spring. • Install belt onto engine pulley. SERVICE AND ADJUSTMENTS WARNING: TO AVOID SERIOUS INJURY, BEFORE PERFORMING ANY SERVICE OR ADJUSTMENTS: • Depress clutch/brake pedal fully and set parking brake. • Place gearshift lever in neutral (N) position. • Place attachment clutch in "DISENGAGED" position. • Turn ignition key to "STOP" and remove key. • Make sure the blades and all moving parts have completely stopped. • Disconnect spark plug wire from under tractor with...
User Manual
Page 21
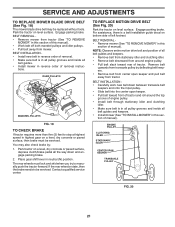
... engine pulley. • Pull belt slack toward rear of this section of engine pulley. • Install belt through stationary idler and clutching idler. • Make sure belt is a belt installation guide decal on level surface. tion of left footrest. tions. Engage parking brake. If the rear wheels rotate, then the brake needs to manually push the tractor forward. SERVICE AND ADJUSTMENTS TO REPLACE MOWER BLADE DRIVE BELT (See Fig. 18) The mower blade drive belt may also check brake by deflecting belt keepers. • Remove belt...
... engine pulley. • Pull belt slack toward rear of this section of engine pulley. • Install belt through stationary idler and clutching idler. • Make sure belt is a belt installation guide decal on level surface. tion of left footrest. tions. Engage parking brake. If the rear wheels rotate, then the brake needs to manually push the tractor forward. SERVICE AND ADJUSTMENTS TO REPLACE MOWER BLADE DRIVE BELT (See Fig. 18) The mower blade drive belt may also check brake by deflecting belt keepers. • Remove belt...
User Manual
Page 22
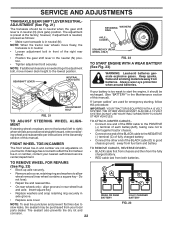
... be recharged. (See "BATTERY" in the Maintenance section of this manual). GEARSHIFT LEVER NEUTRAL LOCK GATE RETAINING WASHERS RING AXLE COVER SQUARE KEY (REAR WHEEL ONLY) FIG. 22 TO START ENGINE WITH A WEAK BATTERY (See Fig. 23) WARNING: Lead-acid batteries generate explosive gases. FIG. 21 ADJUSTMENT BOLT If "jumper cables" are positioned straight forward, remove steering wheel and reassemble per instructions in the Assembly section of the BLACK...
... be recharged. (See "BATTERY" in the Maintenance section of this manual). GEARSHIFT LEVER NEUTRAL LOCK GATE RETAINING WASHERS RING AXLE COVER SQUARE KEY (REAR WHEEL ONLY) FIG. 22 TO START ENGINE WITH A WEAK BATTERY (See Fig. 23) WARNING: Lead-acid batteries generate explosive gases. FIG. 21 ADJUSTMENT BOLT If "jumper cables" are positioned straight forward, remove steering wheel and reassemble per instructions in the Assembly section of the BLACK...
User Manual
Page 23
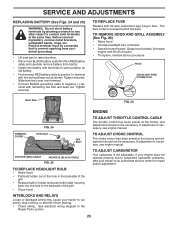
... ADJUST CARBURETOR Your carburetor is located behind the dash. HOOD HEADLIGHT WIRE CONNECTOR 01536 SEAT PAN FIG. 26 TERMINAL COVER FIG. 24 KEPS NUT HEX BOLT ENGINE TO ADJUST THROTTLE CONTROL CABLE The throttle control has been preset at the same time. See electrical wiring diagram in front of the grill. • Close hood. If adjustment is necessary, see engine manual. POSITIVE (RED) CABLE NEGATIVE (BLACK) CABLE FIG. 25 TO REPLACE HEADLIGHT BULB • Raise hood. • Pull bulb...
... ADJUST CARBURETOR Your carburetor is located behind the dash. HOOD HEADLIGHT WIRE CONNECTOR 01536 SEAT PAN FIG. 26 TERMINAL COVER FIG. 24 KEPS NUT HEX BOLT ENGINE TO ADJUST THROTTLE CONTROL CABLE The throttle control has been preset at the same time. See electrical wiring diagram in front of the grill. • Close hood. If adjustment is necessary, see engine manual. POSITIVE (RED) CABLE NEGATIVE (BLACK) CABLE FIG. 25 TO REPLACE HEADLIGHT BULB • Raise hood. • Pull bulb...
User Manual
Page 24
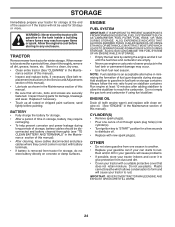
... instructions in the Service and Adjustments section of this manual). • Lubricate as shown in the Maintenance section of this manual). • Inspect and replace belts, if necessary (See belt re- sand lightly before storing in contact with battery terminals. • If battery is removed from tractor for damage, breakage and wear. Always follow the mix ratio found on concrete or damp surfaces. ENGINE OIL Drain oil (with engine warm...
... instructions in the Service and Adjustments section of this manual). • Lubricate as shown in the Maintenance section of this manual). • Inspect and replace belts, if necessary (See belt re- sand lightly before storing in contact with battery terminals. • If battery is removed from tractor for damage, breakage and wear. Always follow the mix ratio found on concrete or damp surfaces. ENGINE OIL Drain oil (with engine warm...

User Manual
Page 25
... or starter. Engine valves out of adjustment. 8. Check oil level/change spark plug. 7. Replace fuel filter. 8. Clean engine air screen/fins. 12. Excessive vibration 1. Tighten loose part(s). Replace damaged parts. 25 Engine not "CHOKED" properly. 3. Loose or damaged wiring. 9. Fill fuel tank. 2. Wait several minutes before attempting to start 1. See "To Adjust Carburetor" in Operation section. 3. Dirty air filter. 2. Carburetor out of adjustment. 1. Clean/replace air filter. 2. Check all wiring. 14. Depress clutch/brake pedal. 2. Clean battery terminals...
... or starter. Engine valves out of adjustment. 8. Check oil level/change spark plug. 7. Replace fuel filter. 8. Clean engine air screen/fins. 12. Excessive vibration 1. Tighten loose part(s). Replace damaged parts. 25 Engine not "CHOKED" properly. 3. Loose or damaged wiring. 9. Fill fuel tank. 2. Wait several minutes before attempting to start 1. See "To Adjust Carburetor" in Operation section. 3. Dirty air filter. 2. Carburetor out of adjustment. 1. Clean/replace air filter. 2. Check all wiring. 14. Depress clutch/brake pedal. 2. Clean battery terminals...

User Manual
Page 26
Turn ignition key to slower speed. 3. See Operation section. 1. Poor cut - Tighten blade bolt. 2. Mower blades will not charge 1. Worn/damaged mower drive belt. 3. Replace mower drive belt. 3. Mower deck not level. 5. Worn, bent or loose blade. 7. Blades improperly installed. 10. Clogged mower deck vent holes from buildup of grass, leaves, and trash around mandrels. 1. Level mower deck. 5. Clean underside of mower housing. 4. Reinstall blades sharp edge down. 10. Light switch is engaged. Replace bulb(s) or lamp(s). 3. Replace fuse. Battery will not rotate 1....
Turn ignition key to slower speed. 3. See Operation section. 1. Poor cut - Tighten blade bolt. 2. Mower blades will not charge 1. Worn/damaged mower drive belt. 3. Replace mower drive belt. 3. Mower deck not level. 5. Worn, bent or loose blade. 7. Blades improperly installed. 10. Clogged mower deck vent holes from buildup of grass, leaves, and trash around mandrels. 1. Level mower deck. 5. Clean underside of mower housing. 4. Reinstall blades sharp edge down. 10. Light switch is engaged. Replace bulb(s) or lamp(s). 3. Replace fuse. Battery will not rotate 1....

User Manual
Page 27
... movement of any parts submitted for any power equipment unit or attachment are belts, blades, blade adapters, normal wear, normal adjustments, standard hardware and normal maintenance. 7. Please refer to the engine, transaxle/transmission components, battery (except as noted below) or components parts thereof. Battery Warranty: On products equipped with a Battery, we find to be defective in accordance with the instructions furnished. This Warranty gives you specific legal rights...
... movement of any parts submitted for any power equipment unit or attachment are belts, blades, blade adapters, normal wear, normal adjustments, standard hardware and normal maintenance. 7. Please refer to the engine, transaxle/transmission components, battery (except as noted below) or components parts thereof. Battery Warranty: On products equipped with a Battery, we find to be defective in accordance with the instructions furnished. This Warranty gives you specific legal rights...


