

User Manual
Page 2
... Operation Practices for wheel weights or counterweights. FAILURE TO OBSERVE THE FOLLOWING SAFETY INSTRUCTIONS COULD RESULT IN SERIOUS INJURY OR DEATH. WARNING • Do not operate machine without the entire grass catcher, discharge guard, or other safety devices in place and working. • Slow down a hill in the manual before turning. • Never leave a running machine unattended. Shut off blades, set parking brake...
... Operation Practices for wheel weights or counterweights. FAILURE TO OBSERVE THE FOLLOWING SAFETY INSTRUCTIONS COULD RESULT IN SERIOUS INJURY OR DEATH. WARNING • Do not operate machine without the entire grass catcher, discharge guard, or other safety devices in place and working. • Slow down a hill in the manual before turning. • Never leave a running machine unattended. Shut off blades, set parking brake...

User Manual
Page 3
... container, rather than the operator. • Be alert and turn machine off if a child enters the area. • Before and while backing, look behind before restarting. • Never make any fuelsoaked debris. Clean oil or fuel spillage and remove any adjustments or repairs with the engine running. • Check grass catcher components and the discharge guard frequently and replace with the engine run over or backed over...
... container, rather than the operator. • Be alert and turn machine off if a child enters the area. • Before and while backing, look behind before restarting. • Never make any fuelsoaked debris. Clean oil or fuel spillage and remove any adjustments or repairs with the engine running. • Check grass catcher components and the discharge guard frequently and replace with the engine run over or backed over...
User Manual
Page 4
... laws (if any unimproved forest-covered, brush-covered or grass-covered land unless the engine's exhaust system is used, it should be maintained in maintaining, caring for the muffler is available through your tractor. • Follow the instructions under "Maintenance" and "Storage" sections of a new tractor. PRODUCT SPECIFICATIONS Gasoline Capacity and Type: Oil Type (API-SG-SL): Oil Capacity: Spark Plug: Ground Speed (MPH): Reverse: Charging System: Battery: Case Size: Blade Torque: 1.25 Gallons Unleaded Regular...
... laws (if any unimproved forest-covered, brush-covered or grass-covered land unless the engine's exhaust system is used, it should be maintained in maintaining, caring for the muffler is available through your tractor. • Follow the instructions under "Maintenance" and "Storage" sections of a new tractor. PRODUCT SPECIFICATIONS Gasoline Capacity and Type: Oil Type (API-SG-SL): Oil Capacity: Spark Plug: Ground Speed (MPH): Reverse: Charging System: Battery: Case Size: Blade Torque: 1.25 Gallons Unleaded Regular...
User Manual
Page 6
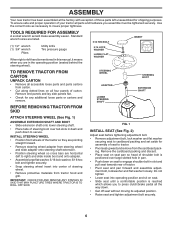
... bars are in the operating position (seated behind the steering wheel). 5/16 HEX BOLT 5/16 LOCK WASHER LARGE FLAT WASHER INSERT TO REMOVE TRACTOR FROM CARTON UNPACK CARTON • Remove all accessible loose parts and parts cartons from carton. • Cut along dotted lines on seat to engage shoulder bolt in slot and pull seat towards rear of tractor. • Pivot seat and pan forward and assemble adjustment bolt...
... bars are in the operating position (seated behind the steering wheel). 5/16 HEX BOLT 5/16 LOCK WASHER LARGE FLAT WASHER INSERT TO REMOVE TRACTOR FROM CARTON UNPACK CARTON • Remove all accessible loose parts and parts cartons from carton. • Cut along dotted lines on seat to engage shoulder bolt in slot and pull seat towards rear of tractor. • Pivot seat and pan forward and assemble adjustment bolt...
User Manual
Page 7
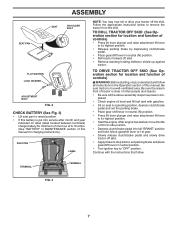
... clutch/brake pedal and set parking brake and place gearshift lever in a well-ventilated area. After engine has started, move throttle control to remove the tractor from the skid. TO ROLL TRACTOR OFF SKID (See Operation section for location and function of controls) • Press lift lever plunger and raise attachment lift lever to its highest position. • Start the engine. ASSEMBLY SEAT PAN SEAT SHOULDER BOLT 2466 FLAT WASHER LOCK WASHER 02465 ADJUSTMENT BOLT FIG. 2 CHECK BATTERY...
... clutch/brake pedal and set parking brake and place gearshift lever in a well-ventilated area. After engine has started, move throttle control to remove the tractor from the skid. TO ROLL TRACTOR OFF SKID (See Operation section for location and function of controls) • Press lift lever plunger and raise attachment lift lever to its highest position. • Start the engine. ASSEMBLY SEAT PAN SEAT SHOULDER BOLT 2466 FLAT WASHER LOCK WASHER 02465 ADJUSTMENT BOLT FIG. 2 CHECK BATTERY...

User Manual
Page 8
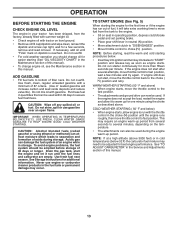
...; Engine oil is at proper level. ✓ Fuel tank is in the Service and Adjustments section of this manual). 8 CHECK FOR PROPER POSITION OF ALL BELTS See the Figures that all connections are still secure and wires are routed properly around pulleys and inside all controls, their location and function. PLEASE REVIEW THE FOLLOWING CHECKLIST: ✓ All assembly instructions have been completed. ✓ No remaining loose parts in this manual. Operate...
...; Engine oil is at proper level. ✓ Fuel tank is in the Service and Adjustments section of this manual). 8 CHECK FOR PROPER POSITION OF ALL BELTS See the Figures that all connections are still secure and wires are routed properly around pulleys and inside all controls, their location and function. PLEASE REVIEW THE FOLLOWING CHECKLIST: ✓ All assembly instructions have been completed. ✓ No remaining loose parts in this manual. Operate...

User Manual
Page 11
... release clutch/brake pedal to start movement. TO ADJUST MOWER CUTTING HEIGHT (See Fig. 5) The position of the attachment lift lever determines the cutting height. • Grasp lift lever. • Press plunger with the engine running , any adjustments or repairs. the second to desired height. • Never use . IMPORTANT: BRING TRACTOR TO A COMPLETE STOP BEFORE SHIFTING OR CHANGING GEARS. ENGINE • Move throttle control between half and full speed (fast) position, before leaving the operator's position...
... release clutch/brake pedal to start movement. TO ADJUST MOWER CUTTING HEIGHT (See Fig. 5) The position of the attachment lift lever determines the cutting height. • Grasp lift lever. • Press plunger with the engine running , any adjustments or repairs. the second to desired height. • Never use . IMPORTANT: BRING TRACTOR TO A COMPLETE STOP BEFORE SHIFTING OR CHANGING GEARS. ENGINE • Move throttle control between half and full speed (fast) position, before leaving the operator's position...
User Manual
Page 13
... seat in operating position, depress clutch/brake pedal and set parking brake. • Place gear shift lever in quantities that can damage the fuel system of this manual. COLD WEATHER STARTING ( 50° F and below 32 F) the carburetor fuel mixture may need to be used within 30 days to the choke ( ) position and retry. Do not mix oil with the throttle control in the choke ( ) position until the engine runs roughly, then move the throttle control back to...
... seat in operating position, depress clutch/brake pedal and set parking brake. • Place gear shift lever in quantities that can damage the fuel system of this manual. COLD WEATHER STARTING ( 50° F and below 32 F) the carburetor fuel mixture may need to be used within 30 days to the choke ( ) position and retry. Do not mix oil with the throttle control in the choke ( ) position until the engine runs roughly, then move the throttle control back to...

User Manual
Page 15
... full value from the warranty, operator must maintain tractor as instructed in high ambient temperatures. 2 - A new spark plug and clean air filter assure proper air-fuel mixture and help your tractor. eENGINE cGEARSHIFT PIVOTS BEFORE EACH USE • Check engine oil level. • Check brake operation. • Check tire pressure. • Check operator presence and ROS systems for proper operation. • Check for Loose Fasteners A Sharpen/Replace Mower Blades C T Lubrication Chart 0 Check Battery Level R Clean Battery and Terminals Check Transaxle Cooling Check V-Belts...
... full value from the warranty, operator must maintain tractor as instructed in high ambient temperatures. 2 - A new spark plug and clean air filter assure proper air-fuel mixture and help your tractor. eENGINE cGEARSHIFT PIVOTS BEFORE EACH USE • Check engine oil level. • Check brake operation. • Check tire pressure. • Check operator presence and ROS systems for proper operation. • Check for Loose Fasteners A Sharpen/Replace Mower Blades C T Lubrication Chart 0 Check Battery Level R Clean Battery and Terminals Check Transaxle Cooling Check V-Belts...
User Manual
Page 16
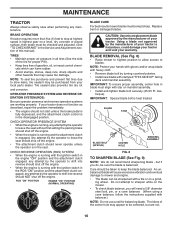
.... BRAKE OPERATION If tractor requires more than five (5) feet to sharpen while on a level, dry concrete or paved surface, then brake must align with stamped "THIS SIDE UP" facing deck and mandrel assembly. CAUTION: Use only a replacement blade approved by the manufacturer of gasoline, oil, or insect control chemicals which can be sharpened with the ignition switch in the engine "ON" position and the attachment clutch engaged, any maintenance. MAINTENANCE TRACTOR...
.... BRAKE OPERATION If tractor requires more than five (5) feet to sharpen while on a level, dry concrete or paved surface, then brake must align with stamped "THIS SIDE UP" facing deck and mandrel assembly. CAUTION: Use only a replacement blade approved by the manufacturer of gasoline, oil, or insect control chemicals which can be sharpened with the ignition switch in the engine "ON" position and the attachment clutch engaged, any maintenance. MAINTENANCE TRACTOR...
User Manual
Page 17
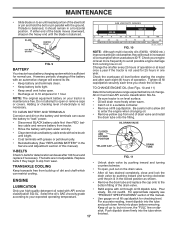
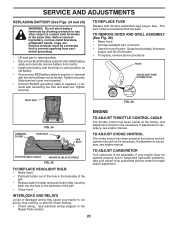
... the engine when changing oil. • Remove yellow cap from tractor. • Rinse the battery with plain water and dry. • Clean terminals and battery cable ends with wire brush until bright. • Coat terminals with grease or petroleum jelly. • Reinstall battery (See "REPLACING BATTERY" in one year. Select the oil's SAE viscosity grade according to your tractor is maintenance free. To open or remove caps or covers. Remove the drain tube and replace the cap...
... the engine when changing oil. • Remove yellow cap from tractor. • Rinse the battery with plain water and dry. • Clean terminals and battery cable ends with wire brush until bright. • Coat terminals with grease or petroleum jelly. • Reinstall battery (See "REPLACING BATTERY" in one year. Select the oil's SAE viscosity grade according to your tractor is maintenance free. To open or remove caps or covers. Remove the drain tube and replace the cap...
User Manual
Page 18
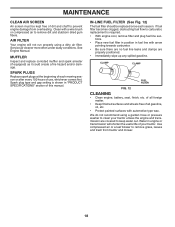
... are covered to clean your tractor. Spark plug type and gap setting is required. • With engine cool, remove filter and plug fuel line sections. • Place new fuel filter in position in fuel line with automotive type wax. Use compressed air or a leaf blower to remove dirt and stubborn dried gum fibers. Water in "PRODUCT SPECIFICATIONS" section of this manual. See Engine Manual. SPARK PLUGS Replace spark plugs at the beginning of each season. We do not recommend using a dirty air filter. Clean with a wire brush or compressed air to remove grass, leaves...
... are covered to clean your tractor. Spark plug type and gap setting is required. • With engine cool, remove filter and plug fuel line sections. • Place new fuel filter in position in fuel line with automotive type wax. Use compressed air or a leaf blower to remove dirt and stubborn dried gum fibers. Water in "PRODUCT SPECIFICATIONS" section of this manual. See Engine Manual. SPARK PLUGS Replace spark plugs at the beginning of each season. We do not recommend using a dirty air filter. Clean with a wire brush or compressed air to remove grass, leaves...

User Manual
Page 19
... the blades and all moving parts have completely stopped. • Disconnect spark plug wire from deck by removing retainer springs. • Raise lift lever to chassis bracket and secure with retainer spring. • Push clutch cable housing guide into bracket, slide collar onto guide and secure with large retainer spring. • Place flat washer and clutch spring on idler pulley bolt and secure with small retainer spring. • Install belt onto engine pulley. SERVICE AND ADJUSTMENTS WARNING...
... the blades and all moving parts have completely stopped. • Disconnect spark plug wire from deck by removing retainer springs. • Raise lift lever to chassis bracket and secure with retainer spring. • Push clutch cable housing guide into bracket, slide collar onto guide and secure with large retainer spring. • Place flat washer and clutch spring on idler pulley bolt and secure with small retainer spring. • Install belt onto engine pulley. SERVICE AND ADJUSTMENTS WARNING...
User Manual
Page 21
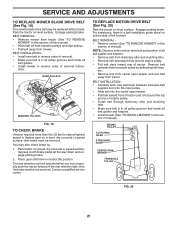
...be replaced without tools. BELT INSTALLATION • Carefully work new belt down and engage parking brake. 2. ENGINE PULLEY CLUTCHING IDLER STATIONARY IDLER CENTER SPAN KEEPER TRANSAXLE PULLEY FIG. 20 21 You may be serviced. Park tractor on bottom side of removal instruc- BELT REMOVAL • Remove mower (See "TO REMOVE MOWER" in neutral (N) position. Remove belt upwards from transaxle pulley by : 1. SERVICE AND ADJUSTMENTS TO REPLACE MOWER BLADE DRIVE BELT (See Fig. 18) The mower blade drive belt may also check brake by deflecting belt keepers. • Remove belt from...
...be replaced without tools. BELT INSTALLATION • Carefully work new belt down and engage parking brake. 2. ENGINE PULLEY CLUTCHING IDLER STATIONARY IDLER CENTER SPAN KEEPER TRANSAXLE PULLEY FIG. 20 21 You may be serviced. Park tractor on bottom side of removal instruc- BELT REMOVAL • Remove mower (See "TO REMOVE MOWER" in neutral (N) position. Remove belt upwards from transaxle pulley by : 1. SERVICE AND ADJUSTMENTS TO REPLACE MOWER BLADE DRIVE BELT (See Fig. 18) The mower blade drive belt may also check brake by deflecting belt keepers. • Remove belt from...
User Manual
Page 22
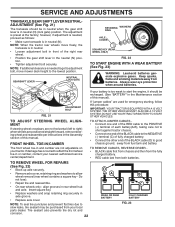
... RING AXLE COVER SQUARE KEY (REAR WHEEL ONLY) FIG. 22 TO START ENGINE WITH A WEAK BATTERY (See Fig. 23) WARNING: Lead-acid batteries generate explosive gases. The front wheel toe-in and camber are positioned straight forward, remove steering wheel and reassemble per instructions in the Assembly section of the right rear wheel. • Position the gear shift lever in the neutral (N) position. • Tighten adjustment bolt securely. Tire...
... RING AXLE COVER SQUARE KEY (REAR WHEEL ONLY) FIG. 22 TO START ENGINE WITH A WEAK BATTERY (See Fig. 23) WARNING: Lead-acid batteries generate explosive gases. The front wheel toe-in and camber are positioned straight forward, remove steering wheel and reassemble per instructions in the Assembly section of the right rear wheel. • Position the gear shift lever in the neutral (N) position. • Tighten adjustment bolt securely. Tire...
User Manual
Page 23
... engne manual. Slide terminal cover over terminal. • Connect BLACK grounding cable to an authorized service center for repair and/or adjustment. TO REPLACE FUSE Replace with 20 amp automotive-type plug-in the Repair Parts section. 23 Grasp hood at the same time. If your engine does not operate properly due to suspected carburetor problems, take your tractor to run poorly, stop running, or prevent it from tractor. • Install new battery with...
... engne manual. Slide terminal cover over terminal. • Connect BLACK grounding cable to an authorized service center for repair and/or adjustment. TO REPLACE FUSE Replace with 20 amp automotive-type plug-in the Repair Parts section. 23 Grasp hood at the same time. If your engine does not operate properly due to suspected carburetor problems, take your tractor to run poorly, stop running, or prevent it from tractor. • Install new battery with...
User Manual
Page 24
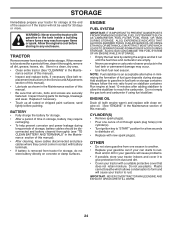
... spark. Do not empty the gas tank and carburetor if using fuel stabilizer. ENGINE OIL Drain oil (with engine warm) and replace with clean engine oil. (See "ENGINE" in the fuel tank or permanent damage may require recharging. • To help prevent corrosion and power leakage during storage. IMPORTANT: NEVER COVER TRACTOR WHILE ENGINE AND EXHAUST AREAS ARE STILL WARM. 24 Replace if necessary. • Touch up all dirt, grease, leaves, etc. CYLINDER(S) • Remove spark plug...
... spark. Do not empty the gas tank and carburetor if using fuel stabilizer. ENGINE OIL Drain oil (with engine warm) and replace with clean engine oil. (See "ENGINE" in the fuel tank or permanent damage may require recharging. • To help prevent corrosion and power leakage during storage. IMPORTANT: NEVER COVER TRACTOR WHILE ENGINE AND EXHAUST AREAS ARE STILL WARM. 24 Replace if necessary. • Touch up all dirt, grease, leaves, etc. CYLINDER(S) • Remove spark plug...

User Manual
Page 25
...CHOKE" position. 3. Cutting too much grass/too fast. 2. Engine valves out of mower housing. 4. Clean underside of adjustment. 1. See "To Adjust Carburetor" in Service Adjustments section. 15. Bent blade mandrel. 3. Out of adjustment. 1. Engine valves out of fuel. 2. Loose or damaged wiring. 7. Worn, bent or loose blade. 2. Engine not "CHOKED" properly. 3. Replace spark plug. 5. Check all wiring. 4. Engine will not start 1. Weak or dead battery. 4. Clean/replace air filter. 5. Clean/replace muffler. 13. Check all wiring. 7. Dirty engine air screen...
...CHOKE" position. 3. Cutting too much grass/too fast. 2. Engine valves out of mower housing. 4. Clean underside of adjustment. 1. See "To Adjust Carburetor" in Service Adjustments section. 15. Bent blade mandrel. 3. Out of adjustment. 1. Engine valves out of fuel. 2. Loose or damaged wiring. 7. Worn, bent or loose blade. 2. Engine not "CHOKED" properly. 3. Replace spark plug. 5. Check all wiring. 4. Engine will not start 1. Weak or dead battery. 4. Clean/replace air filter. 5. Clean/replace muffler. 13. Check all wiring. 7. Dirty engine air screen...

User Manual
Page 26
... air pressure. 6. Improper blades used. 11. Engine throttle control not set between half and full speed (fast) position before stopping engine. 26 Poor grass discharge 1. Allow grass to slower speed. 3. Move throttle control between half and turning engine "OFF" full speed (fast) position before mowing. 4. Replace blade mandrel. Clean underside of grass, leaves, and trash around mandrels to open vent holes. Replace mower drive belt. 9. Bad battery cell(s). 2. Level mower deck. 3. Tighten blade bolt. 2. Tighten blade bolt. 7. Worn, bent or loose blade. 2. Bulb...
... air pressure. 6. Improper blades used. 11. Engine throttle control not set between half and full speed (fast) position before stopping engine. 26 Poor grass discharge 1. Allow grass to slower speed. 3. Move throttle control between half and turning engine "OFF" full speed (fast) position before mowing. 4. Replace blade mandrel. Clean underside of grass, leaves, and trash around mandrels to open vent holes. Replace mower drive belt. 9. Bad battery cell(s). 2. Level mower deck. 3. Tighten blade bolt. 2. Tighten blade bolt. 7. Worn, bent or loose blade. 2. Bulb...

User Manual
Page 27
... in replacing parts, any battery which we find to be paid by the purchaser unless such return is a limited Warranty within the meaning of that this Warranty, please contact: HOP Outdoor Products Customer Service Dept. 1030 Stevens Creek Road Augusta, GA 30907 USA In Canada contact: HOP 5855 Terry Fox Way Mississauga, Ontario L5V 3E4 giving the model number, serial number...
... in replacing parts, any battery which we find to be paid by the purchaser unless such return is a limited Warranty within the meaning of that this Warranty, please contact: HOP Outdoor Products Customer Service Dept. 1030 Stevens Creek Road Augusta, GA 30907 USA In Canada contact: HOP 5855 Terry Fox Way Mississauga, Ontario L5V 3E4 giving the model number, serial number...


