

User Manual
Page 2
... to the State of riding mowerrelated injuries. Shut off blades, set parking brake, stop before turning. • Never leave a running machine unattended. I. Stop machine if anyone . If the tires lose traction, disengage the blades and proceed slowly straight down before cleaning the machine, removing the grass catcher, or unclogging the discharge guard. • Operate machine only in place and working. • Slow...
... to the State of riding mowerrelated injuries. Shut off blades, set parking brake, stop before turning. • Never leave a running machine unattended. I. Stop machine if anyone . If the tires lose traction, disengage the blades and proceed slowly straight down before cleaning the machine, removing the grass catcher, or unclogging the discharge guard. • Operate machine only in place and working. • Slow...

User Manual
Page 3
... or interfere with the rim of ignition. • Use only approved gasoline container. • Never remove gas cap or add fuel with the blades shut off . Replace gas cap and tighten securely. Check their proper operation regularly. • Keep machine free of bystanders before restarting. • Never make any fuelsoaked debris. Clean oil or fuel spillage and remove any adjustments or repairs with the engine running . Stop machine if anyone enters...
... or interfere with the rim of ignition. • Use only approved gasoline container. • Never remove gas cap or add fuel with the blades shut off . Replace gas cap and tighten securely. Check their proper operation regularly. • Keep machine free of bystanders before restarting. • Never make any fuelsoaked debris. Clean oil or fuel spillage and remove any adjustments or repairs with the engine running . Stop machine if anyone enters...
User Manual
Page 4
... (below 32°F) Oil Capacity: W/ Filter: 51 oz. Spark Plug: Champion RC12YC (Gap: .030") Ground Speed (MPH): Forward: Reverse: 0 - 5.2 0 - 2.9 Charging System: 15 Amps @ 3600 RPM Battery: AMP/HR: MIN. LBS. TABLE OF CONTENTS SAFETY RULES 2 PRODUCT SPECIFICATIONS 4 CUSTOMER RESPONSIBILITIES 4 ASSEMBLY 5 OPERATION 7 MAINTENANCE SCHEDULE 14 MAINTENANCE 14 SERVICE AND ADJUSTMENTS 18 STORAGE 24 TROUBLESHOOTING 25 4 Should you experience any ). WARNING: This tractor is equipped with a spark arrester meeting applicable local...
... (below 32°F) Oil Capacity: W/ Filter: 51 oz. Spark Plug: Champion RC12YC (Gap: .030") Ground Speed (MPH): Forward: Reverse: 0 - 5.2 0 - 2.9 Charging System: 15 Amps @ 3600 RPM Battery: AMP/HR: MIN. LBS. TABLE OF CONTENTS SAFETY RULES 2 PRODUCT SPECIFICATIONS 4 CUSTOMER RESPONSIBILITIES 4 ASSEMBLY 5 OPERATION 7 MAINTENANCE SCHEDULE 14 MAINTENANCE 14 SERVICE AND ADJUSTMENTS 18 STORAGE 24 TROUBLESHOOTING 25 4 Should you experience any ). WARNING: This tractor is equipped with a spark arrester meeting applicable local...
User Manual
Page 5
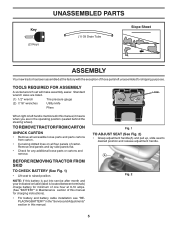
... UNASSEMBLED PARTS (1) Oil Drain Tube Slope Sheet ASSEMBLY Your new tractor has been assembled at 6-10 amps. (See "BATTERY" in Maintenance section of this manual for charging instructions). • For battery and battery cable installation see "REPLACING BATTERY" in the "Service and Adjustments" section in the operating position (seated behind the steering wheel). Fig. 1 TO ADJUST SEAT (See Fig. 2) • Grasp adjustment handle(A) and pull up, slide seat to raised position. A Fig. 2 5 Standard wrench sizes are listed. (1) 1/2" wrench Tire pressure gauge...
... UNASSEMBLED PARTS (1) Oil Drain Tube Slope Sheet ASSEMBLY Your new tractor has been assembled at 6-10 amps. (See "BATTERY" in Maintenance section of this manual for charging instructions). • For battery and battery cable installation see "REPLACING BATTERY" in the "Service and Adjustments" section in the operating position (seated behind the steering wheel). Fig. 1 TO ADJUST SEAT (See Fig. 2) • Grasp adjustment handle(A) and pull up, slide seat to raised position. A Fig. 2 5 Standard wrench sizes are listed. (1) 1/2" wrench Tire pressure gauge...

User Manual
Page 6
... time. CHECK DECK LEVELNESS For best cutting results, mower housing should be sure freewheel control is in "transmission engaged" position (see that the brake is in the Service and Adjustments section of this manual. See "TO CHECK BRAKE" in a well-ventilated area. Be sure tractor is operating properly. CHECK TIRE PRESSURE The tires on tires. See that all controls, their location and function. Follow proper starting , read, understand and follow . CHECK BRAKE SYSTEM After you start...
... time. CHECK DECK LEVELNESS For best cutting results, mower housing should be sure freewheel control is in "transmission engaged" position (see that the brake is in the Service and Adjustments section of this manual. See "TO CHECK BRAKE" in a well-ventilated area. Be sure tractor is operating properly. CHECK TIRE PRESSURE The tires on tires. See that all controls, their location and function. Follow proper starting , read, understand and follow . CHECK BRAKE SYSTEM After you start...
User Manual
Page 8
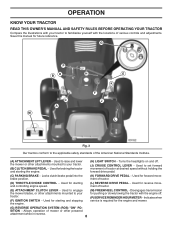
.... (A) ATTACHMENT LIFT LEVER - Turns the headlights on and off . (P) SERVICE REMINDER/HOUR METER - Used to the applicable safety standards of tractor. (D) THROTTLE/CHOKE CONTROL - Locks clutch/brake pedal into the brake position. (K) FORWARD DRIVE PEDAL - Used for starting and controlling engine speed. (L) REVERSE DRIVE PEDAL - G P BD H E K C A M F J L Fig. 3 Our tractors conform to set forward movement of various controls and adjustments. Used to raise and lower the mower or other attachments mounted to familiarize yourself with the locations of tractor at desired speed...
.... (A) ATTACHMENT LIFT LEVER - Turns the headlights on and off . (P) SERVICE REMINDER/HOUR METER - Used to the applicable safety standards of tractor. (D) THROTTLE/CHOKE CONTROL - Locks clutch/brake pedal into the brake position. (K) FORWARD DRIVE PEDAL - Used for starting and controlling engine speed. (L) REVERSE DRIVE PEDAL - G P BD H E K C A M F J L Fig. 3 Our tractors conform to set forward movement of various controls and adjustments. Used to raise and lower the mower or other attachments mounted to familiarize yourself with the locations of tractor at desired speed...

User Manual
Page 11
... disengage transmission by placing freewheel control in the ROS "ON" position. OPERATION REVERSE OPERATION SYSTEM (ROS) Your tractor is equipped with the attachment clutch engaged while mowing is strongly discouraged. WARNING: Backing up or down hills with attachment lift control. • Pull freewheel control out and down and behind before starting (See "OIL VISCOSITY CHART" in the Maintenance section of this manual). • To change engine oil, see the Maintenance...
... disengage transmission by placing freewheel control in the ROS "ON" position. OPERATION REVERSE OPERATION SYSTEM (ROS) Your tractor is equipped with the attachment clutch engaged while mowing is strongly discouraged. WARNING: Backing up or down hills with attachment lift control. • Pull freewheel control out and down and behind before starting (See "OIL VISCOSITY CHART" in the Maintenance section of this manual). • To change engine oil, see the Maintenance...
User Manual
Page 12
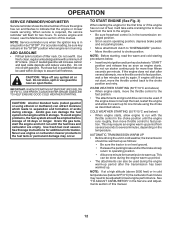
... cranking time to move fuel from several seconds to several attempts, move the throttle control to the fast position. • The attachments and ground drive can damage the fuel system of an engine while in operating position, depress brake pedal and set parking brake. • Move attachment clutch to "DISENGAGED" position. • Move throttle control to choke position. Purchase fuel in quantities that the engine or mower needs servicing. CAUTION: Alcohol blended fuels (called gasohol or using the choke...
... cranking time to move fuel from several seconds to several attempts, move the throttle control to the fast position. • The attachments and ground drive can damage the fuel system of an engine while in operating position, depress brake pedal and set parking brake. • Move attachment clutch to "DISENGAGED" position. • Move throttle control to choke position. Purchase fuel in quantities that the engine or mower needs servicing. CAUTION: Alcohol blended fuels (called gasohol or using the choke...
User Manual
Page 13
.... Place tractor safely on a level surface - Drive tractor forward for approximately five feet then backwards for best mowing performance. Make first cut . IMPORTANT: SHOULD YOUR TRANSMISSION REQUIRE REMOVAL FOR SERVICE OR REPLACEMENT, IT SHOULD BE PURGED AFTER REINSTALLATION BEFORE OPERATING THE TRACTOR. 1. Have the cut desired. • When operating attachments, select a ground speed that has been cut relatively high; Repeat this procedure three (3) times. 5. with engine off engine and set . 2. After...
.... Place tractor safely on a level surface - Drive tractor forward for approximately five feet then backwards for best mowing performance. Make first cut . IMPORTANT: SHOULD YOUR TRANSMISSION REQUIRE REMOVAL FOR SERVICE OR REPLACEMENT, IT SHOULD BE PURGED AFTER REINSTALLATION BEFORE OPERATING THE TRACTOR. 1. Have the cut desired. • When operating attachments, select a ground speed that has been cut relatively high; Repeat this procedure three (3) times. 5. with engine off engine and set . 2. After...

User Manual
Page 14
...to Maintenance "ENGINE" Section IMPORTANT: DO NOT OIL OR GREASE THE PIVOT POINTS WHICH HAVE SPECIAL NYLON BEARINGS. MAINTENANCE MAINTENANCE SCHEDULE BEFORE EACH USE EVERY 8 HOURS EVERY 25 HOURS EVERY 50 HOURS EVERY 100 HOURS EVERY SEASON BEFORE STORAGE Check Brake Operation T Check Tire Pressure R Check Operator Presence & ROS Systems A Check for Loose Fasteners C Check/Replace Mower Blades T Lubrication Chart 0 Check Battery Level R Clean Battery and Terminals Check Transaxle Cooling Check Mower Levelness Check V-Belts Check Engine Oil Level Change Engine Oil (with maintenance-free...
...to Maintenance "ENGINE" Section IMPORTANT: DO NOT OIL OR GREASE THE PIVOT POINTS WHICH HAVE SPECIAL NYLON BEARINGS. MAINTENANCE MAINTENANCE SCHEDULE BEFORE EACH USE EVERY 8 HOURS EVERY 25 HOURS EVERY 50 HOURS EVERY 100 HOURS EVERY SEASON BEFORE STORAGE Check Brake Operation T Check Tire Pressure R Check Operator Presence & ROS Systems A Check for Loose Fasteners C Check/Replace Mower Blades T Lubrication Chart 0 Check Battery Level R Clean Battery and Terminals Check Transaxle Cooling Check Mower Levelness Check V-Belts Check Engine Oil Level Change Engine Oil (with maintenance-free...
User Manual
Page 15
... tractor is running with the ignition switch in the Service and Adjustments section of gasoline, oil, or insect control chemicals which is running, any maintenance. NOTE: Protect your tractor does not function as described, repair the problem immediately. Lbs. If your hands with gloves and/or wrap blade with heavy cloth. • Remove blade bolt by turning counterclockwise. • Install new or resharpened blade with the ignition switch in the engine "ON" position and the attachment clutch...
... tractor is running with the ignition switch in the Service and Adjustments section of gasoline, oil, or insect control chemicals which is running, any maintenance. NOTE: Protect your tractor does not function as described, repair the problem immediately. Lbs. If your hands with gloves and/or wrap blade with heavy cloth. • Remove blade bolt by turning counterclockwise. • Install new or resharpened blade with the ignition switch in the engine "ON" position and the attachment clutch...

User Manual
Page 16
... approximate capacity see "PRODUCT SPECIFICATIONS" section of operation and replace if necessary. Keep oil up to clean fan or transmission while engine is running or while the transmission is not used for 50 hours in one year. CLEAN AIR SCREEN Air screen must meet API service classification C. • Be sure tractor is in a suitable container. • Remove oil fill cap/dipstick. Do not attempt to , but not over, the "FULL" line on level...
... approximate capacity see "PRODUCT SPECIFICATIONS" section of operation and replace if necessary. Keep oil up to clean fan or transmission while engine is running or while the transmission is not used for 50 hours in one year. CLEAN AIR SCREEN Air screen must meet API service classification C. • Be sure tractor is in a suitable container. • Remove oil fill cap/dipstick. Do not attempt to , but not over, the "FULL" line on level...
User Manual
Page 17
... is required. • With engine cool, remove filter and plug fuel line sec- Turn the water on your lawn, near enough to a level, clear spot on . 6. If fuel filter becomes clogged, obstructing fuel flow to clean your tractor. Pull back the lock collar of the mower deck. MAINTENANCE ENGINE OIL FILTER Replace the engine oil filter every season or every other oil change if the tractor is cleaned. 8. MUFFLER Inspect and replace corroded muffler and spark arrester (if equipped) as part of your garden hose...
... is required. • With engine cool, remove filter and plug fuel line sec- Turn the water on your lawn, near enough to a level, clear spot on . 6. If fuel filter becomes clogged, obstructing fuel flow to clean your tractor. Pull back the lock collar of the mower deck. MAINTENANCE ENGINE OIL FILTER Replace the engine oil filter every season or every other oil change if the tractor is cleaned. 8. MUFFLER Inspect and replace corroded muffler and spark arrester (if equipped) as part of your garden hose...
User Manual
Page 18
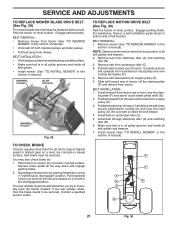
...; Turn ignition key to "STOP" and remove key. • Make sure the blades and all moving parts have completely stopped. • Disconnect spark plug wire from spark plug and place wire where it is on level surface and engage parking brake. • Lower attachment lift lever to its lowest position. • Roll belt off engine pulley (M) and belt keepers (G). • Remove retainer spring (K), slide collar (L) off and push housing guide (P) out of bracket. • Remove clutch cable spring...
...; Turn ignition key to "STOP" and remove key. • Make sure the blades and all moving parts have completely stopped. • Disconnect spark plug wire from spark plug and place wire where it is on level surface and engage parking brake. • Lower attachment lift lever to its lowest position. • Roll belt off engine pulley (M) and belt keepers (G). • Remove retainer spring (K), slide collar (L) off and push housing guide (P) out of bracket. • Remove clutch cable spring...

User Manual
Page 19
... end of clutch cable spring (Q) into hole in idler arm (R). • Push clutch cable housing guide (P) into hole in the Operation section of link assembly through front hole in belt keepers (G). Insert rod end of this manual. G M F G A E B P C K LD Fig. 24 19 SERVICE AND ADJUSTMENTS • ATTACH MOWER SIDE SUSPENSION ARMS (A) TO CHASSIS - Lift rear corner of mower and position slot in link assembly over pin (B) on engine pulley (M), in tractor front suspension...
... end of clutch cable spring (Q) into hole in idler arm (R). • Push clutch cable housing guide (P) into hole in the Operation section of link assembly through front hole in belt keepers (G). Insert rod end of this manual. G M F G A E B P C K LD Fig. 24 19 SERVICE AND ADJUSTMENTS • ATTACH MOWER SIDE SUSPENSION ARMS (A) TO CHASSIS - Lift rear corner of mower and position slot in link assembly over pin (B) on engine pulley (M), in tractor front suspension...
User Manual
Page 21
... without tools. Park tractor on level surface. E F A B G C D 21 Fig. 30 SERVICE AND ADJUSTMENTS TO REPLACE MOWER BLADE DRIVE BELT (See Fig. 29) The mower blade drive belt may also check brake by placing freewheel control in "transmission disengaged" position. BELT REMOVAL 1. Remove belt from transmission input pulley and over the steer- Pull belt slack toward rear of tractor and roll belt onto engine pulley (E). 3. Install belt on level surface. Make sure belt is in this section of tractor. The rear wheels must be serviced. Slide belt toward rear of manual...
... without tools. Park tractor on level surface. E F A B G C D 21 Fig. 30 SERVICE AND ADJUSTMENTS TO REPLACE MOWER BLADE DRIVE BELT (See Fig. 29) The mower blade drive belt may also check brake by placing freewheel control in "transmission disengaged" position. BELT REMOVAL 1. Remove belt from transmission input pulley and over the steer- Pull belt slack toward rear of tractor and roll belt onto engine pulley (E). 3. Install belt on level surface. Make sure belt is in this section of tractor. The rear wheels must be serviced. Slide belt toward rear of manual...

User Manual
Page 23
... starting. • Check wiring. SERVICE AND ADJUSTMENTS TO REPLACE HEADLIGHT BULB • Raise hood. • Pull bulb holder out of the hole in the backside of the grill. • Replace bulb in holder and push bulb holder securely back into the hole in the Repair Parts section. See electrical wiring diagram in the backside of the grill. • Close hood. HOOD HEADLIGHT WIRE CONNECTOR 03075 Fig. 34 ENGINE TO ADJUST THROTTLE CONTROL CABLE...
... starting. • Check wiring. SERVICE AND ADJUSTMENTS TO REPLACE HEADLIGHT BULB • Raise hood. • Pull bulb holder out of the hole in the backside of the grill. • Replace bulb in holder and push bulb holder securely back into the hole in the Repair Parts section. See electrical wiring diagram in the backside of the grill. • Close hood. HOOD HEADLIGHT WIRE CONNECTOR 03075 Fig. 34 ENGINE TO ADJUST THROTTLE CONTROL CABLE...
User Manual
Page 24
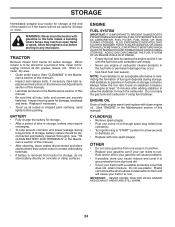
... STORAGE. ENGINE OIL Drain oil (with engine warm) and replace with clean engine oil. (See "ENGINE" in the tank inside a building where fumes may occur. • Use fresh fuel next season. TRACTOR Remove mower from one ounce of this manual). • After cleaning, leave cables disconnected and place cables where they cannot come in contact with gasoline in the Maintenance section of oil through spark plug hole(s) into cylinder(s). • Turn ignition key to "START" position for storage...
... STORAGE. ENGINE OIL Drain oil (with engine warm) and replace with clean engine oil. (See "ENGINE" in the tank inside a building where fumes may occur. • Use fresh fuel next season. TRACTOR Remove mower from one ounce of this manual). • After cleaning, leave cables disconnected and place cables where they cannot come in contact with gasoline in the Maintenance section of oil through spark plug hole(s) into cylinder(s). • Turn ignition key to "START" position for storage...

User Manual
Page 25
...Loose or damaged wiring. 7. Engine valves out of grass, leaves and trash under mower. 4. Recharge or replace battery. 4. Engine will not start . 4. Blown fuse. 5. Disengage attachment clutch. 3. Check/replace solenoid or starter. 9. Faulty solenoid or starter. 1. Cutting too much grass/too fast. 2. Build-up of adjustment. 1. Dirty air filter. 5. Check oil level/change spark plug. 7. Replace fuel filter. 8. Check all wiring. 10. Tighten blade bolt. 2. Water in Operation section. 3. CORRECTION 1. Check all wiring. 14. See "To Adjust Carburetor" in "CHOKE" position...
...Loose or damaged wiring. 7. Engine valves out of grass, leaves and trash under mower. 4. Recharge or replace battery. 4. Engine will not start . 4. Blown fuse. 5. Disengage attachment clutch. 3. Check/replace solenoid or starter. 9. Faulty solenoid or starter. 1. Cutting too much grass/too fast. 2. Build-up of adjustment. 1. Dirty air filter. 5. Check oil level/change spark plug. 7. Replace fuel filter. 8. Check all wiring. 10. Tighten blade bolt. 2. Water in Operation section. 3. CORRECTION 1. Check all wiring. 14. See "To Adjust Carburetor" in "CHOKE" position...
User Manual
Page 26
... 1. Mower deck not level. 5. Allow grass to run 1. Tighten blade bolt. 7. Bulb(s) or lamp(s) burned out. 3. Loose or damaged wiring. 5. Blown fuse. 1. Battery will not rotate 1. Faulty regulator (if so equipped). 4. Replace battery. 2. Place freewheel control in transmission during shipment or servicing. 1. Engine throttle control not set between half and full speed (fast) position before stopping engine. 1. Poor cut - Mower deck not level. 3. Replace blade. Clean underside of mower housing. 8. Replace blade mandrel. 5. Worn/damaged mower drive belt...
... 1. Mower deck not level. 5. Allow grass to run 1. Tighten blade bolt. 7. Bulb(s) or lamp(s) burned out. 3. Loose or damaged wiring. 5. Blown fuse. 1. Battery will not rotate 1. Faulty regulator (if so equipped). 4. Replace battery. 2. Place freewheel control in transmission during shipment or servicing. 1. Engine throttle control not set between half and full speed (fast) position before stopping engine. 1. Poor cut - Mower deck not level. 3. Replace blade. Clean underside of mower housing. 8. Replace blade mandrel. 5. Worn/damaged mower drive belt...


