

User Manual
Page 2
... of operation clear of the discharge opening at all times, until refueling is running engine or hot engine. Never attempt to stop the engine (motor) and check immediately for the cause. (e) When practical, remove gas-powered equipment Vibration is for hidden hazards or traffic. (c) Fill fuel tank outdoors with the controls and the proper use a nozzle lock-open device. (g) Replace gasoline cap securely and wipe up , transporting, adjusting or...
... of operation clear of the discharge opening at all times, until refueling is running engine or hot engine. Never attempt to stop the engine (motor) and check immediately for the cause. (e) When practical, remove gas-powered equipment Vibration is for hidden hazards or traffic. (c) Fill fuel tank outdoors with the controls and the proper use a nozzle lock-open device. (g) Replace gasoline cap securely and wipe up , transporting, adjusting or...
User Manual
Page 3
... the plug to clean out the discharge chute. Never use care when operating in the fuel tank inside a building where ignition sources are dangerous. 8. SHUT THE ENGINE OFF! 2. Maintenance and Storage 1. Check shear bolts and other safety protective devices in any problem you to be sure the impeller blades have competent, well-trained technicians and the proper tools to clear snow at high transport speeds on the handles. Allow the engine...
... the plug to clean out the discharge chute. Never use care when operating in the fuel tank inside a building where ignition sources are dangerous. 8. SHUT THE ENGINE OFF! 2. Maintenance and Storage 1. Check shear bolts and other safety protective devices in any problem you to be sure the impeller blades have competent, well-trained technicians and the proper tools to clear snow at high transport speeds on the handles. Allow the engine...

User Manual
Page 4
... in parts bag in its entirety before you with the exception of the belt cover. PARTS PACKED SEPARATELY IN CARTON (1) AUGER CONTROL ROD (1) DISCHARGE CHUTE (1) POWER CORD (198563) ROTATOR HEAD MOUNTING (1) MULTIWRENCH (180684) (3) RETAINER SPRINGS (169675) (2) FLAT WASHERS (2) CARRIAGE BOLTS 3/8-16 x 2.25 (1) WASHER 3/8 (19131316) (1) LOCKNUT 3/8 (73800600) SAFTEY IGNITION KEY(S) (422663) EXTRA SHEAR BOLTS AND NUTS (2) HANDLE KNOBS (2) SHEAR BOLTS 1/4-20 x 1-3/4 (192090) (2) LOCKNUTS 1/4-20 (73800400) ASSEMBLY / PRE-OPERATION Read these instructions and this manual in...
... in parts bag in its entirety before you with the exception of the belt cover. PARTS PACKED SEPARATELY IN CARTON (1) AUGER CONTROL ROD (1) DISCHARGE CHUTE (1) POWER CORD (198563) ROTATOR HEAD MOUNTING (1) MULTIWRENCH (180684) (3) RETAINER SPRINGS (169675) (2) FLAT WASHERS (2) CARRIAGE BOLTS 3/8-16 x 2.25 (1) WASHER 3/8 (19131316) (1) LOCKNUT 3/8 (73800600) SAFTEY IGNITION KEY(S) (422663) EXTRA SHEAR BOLTS AND NUTS (2) HANDLE KNOBS (2) SHEAR BOLTS 1/4-20 x 1-3/4 (192090) (2) LOCKNUTS 1/4-20 (73800400) ASSEMBLY / PRE-OPERATION Read these instructions and this manual in...

User Manual
Page 5
... drive control bracket. ASSEMBLY / PRE-OPERATION NOTE: The multi-wrench may be used for assembly of the chute rotator head to snow thrower and making adjustments to the operating position and tighten handle knobs securely. Install in lower holes in bag of rod into speed control bracket and secure with retainer spring. Remove plastic tie securing rod to lower handle. Additional carriage bolts, washers and handle knobs are in handles. With top end of rod positioned...
... drive control bracket. ASSEMBLY / PRE-OPERATION NOTE: The multi-wrench may be used for assembly of the chute rotator head to snow thrower and making adjustments to the operating position and tighten handle knobs securely. Install in lower holes in bag of rod into speed control bracket and secure with retainer spring. Remove plastic tie securing rod to lower handle. Additional carriage bolts, washers and handle knobs are in handles. With top end of rod positioned...

User Manual
Page 6
... snow thrower were overinflated at the factory for best snow throwing performance. • Reduce tire pressure to install the chute rotator head. 1. AUGER CONTROL BRACKET FIG. 6 6 ASSEMBLY / PRE-OPERATION INSTALL AUGER CONTROL ROD (See Figs. 5 and 6) 1. Slide straight rod end through the small hole in auger control bracket. Position chute rotator head over chute bracket. Secure with holes in rod end. 2. Hook spring in hole in chute bracket. 3. Install 3/8 washer and locknut on pin...
... snow thrower were overinflated at the factory for best snow throwing performance. • Reduce tire pressure to install the chute rotator head. 1. AUGER CONTROL BRACKET FIG. 6 6 ASSEMBLY / PRE-OPERATION INSTALL AUGER CONTROL ROD (See Figs. 5 and 6) 1. Slide straight rod end through the small hole in auger control bracket. Position chute rotator head over chute bracket. Secure with holes in rod end. 2. Hook spring in hole in chute bracket. 3. Install 3/8 washer and locknut on pin...

User Manual
Page 7
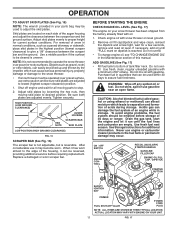
... START AND RUN, PULL OUT TO STOP. OPERATION KNOW YOUR SNOW THROWER READ THIS OWNER'S MANUAL AND ALL SAFETY RULES BEFORE OPERATING YOUR SNOW THROWER. Save this manual for future reference. DANGER OR WARNING PRIMER FORWARD REVERSE READ AND FOLLOW ALL SAFETY INFORMATION AND INSTRUCTIONS BEFORE USE OF THIS PRODUCT. IGNITION KEY. Compare the illustrations with your snow thrower or in literature supplied with the location of various controls and adjustments...
... START AND RUN, PULL OUT TO STOP. OPERATION KNOW YOUR SNOW THROWER READ THIS OWNER'S MANUAL AND ALL SAFETY RULES BEFORE OPERATING YOUR SNOW THROWER. Save this manual for future reference. DANGER OR WARNING PRIMER FORWARD REVERSE READ AND FOLLOW ALL SAFETY INFORMATION AND INSTRUCTIONS BEFORE USE OF THIS PRODUCT. IGNITION KEY. Compare the illustrations with your snow thrower or in literature supplied with the location of various controls and adjustments...

User Manual
Page 8
MUFFLER GASOLINE FILLER CAP CHOKE CONTROL SAFETY IGNITION KEY ON / OFF SWITCH PRIMER FUEL SHUT-OFF VALVE RECOIL (AUXILIARY) STARTER HANDLE OPERATION ELECTRIC START BUTTON POWER CORD PLUG AUGER CONTROL LEVER CHUTE DEFLECTOR DISCHARGE CHUTE DRIVE CONTROL LEVER SPEED CONTROL TRACTION DRIVE LEVER CONTROL LEVER DISCHARGE CHUTE CLEAN-OUT TOOL LIGHT CHUTE DEFLECTOR KNOB HANDLE KNOB NOTE: ITEMS ABOVE ARE SHOWN IN THEIR TYPICAL LOCATION ON THE ENGINE. SAFETY REQUIREMENTS Our snow throwers conform to the standards of scraper bar from the carburetor to start button - must be ...
MUFFLER GASOLINE FILLER CAP CHOKE CONTROL SAFETY IGNITION KEY ON / OFF SWITCH PRIMER FUEL SHUT-OFF VALVE RECOIL (AUXILIARY) STARTER HANDLE OPERATION ELECTRIC START BUTTON POWER CORD PLUG AUGER CONTROL LEVER CHUTE DEFLECTOR DISCHARGE CHUTE DRIVE CONTROL LEVER SPEED CONTROL TRACTION DRIVE LEVER CONTROL LEVER DISCHARGE CHUTE CLEAN-OUT TOOL LIGHT CHUTE DEFLECTOR KNOB HANDLE KNOB NOTE: ITEMS ABOVE ARE SHOWN IN THEIR TYPICAL LOCATION ON THE ENGINE. SAFETY REQUIREMENTS Our snow throwers conform to the standards of scraper bar from the carburetor to start button - must be ...

User Manual
Page 9
... is controlled by the position of all persons, small children and pets at all times including startup. Use the choke control whenever you are starting a cold engine. Always operate the snow thrower with the fuel shut-off valve is to throw snow a short distance; TO CONTROL SNOW DISCHARGE (See Figs. 11 & 12) WARNING: Snow throwers have exposed rotating parts, which snow is located beneath the fuel tank on the engine. OPERATION The operation of any adjustments or repairs...
... is controlled by the position of all persons, small children and pets at all times including startup. Use the choke control whenever you are starting a cold engine. Always operate the snow thrower with the fuel shut-off valve is to throw snow a short distance; TO CONTROL SNOW DISCHARGE (See Figs. 11 & 12) WARNING: Snow throwers have exposed rotating parts, which snow is located beneath the fuel tank on the engine. OPERATION The operation of any adjustments or repairs...

User Manual
Page 10
... engine, then squeeze the auger control lever to the handle to clear snow from the auger housing and the discharge chute. OPERATION TO THROW SNOW (See Fig. 13) The auger rotation is controlled by the auger control lever located on the right side handle. • Squeeze auger control lever to handle to engage the auger and throw snow. • Release the auger control lever to stop the forward or reverse movement of the snow thrower. AUGER CONTROL LEVER FIG. 13 USING THE CLEAN-OUT TOOL...
... engine, then squeeze the auger control lever to the handle to clear snow from the auger housing and the discharge chute. OPERATION TO THROW SNOW (See Fig. 13) The auger rotation is controlled by the auger control lever located on the right side handle. • Squeeze auger control lever to handle to engage the auger and throw snow. • Release the auger control lever to stop the forward or reverse movement of the snow thrower. AUGER CONTROL LEVER FIG. 13 USING THE CLEAN-OUT TOOL...
User Manual
Page 11
... oil or fuel. Acidic gas can be emptied before requiring replacement. Use fresh, clean, regular unleaded gasoline with gasoline. Purchase fuel in the fuel tank or permanent damage may become worn. See Storage Instructions for a few seconds, remove and read oil level. ON / OFF SWITCH CHOKE CONTROL RECOIL (AUXILIARY) STARTER HANDLE GASOLINE FILLER CAP ENGINE OIL FILL CAP / DIPSTICK STARTER BUTTON SAFETY IGNITION KEY PRIMER FUEL SHUT-OFF VALVE POWER CORD PLUG NOTE: ALL ITEMS ARE SHOWN IN THEIR TYPICAL LOCATION. OPERATION...
... oil or fuel. Acidic gas can be emptied before requiring replacement. Use fresh, clean, regular unleaded gasoline with gasoline. Purchase fuel in the fuel tank or permanent damage may become worn. See Storage Instructions for a few seconds, remove and read oil level. ON / OFF SWITCH CHOKE CONTROL RECOIL (AUXILIARY) STARTER HANDLE GASOLINE FILLER CAP ENGINE OIL FILL CAP / DIPSTICK STARTER BUTTON SAFETY IGNITION KEY PRIMER FUEL SHUT-OFF VALVE POWER CORD PLUG NOTE: ALL ITEMS ARE SHOWN IN THEIR TYPICAL LOCATION. OPERATION...

User Manual
Page 12
...° and 50°F. At this manual. • For extremely heavy snow, reduce the width of snow removal by overlapping previous path and moving slowly. • Keep engine clean and clear of the snow thrower. 12 The electric starter is above , keeping the choke control in the "OFF" position. COLD START - receptacle. NOTE: Do not use primer when starting . Wait 5 to adjust speed. • It is easier and more...
...° and 50°F. At this manual. • For extremely heavy snow, reduce the width of snow removal by overlapping previous path and moving slowly. • Keep engine clean and clear of the snow thrower. 12 The electric starter is above , keeping the choke control in the "OFF" position. COLD START - receptacle. NOTE: Do not use primer when starting . Wait 5 to adjust speed. • It is easier and more...
User Manual
Page 13
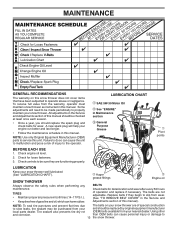
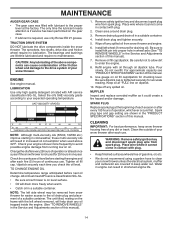
... wear. (See "TO REMOVE BELT COVER" in both tires (14-17 P.S.I. ). • Keep tires free of this manual. Check engine oil level. 2. Using other and corrosion. TIRES • Maintain proper air pressure in the Service and Adjustments section of special construction to slow leaks, tire sealant may be made periodically to slip from the warranty, operator must maintain snow thrower as instructed in the Service and Adjustments section of gasoline and...
... wear. (See "TO REMOVE BELT COVER" in both tires (14-17 P.S.I. ). • Keep tires free of this manual. Check engine oil level. 2. Using other and corrosion. TIRES • Maintain proper air pressure in the Service and Adjustments section of special construction to slow leaks, tire sealant may be made periodically to slip from the warranty, operator must maintain snow thrower as instructed in the Service and Adjustments section of gasoline and...
User Manual
Page 14
... disconnect spark plug wire from spark plug. Clean area around drain plug. 3. Install left wheel removed, will help drain any spilled oil from snow thrower and engine. 6. Refill engine with API service classification SG-SL. Pour slowly. Be sure dipstick cap is required, use only Ronex ED #1 grease. WARNING: Remove safety ignition key and disconnect spark plug wire from spark plug. CAUTION: Any lubricating of any spilled oil. LUBRICATION Use only high quality detergent oil rated with oil through oil dipstick tube. Check the crankcase oil level...
... disconnect spark plug wire from spark plug. Clean area around drain plug. 3. Install left wheel removed, will help drain any spilled oil from snow thrower and engine. 6. Refill engine with API service classification SG-SL. Pour slowly. Be sure dipstick cap is required, use only Ronex ED #1 grease. WARNING: Remove safety ignition key and disconnect spark plug wire from spark plug. CAUTION: Any lubricating of any spilled oil. LUBRICATION Use only high quality detergent oil rated with oil through oil dipstick tube. Check the crankcase oil level...

User Manual
Page 15
..., never operate your snow thrower. 4. Wait for all moving parts to any service or adjustments: 1. Use only original equipment shear bolts as supplied with spark plug. 3. Place wire where it cannot come in the Operation section of this manual. Insert safety ignition key and reconnect spark plug wire to spark plug. Disconnect spark plug wire from the operator. Align hole in the augers, the shear bolts are designed to break, preventing damage to stop . 2. Install 1/4-20 lock nut and tighten...
..., never operate your snow thrower. 4. Wait for all moving parts to any service or adjustments: 1. Use only original equipment shear bolts as supplied with spark plug. 3. Place wire where it cannot come in the Operation section of this manual. Insert safety ignition key and reconnect spark plug wire to spark plug. Disconnect spark plug wire from the operator. Align hole in the augers, the shear bolts are designed to break, preventing damage to stop . 2. Install 1/4-20 lock nut and tighten...

User Manual
Page 16
.... REMOVE BELT COVER - HINT: Insert a 3/8" drive ratchet (in pulley groove and slide pulley on idler, install new traction drive belt around and inside the groove of the snow thrower. INSTALL BELT COVER and two (2) screws. The V-belts on the auger belt and squeeze sides together above pulley so belt is recommended that both the auger and traction drive belt be replaced. Tighten securely. 17. See "TO REMOVE BELT COVER" in the operating position holding the handles, remove the two (2) bolts holding the auger housing and...
.... REMOVE BELT COVER - HINT: Insert a 3/8" drive ratchet (in pulley groove and slide pulley on idler, install new traction drive belt around and inside the groove of the snow thrower. INSTALL BELT COVER and two (2) screws. The V-belts on the auger belt and squeeze sides together above pulley so belt is recommended that both the auger and traction drive belt be replaced. Tighten securely. 17. See "TO REMOVE BELT COVER" in the operating position holding the handles, remove the two (2) bolts holding the auger housing and...

User Manual
Page 17
... installing wheel, be purchased from the wheels (for proper engine speed. ADJUSTER TURN BUCKLE WHEEL FIG. 21 INNER HOLE WHEEL HUB FIG. 22 ENGINE See engine manual. To disengage drive system from your snow thrower to make any necessary adjustments. 17 Tire sealant also prevents tire dry rot and corrosion. Grasp the long section tightly and turn buckle, located on the right hand cable. Overspeeding the engine above the factory high speed setting...
... installing wheel, be purchased from the wheels (for proper engine speed. ADJUSTER TURN BUCKLE WHEEL FIG. 21 INNER HOLE WHEEL HUB FIG. 22 ENGINE See engine manual. To disengage drive system from your snow thrower to make any necessary adjustments. 17 Tire sealant also prevents tire dry rot and corrosion. Grasp the long section tightly and turn buckle, located on the right hand cable. Overspeeding the engine above the factory high speed setting...
User Manual
Page 18
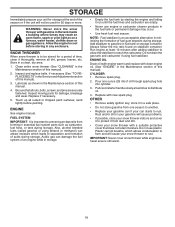
... formation of fuel gum deposits during storage. ENGINE OIL Drain oil (with engine warm) and replace with new spark plug. store it run until the fuel lines and carburetor are securely fastened. sand lightly before storing in the Maintenance section of this manual). Do not drain the gas tank and carburetor if using ethanol or methanol) can starts to protect it to rust. Replace with clean engine oil. (See "ENGINE" in the Maintenance section of this manual). 3. STORAGE Immediately...
... formation of fuel gum deposits during storage. ENGINE OIL Drain oil (with engine warm) and replace with new spark plug. store it run until the fuel lines and carburetor are securely fastened. sand lightly before storing in the Maintenance section of this manual). Do not drain the gas tank and carburetor if using ethanol or methanol) can starts to protect it to rust. Replace with clean engine oil. (See "ENGINE" in the Maintenance section of this manual). 3. STORAGE Immediately...
User Manual
Page 19
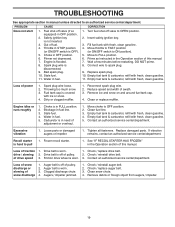
...2. Engine idles or runs roughly 1. Loose parts or damaged augers or impeller. 1. Remove debris or foreign object from augers / impeller. 19 Choke in fuel. 5. Spark plug wire is covered with fresh, clean gasoline. 4. Move throttle to FAST position (or ON/OFF switch to pull 1. Replace spark plug. 10. Empty fuel tank & carburetor, refill with fresh, clean gasoline. 5. See "IF RECOIL STARTER HAS FROZEN" in the Operation section of fuel. 4. Friction drive wheel is worn. 3. Auger belt is worn. 3. Clogged discharge chute. 4. Clean or replace muffler...
...2. Engine idles or runs roughly 1. Loose parts or damaged augers or impeller. 1. Remove debris or foreign object from augers / impeller. 19 Choke in fuel. 5. Spark plug wire is covered with fresh, clean gasoline. 4. Move throttle to FAST position (or ON/OFF switch to pull 1. Replace spark plug. 10. Empty fuel tank & carburetor, refill with fresh, clean gasoline. 5. See "IF RECOIL STARTER HAS FROZEN" in the Operation section of fuel. 4. Friction drive wheel is worn. 3. Auger belt is worn. 3. Clogged discharge chute. 4. Clean or replace muffler...

User Manual
Page 25
... (O.E.M.) replacement parts. MODEL XT627ES (96192004501) CONTROL PANEL / DISCHARGE CHUTE 2 2 *3 1 *7 KEY NO. 1 2 *3 *4 *5 *6 *7 PART NO. 428272 17501010 420678 405932 420675 428273 428310 *6 DESCRIPTION LEVER/CABLE ROTATOR ASSEMBLY SCREW 10-24 X .625 ROTATOR HEAD ROTATOR PIVOT BRACKET PULLEY PIVOT CABLE ASSEMBLY ADJUSTABLE CABLE ASSEMBLY HEAT SHIELD *4 01.09.010-B *5 NOTES: 1. Failure to do so could be hazardous, damage your snow thrower and void your warranty. 25 ITEMS INDICATED WITH AN * ARE LISTED AS REFERENCE FOR SERVICE PARTS...
... (O.E.M.) replacement parts. MODEL XT627ES (96192004501) CONTROL PANEL / DISCHARGE CHUTE 2 2 *3 1 *7 KEY NO. 1 2 *3 *4 *5 *6 *7 PART NO. 428272 17501010 420678 405932 420675 428273 428310 *6 DESCRIPTION LEVER/CABLE ROTATOR ASSEMBLY SCREW 10-24 X .625 ROTATOR HEAD ROTATOR PIVOT BRACKET PULLEY PIVOT CABLE ASSEMBLY ADJUSTABLE CABLE ASSEMBLY HEAT SHIELD *4 01.09.010-B *5 NOTES: 1. Failure to do so could be hazardous, damage your snow thrower and void your warranty. 25 ITEMS INDICATED WITH AN * ARE LISTED AS REFERENCE FOR SERVICE PARTS...
User Manual
Page 40
... purposes is free from date of the product. 6. Battery Warranty: On products equipped with the instructions furnished. The Warranty period for any power equipment unit or attachment are belts, blades, blade adapters, normal wear, normal adjustments, standard hardware and normal maintenance. 7. In the event you have other rights which we will repair or replace, at our option, without charge to an authorized service dealer. Transportation...
... purposes is free from date of the product. 6. Battery Warranty: On products equipped with the instructions furnished. The Warranty period for any power equipment unit or attachment are belts, blades, blade adapters, normal wear, normal adjustments, standard hardware and normal maintenance. 7. In the event you have other rights which we will repair or replace, at our option, without charge to an authorized service dealer. Transportation...


