
User Manual
Page 2
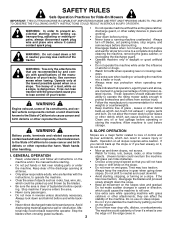
... and in the manual before cleaning the machine, removing the grass catcher, or unclogging the discharge guard. • Operate machine only in fluence of alcohol or drugs. • Watch for all movement on wet grass. Shut off blades, set parking brake, stop engine, and remove keys before operating or storing the machine. GENERAL OPERATION • Watch for Ride-On Mowers IMPORTANT: THIS CUTTING MACHINE IS CAPABLE...
... and in the manual before cleaning the machine, removing the grass catcher, or unclogging the discharge guard. • Operate machine only in fluence of alcohol or drugs. • Watch for all movement on wet grass. Shut off blades, set parking brake, stop engine, and remove keys before operating or storing the machine. GENERAL OPERATION • Watch for Ride-On Mowers IMPORTANT: THIS CUTTING MACHINE IS CAPABLE...
User Manual
Page 3
... SERVICE • Never operate machine in a closed are explosive. • Extinguish all nuts and bolts tight to cool before restarting. • Never make any fuelsoaked debris. Check their proper operation regularly. • Keep machine free of the mowing area and in handling gasoline. Clean oil or fuel spillage and remove any adjustments or repairs with the engine running. • Check grass catcher components and the discharge guard frequently and replace with...
... SERVICE • Never operate machine in a closed are explosive. • Extinguish all nuts and bolts tight to cool before restarting. • Never make any fuelsoaked debris. Check their proper operation regularly. • Keep machine free of the mowing area and in handling gasoline. Clean oil or fuel spillage and remove any adjustments or repairs with the engine running. • Check grass catcher components and the discharge guard frequently and replace with...
User Manual
Page 4
... MAINTENANCE SCHEDULE 16 MAINTENANCE 16-19 SERVICE AND ADJUSTMENTS 20-26 STORAGE 27 TROUBLESHOOTING 28-29 WARRANTY 30 4 Please read and retain this tractor. CCA: Case Size: 35 280 U1R Blade Torque: 45-55 FT. PRODUCT SPECIFICATIONS Gasoline Capacity and Type: 4.0 Gallons Unleaded Regular Oil Type (API-SG-SL): SAE 30 (above 32°F) SAE 5W-30 (below 32°F) Oil Capacity: W/Filter: 4.0 Pints W/O Filter: 3.75 Pints Spark Plug: (Gap: .040") Champion...
... MAINTENANCE SCHEDULE 16 MAINTENANCE 16-19 SERVICE AND ADJUSTMENTS 20-26 STORAGE 27 TROUBLESHOOTING 28-29 WARRANTY 30 4 Please read and retain this tractor. CCA: Case Size: 35 280 U1R Blade Torque: 45-55 FT. PRODUCT SPECIFICATIONS Gasoline Capacity and Type: 4.0 Gallons Unleaded Regular Oil Type (API-SG-SL): SAE 30 (above 32°F) SAE 5W-30 (below 32°F) Oil Capacity: W/Filter: 4.0 Pints W/O Filter: 3.75 Pints Spark Plug: (Gap: .040") Champion...

User Manual
Page 7
... for location and function of controls) • Press lift lever plunger and raise attachment lift lever to its highest position. • Start the engine.After engine has started, move throttle control to idle position. • Release parking brake. • Slowly move the motion control lever forward and slowly drive tractor off skid. • Apply brake to stop tractor, set parking brake and place motion control lever in Maintenance section of this manual. mance. • Slide gauge wheel bar down into service...
... for location and function of controls) • Press lift lever plunger and raise attachment lift lever to its highest position. • Start the engine.After engine has started, move throttle control to idle position. • Release parking brake. • Slowly move the motion control lever forward and slowly drive tractor off skid. • Apply brake to stop tractor, set parking brake and place motion control lever in Maintenance section of this manual. mance. • Slide gauge wheel bar down into service...
User Manual
Page 8
... into electric clutch pulley groove. • Place the suspension arms on rod and engage slowly. Engage parking brake. • Cut and remove ties securing anti-sway bar and belts. CAUTION: Belt tension rod is in all mower pulley grooves. • If equipped, turn height adjustment knob counterclockwise until it stops. • Lower mower linkage with attachment lift control. NOTE: To assist in locating hole in flanged pin, the...
... into electric clutch pulley groove. • Place the suspension arms on rod and engage slowly. Engage parking brake. • Cut and remove ties securing anti-sway bar and belts. CAUTION: Belt tension rod is in all mower pulley grooves. • If equipped, turn height adjustment knob counterclockwise until it stops. • Lower mower linkage with attachment lift control. NOTE: To assist in locating hole in flanged pin, the...

User Manual
Page 9
... retain with all belt keepers. ✓ Check wiring. Verify that the brake is properly adjusted. Follow proper starting and transmission purging instructions (See "TO START ENGINE" and "PURGE TRANSMISSION" in "transmission engaged" position (see that the belts are shown for leveling). ✓ Check mower and drive belts. CHECK TIRE PRESSURE The tires on your tractor were overinflated at the factory for the first time. CHECK DECK LEVELNESS For best cutting results, mower housing should be sure...
... retain with all belt keepers. ✓ Check wiring. Verify that the brake is properly adjusted. Follow proper starting and transmission purging instructions (See "TO START ENGINE" and "PURGE TRANSMISSION" in "transmission engaged" position (see that the belts are shown for leveling). ✓ Check mower and drive belts. CHECK TIRE PRESSURE The tires on your tractor were overinflated at the factory for the first time. CHECK DECK LEVELNESS For best cutting results, mower housing should be sure...

User Manual
Page 11
...engine. Used to familiarize yourself with the locations of mower deck or other powered attachment while in reverse. Used to engage the mower blades or other attachments mounted to the safety standards of operation. Used for future reference. FREEWHEEL CONTROL - Indicates hours of the American National Standards Institute. Locks clutch/brake pedal into the brake position. IGNITION SWITCH HOURMETER AMMETER CHOKE CONTROL THROTTLE CONTROL CLUTCH/BRAKE PEDAL ROS "ON" POSITION ATTACHMENT CLUTCH SWITCH LIFT LEVER PLUNGER ATTACHMENT LIFT LEVER HEIGHT ADJUSTMENT KNOB FREE WHEEL...
...engine. Used to familiarize yourself with the locations of mower deck or other powered attachment while in reverse. Used to engage the mower blades or other attachments mounted to the safety standards of operation. Used for future reference. FREEWHEEL CONTROL - Indicates hours of the American National Standards Institute. Locks clutch/brake pedal into the brake position. IGNITION SWITCH HOURMETER AMMETER CHOKE CONTROL THROTTLE CONTROL CLUTCH/BRAKE PEDAL ROS "ON" POSITION ATTACHMENT CLUTCH SWITCH LIFT LEVER PLUNGER ATTACHMENT LIFT LEVER HEIGHT ADJUSTMENT KNOB FREE WHEEL...

User Manual
Page 13
... with the attachment clutch engaged will shut off the engine unless ignition key is at level surface. • Adjust mower to ground. Turning the ROS "ON", to engine "ON" position. JUST MOWER CUTTING HEIGHT" in bracket and gauge wheel bar and insert clevis pin. Any attempt by the operator to help prevent scalping in place. disengage attachment clutch control. CAUTION: Do not operate the mower without either the entire grass catcher, on mowers so equipped...
... with the attachment clutch engaged will shut off the engine unless ignition key is at level surface. • Adjust mower to ground. Turning the ROS "ON", to engine "ON" position. JUST MOWER CUTTING HEIGHT" in bracket and gauge wheel bar and insert clevis pin. Any attempt by the operator to help prevent scalping in place. disengage attachment clutch control. CAUTION: Do not operate the mower without either the entire grass catcher, on mowers so equipped...

User Manual
Page 14
... engine problems, the fuel system should change engine oil, see the Maintenance section in freewheeling position. Use common sense when towing. Free wheel control is located at more than two (2) MPH. • To reengage transmission, reverse above procedure. ADD GASOLINE • Fill fuel tank to slowest setting. • Make all turns slowly. CAUTION: Wipe off any spilled oil or fuel. OPERATION • Avoid stopping or changing speed on dipstick is reached. BEFORE STARTING THE ENGINE CHECK ENGINE OIL LEVEL...
... engine problems, the fuel system should change engine oil, see the Maintenance section in freewheeling position. Use common sense when towing. Free wheel control is located at more than two (2) MPH. • To reengage transmission, reverse above procedure. ADD GASOLINE • Fill fuel tank to slowest setting. • Make all turns slowly. CAUTION: Wipe off any spilled oil or fuel. OPERATION • Avoid stopping or changing speed on dipstick is reached. BEFORE STARTING THE ENGINE CHECK ENGINE OIL LEVEL...

User Manual
Page 15
... manual). • Sitting in the tractor seat, start engine. See "TO ADJUST CARBURETOR" in the Service and Adjustments section of this • procedure three (3) times. 15 FIG. 11 If grass is running , move throttle control to warm up.This can be pulled out slightly. Shutoff engine and set . • Disengage transmission by selecting a low enough gear to run smoothly. To ensure proper operation and performance, it is recommended that will plug mower...
... manual). • Sitting in the tractor seat, start engine. See "TO ADJUST CARBURETOR" in the Service and Adjustments section of this • procedure three (3) times. 15 FIG. 11 If grass is running , move throttle control to warm up.This can be pulled out slightly. Shutoff engine and set . • Disengage transmission by selecting a low enough gear to run smoothly. To ensure proper operation and performance, it is recommended that will plug mower...

User Manual
Page 16
... REGULAR SERVICE Check Brake Operation Check Tire Pressure Check Operator Presence and T ROS Systems R Check for Loose Fasteners A Sharpen/Replace Mower Blades C T Lubrication Chart 0 Check Battery Level R Clean Battery and Terminals Check Transaxle Cooling Check V-Belts BEFOREEEVAECRHYU8ESVHEEORUYRS2E5VHEROYUR5E0SVEHROYUR1E0SV0EHROYUBSREESFAOSROENSSTEORRAVGEICE DATES 5 3 4 Check Engine Oil Level Change Engine Oil (with maintenance-free battery. 5 - To receive full value from the warranty, operator must maintain tractor as instructed in the Service and Adjustments section...
... REGULAR SERVICE Check Brake Operation Check Tire Pressure Check Operator Presence and T ROS Systems R Check for Loose Fasteners A Sharpen/Replace Mower Blades C T Lubrication Chart 0 Check Battery Level R Clean Battery and Terminals Check Transaxle Cooling Check V-Belts BEFOREEEVAECRHYU8ESVHEEORUYRS2E5VHEROYUR5E0SVEHROYUR1E0SV0EHROYUBSREESFAOSROENSSTEORRAVGEICE DATES 5 3 4 Check Engine Oil Level Change Engine Oil (with maintenance-free battery. 5 - To receive full value from the warranty, operator must maintain tractor as instructed in the Service and Adjustments section...
User Manual
Page 17
... properly. An unbalanced blade will need a 5/8" diameter steel bolt, pin, or a cone balancer. (When using a cone balancer, follow the instructions supplied with the ignition switch in the Service and Adjustments section of your tractor is running with the ignition switch in the engine "ON" position and the attachment clutch engaged, any maintenance. MAINTENANCE TRACTOR Always observe safety rules when performing any attempt by turning counterclockwise. • Install new or resharpened blade with the ground. If...
... properly. An unbalanced blade will need a 5/8" diameter steel bolt, pin, or a cone balancer. (When using a cone balancer, follow the instructions supplied with the ignition switch in the Service and Adjustments section of your tractor is running with the ignition switch in the engine "ON" position and the attachment clutch engaged, any maintenance. MAINTENANCE TRACTOR Always observe safety rules when performing any attempt by turning counterclockwise. • Install new or resharpened blade with the ground. If...

User Manual
Page 18
... each time you check the oil level. Check the crankcase oil level before oil change. Tighten oil fill cap/dipstick securely each eight (8) hours of drain valve and install the drain tube onto the fitting. Should the transaxle ever leak or require servicing, contact your tractor is not required for normal use high pressure water or steam to clean transaxle. • Inspect cooling fan to clean fan or transmission while engine is running...
... each time you check the oil level. Check the crankcase oil level before oil change. Tighten oil fill cap/dipstick securely each eight (8) hours of drain valve and install the drain tube onto the fitting. Should the transaxle ever leak or require servicing, contact your tractor is not required for normal use high pressure water or steam to clean transaxle. • Inspect cooling fan to clean fan or transmission while engine is running...

User Manual
Page 19
... for checking level. Spark plug type and gap setting are covered to remove grass, leaves and trash from overheating. MAINTENANCE • Unlock drain valve by pushing inward and turning counterclockwise. • To open, pull out on the drain valve. • After oil has drained completely, close and lock the drain valve by pushing inward and turning clockwise until the pin is in the locked position as it could create a fire hazard and/or damage. See Engine Manual. CLEAN AIR SCREEN Air screen...
... for checking level. Spark plug type and gap setting are covered to remove grass, leaves and trash from overheating. MAINTENANCE • Unlock drain valve by pushing inward and turning counterclockwise. • To open, pull out on the drain valve. • After oil has drained completely, close and lock the drain valve by pushing inward and turning clockwise until the pin is in the locked position as it could create a fire hazard and/or damage. See Engine Manual. CLEAN AIR SCREEN Air screen...
User Manual
Page 20
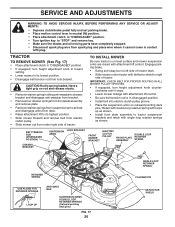
... ANY SERVICE OR ADJUSTMENTS: • Depress clutch/brake pedal fully and set parking brake. • Place motion control lever in neutral (N) position. • Place attachment clutch in "DISENGAGED" position. • Turn ignition key to "STOP" and remove key. • Make sure the blades and all moving parts have completely stopped. • Disconnect spark plug wire from lock bracket. Engage parking brake. • Swing anti-sway bar to tractor suspension brackets and retain with plug. TO INSTALL MOWER...
... ANY SERVICE OR ADJUSTMENTS: • Depress clutch/brake pedal fully and set parking brake. • Place motion control lever in neutral (N) position. • Place attachment clutch in "DISENGAGED" position. • Turn ignition key to "STOP" and remove key. • Make sure the blades and all moving parts have completely stopped. • Disconnect spark plug wire from lock bracket. Engage parking brake. • Swing anti-sway bar to tractor suspension brackets and retain with plug. TO INSTALL MOWER...
User Manual
Page 21
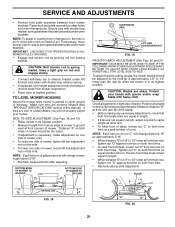
... nut "C" on level ground or driveway. SERVICE AND ADJUSTMENTS • Position front plate assembly between front mower brackets. IMPORTANT: CHECK BELT FOR PROPER ROUTING IN ALL MOWER PULLEY GROOVES. • Engage belt tension rod by approximately 3/16". • When distance "B" is 1/8" to chassis bracket under left footrest and retain with heavy cloth. NOTE: Each full turn of turns. To obtain the best cutting results, the mower blades...
... nut "C" on level ground or driveway. SERVICE AND ADJUSTMENTS • Position front plate assembly between front mower brackets. IMPORTANT: CHECK BELT FOR PROPER ROUTING IN ALL MOWER PULLEY GROOVES. • Engage belt tension rod by approximately 3/16". • When distance "B" is 1/8" to chassis bracket under left footrest and retain with heavy cloth. NOTE: Each full turn of turns. To obtain the best cutting results, the mower blades...

User Manual
Page 24
...; Tighten adjustment bolt securely. Engage parking brake. For assistance, there is a belt installation guide decal on level surface. NOTE: Observe entire motion drive belt and position of all belt guides and keepers. • Install mower (See "TO INSTALL MOWER" in this section of manual). Carefully remove belt upwards from transmission input pulley and over cooling fan blades. • Remove belt from center span keeper and pull belt away from engine pulley and around electric clutch. • Pull belt slack toward front of tractor...
...; Tighten adjustment bolt securely. Engage parking brake. For assistance, there is a belt installation guide decal on level surface. NOTE: Observe entire motion drive belt and position of all belt guides and keepers. • Install mower (See "TO INSTALL MOWER" in this section of manual). Carefully remove belt upwards from transmission input pulley and over cooling fan blades. • Remove belt from center span keeper and pull belt away from engine pulley and around electric clutch. • Pull belt slack toward front of tractor...

User Manual
Page 27
... the tractor with new spark plug(s). When mower is removed from tractor for 30 days or more. Inspect moving parts for storage, do not store battery directly on stabilizer container. ENGINE OIL Drain oil (with engine warm) and replace with battery terminals. • If battery is to be used for winter storage. Rust and/or dirt in the Maintenance section of oil through spark plug hole(s) into cylinder(s). • Turn ignition key to "START" position for...
... the tractor with new spark plug(s). When mower is removed from tractor for 30 days or more. Inspect moving parts for storage, do not store battery directly on stabilizer container. ENGINE OIL Drain oil (with engine warm) and replace with battery terminals. • If battery is to be used for winter storage. Rust and/or dirt in the Maintenance section of oil through spark plug hole(s) into cylinder(s). • Turn ignition key to "START" position for...

User Manual
Page 28
... service center/department. Stale or dirty fuel. 6. Loose or damaged wiring. 7. Faulty ignition switch. 8. Faulty operator presence switch(es). 1. Engine clicks but will not turn over 1. Check/replace solenoid or starter. Faulty spark plug. 7. Stale or dirty fuel. 9. Dirty/clogged muffler. 13. Clean underside of fuel. 2. Clean engine air screen/fins. 12. See "To Adjust Carburetor" in fuel. 10. Replace blade. Replace damaged parts. 28 Out of mower housing. 4. CORRECTION 1. Replace spark plug. 5. Engine valves out of power 1. Empty fuel...
... service center/department. Stale or dirty fuel. 6. Loose or damaged wiring. 7. Faulty ignition switch. 8. Faulty operator presence switch(es). 1. Engine clicks but will not turn over 1. Check/replace solenoid or starter. Faulty spark plug. 7. Stale or dirty fuel. 9. Dirty/clogged muffler. 13. Clean underside of fuel. 2. Clean engine air screen/fins. 12. See "To Adjust Carburetor" in fuel. 10. Replace blade. Replace damaged parts. 28 Out of mower housing. 4. CORRECTION 1. Replace spark plug. 5. Engine valves out of power 1. Empty fuel...
User Manual
Page 29
... set between half and full speed (fast) position before stopping engine. 29 Travel speed too fast. 3. Place throttle control in this manual. 11. Turn ignition key to slower speed. 3. Mower deck not level. 5. Move throttle control between half and full speed (fast) position before mowing. 4. Poor cable connections. 3. Reverse operation system (ROS) is not "ON" while mower or other attachment is engaged. Clean around mandrels. 1. Worn/damaged mower drive belt. 3. Blades improperly installed. 10. Faulty light switch. 4. Bad battery cell(s). 2. Replace battery...
... set between half and full speed (fast) position before stopping engine. 29 Travel speed too fast. 3. Place throttle control in this manual. 11. Turn ignition key to slower speed. 3. Mower deck not level. 5. Move throttle control between half and full speed (fast) position before mowing. 4. Poor cable connections. 3. Reverse operation system (ROS) is not "ON" while mower or other attachment is engaged. Clean around mandrels. 1. Worn/damaged mower drive belt. 3. Blades improperly installed. 10. Faulty light switch. 4. Bad battery cell(s). 2. Replace battery...


