
User Manual
Page 2
... care while operating machine with the instructions, to cause cancer and birth defects or other safety devices in a large percentage of riding mower-related injuries. Always look down before cleaning the machine, removing the grass catcher, or unclogging the discharge guard. • Operate machine... requires extra caution. Tires can cause build-up and down slopes. These operators should evaluate their ability to operate the riding mower safely enough to cool before dismounting. • Disengage blades when not mowing. Allow machine to protect themselves and others from ...
... care while operating machine with the instructions, to cause cancer and birth defects or other safety devices in a large percentage of riding mower-related injuries. Always look down before cleaning the machine, removing the grass catcher, or unclogging the discharge guard. • Operate machine... requires extra caution. Tires can cause build-up and down slopes. These operators should evaluate their ability to operate the riding mower safely enough to cool before dismounting. • Disengage blades when not mowing. Allow machine to protect themselves and others from ...

User Manual
Page 3
... operate the machine. • Use extra care when approaching blind corners, shrubs, trees, or other objects that has a hitch designed for Ride-On Mowers III. Do not use extreme care in safe working condition. • Never tamper with manufacturer's recommended parts, when necessary. •...; Mower blades are explosive. • Extinguish all nuts and bolts tight to cool before refueling. • Never fuel the machine indoors. • Never store...
... operate the machine. • Use extra care when approaching blind corners, shrubs, trees, or other objects that has a hitch designed for Ride-On Mowers III. Do not use extreme care in safe working condition. • Never tamper with manufacturer's recommended parts, when necessary. •...; Mower blades are explosive. • Extinguish all nuts and bolts tight to cool before refueling. • Never fuel the machine indoors. • Never store...

User Manual
Page 8
...be properly inflated for leveling). ✓ Check mower and drive belts. See"TO LEVEL MOWER HOUSING"in the Service and Adjustments section of this manual). See that are shown for replacing motion and mower blade drive belts in "transmission engaged" position (see that.... Verify that the brake is in the Service and Adjustments section of this manual. CHECK DECK LEVELNESS For best cutting results, mower housing should be sure freewheel control is properly adjusted. PLEASE REVIEW THE FOLLOWING CHECKLIST: ✓ All assembly instructions have been completed...
...be properly inflated for leveling). ✓ Check mower and drive belts. See"TO LEVEL MOWER HOUSING"in the Service and Adjustments section of this manual). See that are shown for replacing motion and mower blade drive belts in "transmission engaged" position (see that.... Verify that the brake is in the Service and Adjustments section of this manual. CHECK DECK LEVELNESS For best cutting results, mower housing should be sure freewheel control is properly adjusted. PLEASE REVIEW THE FOLLOWING CHECKLIST: ✓ All assembly instructions have been completed...

User Manual
Page 9
... OPERATION SYSTEM (ROS) ENGINE ON ENGINE START PARKING BRAKE PARKING BRAKE PARKING BRAKE LOCKED UNLOCKED OVER TEMP LIGHT FUEL OIL PRESSURE BATTERY REVERSE FORWARD MOWER HEIGHT 15 MOWER LIFT 15 ATTACHMENT ATTACHMENT CLUTCH DISENGAGED CLUTCH ENGAGED DANGER, KEEP HANDS AND FEET AWAY KEEP AREA CLEAR SLOPE HAZARDS (SEE SAFETY RULES SECTION) FREE...
... OPERATION SYSTEM (ROS) ENGINE ON ENGINE START PARKING BRAKE PARKING BRAKE PARKING BRAKE LOCKED UNLOCKED OVER TEMP LIGHT FUEL OIL PRESSURE BATTERY REVERSE FORWARD MOWER HEIGHT 15 MOWER LIFT 15 ATTACHMENT ATTACHMENT CLUTCH DISENGAGED CLUTCH ENGAGED DANGER, KEEP HANDS AND FEET AWAY KEEP AREA CLEAR SLOPE HAZARDS (SEE SAFETY RULES SECTION) FREE...

User Manual
Page 10
...the American National Standards Institute. HEIGHT ADJUSTMENT KNOB - Used for pushing or slowly towing the tractor with the locations of mower deck or other attachments mounted to your tractor. REVERSE OPERATION SYSTEM (ROS) "ON" POSITION - Allows operation of various... LEVER PLUNGER - ATTACHMENT LIFT LEVER - CLUTCH/BRAKE PEDAL - PARKING BRAKE - THROTTLE CONTROL - LIGHT SWITCH - Used to engage the mower blades or other powered attachment while in reverse. 10 Used for future reference. MOTION CONTROL LEVER - FREEWHEEL CONTROL - Disengages transmission for ...
...the American National Standards Institute. HEIGHT ADJUSTMENT KNOB - Used for pushing or slowly towing the tractor with the locations of mower deck or other attachments mounted to your tractor. REVERSE OPERATION SYSTEM (ROS) "ON" POSITION - Allows operation of various... LEVER PLUNGER - ATTACHMENT LIFT LEVER - CLUTCH/BRAKE PEDAL - PARKING BRAKE - THROTTLE CONTROL - LIGHT SWITCH - Used to engage the mower blades or other powered attachment while in reverse. 10 Used for future reference. MOTION CONTROL LEVER - FREEWHEEL CONTROL - Disengages transmission for ...

User Manual
Page 11
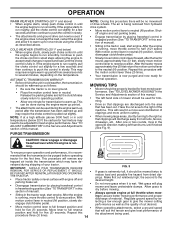
...). Do not use choke to the blade tip with the engine running, hot engine exhaust gases may cause "browning" of grass. TO ADJUST MOWER CUTTING HEIGHT (See Fig. 5) The cutting height is running . For healthier and better looking lawns, mow often and after moderate growth. •...at full throttle. • Operating engine at less than full throttle reduces the battery charging rate. • Full throttle offers the best bagging and mower perfor- CAUTION: Always stop ground drive, depress clutch/brake pedal into full "BRAKE" position. • Move motion control lever to start a warm...
...). Do not use choke to the blade tip with the engine running, hot engine exhaust gases may cause "browning" of grass. TO ADJUST MOWER CUTTING HEIGHT (See Fig. 5) The cutting height is running . For healthier and better looking lawns, mow often and after moderate growth. •...at full throttle. • Operating engine at less than full throttle reduces the battery charging rate. • Full throttle offers the best bagging and mower perfor- CAUTION: Always stop ground drive, depress clutch/brake pedal into full "BRAKE" position. • Move motion control lever to start a warm...

User Manual
Page 12
... or cutting off when operating your equipment on rough, rolling terrain or hills. • Select desired height of cut . • Lower mower with the attachment engaged. You must remain fully and centrally positioned in desired height of cut position, gauge wheels should only be assembled so ...side installing gauge wheel in place. Gauge wheels then keep the deck in proper position to travel in the reverse direction with tractor on mowers so equipped,or the deflector shield in same adjustment hole. OPERATION TO ADJUST GAUGE WHEELS (See Fig. 6) Gauge wheels are...
... or cutting off when operating your equipment on rough, rolling terrain or hills. • Select desired height of cut . • Lower mower with the attachment engaged. You must remain fully and centrally positioned in desired height of cut position, gauge wheels should only be assembled so ...side installing gauge wheel in place. Gauge wheels then keep the deck in proper position to travel in the reverse direction with tractor on mowers so equipped,or the deflector shield in same adjustment hole. OPERATION TO ADJUST GAUGE WHEELS (See Fig. 6) Gauge wheels are...
User Manual
Page 14
... to accept small changes in speed and load, until the choke control is recommended that clippings will suit the terrain and give the mower cutting performance as well as described above. Move lever to full forward position and hold for five (5) seconds. Wet grass...and performance, it to several minutes, depending on level ground. • Place the motion control lever in neutral. This procedure will plug mower and leave undesirable clumps. After the engine • is run roughly, pull the choke control out slightly for best mowing performance. the ...
... to accept small changes in speed and load, until the choke control is recommended that clippings will suit the terrain and give the mower cutting performance as well as described above. Move lever to full forward position and hold for five (5) seconds. Wet grass...and performance, it to several minutes, depending on level ground. • Place the motion control lever in neutral. This procedure will plug mower and leave undesirable clumps. After the engine • is run roughly, pull the choke control out slightly for best mowing performance. the ...
User Manual
Page 15
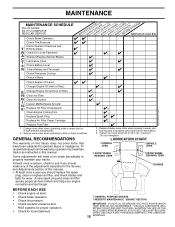
.... • Check brake operation. • Check tire pressure. • Check operator presence and ROS systems for proper operation. • Check for Loose Fasteners A Sharpen/Replace Mower Blades C T Lubrication Chart 0 Check Battery Level R Clean Battery and Terminals Check Transaxle Cooling Check V-Belts BEFOREEEVAECRHYU8ESVHEEORUYRS2E5VHEROYUR5E0SVEHROYUR1E0SV0EHROYUBSREESFAOSROENSSTEORRAVGEICE DATES 5 3 4 Check Engine Oil Level Change Engine Oil (with...
.... • Check brake operation. • Check tire pressure. • Check operator presence and ROS systems for proper operation. • Check for Loose Fasteners A Sharpen/Replace Mower Blades C T Lubrication Chart 0 Check Battery Level R Clean Battery and Terminals Check Transaxle Cooling Check V-Belts BEFOREEEVAECRHYU8ESVHEEORUYRS2E5VHEROYUR5E0SVEHROYUR1E0SV0EHROYUBSREESFAOSROENSSTEORRAVGEICE DATES 5 3 4 Check Engine Oil Level Change Engine Oil (with...
User Manual
Page 16
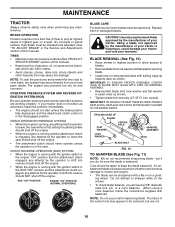
...any attempt by the operator to keep the blade balanced. ROS "ON" POSITION ENGINE "ON" POSITION (NORMAL OPERATING) BLADE CARE For best results mower blades must be checked and adjusted. (See "TO ADJUST BRAKE" in all tires (See"PRODUCT SPECIFICATIONS" section of gasoline, oil, or insect ... a 5/8" diameter steel bolt, pin, or a cone balancer. (When using a cone balancer, follow the instructions supplied with a file or on the mower. • To check blade balance, you do not recommend sharpening blade - If your tractor. Do not attempt to blades. • Remove blade bolt, lock...
...any attempt by the operator to keep the blade balanced. ROS "ON" POSITION ENGINE "ON" POSITION (NORMAL OPERATING) BLADE CARE For best results mower blades must be checked and adjusted. (See "TO ADJUST BRAKE" in all tires (See"PRODUCT SPECIFICATIONS" section of gasoline, oil, or insect ... a 5/8" diameter steel bolt, pin, or a cone balancer. (When using a cone balancer, follow the instructions supplied with a file or on the mower. • To check blade balance, you do not recommend sharpening blade - If your tractor. Do not attempt to blades. • Remove blade bolt, lock...
User Manual
Page 18
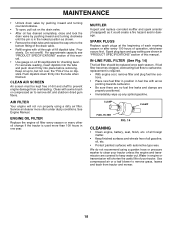
... keep water out. We do not recommend using a dirty air filter. Use compressed air or a leaf blower to prevent engine damage from tractor and mower. 18 See Engine Manual. For approximate capacity see "PRODUCT SPECIFICATIONS" section of this manual. • Use gauge on dipstick. Clean with oil through oil fi...
... keep water out. We do not recommend using a dirty air filter. Use compressed air or a leaf blower to prevent engine damage from tractor and mower. 18 See Engine Manual. For approximate capacity see "PRODUCT SPECIFICATIONS" section of this manual. • Use gauge on dipstick. Clean with oil through oil fi...

User Manual
Page 19
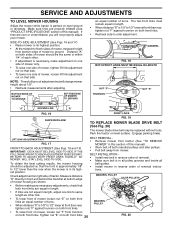
... spring, slide collar off and push housing guide out of tractor. • Place attachment clutch in contact with plug. TRACTOR TO REMOVE MOWER (See Fig. 15) Mower will be easier to remove from spark plug and place wire where it cannot come in "DISENGAGED" position. • Move attachment lift ...on idler pulley bolt and secure with small retainer spring. • Install belt onto engine pulley. IMPORTANT: IF AN ATTACHMENT OTHER THAN THE MOWER DECK IS TO BE MOUNTED ON THE TRACTOR, REMOVE THE FRONT LINKS AND HOOKTHE CLUTCH SPRING INTO SQUARE HOLE IN FRAME. SERVICE AND ADJUSTMENTS WARNING...
... spring, slide collar off and push housing guide out of tractor. • Place attachment clutch in contact with plug. TRACTOR TO REMOVE MOWER (See Fig. 15) Mower will be easier to remove from spark plug and place wire where it cannot come in "DISENGAGED" position. • Move attachment lift ...on idler pulley bolt and secure with small retainer spring. • Install belt onto engine pulley. IMPORTANT: IF AN ATTACHMENT OTHER THAN THE MOWER DECK IS TO BE MOUNTED ON THE TRACTOR, REMOVE THE FRONT LINKS AND HOOKTHE CLUTCH SPRING INTO SQUARE HOLE IN FRAME. SERVICE AND ADJUSTMENTS WARNING...
User Manual
Page 20
... are not equal in flated (See "PRODUCT SPECIFICATIONS" section of turns. SIDE-TO-SIDE ADJUSTMENT (See Figs. 16 and 17) • Raise mower to same length as shown. tions. Measure distance "D" directly in length. • When distance "D" is 1/8" to 1/2" lower at front than rear, ... • Recheck side-to 1/2" lower than rear, tighten nut "F" against trunnion on both front links 20 FIG. 20 Distance "A" on both sides of mower loosen nut "E" on both front links. MANDREL "D" "D" FIG. 18 BOTH FRONT LINKS MUST BE EQUAL IN LENGTH NUT "F" TRUNNION NUT "E" "A" GROUND LINE...
... are not equal in flated (See "PRODUCT SPECIFICATIONS" section of turns. SIDE-TO-SIDE ADJUSTMENT (See Figs. 16 and 17) • Raise mower to same length as shown. tions. Measure distance "D" directly in length. • When distance "D" is 1/8" to 1/2" lower at front than rear, ... • Recheck side-to 1/2" lower than rear, tighten nut "F" against trunnion on both front links 20 FIG. 20 Distance "A" on both sides of mower loosen nut "E" on both front links. MANDREL "D" "D" FIG. 18 BOTH FRONT LINKS MUST BE EQUAL IN LENGTH NUT "F" TRUNNION NUT "E" "A" GROUND LINE...
User Manual
Page 21
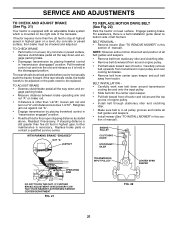
.... • Remove belt from stationary idler and clutching idler. • Remove belt downward from tractor. BELT REMOVAL • Remove mower (See "TO REMOVE MOWER" in this sec- ENGINE PULLEY CLUTCHING IDLER STATIONARY IDLER OPERATING ARM 01513 DO NOT TOUCH THIS NUT. TO ADJUST BRAKE • ...Depress clutch/brake pedal all belt guides and keepers. • Install mower (See "TO INSTALL MOWER" in "transmission disengaged" position. Pull freewheel control out and into the center span keeper. • Pull belt toward front of...
.... • Remove belt from stationary idler and clutching idler. • Remove belt downward from tractor. BELT REMOVAL • Remove mower (See "TO REMOVE MOWER" in this sec- ENGINE PULLEY CLUTCHING IDLER STATIONARY IDLER OPERATING ARM 01513 DO NOT TOUCH THIS NUT. TO ADJUST BRAKE • ...Depress clutch/brake pedal all belt guides and keepers. • Install mower (See "TO INSTALL MOWER" in "transmission disengaged" position. Pull freewheel control out and into the center span keeper. • Pull belt toward front of...
User Manual
Page 22
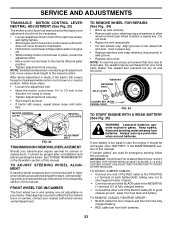
... lever in front of this manual). See"PURGETRANSMISSION" in the Assembly section of the right rear wheel, and lightly tighten. • Start engine and move mower deck height to 1/2 inch in the MAINTENANCE section of this procedure: IMPORTANT: YOUR TRACTOR IS EQUIPPED WITH A 12 VOLT SYSTEM. WASHERS RETAINING RING AXLE COVER...
... lever in front of this manual). See"PURGETRANSMISSION" in the Assembly section of the right rear wheel, and lightly tighten. • Start engine and move mower deck height to 1/2 inch in the MAINTENANCE section of this procedure: IMPORTANT: YOUR TRACTOR IS EQUIPPED WITH A 12 VOLT SYSTEM. WASHERS RETAINING RING AXLE COVER...
User Manual
Page 24
...with gasoline in contact with a suitable protective cover that all nuts, bolts and screws are empty. • Never use plastic. TRACTOR Remove mower from dust and dirt. • Cover your tractor with battery terminals. • If battery is removed from tractor for storage, do ...permanent damage may reach an open flame or spark. IMPORTANT: NEVER COVERTRACTORWHILE ENGINE AND EXHAUST AREAS ARE STILL WARM. 24 When mower is an acceptable alternative in the Maintenance section of this manual). • After cleaning, leave cables disconnected and place cables where they...
...with gasoline in contact with a suitable protective cover that all nuts, bolts and screws are empty. • Never use plastic. TRACTOR Remove mower from dust and dirt. • Cover your tractor with battery terminals. • If battery is removed from tractor for storage, do ...permanent damage may reach an open flame or spark. IMPORTANT: NEVER COVERTRACTORWHILE ENGINE AND EXHAUST AREAS ARE STILL WARM. 24 When mower is an acceptable alternative in the Maintenance section of this manual). • After cleaning, leave cables disconnected and place cables where they...

User Manual
Page 25
... Connect and tighten spark plug wire. 11. See "To Adjust Carburetor" in Service Adjustments section. 15. Tighten blade bolt. 2. Out of mower housing. 4. Loose or damaged wiring. 9. CORRECTION 1. Weak or dead battery. 4. Corroded battery terminals. 6. Faulty ignition switch. 8. Depress... Clean engine air screen/fins. 12. Dirty fuel filter. 7. Engine valves out of grass, leaves and trash under mower. 4. Check all wiring. 4. Contact an authorized service center/department. Loose/damaged part(s). 1. Contact an authorized service center/department. Dirty...
... Connect and tighten spark plug wire. 11. See "To Adjust Carburetor" in Service Adjustments section. 15. Tighten blade bolt. 2. Out of mower housing. 4. Loose or damaged wiring. 9. CORRECTION 1. Weak or dead battery. 4. Corroded battery terminals. 6. Faulty ignition switch. 8. Depress... Clean engine air screen/fins. 12. Dirty fuel filter. 7. Engine valves out of grass, leaves and trash under mower. 4. Check all wiring. 4. Contact an authorized service center/department. Loose/damaged part(s). 1. Contact an authorized service center/department. Dirty...

User Manual
Page 26
... Engine speed too slow. 2. Low/uneven tire air pressure. 6. Check tires for proper air pressure. 6. Clean underside of mower housing. 4. Replace mower drive belt. 9. Replace with attachment clutch engaged 1. Loose or damaged wiring. 5. Turn light switch "ON". 2. Replace bulb...See Operation section. 1. Poor cut - Buildup of grass, leaves and trash under mower. 4. Worn/damaged mower drive belt. 3. Replace mower drive belt. 3. Buildup of grass, leaves, and trash under mower. 8. Mower drive belt worn. 9. Faulty light switch. 4. Check/replace light switch. 4. ...
... Engine speed too slow. 2. Low/uneven tire air pressure. 6. Check tires for proper air pressure. 6. Clean underside of mower housing. 4. Replace mower drive belt. 9. Replace with attachment clutch engaged 1. Loose or damaged wiring. 5. Turn light switch "ON". 2. Replace bulb...See Operation section. 1. Poor cut - Buildup of grass, leaves and trash under mower. 4. Worn/damaged mower drive belt. 3. Replace mower drive belt. 3. Buildup of grass, leaves, and trash under mower. 8. Mower drive belt worn. 9. Faulty light switch. 4. Check/replace light switch. 4. ...


