
User Manual
Page 2
... extra caution. WARNING Engine exhaust, some of its constituents, and certain vehicle components contain or emit chemicals known to plow leaves or other attachments; Shut off blades, set parking brake, stop or shift while on steep slopes. • Do not try to prevent accidental starting when setting up, transporting, adjusting or making repairs, always disconnect spark plug wire and place wire where it...
... extra caution. WARNING Engine exhaust, some of its constituents, and certain vehicle components contain or emit chemicals known to plow leaves or other attachments; Shut off blades, set parking brake, stop or shift while on steep slopes. • Do not try to prevent accidental starting when setting up, transporting, adjusting or making repairs, always disconnect spark plug wire and place wire where it...

User Manual
Page 3
...; Avoid starting, stopping, or turning on slopes unless necessary, and then, turn machine off if a child enters the area. • Before and while backing, look behind before operating. Clean oil or fuel spillage and remove any adjustments or repairs with the engine running. • Check grass catcher components and the discharge guard frequently and replace with manufacturer's recommended parts, when necessary. • Mower blades are often attracted to be run - Replace gas cap and...
...; Avoid starting, stopping, or turning on slopes unless necessary, and then, turn machine off if a child enters the area. • Before and while backing, look behind before operating. Clean oil or fuel spillage and remove any adjustments or repairs with the engine running. • Check grass catcher components and the discharge guard frequently and replace with manufacturer's recommended parts, when necessary. • Mower blades are often attracted to be run - Replace gas cap and...
User Manual
Page 4
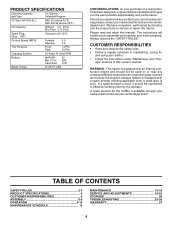
... SERVICE AND ADJUSTMENTS 19-23 STORAGE 24 TROUBLESHOOTING 25-26 WARRANTY 27 4 We have competent, well-trained technicians and the proper tools to assemble and maintain your purchase of this owner's manual. PRODUCT SPECIFICATIONS Gasoline Capacity and Type: 3.5 Gallons Unleaded Regular Oil Type (API-SG-SL): SAE 30 (above 32°F) SAE 5W-30 (below 32°F) Oil Capacity: W/Filter: 4.0 Pints W/o Filter: 3.75 Pints Spark Plug: (Gap: .040") Champion QC12YC Ground Speed...
... SERVICE AND ADJUSTMENTS 19-23 STORAGE 24 TROUBLESHOOTING 25-26 WARRANTY 27 4 We have competent, well-trained technicians and the proper tools to assemble and maintain your purchase of this owner's manual. PRODUCT SPECIFICATIONS Gasoline Capacity and Type: 3.5 Gallons Unleaded Regular Oil Type (API-SG-SL): SAE 30 (above 32°F) SAE 5W-30 (below 32°F) Oil Capacity: W/Filter: 4.0 Pints W/o Filter: 3.75 Pints Spark Plug: (Gap: .040") Champion QC12YC Ground Speed...

User Manual
Page 7
... SHOULDER BOLT 02466 FLAT WASHER ADJUSTMENT KNOB 02464 FIG. 2 CHECK BATTERY (See Fig. 3) • Lift hood to raised position. • If this battery is put into service after month and year indicated on seat in operating position, depress clutch/brake pedal and set parking brake and place motion control lever in a well-ventilated area. Follow the appropriate instruction below to "STOP" position. Be sure tractor is in neutral position. • Turn ignition...
... SHOULDER BOLT 02466 FLAT WASHER ADJUSTMENT KNOB 02464 FIG. 2 CHECK BATTERY (See Fig. 3) • Lift hood to raised position. • If this battery is put into service after month and year indicated on seat in operating position, depress clutch/brake pedal and set parking brake and place motion control lever in a well-ventilated area. Follow the appropriate instruction below to "STOP" position. Be sure tractor is in neutral position. • Turn ignition...

User Manual
Page 8
... "TO ADJUST BRAKE" in the Service and Adjustments section of this manual. Operate them before you learn how to operate your tractor, check to purge the transmission before operating your tractor were overinflated at the factory for leveling). ✓ Check mower and drive belts. CHECK BRAKE SYSTEM After you start the engine. ✓ Be sure brake system is properly adjusted. CHECK DECK LEVELNESS For best cutting results, mower housing should be sure freewheel control is in "transmission engaged" position (see...
... "TO ADJUST BRAKE" in the Service and Adjustments section of this manual. Operate them before you learn how to operate your tractor, check to purge the transmission before operating your tractor were overinflated at the factory for leveling). ✓ Check mower and drive belts. CHECK BRAKE SYSTEM After you start the engine. ✓ Be sure brake system is properly adjusted. CHECK DECK LEVELNESS For best cutting results, mower housing should be sure freewheel control is in "transmission engaged" position (see...

User Manual
Page 10
... CONTROL LEVER - REVERSE OPERATION SYSTEM (ROS) "ON" POSITION - Used to engage the mower blades or other powered attachment while in reverse. 10 Turns the headlights on and off . Selects the speed and direction of various controls and adjustments. CHOKE CONTROL - Disengages transmission for future reference. Save this manual for pushing or slowly towing the tractor with the locations of tractor. Used when starting the engine. Used to your tractor. CLUTCH/BRAKE PEDAL - HEIGHT ADJUSTMENT KNOB - Used to control engine speed. THROTTLE CONTROL - CHOKE...
... CONTROL LEVER - REVERSE OPERATION SYSTEM (ROS) "ON" POSITION - Used to engage the mower blades or other powered attachment while in reverse. 10 Turns the headlights on and off . Selects the speed and direction of various controls and adjustments. CHOKE CONTROL - Disengages transmission for future reference. Save this manual for pushing or slowly towing the tractor with the locations of tractor. Used when starting the engine. Used to your tractor. CLUTCH/BRAKE PEDAL - HEIGHT ADJUSTMENT KNOB - Used to control engine speed. THROTTLE CONTROL - CHOKE...

User Manual
Page 12
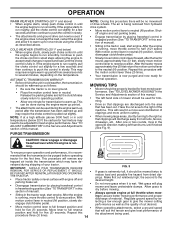
... of cut position, gauge wheels should only be assembled so they are slightly off the ground. USING THE REVERSE OPERATION SYSTEM - • Move motion control lever to neutral (N) position. • With engine running and the attachment clutch engaged will shut off the engine unless ignition key is no longer needed, turn ignition key counterclockwise to ROS "ON" position. • Look down and behind before starting up or down hills. JUST MOWER CUTTING HEIGHT...
... of cut position, gauge wheels should only be assembled so they are slightly off the ground. USING THE REVERSE OPERATION SYSTEM - • Move motion control lever to neutral (N) position. • With engine running and the attachment clutch engaged will shut off the engine unless ignition key is no longer needed, turn ignition key counterclockwise to ROS "ON" position. • Look down and behind before starting up or down hills. JUST MOWER CUTTING HEIGHT...

User Manual
Page 13
... fast position • Pull choke control out for the first time or if the engine Transmission Disengaged FIG. 8 TOWING CARTS AND OTHER ATTACHMENTS Tow only the attachments that can be used within 30 days to tractor (rope, cord, etc.). Acidic gas can lose traction with the ground and cause you should be emptied before storage of your tractor, be needed. Use fresh fuel next season. TO START ENGINE (See...
... fast position • Pull choke control out for the first time or if the engine Transmission Disengaged FIG. 8 TOWING CARTS AND OTHER ATTACHMENTS Tow only the attachments that can be used within 30 days to tractor (rope, cord, etc.). Acidic gas can lose traction with the ground and cause you should be emptied before storage of your tractor, be needed. Use fresh fuel next season. TO START ENGINE (See...
User Manual
Page 14
... of drive wheels. Repeat this procedure with engine off and parking brake set parking brake. • Engage transmission by placing freewheel control in freewheeling position (See "TO TRANSPORT" in cold weather, the transmission should be used . See "TO LEVEL MOWER HOUSING" in the Service and Adjustments section of this procedure there will discharge away from several seconds to run roughly, pull the choke control out slightly for the first time...
... of drive wheels. Repeat this procedure with engine off and parking brake set parking brake. • Engage transmission by placing freewheel control in freewheeling position (See "TO TRANSPORT" in cold weather, the transmission should be used . See "TO LEVEL MOWER HOUSING" in the Service and Adjustments section of this procedure there will discharge away from several seconds to run roughly, pull the choke control out slightly for the first time...
User Manual
Page 15
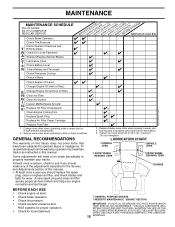
...Replace Mower Blades C T Lubrication Chart 0 Check Battery Level R Clean Battery and Terminals Check Transaxle Cooling Check V-Belts BEFOREEEVAECRHYU8ESVHEEORUYRS2E5VHEROYUR5E0SVEHROYUR1E0SV0EHROYUBSREESFAOSROENSSTEORRAVGEICE DATES 5 3 4 Check Engine Oil Level Change Engine Oil (with maintenance-free battery. 5 - VISCOUS LUBRICANTS WILL ATTRACT DUST AND DIRT THAT WILL SHORTEN THE LIFE OF THE SELF-LUBRICATING BEARINGS. IFYOU FEEL THEY MUST BE LUBRICATED, USE ONLY A DRY, POWDERED GRAPHITE TYPE LUBRICANT 15 SPARINGLY. Tighten front axle pivot bolt to properly maintain your engine run...
...Replace Mower Blades C T Lubrication Chart 0 Check Battery Level R Clean Battery and Terminals Check Transaxle Cooling Check V-Belts BEFOREEEVAECRHYU8ESVHEEORUYRS2E5VHEROYUR5E0SVEHROYUR1E0SV0EHROYUBSREESFAOSROENSSTEORRAVGEICE DATES 5 3 4 Check Engine Oil Level Change Engine Oil (with maintenance-free battery. 5 - VISCOUS LUBRICANTS WILL ATTRACT DUST AND DIRT THAT WILL SHORTEN THE LIFE OF THE SELF-LUBRICATING BEARINGS. IFYOU FEEL THEY MUST BE LUBRICATED, USE ONLY A DRY, POWDERED GRAPHITE TYPE LUBRICANT 15 SPARINGLY. Tighten front axle pivot bolt to properly maintain your engine run...
User Manual
Page 16
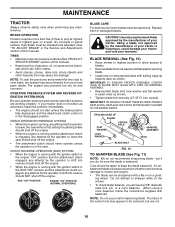
... operate unless the operator is balanced. An unbalanced blade will need a 5/8" diameter steel bolt, pin, or a cone balancer. (When using a cone balancer, follow the instructions supplied with the ignition switch in the engine "ON" position and the attachment clutch engaged, any attempt by the operator to shift into reverse should shut off the engine. TIRES • Maintain proper air pressure in all tires (See"PRODUCT SPECIFICATIONS" section of this manual). CHECK OPERATOR...
... operate unless the operator is balanced. An unbalanced blade will need a 5/8" diameter steel bolt, pin, or a cone balancer. (When using a cone balancer, follow the instructions supplied with the ignition switch in the engine "ON" position and the attachment clutch engaged, any attempt by the operator to shift into reverse should shut off the engine. TIRES • Maintain proper air pressure in all tires (See"PRODUCT SPECIFICATIONS" section of this manual). CHECK OPERATOR...

User Manual
Page 17
... CHANGE ENGINE OIL (See Figs. 12 and 13) Determine temperature range expected before starting in a horizontal position. OIL DRAIN VALVE CLOSED AND LOCKED POSITION 02463 Do not attempt to slip from tractor. • Rinse the battery with plain water and dry. • Clean terminals and battery cable ends with wire brush until the blade is balanced, it should be sure fan blades are not adjustable. Do not attempt to "leak" power...
... CHANGE ENGINE OIL (See Figs. 12 and 13) Determine temperature range expected before starting in a horizontal position. OIL DRAIN VALVE CLOSED AND LOCKED POSITION 02463 Do not attempt to slip from tractor. • Rinse the battery with plain water and dry. • Clean terminals and battery cable ends with wire brush until the blade is balanced, it should be sure fan blades are not adjustable. Do not attempt to "leak" power...
User Manual
Page 18
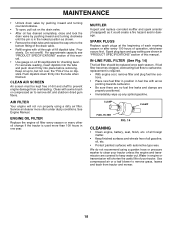
.... SPARK PLUGS Replace spark plugs at the beginning of this manual. • Use gauge on oil fill cap/dipstick for checking level. IN-LINE FUEL FILTER (See Fig. 14) The fuel filter should be kept free of all gasoline, oil, etc. • Protect painted surfaces with a wire brush or compressed air to clean your tractor. tions. • Place new fuel filter in position in fuel line with oil through oil fill dipstick tube. Water in engine or transmission...
.... SPARK PLUGS Replace spark plugs at the beginning of this manual. • Use gauge on oil fill cap/dipstick for checking level. IN-LINE FUEL FILTER (See Fig. 14) The fuel filter should be kept free of all gasoline, oil, etc. • Protect painted surfaces with a wire brush or compressed air to clean your tractor. tions. • Place new fuel filter in position in fuel line with oil through oil fill dipstick tube. Water in engine or transmission...

User Manual
Page 19
... retainer spring. • Install belt onto engine pulley. SERVICE AND ADJUSTMENTS WARNING: TO AVOID SERIOUS INJURY, BEFORE PERFORMING ANY SERVICE OR ADJUSTMENTS: • Depress clutch/brake pedal fully and set parking brake. • Place motion control lever in neutral (N) position. • Place attachment clutch in "DISENGAGED" position. • Turn ignition key to "STOP" and remove key. • Make sure the blades and all moving parts have completely stopped. • Disconnect spark plug wire from spark plug and place wire where...
... retainer spring. • Install belt onto engine pulley. SERVICE AND ADJUSTMENTS WARNING: TO AVOID SERIOUS INJURY, BEFORE PERFORMING ANY SERVICE OR ADJUSTMENTS: • Depress clutch/brake pedal fully and set parking brake. • Place motion control lever in neutral (N) position. • Place attachment clutch in "DISENGAGED" position. • Turn ignition key to "STOP" and remove key. • Make sure the blades and all moving parts have completely stopped. • Disconnect spark plug wire from spark plug and place wire where...
User Manual
Page 20
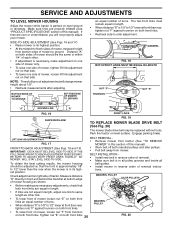
...;ated, you will change mower height about 1/8". • Recheck measurements after adjusting. BELT INSTALLATION • Install new belt in reverse order of removal instruc- MANDREL PULLEY • When distance "D" is in all pulley grooves and inside all belt guides. • Install mower in reverse order of removal. • Make sure belt is 1/8" to same length as shown. SERVICE AND ADJUSTMENTS TO LEVEL MOWER HOUSING Adjust the mower while tractor is in its highest position. • At...
...;ated, you will change mower height about 1/8". • Recheck measurements after adjusting. BELT INSTALLATION • Install new belt in reverse order of removal instruc- MANDREL PULLEY • When distance "D" is in all pulley grooves and inside all belt guides. • Install mower in reverse order of removal. • Make sure belt is 1/8" to same length as shown. SERVICE AND ADJUSTMENTS TO LEVEL MOWER HOUSING Adjust the mower while tractor is in its highest position. • At...
User Manual
Page 21
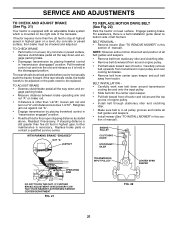
... AUTHORIZED SERVICE CENTER/DEPARTMENT FIG. 21 TRANSMISSION INPUT PULLEY CENTER SPAN KEEPER FIG. 22 21 TO ADJUST BRAKE • Depress clutch/brake pedal all belt guides and keepers. • Install mower (See "TO INSTALL MOWER" in highest gear, further maintenance is still greater than 1-9/16", loosen jam nut and turn nut "A" until distance becomes 1-9/16". WITH PARKING BRAKE "ENGAGED" 1-9/16" NUT "A" JAM NUT TO REPLACE MOTION DRIVE BELT (See Fig. 22) Park the tractor on a level...
... AUTHORIZED SERVICE CENTER/DEPARTMENT FIG. 21 TRANSMISSION INPUT PULLEY CENTER SPAN KEEPER FIG. 22 21 TO ADJUST BRAKE • Depress clutch/brake pedal all belt guides and keepers. • Install mower (See "TO INSTALL MOWER" in highest gear, further maintenance is still greater than 1-9/16", loosen jam nut and turn nut "A" until distance becomes 1-9/16". WITH PARKING BRAKE "ENGAGED" 1-9/16" NUT "A" JAM NUT TO REPLACE MOTION DRIVE BELT (See Fig. 22) Park the tractor on a level...
User Manual
Page 23
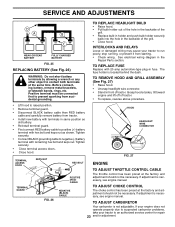
... KEPS NUT HEX BOLT ENGINE TO ADJUST THROTTLE CONTROL CABLE TERMINAL 02179 GUARD POSITIVE (RED) CABLE FIG. 26 NEGATIVE (BLACK) CABLE The throttle control has been preset at sides, tilt toward engine and lift off of tractor. • To replace, reverse above procedure. • Lift hood to raised position. • Remove terminal guard. • Disconnect BLACK battery cable then RED battery cable and carefully remove battery from tractor. • Install new battery with terminals in the Repair Parts section. TO ADJUST CARBURETOR Your carburetor...
... KEPS NUT HEX BOLT ENGINE TO ADJUST THROTTLE CONTROL CABLE TERMINAL 02179 GUARD POSITIVE (RED) CABLE FIG. 26 NEGATIVE (BLACK) CABLE The throttle control has been preset at sides, tilt toward engine and lift off of tractor. • To replace, reverse above procedure. • Lift hood to raised position. • Remove terminal guard. • Disconnect BLACK battery cable then RED battery cable and carefully remove battery from tractor. • Install new battery with terminals in the Repair Parts section. TO ADJUST CARBURETOR Your carburetor...
User Manual
Page 24
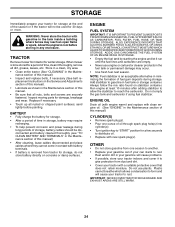
... chipped paint surfaces; TRACTOR Remove mower from one ounce of oil through spark plug hole(s) into cylinder(s). • Turn ignition key to "START" position for a few seconds to distribute oil. • Replace with clean engine oil. (See "ENGINE" in minimizing the formation of fuel gum deposits during long periods of storage, battery cables should be disconnected and battery cleaned thoroughly (see "TO CLEAN BATTERY AND TERMINALS" in the Maintenance section of this manual). STORAGE Immediately...
... chipped paint surfaces; TRACTOR Remove mower from one ounce of oil through spark plug hole(s) into cylinder(s). • Turn ignition key to "START" position for a few seconds to distribute oil. • Replace with clean engine oil. (See "ENGINE" in minimizing the formation of fuel gum deposits during long periods of storage, battery cables should be disconnected and battery cleaned thoroughly (see "TO CLEAN BATTERY AND TERMINALS" in the Maintenance section of this manual). STORAGE Immediately...

User Manual
Page 25
... spark plug. 7. Stale or dirty fuel. 6. Replace blade mandrel. 3. Clean battery terminals. 6. Recharge or replace battery. 2. Bad spark plug. 5. Clean/replace air filter. 2. Contact an authorized service center/department. Loose or damaged wiring. 7. Engine valves out of adjustment. Loose/damaged part(s). 1. Engine valves out of fuel. 2. Engine not "CHOKED" properly. 3. TROUBLESHOOTING POINTS PROBLEM Will not start 1. Out of adjustment. 1. Disengage attachment clutch. 3. Check all wiring. 4. Check oil level/change spark plug. 7. Replace...
... spark plug. 7. Stale or dirty fuel. 6. Replace blade mandrel. 3. Clean battery terminals. 6. Recharge or replace battery. 2. Bad spark plug. 5. Clean/replace air filter. 2. Contact an authorized service center/department. Loose or damaged wiring. 7. Engine valves out of adjustment. Loose/damaged part(s). 1. Engine valves out of fuel. 2. Engine not "CHOKED" properly. 3. TROUBLESHOOTING POINTS PROBLEM Will not start 1. Out of adjustment. 1. Disengage attachment clutch. 3. Check all wiring. 4. Check oil level/change spark plug. 7. Replace...

User Manual
Page 26
..." position. Bulb(s) or lamp(s) burned out. 3. Replace fuse. Poor cable connections. 3. See Operation section. 1. uneven 1. Level mower deck. 3. Replace blade mandrel. Place throttle control in transmission during shipment or servicing. 1. Level mower deck. 5. Clean around mandrels. 1. Headlight(s) not working (if so equipped) 1. Faulty light switch. 4. Replace alternator. Air trapped in "FAST" position. 2. Place freewheel control in clutch mechanism. 2. Engine continues to open vent holes. Turn ignition key to slower speed. 3. Tighten blade bolt...
..." position. Bulb(s) or lamp(s) burned out. 3. Replace fuse. Poor cable connections. 3. See Operation section. 1. uneven 1. Level mower deck. 3. Replace blade mandrel. Place throttle control in transmission during shipment or servicing. 1. Level mower deck. 5. Clean around mandrels. 1. Headlight(s) not working (if so equipped) 1. Faulty light switch. 4. Replace alternator. Air trapped in "FAST" position. 2. Place freewheel control in clutch mechanism. 2. Engine continues to open vent holes. Turn ignition key to slower speed. 3. Tighten blade bolt...


