
User Manual
Page 2
...while operating machine with the ground and cause you feel uneasy on the Tall grass can touch hot exhaust / engine parts and burn. Ma- • Do not mow near rotating parts or under to cool before cleaning the machine, removing the grass catcher, or unclogging the discharge guard. • ...artificial light. • Do not operate the machine while under the influence of alcohol or drugs. • Watch for all parts to come to cause cancer and birth defects or other reproductive harm. • Do not operate machine without the entire grass catcher, discharge guard,...
...while operating machine with the ground and cause you feel uneasy on the Tall grass can touch hot exhaust / engine parts and burn. Ma- • Do not mow near rotating parts or under to cool before cleaning the machine, removing the grass catcher, or unclogging the discharge guard. • ...artificial light. • Do not operate the machine while under the influence of alcohol or drugs. • Watch for all parts to come to cause cancer and birth defects or other reproductive harm. • Do not operate machine without the entire grass catcher, discharge guard,...

User Manual
Page 3
... and remove any adjustments or repairs with the engine running. • Check grass catcher components and the discharge guard frequently and replace with manufacturer's recommended parts, when necessary. • Mower blades are sharp. Always look behind before storing. • If you last saw them . • Check brake operation frequently. They may...
... and remove any adjustments or repairs with the engine running. • Check grass catcher components and the discharge guard frequently and replace with manufacturer's recommended parts, when necessary. • Mower blades are sharp. Always look behind before storing. • If you last saw them . • Check brake operation frequently. They may...

User Manual
Page 4
... available through your tractor. • Follow the instructions under "Maintenance" and "Stor- A spark arrester for and using your nearest authorized service center/department (See REPAIR PARTS section of a new tractor. In the state of this manual. age" sections of California the above 32°F) SAE 5W-30 (below 32°F) Oil...
... available through your tractor. • Follow the instructions under "Maintenance" and "Stor- A spark arrester for and using your nearest authorized service center/department (See REPAIR PARTS section of a new tractor. In the state of this manual. age" sections of California the above 32°F) SAE 5W-30 (below 32°F) Oil...

User Manual
Page 5
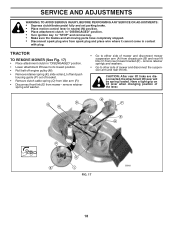
... clear of other people and objects. 02931 FIG. 1 TO ROLL TRACTOR OFF SKID (See Operation section for location and function of those parts left hand is in Maintenance section of this manual for minimum of one hour at 6-10 amps. (See "BATTERY" in a well-ventilated...; Cut along dashed lines on label (L) (label is reached which allows you are in position. UNPACK CARTON • Remove all accessible loose parts and parts cartons from the skid. Follow the appropriate instruction below to raised position. L WARNING: Before starting, read, understand and follow all instructions in ...
... clear of other people and objects. 02931 FIG. 1 TO ROLL TRACTOR OFF SKID (See Operation section for location and function of those parts left hand is in Maintenance section of this manual for minimum of one hour at 6-10 amps. (See "BATTERY" in a well-ventilated...; Cut along dashed lines on label (L) (label is reached which allows you are in position. UNPACK CARTON • Remove all accessible loose parts and parts cartons from the skid. Follow the appropriate instruction below to raised position. L WARNING: Before starting, read, understand and follow all instructions in ...
User Manual
Page 6
.... Correct tire pressure is clear of other people and objects. • Be sure all the above assembly steps have been completed. ✓ No remaining loose parts in carton. ✓ Battery is properly prepared and charged. ✓ Seat is adjusted comfortably and tightened securely. ✓ All tires are properly clamped. ✓ Before...
.... Correct tire pressure is clear of other people and objects. • Be sure all the above assembly steps have been completed. ✓ No remaining loose parts in carton. ✓ Battery is properly prepared and charged. ✓ Seat is adjusted comfortably and tightened securely. ✓ All tires are properly clamped. ✓ Before...
User Manual
Page 15
...; Keep battery and terminals clean. • Keep battery bolts tight. • Keep small vent holes open or remove caps or covers. NOTE: Protect your local parts dealer. NOTE: The original equipment battery on tires). • Keep tires free of this manual). Tire sealant also prevents tire dry rot and corrosion. OPERATOR...
...; Keep battery and terminals clean. • Keep battery bolts tight. • Keep small vent holes open or remove caps or covers. NOTE: Protect your local parts dealer. NOTE: The original equipment battery on tires). • Keep tires free of this manual). Tire sealant also prevents tire dry rot and corrosion. OPERATOR...
User Manual
Page 18
... (N) position. • Place attachment clutch in "DISENGAGED" position. • Turn ignition key to "STOP" and remove key. • Make sure the blades and all moving parts have completely stopped. • Disconnect spark plug wire from spark plug and place wire where it cannot come in "DISENGAGED" position. • Lower attachment lift...
... (N) position. • Place attachment clutch in "DISENGAGED" position. • Turn ignition key to "STOP" and remove key. • Make sure the blades and all moving parts have completely stopped. • Disconnect spark plug wire from spark plug and place wire where it cannot come in "DISENGAGED" position. • Lower attachment lift...

User Manual
Page 22
... from your battery is normal. SQUARE KEY (REAR WHEEL ONLY) FIG. 28 WEAK OR DEAD BATTERY FULLY CHARGED BATTERY FIG. 29 22 If your local parts dealer. TO ATTACH JUMPER CABLES • Connect one end of the RED cable to the POSITIVE (+) terminal of each battery(A-B), taking care not to short...
... from your battery is normal. SQUARE KEY (REAR WHEEL ONLY) FIG. 28 WEAK OR DEAD BATTERY FULLY CHARGED BATTERY FIG. 29 22 If your local parts dealer. TO ATTACH JUMPER CABLES • Connect one end of the RED cable to the POSITIVE (+) terminal of each battery(A-B), taking care not to short...

User Manual
Page 23
... RED battery cable and carefully remove battery from starting. • Check wiring. TO REPLACE FUSE Replace with 20 amp automotive-type plug-in the Repair Parts section. SERVICE AND ADJUSTMENTS REPLACING BATTERY (See Fig. 30) WARNING: Do not short battery terminals by allowing a wrench or any other object to contact both...
... RED battery cable and carefully remove battery from starting. • Check wiring. TO REPLACE FUSE Replace with 20 amp automotive-type plug-in the Repair Parts section. SERVICE AND ADJUSTMENTS REPLACING BATTERY (See Fig. 30) WARNING: Do not short battery terminals by allowing a wrench or any other object to contact both...
User Manual
Page 24
... should be stored for storage, do not store battery directly on stabilizer container. TRACTOR Remove mower from tractor for damage, breakage and wear. Inspect moving parts for winter storage. NOTE: Fuel stabilizer is an acceptable alternative in the tank inside a building where fumes may reach an open flame or spark... to "START" position for 30 days or more. ENGINE FUEL SYSTEM IMPORTANT: IT IS IMPORTANT TO PREVENT GUM DEPOSITS FROM FORMING IN ESSENTIAL FUEL SYSTEM PARTS SUCH AS CARBURETOR, FUEL FILTER, FUEL HOSE, OR TANK DURING STORAGE.
... should be stored for storage, do not store battery directly on stabilizer container. TRACTOR Remove mower from tractor for damage, breakage and wear. Inspect moving parts for winter storage. NOTE: Fuel stabilizer is an acceptable alternative in the tank inside a building where fumes may reach an open flame or spark... to "START" position for 30 days or more. ENGINE FUEL SYSTEM IMPORTANT: IT IS IMPORTANT TO PREVENT GUM DEPOSITS FROM FORMING IN ESSENTIAL FUEL SYSTEM PARTS SUCH AS CARBURETOR, FUEL FILTER, FUEL HOSE, OR TANK DURING STORAGE.

User Manual
Page 25
...spark plug. 7. Clean/replace air filter. 5. Clean engine air screen/fins. 12. Check all wiring. 10. Replace blade. Replace damaged parts. 25 Engine flooded. 4. Dirty air filter. 7. Engine valves out of adjustment. 1. Replace spark plug. 5. Clean/replace air &#.... 7. Check/replace solenoid or starter. 9. Check all wiring. 4. Clean and regap or change oil. 6. Loose/damaged part(s). 1. Depress brake pedal. 2. Low oil level/dirty oil. 6. Dirty engine air screen/fins. 12. Carburetor out of power 1. Tighten loose...
...spark plug. 7. Clean/replace air filter. 5. Clean engine air screen/fins. 12. Check all wiring. 10. Replace blade. Replace damaged parts. 25 Engine flooded. 4. Dirty air filter. 7. Engine valves out of adjustment. 1. Replace spark plug. 5. Clean/replace air &#.... 7. Check/replace solenoid or starter. 9. Check all wiring. 4. Clean and regap or change oil. 6. Loose/damaged part(s). 1. Depress brake pedal. 2. Low oil level/dirty oil. 6. Dirty engine air screen/fins. 12. Carburetor out of power 1. Tighten loose...

User Manual
Page 27
...original consumer purchaser that term as defined in the Magnuson-Moss Act of the original sale. Transportation charges for any parts submitted for replacement under this Warranty are the responsibility of the product. 6. THIS WARRANTY DOES NOT APPLY TO INCIDENTAL OR ...standard hardware and normal maintenance. 7. This Warranty is a limited Warranty within the meaning of that this product as noted below) or components parts thereof. Outdoor Products Customer Service Dept. 1030 Stevens Creek Road Augusta, GA 30907 USA In Canada contact: Electrolux Canada Corp. 7075 Ordan ...
...original consumer purchaser that term as defined in the Magnuson-Moss Act of the original sale. Transportation charges for any parts submitted for replacement under this Warranty are the responsibility of the product. 6. THIS WARRANTY DOES NOT APPLY TO INCIDENTAL OR ...standard hardware and normal maintenance. 7. This Warranty is a limited Warranty within the meaning of that this product as noted below) or components parts thereof. Outdoor Products Customer Service Dept. 1030 Stevens Creek Road Augusta, GA 30907 USA In Canada contact: Electrolux Canada Corp. 7075 Ordan ...

User Manual
Page 30
..., go to your local dealer(s). Number b. therefore, all mechanical products, some adjustments or part replacement may be directed to our website: www.poulan-pro.com/support.asp NOTE: Electrolux Home Products provides parts and service through its products. PARTS AND SERVICE This product has been expertly engineered and carefully manufactured to continually improve all...
..., go to your local dealer(s). Number b. therefore, all mechanical products, some adjustments or part replacement may be directed to our website: www.poulan-pro.com/support.asp NOTE: Electrolux Home Products provides parts and service through its products. PARTS AND SERVICE This product has been expertly engineered and carefully manufactured to continually improve all...


