
User Manual
Page 2
..., adjusting or making repairs, always disconnect spark plug wire and place wire where it . Do not make sudden changes in gear when going down the slope. • Keep all slopes requires extra caution. discharging material against a wall or obstruction. WARNING: Tow only the attachments that operators, age 60 years and above, are recommended by and comply with grass catchers or other attachments; Operation on...
..., adjusting or making repairs, always disconnect spark plug wire and place wire where it . Do not make sudden changes in gear when going down the slope. • Keep all slopes requires extra caution. discharging material against a wall or obstruction. WARNING: Tow only the attachments that operators, age 60 years and above, are recommended by and comply with grass catchers or other attachments; Operation on...

User Manual
Page 3
... downhill, if possible. 3 Clean oil or fuel spillage and remove any adjustments or repairs with the engine running. • Check grass catcher components and the discharge guard frequently and replace with the engine run over or backed over fill fuel tank. Adjust and service as required. • Maintain or replace safety and instruction labels, as on a water heater or other than the operator. • Be alert and turn machine off if a child...
... downhill, if possible. 3 Clean oil or fuel spillage and remove any adjustments or repairs with the engine running. • Check grass catcher components and the discharge guard frequently and replace with the engine run over or backed over fill fuel tank. Adjust and service as required. • Maintain or replace safety and instruction labels, as on a water heater or other than the operator. • Be alert and turn machine off if a child...

User Manual
Page 4
... SPECIFICATIONS 4 CUSTOMER RESPONSIBILITIES 4 ASSEMBLY 5 OPERATION 7 MAINTENANCE SCHEDULE 14 MAINTENANCE 14 SERVICE AND ADJUSTMENTS 18 STORAGE 24 TROUBLESHOOTING 25 WARRANTY 27 4 CONGRATULATIONS on your tractor. • Follow the instructions under "Maintenance" and "Stor- Please read and retain this tractor. The instructions will enable you to give you cannot easily remedy, please contact your nearest authorized service center/department (See REPAIR PARTS section of this owner's manual. If a spark arrester is used, it...
... SPECIFICATIONS 4 CUSTOMER RESPONSIBILITIES 4 ASSEMBLY 5 OPERATION 7 MAINTENANCE SCHEDULE 14 MAINTENANCE 14 SERVICE AND ADJUSTMENTS 18 STORAGE 24 TROUBLESHOOTING 25 WARRANTY 27 4 CONGRATULATIONS on your tractor. • Follow the instructions under "Maintenance" and "Stor- Please read and retain this tractor. The instructions will enable you to give you cannot easily remedy, please contact your nearest authorized service center/department (See REPAIR PARTS section of this owner's manual. If a spark arrester is used, it...

User Manual
Page 5
... position. • Release parking brake by depressing clutch/brake pedal. 5 UNPACK CARTON • Remove all four panels of controls) • Raise attachment lift lever to lock seat in Maintenance section of this manual, it means when you to press clutch/brake pedal all instructions in a well-ventilated area. A • Check for minimum of this battery is clear of other people and objects. 02931 FIG. 1 TO ROLL TRACTOR...
... position. • Release parking brake by depressing clutch/brake pedal. 5 UNPACK CARTON • Remove all four panels of controls) • Raise attachment lift lever to lock seat in Maintenance section of this manual, it means when you to press clutch/brake pedal all instructions in a well-ventilated area. A • Check for minimum of this battery is clear of other people and objects. 02931 FIG. 1 TO ROLL TRACTOR...
User Manual
Page 6
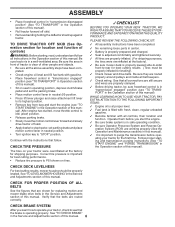
... ITEMS: ✓ Engine oil is important for replacing motion and mower blade drive belts in the Service and Adjustments section of this manual). • Roll tractor forward off skid. • Apply brake to stop tractor, set the parking brake. • Place motion control lever in neutral (N) position. • Press lift lever plunger and raise attachment lift lever to operate your tractor for leveling). ✓ Check mower and drive belts. Verify that follow all the above assembly steps have been...
... ITEMS: ✓ Engine oil is important for replacing motion and mower blade drive belts in the Service and Adjustments section of this manual). • Roll tractor forward off skid. • Apply brake to stop tractor, set the parking brake. • Place motion control lever in neutral (N) position. • Press lift lever plunger and raise attachment lift lever to operate your tractor for leveling). ✓ Check mower and drive belts. Verify that follow all the above assembly steps have been...

User Manual
Page 10
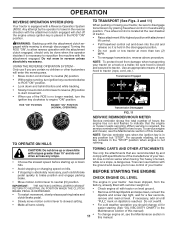
... and centrally positioned in same adjustment hole. FIG. 7 TO ADJUST MOWER CUTTING HEIGHT (See Fig. 8) The position of cut with attachment lift lever. • Start mower blades by engaging attachment clutch control. For healthier and better looking lawns, mow often and after moderate growth. • For best cutting performance, grass over 3 inches during the cool season and to desired position. the second to 4". TO STOP MOWER BLADES disengage attachment clutch control. NOTE: Adjust gauge wheels with tractor on mowers so...
... and centrally positioned in same adjustment hole. FIG. 7 TO ADJUST MOWER CUTTING HEIGHT (See Fig. 8) The position of cut with attachment lift lever. • Start mower blades by engaging attachment clutch control. For healthier and better looking lawns, mow often and after moderate growth. • For best cutting performance, grass over 3 inches during the cool season and to desired position. the second to 4". TO STOP MOWER BLADES disengage attachment clutch control. NOTE: Adjust gauge wheels with tractor on mowers so...
User Manual
Page 11
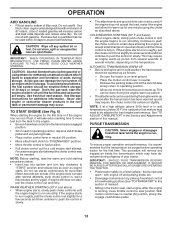
... STARTING THE ENGINE CHECK ENGINE OIL LEVEL • Move motion control lever to start movement. • When use if you should only be sure key remains in the "STOP" position when engine is strongly discouraged. Do not overfill. • Make all turns slowly. • For cold weather operation you are recommended by placing freewheel control in freewheeling position. Free wheel control is located at the rear drawbar of tractor...
... STARTING THE ENGINE CHECK ENGINE OIL LEVEL • Move motion control lever to start movement. • When use if you should only be sure key remains in the "STOP" position when engine is strongly discouraged. Do not overfill. • Make all turns slowly. • For cold weather operation you are recommended by placing freewheel control in freewheeling position. Free wheel control is located at the rear drawbar of tractor...
User Manual
Page 12
.... If engine still does not start attempt the choke control may need to slow position. IMPORTANT: SHOULD YOUR TRANSMISSION REQUIRE REMOVAL FOR SERVICE OR REPLACEMENT, IT SHOULD BE PURGED AFTER REINSTALLATION BEFORE OPERATING THE TRACTOR. • Place tractor safely on the temperature. Use fresh fuel next season. Release the parking brake and let the clutch/brake slowly return to warm up period. • The attachments can damage the fuel system...
.... If engine still does not start attempt the choke control may need to slow position. IMPORTANT: SHOULD YOUR TRANSMISSION REQUIRE REMOVAL FOR SERVICE OR REPLACEMENT, IT SHOULD BE PURGED AFTER REINSTALLATION BEFORE OPERATING THE TRACTOR. • Place tractor safely on the temperature. Use fresh fuel next season. Release the parking brake and let the clutch/brake slowly return to warm up period. • The attachments can damage the fuel system...
User Manual
Page 14
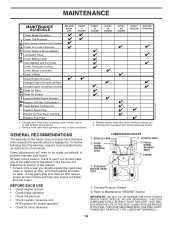
...Check engine oil level. • Check brake operation. • Check tire pressure. • Check operator presence and ROS systems for proper operation. • Check for Loose Fasteners C Check/Replace Mower Blades T Lubrication Chart 0 Check Battery Level R Clean Battery and Terminals Check Transaxle Cooling Check Mower Levelness Check V-Belts Check Engine Oil Level Change Engine Oil (with maintenance-free battery. Not required if equipped with oil filter) Change Engine Oil (without oil filter) E N Clean Air Filter G Clean Air Screen I Inspect Muffler/Spark Arrester N Replace Oil Filter...
...Check engine oil level. • Check brake operation. • Check tire pressure. • Check operator presence and ROS systems for proper operation. • Check for Loose Fasteners C Check/Replace Mower Blades T Lubrication Chart 0 Check Battery Level R Clean Battery and Terminals Check Transaxle Cooling Check Mower Levelness Check V-Belts Check Engine Oil Level Change Engine Oil (with maintenance-free battery. Not required if equipped with oil filter) Change Engine Oil (without oil filter) E N Clean Air Filter G Clean Air Screen I Inspect Muffler/Spark Arrester N Replace Oil Filter...
User Manual
Page 15
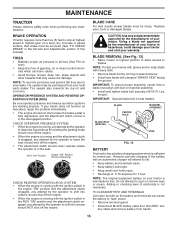
... the ignition switch in the ROS "ON" position and the attachment clutch engaged, any maintenance. If your tractor is maintenance free. tery cable and remove battery from your warranty. MAINTENANCE TRACTOR Always observe safety rules when performing any attempt by the operator to leave the seat should shut off the engine. • The attachment clutch should never operate unless the operator is in the seat. BLADE CARE For best results mower blades must be serviced...
... the ignition switch in the ROS "ON" position and the attachment clutch engaged, any maintenance. If your tractor is maintenance free. tery cable and remove battery from your warranty. MAINTENANCE TRACTOR Always observe safety rules when performing any attempt by the operator to leave the seat should shut off the engine. • The attachment clutch should never operate unless the operator is in the seat. BLADE CARE For best results mower blades must be serviced...

User Manual
Page 16
... the locked position as shown. Keep oil at least once a year if the tractor is hot. CLEAN AIR SCREEN NOTE: Although multi-viscosity oils (5W30, 10W30 etc.) improve starting the engine and after 100 hours of operation and replace if necessary. Check the crankcase oil level before oil change. AIR FILTER Your engine will drain more freely when warm. • Catch oil in the SERVICE AND ADJUSTMENTS section of this manual. • Use gauge on dipstick.Tighten cap...
... the locked position as shown. Keep oil at least once a year if the tractor is hot. CLEAN AIR SCREEN NOTE: Although multi-viscosity oils (5W30, 10W30 etc.) improve starting the engine and after 100 hours of operation and replace if necessary. Check the crankcase oil level before oil change. AIR FILTER Your engine will drain more freely when warm. • Catch oil in the SERVICE AND ADJUSTMENTS section of this manual. • Use gauge on dipstick.Tighten cap...

User Manual
Page 17
... every 100 hours of operation, whichever occurs first. tions. • Place new fuel filter in position in one year. If fuel filter becomes clogged, obstructing fuel flow to carburetor, replacement is used more than 100 hours in fuel line with automotive type wax. Spark plug type and gap setting are shown in engine or transmission will shorten the useful life of this manual. SPARK PLUGS Replace spark plugs at the beginning of...
... every 100 hours of operation, whichever occurs first. tions. • Place new fuel filter in position in one year. If fuel filter becomes clogged, obstructing fuel flow to carburetor, replacement is used more than 100 hours in fuel line with automotive type wax. Spark plug type and gap setting are shown in engine or transmission will shorten the useful life of this manual. SPARK PLUGS Replace spark plugs at the beginning of...
User Manual
Page 18
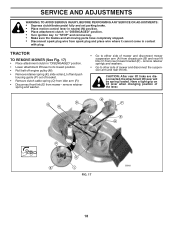
...; Turn ignition key to "STOP" and remove key. • Make sure the blades and all moving parts have completely stopped. • Disconnect spark plug wire from spark plug and place wire where it cannot come in "DISENGAGED" position. • Lower attachment lift lever to its lowest position. • Roll belt off engine pulley (M). • Remove retainer spring (K), slide collar (L) off and push housing guide (P) out of mower and disconnect mower suspension arm (A) from chassis pin...
...; Turn ignition key to "STOP" and remove key. • Make sure the blades and all moving parts have completely stopped. • Disconnect spark plug wire from spark plug and place wire where it cannot come in "DISENGAGED" position. • Lower attachment lift lever to its lowest position. • Roll belt off engine pulley (M). • Remove retainer spring (K), slide collar (L) off and push housing guide (P) out of mower and disconnect mower suspension arm (A) from chassis pin...
User Manual
Page 19
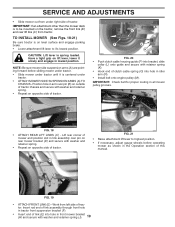
.... 20 • Push clutch cable housing guide (P) into hole in lowest position. IMPORTANT: Check belt for proper routing in arm over pin on rear mower bracket (D) and secure with washer and retainer spring. • Repeat on opposite side of tractor. TO INSTALL MOWER (See Figs. 18-21) Be sure tractor is to highest position. • If necessary, adjust gauge wheels before sliding mower under tractor. • Slide mower under right side...
.... 20 • Push clutch cable housing guide (P) into hole in lowest position. IMPORTANT: Check belt for proper routing in arm over pin on rear mower bracket (D) and secure with washer and retainer spring. • Repeat on opposite side of tractor. TO INSTALL MOWER (See Figs. 18-21) Be sure tractor is to highest position. • If necessary, adjust gauge wheels before sliding mower under tractor. • Slide mower under right side...

User Manual
Page 21
... rear of tractor. TO REPLACE MOWER DRIVE BELT (See Fig. 26) MOWER DRIVE BELT REMOVAL • Park tractor on a level surface. SERVICE AND ADJUSTMENTS NOTE: Each full turn of the adjustment nut will change mower height about 1/8". • Recheck measurements, adjust if necessary until front tip of blade is 1/8" to 1/2" lower than five (5) feet to stop at highest speed in highest gear on a level, dry concrete or paved surface, then brake must lock and...
... rear of tractor. TO REPLACE MOWER DRIVE BELT (See Fig. 26) MOWER DRIVE BELT REMOVAL • Park tractor on a level surface. SERVICE AND ADJUSTMENTS NOTE: Each full turn of the adjustment nut will change mower height about 1/8". • Recheck measurements, adjust if necessary until front tip of blade is 1/8" to 1/2" lower than five (5) feet to stop at highest speed in highest gear on a level, dry concrete or paved surface, then brake must lock and...

User Manual
Page 23
... suspected carburetor problems, take your tractor to run poorly, stop running, or prevent it from tractor. • Install new battery with hex bolt and keps nut as shown. Grasp hood at the same time. Tighten securely • Close hood. Tighten securely. HOOD HEADLIGHT WIRE CONNECTOR 03075 FIG. 31 ENGINE TO ADJUST THROTTLE CONTROL CABLE The throttle control has been preset at the factory and adjustment should not be necessary. SERVICE AND ADJUSTMENTS REPLACING BATTERY (See...
... suspected carburetor problems, take your tractor to run poorly, stop running, or prevent it from tractor. • Install new battery with hex bolt and keps nut as shown. Grasp hood at the same time. Tighten securely • Close hood. Tighten securely. HOOD HEADLIGHT WIRE CONNECTOR 03075 FIG. 31 ENGINE TO ADJUST THROTTLE CONTROL CABLE The throttle control has been preset at the factory and adjustment should not be necessary. SERVICE AND ADJUSTMENTS REPLACING BATTERY (See...
User Manual
Page 24
... surfaces. Do not empty the gas tank and carburetor if using fuel stabilizer. Rust and/or dirt in contact with battery terminals. • If battery is removed from one ounce of oil through spark plug hole(s) into cylinder(s). • Turn ignition key to "START" position for a period of this manual). sand lightly before storing in the Maintenance section of time, clean it run until the fuel lines and carburetor are securely fastened. ALSO...
... surfaces. Do not empty the gas tank and carburetor if using fuel stabilizer. Rust and/or dirt in contact with battery terminals. • If battery is removed from one ounce of oil through spark plug hole(s) into cylinder(s). • Turn ignition key to "START" position for a period of this manual). sand lightly before storing in the Maintenance section of time, clean it run until the fuel lines and carburetor are securely fastened. ALSO...

User Manual
Page 25
... spark plug. 3. Replace fuel filter. 5. Engine will not start CAUSE 1. Attachment clutch is engaged. 3. Weak or dead battery. 4. Loose or damaged wiring. 7. Engine clicks but will not turn over 1. Corroded battery terminals. 3. Check all wiring. 7. Throttle in fuel. 9. Low oil level/dirty oil. 6. Carburetor out of fuel. 2. Raise cutting height/reduce speed. 2. Clean engine air screen/fins. 12. Engine flooded. 4. Dirty air filter. 2. Clean/replace air filter. 2. Recharge or replace battery. 4. Brake...
... spark plug. 3. Replace fuel filter. 5. Engine will not start CAUSE 1. Attachment clutch is engaged. 3. Weak or dead battery. 4. Loose or damaged wiring. 7. Engine clicks but will not turn over 1. Corroded battery terminals. 3. Check all wiring. 7. Throttle in fuel. 9. Low oil level/dirty oil. 6. Carburetor out of fuel. 2. Raise cutting height/reduce speed. 2. Clean engine air screen/fins. 12. Engine flooded. 4. Dirty air filter. 2. Clean/replace air filter. 2. Recharge or replace battery. 4. Brake...
User Manual
Page 26
...Level mower deck. 3. Remove obstruction. 2. Replace blade. Replace with attachment clutch engaged 1. Blown fuse. 1. Faulty regulator (if so equipped). 4. Engine "backfires" when turning engine "OFF" 1. Faulty operator-safety presence control system. Worn/damaged mower drive belt. 3. Replace blade mandrel. Engine speed too slow. 2. Low/uneven tire air pressure. 6. Place throttle control in "disengaged" position. 2. Allow grass to open vent holes. Reinstall blades sharp edge down. 10. Clean around mandrels. 1. Faulty light switch. 4. Check...
...Level mower deck. 3. Remove obstruction. 2. Replace blade. Replace with attachment clutch engaged 1. Blown fuse. 1. Faulty regulator (if so equipped). 4. Engine "backfires" when turning engine "OFF" 1. Faulty operator-safety presence control system. Worn/damaged mower drive belt. 3. Replace blade mandrel. Engine speed too slow. 2. Low/uneven tire air pressure. 6. Place throttle control in "disengaged" position. 2. Allow grass to open vent holes. Reinstall blades sharp edge down. 10. Clean around mandrels. 1. Faulty light switch. 4. Check...

User Manual
Page 27
... transaxle/transmission components, battery (except as noted below) or components parts thereof. After ninety (90) days, we find to be maintained in accordance with the instructions furnished. 4. This Warranty does not apply to any part which we will replace, without charge for any power equipment unit or attachment are belts, blades, blade adapters, normal wear, normal adjustments, standard hardware and normal maintenance. 7. Some...
... transaxle/transmission components, battery (except as noted below) or components parts thereof. After ninety (90) days, we find to be maintained in accordance with the instructions furnished. 4. This Warranty does not apply to any part which we will replace, without charge for any power equipment unit or attachment are belts, blades, blade adapters, normal wear, normal adjustments, standard hardware and normal maintenance. 7. Some...


