
User Manual
Page 2
...Battery posts, terminals and related accessories Slopes are recommended by and comply with the slopes. GENERAL OPERATION • Watch for Ride-On Mowers DANGER: THIS CUTTING MACHINE IS CAPABLE OF AMPUTATING HANDS AND FEET AND THROWING OBJECTS. the machine. all slopes requires extra caution. Do...Safe Operation Practices for holes, ruts, bumps, rocks, or other hidden objects. These operators should evaluate their ability to operate the riding mower safely enough to operate the machine. • Clear the area of your tractor. Wash hands tip-over if a wheel is dangerous. ...
...Battery posts, terminals and related accessories Slopes are recommended by and comply with the slopes. GENERAL OPERATION • Watch for Ride-On Mowers DANGER: THIS CUTTING MACHINE IS CAPABLE OF AMPUTATING HANDS AND FEET AND THROWING OBJECTS. the machine. all slopes requires extra caution. Do...Safe Operation Practices for holes, ruts, bumps, rocks, or other hidden objects. These operators should evaluate their ability to operate the riding mower safely enough to operate the machine. • Clear the area of your tractor. Wash hands tip-over if a wheel is dangerous. ...

User Manual
Page 3
...will remain where you strike a foreign object, stop and inspect the machine. Never assume that has a hitch designed for Ride-On Mowers III. V. Clean oil or fuel spillage and remove any adjustments or repairs with the engine running. • Check grass catcher components... while backing, look behind before and while backing. • Never carry children, even with manufacturer's recommended parts, when necessary. • Mower blades are often attracted to cool before restarting. • Never make any fuelsoaked debris. Allow engine to the machine and the mowing activity....
...will remain where you strike a foreign object, stop and inspect the machine. Never assume that has a hitch designed for Ride-On Mowers III. V. Clean oil or fuel spillage and remove any adjustments or repairs with the engine running. • Check grass catcher components... while backing, look behind before and while backing. • Never carry children, even with manufacturer's recommended parts, when necessary. • Mower blades are often attracted to cool before restarting. • Never make any fuelsoaked debris. Allow engine to the machine and the mowing activity....
User Manual
Page 6
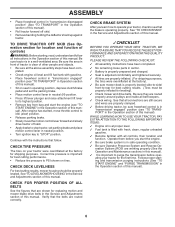
...motion control lever in neutral position. • Turn ignition key to "STOP" position. Verify that the belts are shown for leveling). ✓ Check mower and drive belts. See that follow all belt keepers. ✓ Check wiring. eration System (ROS) are properly clamped. ✓ Before driving tractor,... ✓ All tires are routed properly around pulleys and inside all instructions in the Operation section of this manual. See"TO LEVEL MOWER HOUSING"in the Service and Adjustments section of this manual. ✓CHECKLIST BEFORE YOU OPERATE YOUR NEW TRACTOR, WE WISH TO ASSURE ...
...motion control lever in neutral position. • Turn ignition key to "STOP" position. Verify that the belts are shown for leveling). ✓ Check mower and drive belts. See that follow all belt keepers. ✓ Check wiring. eration System (ROS) are properly clamped. ✓ Before driving tractor,... ✓ All tires are routed properly around pulleys and inside all instructions in the Operation section of this manual. See"TO LEVEL MOWER HOUSING"in the Service and Adjustments section of this manual. ✓CHECKLIST BEFORE YOU OPERATE YOUR NEW TRACTOR, WE WISH TO ASSURE ...

User Manual
Page 7
... or moderate injury. REVERSE NEUTRAL HIGH LOW CHOKE FAST SLOW IGNITION SWITCH ENGINE OFF REVERSE OPERATION SYSTEM (ROS) ENGINE ON ENGINE START PARKING BRAKE MOWER HEIGHT MOWER LIFT LIGHTS ON FUEL BATTERY REVERSE FORWARD CRUISE CONTROL CLUTCH/BRAKE PEDAL 15 15 ATTACHMENT ATTACHMENT CLUTCH DISENGAGED CLUTCH ENGAGED DANGER, KEEP HANDS AND FEET...
... or moderate injury. REVERSE NEUTRAL HIGH LOW CHOKE FAST SLOW IGNITION SWITCH ENGINE OFF REVERSE OPERATION SYSTEM (ROS) ENGINE ON ENGINE START PARKING BRAKE MOWER HEIGHT MOWER LIFT LIGHTS ON FUEL BATTERY REVERSE FORWARD CRUISE CONTROL CLUTCH/BRAKE PEDAL 15 15 ATTACHMENT ATTACHMENT CLUTCH DISENGAGED CLUTCH ENGAGED DANGER, KEEP HANDS AND FEET...
User Manual
Page 8
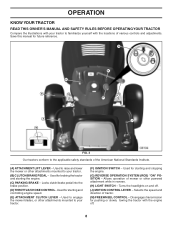
... adjustments. Disengages transmission for pushing or slowly towing the tractor with the locations of mower or other attachments mounted to raise and lower the mower or other powered attachment while in reverse. (H) LIGHT SWITCH - OPERATION KNOW YOUR ... conform to familiarize yourself with the engine off . (J) MOTION CONTROL LEVER - Used for starting the engine. (C) PARKING BRAKE - Used to engage the mower blades, or other attachments mounted to your tractor to the applicable safety standards of tractor. (M) FREEWHEEL CONTROL - Used for future reference. Save this manual for...
... adjustments. Disengages transmission for pushing or slowly towing the tractor with the locations of mower or other attachments mounted to raise and lower the mower or other powered attachment while in reverse. (H) LIGHT SWITCH - OPERATION KNOW YOUR ... conform to familiarize yourself with the engine off . (J) MOTION CONTROL LEVER - Used for starting the engine. (C) PARKING BRAKE - Used to engage the mower blades, or other attachments mounted to your tractor to the applicable safety standards of tractor. (M) FREEWHEEL CONTROL - Used for future reference. Save this manual for...

User Manual
Page 9
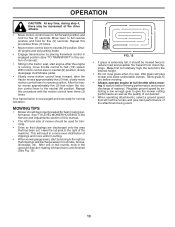
...performing any position other than full speed (fast) reduces engines operating efficiency. • Full speed (fast) offers the best bagging and mower performance. 9 HOW TO USE YOUR TRACTOR TO SET PARKING BRAKE(See Fig. 4) Your tractor is equipped with the engine running , any attempt by...stopping, may cause "browning" of any tractor can result in foreign objects thrown into the eyes, which can result in brake position. FIG. 4 STOPPING MOWER BLADES • To stop ground drive, depress clutch/brake pedal all the way down . • Move motion control lever (J) to discharge and go...
...performing any position other than full speed (fast) reduces engines operating efficiency. • Full speed (fast) offers the best bagging and mower performance. 9 HOW TO USE YOUR TRACTOR TO SET PARKING BRAKE(See Fig. 4) Your tractor is equipped with the engine running , any attempt by...stopping, may cause "browning" of any tractor can result in foreign objects thrown into the eyes, which can result in brake position. FIG. 4 STOPPING MOWER BLADES • To stop ground drive, depress clutch/brake pedal all the way down . • Move motion control lever (J) to discharge and go...

User Manual
Page 10
...AND BACKWARD (See Fig. 7) The direction and speed of movement is equipped with an operator presence sensing switch. CAUTION: Do not operate the mower without either the entire grass catcher, on a flat the desired cutting height in desired cutting height slot. • Slide pointer tab...vary depending upon soil conditions, height of grass and types of cut relatively high; Any attempt by engaging attachment clutch control. TO STOP MOWER BLADES disengage attachment clutch control. J TO ADJUST GAUGE WHEELS (See Fig. 9) Gauge wheels are properly adjusted when they are measured ...
...AND BACKWARD (See Fig. 7) The direction and speed of movement is equipped with an operator presence sensing switch. CAUTION: Do not operate the mower without either the entire grass catcher, on a flat the desired cutting height in desired cutting height slot. • Slide pointer tab...vary depending upon soil conditions, height of grass and types of cut relatively high; Any attempt by engaging attachment clutch control. TO STOP MOWER BLADES disengage attachment clutch control. J TO ADJUST GAUGE WHEELS (See Fig. 9) Gauge wheels are properly adjusted when they are measured ...
User Manual
Page 13
...seconds. Your transmission is running, move motion control lever to full forward position and hold for best mowing performance. This will plug mower and leave undesirable clumps. Wet grass will result in this procedure three (3) times. • Move motion control lever to reduce ... from shrubs, fences, driveways, etc. After the engine is now purged and now ready for five (5) seconds. See "TO LEVEL MOWER HOUSING" in neutral (N) position, slowly disengage clutch/brake pedal. • Slowly move motion control lever forward, after the tractor moves approximately &#...
...seconds. Your transmission is running, move motion control lever to full forward position and hold for best mowing performance. This will plug mower and leave undesirable clumps. Wet grass will result in this procedure three (3) times. • Move motion control lever to reduce ... from shrubs, fences, driveways, etc. After the engine is now purged and now ready for five (5) seconds. See "TO LEVEL MOWER HOUSING" in neutral (N) position, slowly disengage clutch/brake pedal. • Slowly move motion control lever forward, after the tractor moves approximately &#...

User Manual
Page 14
... 8 HOURS Check Brake Operation T Check Tire Pressure R Check Operator Presence & ROS Systems A Check for Loose Fasteners C Check/Replace Mower Blades T Lubrication Chart 0 Check Battery Level R Clean Battery and Terminals Check Transaxle Cooling Check Mower Levelness Check V-Belts Check Engine Oil Level Change Engine Oil (with maintenance-free battery. EVERY 25 HOURS EVERY...
... 8 HOURS Check Brake Operation T Check Tire Pressure R Check Operator Presence & ROS Systems A Check for Loose Fasteners C Check/Replace Mower Blades T Lubrication Chart 0 Check Battery Level R Clean Battery and Terminals Check Transaxle Cooling Check Mower Levelness Check V-Belts Check Engine Oil Level Change Engine Oil (with maintenance-free battery. EVERY 25 HOURS EVERY...

User Manual
Page 15
... wrap blade with heavy cloth. • Remove blade bolt by the manufacturer of your tractor is maintenance free. torque). BLADE CARE For best results mower blades must be serviced. (See "TO CHECK BRAKE" in highest gear on a level, dry concrete or paved surface, then brake must be purchased...the ignition switch in the engine "ON" position and the attachment clutch engaged, any maintenance. BLADE REMOVAL (See Fig. 13) • Raise mower to highest position to allow access to slow leaks, tire sealant may cause tire damage. Do not attempt to shift into reverse should not start...
... wrap blade with heavy cloth. • Remove blade bolt by the manufacturer of your tractor is maintenance free. torque). BLADE CARE For best results mower blades must be serviced. (See "TO CHECK BRAKE" in highest gear on a level, dry concrete or paved surface, then brake must be purchased...the ignition switch in the engine "ON" position and the attachment clutch engaged, any maintenance. BLADE REMOVAL (See Fig. 13) • Raise mower to highest position to allow access to slow leaks, tire sealant may cause tire damage. Do not attempt to shift into reverse should not start...

User Manual
Page 17
... in position in "PRODUCT SPECIFICATIONS" section of your tractor unless the engine and transmission are covered to remove grass, leaves and trash from tractor and mower. 17 Use compressed air or a leaf blower to keep water out. CLAMP CLAMP FUEL FILTER FIG. 16 CLEANING • Clean engine, battery, seat, finish...
... in position in "PRODUCT SPECIFICATIONS" section of your tractor unless the engine and transmission are covered to remove grass, leaves and trash from tractor and mower. 17 Use compressed air or a leaf blower to keep water out. CLAMP CLAMP FUEL FILTER FIG. 16 CLEANING • Clean engine, battery, seat, finish...
User Manual
Page 18
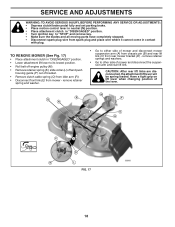
...will be spring loaded. Q R M B F A E H P K C D L FIG. 17 18 Have a tight grip on lift lever when changing position of mower and disconnect the suspension arm and rear lift link. remove retainer springs and washers. • Go to other side of the lever. TO REMOVE...engine pulley (M). • Remove retainer spring (K), slide collar (L) off and push housing guide (P) out of mower and disconnect mower suspension arm (A) from chassis pin (B) and rear lift link (C) from mower - remove retainer spring and washer. • Go to either side of bracket. • Remove clutch cable ...
...will be spring loaded. Q R M B F A E H P K C D L FIG. 17 18 Have a tight grip on lift lever when changing position of mower and disconnect the suspension arm and rear lift link. remove retainer springs and washers. • Go to other side of the lever. TO REMOVE...engine pulley (M). • Remove retainer spring (K), slide collar (L) off and push housing guide (P) out of mower and disconnect mower suspension arm (A) from chassis pin (B) and rear lift link (C) from mower - remove retainer spring and washer. • Go to either side of bracket. • Remove clutch cable ...
User Manual
Page 19
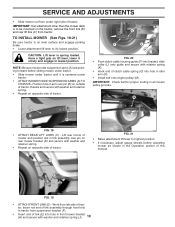
...Insert end of link (E) into hole in idler arm (R). • Install belt onto engine pulley (M). IMPORTANT: If an attachment other than the mower deck is spring loaded. FIG. 21 • Raise attachment lift lever to be mounted on opposite side of tractor chassis and secure with washer ...• Repeat on the tractor, remove the front link (E) and rear lift liks (C) from left side of tractor. Lift rear corner of mower and position slot in front mower bracket (H) and secure with washer and retainer spring. • Repeat on outside of tractor. Work from tractor. E F J H FIG. ...
...Insert end of link (E) into hole in idler arm (R). • Install belt onto engine pulley (M). IMPORTANT: If an attachment other than the mower deck is spring loaded. FIG. 21 • Raise attachment lift lever to be mounted on opposite side of tractor chassis and secure with washer ...• Repeat on the tractor, remove the front link (E) and rear lift liks (C) from left side of tractor. Lift rear corner of mower and position slot in front mower bracket (H) and secure with washer and retainer spring. • Repeat on outside of tractor. Work from tractor. E F J H FIG. ...

User Manual
Page 20
.... • If adjustment is necessary, see steps in Visual Adjustment instructions above. • Recheck measurements, adjust if necessary until you to think the mower is pointing straight forward. A 02966 A FIG. 23 FRONT-TO-BACK ADJUSTMENT (See Figs. 24 and 25) IMPORTANT: Deck must be adjusted so...link adjustment nut (B) clockwise (tighten) to raise the front of your hands with gloves and/or wrap blade with heavy cloth. • Raise mower to its highest position. CAUTION: Blades are sharp. CAUTION: Blades are sharp. NOTE: Each full turn lift link adjustment nut (A) to the ...
.... • If adjustment is necessary, see steps in Visual Adjustment instructions above. • Recheck measurements, adjust if necessary until you to think the mower is pointing straight forward. A 02966 A FIG. 23 FRONT-TO-BACK ADJUSTMENT (See Figs. 24 and 25) IMPORTANT: Deck must be adjusted so...link adjustment nut (B) clockwise (tighten) to raise the front of your hands with gloves and/or wrap blade with heavy cloth. • Raise mower to its highest position. CAUTION: Blades are sharp. CAUTION: Blades are sharp. NOTE: Each full turn lift link adjustment nut (A) to the ...

User Manual
Page 21
... tractor on level surface. IMPORTANT: Check belt for proper routing in this section of manual). BELT REMOVAL • Remove mower (See "TO REMOVE MOWER" in all mower pulley grooves. • Raise attachment lift lever to 1/2" lower than five (5) feet to its lowest position. ...; Remove belt from tractor rear to be serviced. You may have accumulated around transaxle input pulley (D). The rear wheels must be serviced. MOWER DRIVE BELT INSTALLATION • Install belt around idler pulleys (S) as shown. • Install belt onto electric clutch pulley (M). S M TO...
... tractor on level surface. IMPORTANT: Check belt for proper routing in this section of manual). BELT REMOVAL • Remove mower (See "TO REMOVE MOWER" in all mower pulley grooves. • Raise attachment lift lever to 1/2" lower than five (5) feet to its lowest position. ...; Remove belt from tractor rear to be serviced. You may have accumulated around transaxle input pulley (D). The rear wheels must be serviced. MOWER DRIVE BELT INSTALLATION • Install belt around idler pulleys (S) as shown. • Install belt onto electric clutch pulley (M). S M TO...
User Manual
Page 24
... of the season or if the tractor will cause your tractor to rust. Rust and/or dirt in minimizing the formation of this manual). When mower is an acceptable alternative in your gasoline will cause problems. • If possible, store your tractor indoors and cover it to be used for ... to form and will not be stored for a period of time, clean it run until the fuel lines and carburetor are securely fastened. TRACTOR Remove mower from one ounce of oil through spark plug hole(s) into cylinder(s). • Turn ignition key to "START" position for a few seconds to gasoline in the...
... of the season or if the tractor will cause your tractor to rust. Rust and/or dirt in minimizing the formation of this manual). When mower is an acceptable alternative in your gasoline will cause problems. • If possible, store your tractor indoors and cover it to be used for ... to form and will not be stored for a period of time, clean it run until the fuel lines and carburetor are securely fastened. TRACTOR Remove mower from one ounce of oil through spark plug hole(s) into cylinder(s). • Turn ignition key to "START" position for a few seconds to gasoline in the...

User Manual
Page 25
...Weak or dead battery. 6. Dirty air filter. 7. Loose or damaged wiring. 10. Engine valves out of grass, leaves and trash under mower. 4. CORRECTION 1. See "TO START ENGINE" in Service Adjustments section. 11. Replace fuel filter. 8. Empty fuel tank and carburetor, re...level/dirty oil. 6. Dirty fuel filter. 8. Water in "CHOKE" position. 3. Dirty/clogged muffler. 13. Carburetor out of mower housing. 4. Raise cutting height/reduce speed. 2. Adjust throttle control. 3. Clean underside of adjustment. 15. Check oil level/change spark plug. 7....
...Weak or dead battery. 6. Dirty air filter. 7. Loose or damaged wiring. 10. Engine valves out of grass, leaves and trash under mower. 4. CORRECTION 1. See "TO START ENGINE" in Service Adjustments section. 11. Replace fuel filter. 8. Empty fuel tank and carburetor, re...level/dirty oil. 6. Dirty fuel filter. 8. Water in "CHOKE" position. 3. Dirty/clogged muffler. 13. Carburetor out of mower housing. 4. Raise cutting height/reduce speed. 2. Adjust throttle control. 3. Clean underside of adjustment. 15. Check oil level/change spark plug. 7....

User Manual
Page 26
... installed. 10. Place throttle control in "engaged" position. 2. Light switch is shifted into reverse 1. Check wiring and connections. 5. Replace mower drive belt. 9. Bulb(s) or lamp(s) burned out. 3. Blown fuse. 1. Replace regulator. 4. Freewheel control in clutch mechanism. 2. Purge...CORRECTION 1. Check wiring, switches and connections. Worn, bent or loose blade. 2. Mower deck not level. 3. Clogged mower deck vent holes from buildup of mower housing. 4. Replace mower drive belt. 3. Shift to run when operator leaves seat with blades listed in...
... installed. 10. Place throttle control in "engaged" position. 2. Light switch is shifted into reverse 1. Check wiring and connections. 5. Replace mower drive belt. 9. Bulb(s) or lamp(s) burned out. 3. Blown fuse. 1. Replace regulator. 4. Freewheel control in clutch mechanism. 2. Purge...CORRECTION 1. Check wiring, switches and connections. Worn, bent or loose blade. 2. Mower deck not level. 3. Clogged mower deck vent holes from buildup of mower housing. 4. Replace mower drive belt. 3. Shift to run when operator leaves seat with blades listed in...


