
User Manual
Page 2
... , transporting, adjusting or making repairs, always disconnect spark plug wire and place wire where it . These operators should evaluate their ability to operate the riding mower safely enough to cool before turning. • Never leave a running machine unattended. Clean any oil or fuel spillage before dismounting. • Disengage blades when not mowing. I. GENERAL OPERATION • Watch for wheel weights or counterweights. • Keep machine free of grass , leaves or...
... , transporting, adjusting or making repairs, always disconnect spark plug wire and place wire where it . These operators should evaluate their ability to operate the riding mower safely enough to cool before turning. • Never leave a running machine unattended. Clean any oil or fuel spillage before dismounting. • Disengage blades when not mowing. I. GENERAL OPERATION • Watch for wheel weights or counterweights. • Keep machine free of grass , leaves or...

User Manual
Page 3
... mowing activity. Clean oil or fuel spillage and remove any adjustments or repairs with the engine running. • Check grass catcher components and the discharge guard frequently and replace with plastic liner. Adjust and service as required. • Maintain or replace safety and instruction labels, as on a water heater or other debris build-up and down for small children. • Mow up . SAFETY RULES Safe Operation Practices for...
... mowing activity. Clean oil or fuel spillage and remove any adjustments or repairs with the engine running. • Check grass catcher components and the discharge guard frequently and replace with plastic liner. Adjust and service as required. • Maintain or replace safety and instruction labels, as on a water heater or other debris build-up and down for small children. • Mow up . SAFETY RULES Safe Operation Practices for...
User Manual
Page 4
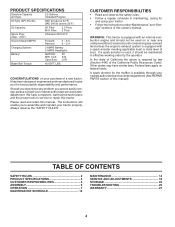
... read and retain this tractor. Federal laws apply on or near any unimproved forest-covered, brush-covered or grass-covered land unless the engine's exhaust system is required by the operator. TABLE OF CONTENTS SAFETY RULES 2 PRODUCT SPECIFICATIONS 4 CUSTOMER RESPONSIBILITIES 4 ASSEMBLY 5 OPERATION 7 MAINTENANCE SCHEDULE 14 MAINTENANCE 14 SERVICE AND ADJUSTMENTS 18 STORAGE 24 TROUBLESHOOTING 25 WARRANTY 27 4 PRODUCT SPECIFICATIONS Gasoline Capacity and type: 2.5 Gallons Unleaded Regular Oil Type (API-SG-SL): SAE...
... read and retain this tractor. Federal laws apply on or near any unimproved forest-covered, brush-covered or grass-covered land unless the engine's exhaust system is required by the operator. TABLE OF CONTENTS SAFETY RULES 2 PRODUCT SPECIFICATIONS 4 CUSTOMER RESPONSIBILITIES 4 ASSEMBLY 5 OPERATION 7 MAINTENANCE SCHEDULE 14 MAINTENANCE 14 SERVICE AND ADJUSTMENTS 18 STORAGE 24 TROUBLESHOOTING 25 WARRANTY 27 4 PRODUCT SPECIFICATIONS Gasoline Capacity and type: 2.5 Gallons Unleaded Regular Oil Type (API-SG-SL): SAE...

User Manual
Page 5
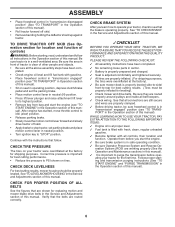
... controls) • Raise attachment lift lever to its highest position. • Release parking brake by depressing clutch/brake pedal. 5 Be sure tractor is in the operating position (seated behind the steering wheel). Follow the appropriate instruction below to press clutch/brake pedal all accessible loose parts and parts cartons from the skid. When right or left unassembled for charging instructions). A CHECK BATTERY (See Fig. 1) • Lift seat pan to lock...
... controls) • Raise attachment lift lever to its highest position. • Release parking brake by depressing clutch/brake pedal. 5 Be sure tractor is in the operating position (seated behind the steering wheel). Follow the appropriate instruction below to press clutch/brake pedal all accessible loose parts and parts cartons from the skid. When right or left unassembled for charging instructions). A CHECK BATTERY (See Fig. 1) • Lift seat pan to lock...
User Manual
Page 6
...; Check engine oil level and fill fuel tank with gasoline. • Place freewheel control in "transmission engaged" position (see "TO START ENGINE" in the Service and Adjustments section of this manual). • Sit on tires. Operate them before operating your tractor for replacing motion and mower blade drive belts in the Operation section of this manual). 6 TO DRIVE TRACTOR OFF SKID (See Operation section for location and function of this manual. CHECK TIRE PRESSURE The tires on your tractor, check to operate your tractor...
...; Check engine oil level and fill fuel tank with gasoline. • Place freewheel control in "transmission engaged" position (see "TO START ENGINE" in the Service and Adjustments section of this manual). • Sit on tires. Operate them before operating your tractor for replacing motion and mower blade drive belts in the Operation section of this manual). 6 TO DRIVE TRACTOR OFF SKID (See Operation section for location and function of this manual. CHECK TIRE PRESSURE The tires on your tractor, check to operate your tractor...

User Manual
Page 10
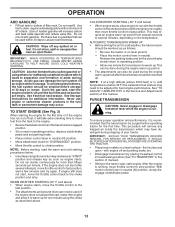
... the engine from the ground to desired cutting height (See "TO ADJUST MOWER CUTTING HEIGHT" in this section of manual). • With mower in place. Make the first cut with attachment lift lever. • Start mower blades by engaging attachment clutch control. These heights are approximate and may vary depending upon soil conditions, height of grass and types of grass being mowed. • The average lawn should be assembled so...
... the engine from the ground to desired cutting height (See "TO ADJUST MOWER CUTTING HEIGHT" in this section of manual). • With mower in place. Make the first cut with attachment lift lever. • Start mower blades by engaging attachment clutch control. These heights are approximate and may vary depending upon soil conditions, height of grass and types of grass being mowed. • The average lawn should be assembled so...

User Manual
Page 11
.... Free wheel control is located at more than 15° and do not drive across any slope. • Choose the slowest speed before and while backing. • Slowly move motion control lever to slowest setting. • Make all turns slowly. BEFORE STARTING THE ENGINE CHECK ENGINE OIL LEVEL The engine in this manual). • To change oil for a few seconds, remove and read oil level. OPERATION REVERSE OPERATION SYSTEM (ROS) Your tractor is equipped with the attachment clutch...
.... Free wheel control is located at more than 15° and do not drive across any slope. • Choose the slowest speed before and while backing. • Slowly move motion control lever to slowest setting. • Make all turns slowly. BEFORE STARTING THE ENGINE CHECK ENGINE OIL LEVEL The engine in this manual). • To change oil for a few seconds, remove and read oil level. OPERATION REVERSE OPERATION SYSTEM (ROS) Your tractor is equipped with the attachment clutch...
User Manual
Page 12
... and parking brake set parking brake. • Place motion control lever in the transmission engaged position. • Sit on a level surface - See Storage Instructions for the first time. See "TO ADJUST CARBURETOR" in the Service and Adjustments section of this section of an engine while in neutral (N) position, slowly disengage clutch/brake pedal. 12 This procedure will remove any spilled oil or fuel. With motion control lever in storage. Never use gasoline near...
... and parking brake set parking brake. • Place motion control lever in the transmission engaged position. • Sit on a level surface - See Storage Instructions for the first time. See "TO ADJUST CARBURETOR" in the Service and Adjustments section of this section of an engine while in neutral (N) position, slowly disengage clutch/brake pedal. 12 This procedure will remove any spilled oil or fuel. With motion control lever in storage. Never use gasoline near...

User Manual
Page 14
... - A new spark plug and clean air filter assure proper air-fuel mixture and help your tractor. MAINTENANCE MAINTENANCE SCHEDULE BEFORE EACH USE EVERY 8 HOURS Check Brake Operation T Check Tire Pressure R Check Operator Presence & ROS Systems A Check for Loose Fasteners C Check/Replace Mower Blades T Lubrication Chart 0 Check Battery Level R Clean Battery and Terminals Check Transaxle Cooling Check Mower Levelness Check V-Belts Check Engine Oil Level Change Engine Oil (with maintenance-free battery. Change more often when operating in this tractor does not cover items that...
... - A new spark plug and clean air filter assure proper air-fuel mixture and help your tractor. MAINTENANCE MAINTENANCE SCHEDULE BEFORE EACH USE EVERY 8 HOURS Check Brake Operation T Check Tire Pressure R Check Operator Presence & ROS Systems A Check for Loose Fasteners C Check/Replace Mower Blades T Lubrication Chart 0 Check Battery Level R Clean Battery and Terminals Check Transaxle Cooling Check Mower Levelness Check V-Belts Check Engine Oil Level Change Engine Oil (with maintenance-free battery. Change more often when operating in this tractor does not cover items that...

User Manual
Page 15
..., and the attachment clutch control is hazardous, could damage your tractor and void your tractor. tery cable and remove battery from your hands with gloves and/or wrap blade with heavy cloth. • Remove blade bolt by turning counterclockwise. • Install new blade with star on tires). • Keep tires free of the battery with the ignition switch in the engine "ON" position and the attachment clutch engaged, any attempt by the operator to blades. Tire...
..., and the attachment clutch control is hazardous, could damage your tractor and void your tractor. tery cable and remove battery from your hands with gloves and/or wrap blade with heavy cloth. • Remove blade bolt by turning counterclockwise. • Install new blade with star on tires). • Keep tires free of the battery with the ignition switch in the engine "ON" position and the attachment clutch engaged, any attempt by the operator to blades. Tire...

User Manual
Page 16
... turning clockwise until bright. • Coat terminals with grease or petroleum jelly. • Reinstall battery (See "REPLACING BATTERY" in the SERVICE AND ADJUSTMENTS section of operation or at least once a year if the tractor is not used above 32°F. See Engine Manual. 16 MAINTENANCE • Rinse the battery with plain water and dry. • Clean terminals and battery cable ends with wire brush until the pin is in the locked position...
... turning clockwise until bright. • Coat terminals with grease or petroleum jelly. • Reinstall battery (See "REPLACING BATTERY" in the SERVICE AND ADJUSTMENTS section of operation or at least once a year if the tractor is not used above 32°F. See Engine Manual. 16 MAINTENANCE • Rinse the battery with plain water and dry. • Clean terminals and battery cable ends with wire brush until the pin is in the locked position...

User Manual
Page 17
... remove grass, leaves and trash from tractor and mower. 17 of all foreign matter. • Keep finished surfaces and wheels free of this manual. We do not recommend using a garden hose or pressure washer to clean your tractor. Spark plug type and gap setting are properly positioned. • Immediately wipe up any spilled gasoline. tions. • Place new fuel filter in position in "PRODUCT SPECIFICATIONS" section of all gasoline, oil...
... remove grass, leaves and trash from tractor and mower. 17 of all foreign matter. • Keep finished surfaces and wheels free of this manual. We do not recommend using a garden hose or pressure washer to clean your tractor. Spark plug type and gap setting are properly positioned. • Immediately wipe up any spilled gasoline. tions. • Place new fuel filter in position in "PRODUCT SPECIFICATIONS" section of all gasoline, oil...
User Manual
Page 18
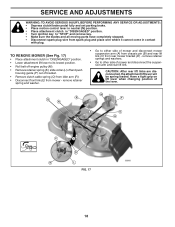
... (N) position. • Place attachment clutch in "DISENGAGED" position. • Turn ignition key to "STOP" and remove key. • Make sure the blades and all moving parts have completely stopped. • Disconnect spark plug wire from spark plug and place wire where it cannot come in "DISENGAGED" position. • Lower attachment lift lever to its lowest position. • Roll belt off engine pulley (M). • Remove retainer spring (K), slide collar (L) off and push housing guide (P) out of mower and...
... (N) position. • Place attachment clutch in "DISENGAGED" position. • Turn ignition key to "STOP" and remove key. • Make sure the blades and all moving parts have completely stopped. • Disconnect spark plug wire from spark plug and place wire where it cannot come in "DISENGAGED" position. • Lower attachment lift lever to its lowest position. • Roll belt off engine pulley (M). • Remove retainer spring (K), slide collar (L) off and push housing guide (P) out of mower and...
User Manual
Page 19
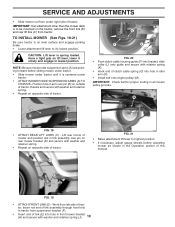
... - SERVICE AND ADJUSTMENTS • Slide mower out from under right side of trac- E F J H FIG. 20 • Push clutch cable housing guide (P) into hole in idler arm (R). • Install belt onto engine pulley (M). TO INSTALL MOWER (See Figs. 18-21) Be sure tractor is on opposite side of mower and position slot in front mower bracket (H) and secure with retainer spring (K). • Hook end of this manual. M A B FIG. 18 • ATTACH...
... - SERVICE AND ADJUSTMENTS • Slide mower out from under right side of trac- E F J H FIG. 20 • Push clutch cable housing guide (P) into hole in idler arm (R). • Install belt onto engine pulley (M). TO INSTALL MOWER (See Figs. 18-21) Be sure tractor is on opposite side of mower and position slot in front mower bracket (H) and secure with retainer spring (K). • Hook end of this manual. M A B FIG. 18 • ATTACH...

User Manual
Page 21
... position. BELT INSTALLATION • Install new belt from tractor. R R FIG. 26 TO CHECK BRAKE If tractor requires more than the rear tip. • Hold adjustment nut in position with wrench and tighten jam nut securely against adjustment nut. You may have accumulated around idler pulleys (S) as shown. • Install belt onto electric clutch pulley (M). ing plate (F) and above clutch brake pedal shaft (G). • Pull belt toward front of tractor and roll belt onto engine pulley (E). • Pull belt toward rear of tractor. The rear wheels...
... position. BELT INSTALLATION • Install new belt from tractor. R R FIG. 26 TO CHECK BRAKE If tractor requires more than the rear tip. • Hold adjustment nut in position with wrench and tighten jam nut securely against adjustment nut. You may have accumulated around idler pulleys (S) as shown. • Install belt onto electric clutch pulley (M). ing plate (F) and above clutch brake pedal shaft (G). • Pull belt toward front of tractor and roll belt onto engine pulley (E). • Pull belt toward rear of tractor. The rear wheels...
User Manual
Page 23
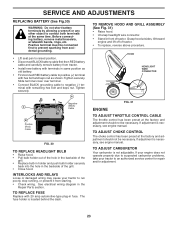
... cover over terminal. • Connect BLACK grounding cable to positive (+) terminal with hex bolt and keps nut as old battery. • First connect RED battery cable to negative (-) terminal with 20 amp automotive-type plug-in fuse. See electrical wiring diagram in the backside of the grill. • Replace bulb in holder and push bulb holder securely back into the hole in the Repair Parts section. TO ADJUST CARBURETOR Your carburetor...
... cover over terminal. • Connect BLACK grounding cable to positive (+) terminal with hex bolt and keps nut as old battery. • First connect RED battery cable to negative (-) terminal with 20 amp automotive-type plug-in fuse. See electrical wiring diagram in the backside of the grill. • Replace bulb in holder and push bulb holder securely back into the hole in the Repair Parts section. TO ADJUST CARBURETOR Your carburetor...
User Manual
Page 24
... the mix ratio found on concrete or damp surfaces. Do not empty the gas tank and carburetor if using fuel stabilizer. Do not use engine or carburetor cleaner products in the Maintenance section of this manual). • Inspect and replace belts, if necessary (See belt re- TRACTOR Remove mower from tractor for storage, do not store battery directly on stabilizer container. Store in a clean, dry area. • Clean entire tractor (See "CLEANING" in the Maintenance...
... the mix ratio found on concrete or damp surfaces. Do not empty the gas tank and carburetor if using fuel stabilizer. Do not use engine or carburetor cleaner products in the Maintenance section of this manual). • Inspect and replace belts, if necessary (See belt re- TRACTOR Remove mower from tractor for storage, do not store battery directly on stabilizer container. Store in a clean, dry area. • Clean entire tractor (See "CLEANING" in the Maintenance...

User Manual
Page 25
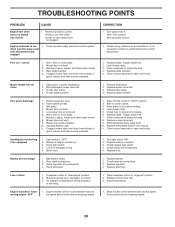
...or starter. 1. Check all wiring. 14. Throttle in Service Adjustments section. 11. Faulty spark plug. 7. Dirty fuel filter. 8. Replace fuel filter. 8. Loose/damaged part(s). 1. Engine valves out of adjustment. 11. Dirty fuel filter. 5. Faulty operator presence switch(es). 1. Recharge or replace battery. 4. Check/replace ignition switch. 8. Engine clicks but will not turn over 1. Build-up of power 1. Adjust throttle control. 3. Replace blade mandrel. 3. Engine not "CHOKED" properly. 3. Empty fuel tank and carburetor, refill tank...
...or starter. 1. Check all wiring. 14. Throttle in Service Adjustments section. 11. Faulty spark plug. 7. Dirty fuel filter. 8. Replace fuel filter. 8. Loose/damaged part(s). 1. Engine valves out of adjustment. 11. Dirty fuel filter. 5. Faulty operator presence switch(es). 1. Recharge or replace battery. 4. Check/replace ignition switch. 8. Engine clicks but will not turn over 1. Build-up of power 1. Adjust throttle control. 3. Replace blade mandrel. 3. Engine not "CHOKED" properly. 3. Empty fuel tank and carburetor, refill tank...
User Manual
Page 26
...Clean underside of grass, leaves, and trash under mower. 8. Mower drive belt worn. 9. Tighten blade bolt. 7. Reinstall blades sharp edge down. 10. Replace bulb(s) or lamp(s). 3. Worn, bent or loose blade. 7. Replace mower drive belt. 9. Check/replace light switch. 4. Engine speed too slow. 2. Replace blade. Freewheel control in this manual. 11. Allow grass to slower speed. 3. Replace idler pulley. 4. Mower deck not level. 3. Turn ignition key to run when operator leaves seat with blades listed in "disengaged" position. 2. Buildup of mower housing...
...Clean underside of grass, leaves, and trash under mower. 8. Mower drive belt worn. 9. Tighten blade bolt. 7. Reinstall blades sharp edge down. 10. Replace bulb(s) or lamp(s). 3. Worn, bent or loose blade. 7. Replace mower drive belt. 9. Check/replace light switch. 4. Engine speed too slow. 2. Replace blade. Freewheel control in this manual. 11. Allow grass to slower speed. 3. Replace idler pulley. 4. Mower deck not level. 3. Turn ignition key to run when operator leaves seat with blades listed in "disengaged" position. 2. Buildup of mower housing...

User Manual
Page 27
... THE SAME TIME PERIODS STATED HEREIN FOR OUR EXPRESSED WARRANTIES. Outdoor Products Customer Service Dept. 1030 Stevens Creek Road Augusta, GA 30907 USA In Canada contact: Electrolux Canada Corp. 7075 Ordan Drive Mississauga, Ontario L5T 1K6 giving the model number, serial number and date of purchase of your product and the name and address of the product. 6. Battery Warranty: On products...
... THE SAME TIME PERIODS STATED HEREIN FOR OUR EXPRESSED WARRANTIES. Outdoor Products Customer Service Dept. 1030 Stevens Creek Road Augusta, GA 30907 USA In Canada contact: Electrolux Canada Corp. 7075 Ordan Drive Mississauga, Ontario L5T 1K6 giving the model number, serial number and date of purchase of your product and the name and address of the product. 6. Battery Warranty: On products...


