
User Manual
Page 2
..., or unclogging the discharge guard. • Operate machine only in . These operators should evaluate their ability to operate the riding mower safely enough to cool before operating or storing the machine. Clean any oil or fuel spillage before storage. Allow machine to protect ...themselves and others from serious injury. • Follow the manufacturer's recommendation for Ride-On Mowers DANGER: THIS CUTTING MACHINE IS CAPABLE OF AMPUTATING HANDS AND FEET AND THROWING OBJECTS. WARNING II. Wash hands tip-over accidents, which...
..., or unclogging the discharge guard. • Operate machine only in . These operators should evaluate their ability to operate the riding mower safely enough to cool before operating or storing the machine. Clean any oil or fuel spillage before storage. Allow machine to protect ...themselves and others from serious injury. • Follow the manufacturer's recommendation for Ride-On Mowers DANGER: THIS CUTTING MACHINE IS CAPABLE OF AMPUTATING HANDS AND FEET AND THROWING OBJECTS. WARNING II. Wash hands tip-over accidents, which...

User Manual
Page 3
... towing. Repair, if necessary, before and while backing. • Never carry children, even with manufacturer's recommended parts, when necessary. • Mower blades are sharp. Always look behind before restarting. • Never make any fuelsoaked debris. Stop machine if anyone enters the area. • ... the fuel tank or container opening at the hitch point. • Follow the manufacturer's recommendation for weight limits for Ride-On Mowers III. SAFETY RULES Safe Operation Practices for towed equipment and towing on slopes. • Never allow extra distance to be run...
... towing. Repair, if necessary, before and while backing. • Never carry children, even with manufacturer's recommended parts, when necessary. • Mower blades are sharp. Always look behind before restarting. • Never make any fuelsoaked debris. Stop machine if anyone enters the area. • ... the fuel tank or container opening at the hitch point. • Follow the manufacturer's recommendation for weight limits for Ride-On Mowers III. SAFETY RULES Safe Operation Practices for towed equipment and towing on slopes. • Never allow extra distance to be run...
User Manual
Page 8
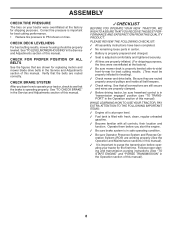
.... ✓ Be sure Operator Presence System and Reverse Operation System (ROS) are properly in flated for leveling). ✓ Check mower and drive belts. Operate them before you learn how to operate your tractor, check to purge the transmission before operating your tractor were overin...transmission purging instructions (See "TO START ENGINE" and "PURGE TRANSMISSION" in the Service and Adjustments section of this manual. See"TO LEVEL MOWER HOUSING"in the Operation section of this manual). 8 Correct tire pressure is properly leveled side-to-side/ front-to PSI shown on ...
.... ✓ Be sure Operator Presence System and Reverse Operation System (ROS) are properly in flated for leveling). ✓ Check mower and drive belts. Operate them before you learn how to operate your tractor, check to purge the transmission before operating your tractor were overin...transmission purging instructions (See "TO START ENGINE" and "PURGE TRANSMISSION" in the Service and Adjustments section of this manual. See"TO LEVEL MOWER HOUSING"in the Operation section of this manual). 8 Correct tire pressure is properly leveled side-to-side/ front-to PSI shown on ...

User Manual
Page 9
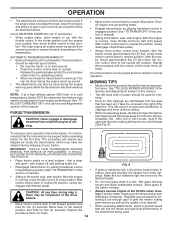
.../or property damage. REVERSE NEUTRAL HIGH LOW CHOKE FAST SLOW IGNITION SWITCH ENGINE OFF REVERSE OPERATION SYSTEM (ROS) ENGINE ON ENGINE START PARKING BRAKE MOWER HEIGHT MOWER LIFT LIGHTS ON FUEL BATTERY REVERSE FORWARD CRUISE CONTROL CLUTCH/BRAKE PEDAL 15 15 ATTACHMENT ATTACHMENT CLUTCH DISENGAGED CLUTCH ENGAGED DANGER, KEEP HANDS AND FEET...
.../or property damage. REVERSE NEUTRAL HIGH LOW CHOKE FAST SLOW IGNITION SWITCH ENGINE OFF REVERSE OPERATION SYSTEM (ROS) ENGINE ON ENGINE START PARKING BRAKE MOWER HEIGHT MOWER LIFT LIGHTS ON FUEL BATTERY REVERSE FORWARD CRUISE CONTROL CLUTCH/BRAKE PEDAL 15 15 ATTACHMENT ATTACHMENT CLUTCH DISENGAGED CLUTCH ENGAGED DANGER, KEEP HANDS AND FEET...

User Manual
Page 10
... - Used for declutching and braking the tractor and starting the engine. Used to engage the mower blades, or other attachments mounted to your tractor to raise and lower the mower deck or other powered attachment while in reverse. LIGHT SWITCH - Used to familiarize yourself with ...of various controls and adjustments. ATTACHMENT CLUTCH LEVER - Save this manual for pushing or slowly towing the tractor with the locations of mower deck or other attachments mounted to release attachment lift lever when changing its position. Used for starting and controling engine speed. 10...
... - Used for declutching and braking the tractor and starting the engine. Used to engage the mower blades, or other attachments mounted to your tractor to raise and lower the mower deck or other powered attachment while in reverse. LIGHT SWITCH - Used to familiarize yourself with ...of various controls and adjustments. ATTACHMENT CLUTCH LEVER - Save this manual for pushing or slowly towing the tractor with the locations of mower deck or other attachments mounted to release attachment lift lever when changing its position. Used for starting and controling engine speed. 10...

User Manual
Page 11
...height. • Grasp lift lever. • Press plunger with the engine running , any adjustments or repairs. CAUTION: Always stop mower blades,move throttle control between half and full speed (fast) position. When engine is equipped with the engine not running. The ... PARKING BRAKE "ENGAGED" POSITION CLUTCH/BRAKE PEDAL "DRIVE" POSITION MOTION CONTROL LEVER PARKING BRAKE "DISENGAGED" POSITION FIG. 5 STOPPING (See Fig. 5) MOWER BLADES - • To stop tractor completely,as described above,before stopping may cause engine to "backfire". • Turn ignition key to...
...height. • Grasp lift lever. • Press plunger with the engine running , any adjustments or repairs. CAUTION: Always stop mower blades,move throttle control between half and full speed (fast) position. When engine is equipped with the engine not running. The ... PARKING BRAKE "ENGAGED" POSITION CLUTCH/BRAKE PEDAL "DRIVE" POSITION MOTION CONTROL LEVER PARKING BRAKE "DISENGAGED" POSITION FIG. 5 STOPPING (See Fig. 5) MOWER BLADES - • To stop tractor completely,as described above,before stopping may cause engine to "backfire". • Turn ignition key to...

User Manual
Page 12
...must remain fully and centrally positioned in the seat to prevent the engine from hesitating or cutting off the ground when mower is at level surface. • Adjust mower to ROS "ON" position. • Look down hills. ATTACHMENT CLUTCH LEVER "DISENGAGED" POSITION "ENGAGED" POSITION ... an operator presence sensing switch. GAUGE WHEEL MOUNTING BRACKET 01423 3/8-16 LOCKNUT 3/8 WASHER GAUGE WHEEL FIG. 6 SHOULDER BOLT TO OPERATE MOWER (See Fig. 7) Your tractor is necessary to allow reverse operation with the attachment clutch engaged, should be done when the operator ...
...must remain fully and centrally positioned in the seat to prevent the engine from hesitating or cutting off the ground when mower is at level surface. • Adjust mower to ROS "ON" position. • Look down hills. ATTACHMENT CLUTCH LEVER "DISENGAGED" POSITION "ENGAGED" POSITION ... an operator presence sensing switch. GAUGE WHEEL MOUNTING BRACKET 01423 3/8-16 LOCKNUT 3/8 WASHER GAUGE WHEEL FIG. 6 SHOULDER BOLT TO OPERATE MOWER (See Fig. 7) Your tractor is necessary to allow reverse operation with the attachment clutch engaged, should be done when the operator ...
User Manual
Page 14
... and set . • Disengage transmission by turning to full forward position and hold for five (5) seconds. See "TO LEVEL MOWER HOUSING" in this manual. • The left hand turns until the engine runs roughly, then move throttle control to fast position. Move...and allow engine to run - See "TO ADJUST CARBURETOR" in neutral. Your transmission is on a level surface - MOWING TIPS • Mower should be mowed twice to neutral (N) position. IMPORTANT: SHOULD YOUR TRANSMISSION REQUIRE REMOVAL FOR SERVICE OR REPLACEMENT, IT SHOULD BE PURGED AFTER REINSTALLATION...
... and set . • Disengage transmission by turning to full forward position and hold for five (5) seconds. See "TO LEVEL MOWER HOUSING" in this manual. • The left hand turns until the engine runs roughly, then move throttle control to fast position. Move...and allow engine to run - See "TO ADJUST CARBURETOR" in neutral. Your transmission is on a level surface - MOWING TIPS • Mower should be mowed twice to neutral (N) position. IMPORTANT: SHOULD YOUR TRANSMISSION REQUIRE REMOVAL FOR SERVICE OR REPLACEMENT, IT SHOULD BE PURGED AFTER REINSTALLATION...
User Manual
Page 15
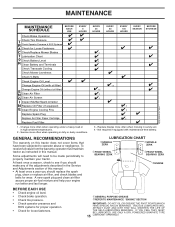
... pressure. • Check operator presence and ROS systems for proper operation. • Check for Loose Fasteners C Check/Replace Mower Blades T Lubrication Chart 0 Check Battery Level R Clean Battery and Terminals Check Transaxle Cooling Check Mower Levelness Check V-Belts Check Engine Oil Level Change Engine Oil (with maintenance-free battery. Not required if equipped...
... pressure. • Check operator presence and ROS systems for proper operation. • Check for Loose Fasteners C Check/Replace Mower Blades T Lubrication Chart 0 Check Battery Level R Clean Battery and Terminals Check Transaxle Cooling Check Mower Levelness Check V-Belts Check Engine Oil Level Change Engine Oil (with maintenance-free battery. Not required if equipped...
User Manual
Page 16
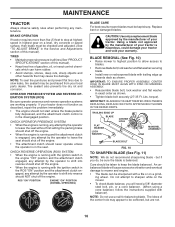
... OPERATION SYSTEM (ROS) Be sure operator presence and reverse operation systems are not. 828 16 BLADE REMOVAL (See Fig. 10) • Raise mower to highest position to allow access to blades. • Remove blade bolt, lock washer and flat washer in the seat. MAINTENANCE TRACTOR ... all tires (See"PRODUCT SPECIFICATIONS" section of this manual). ROS "ON" POSITION ENGINE "ON" POSITION (NORMAL OPERATING) BLADE CARE For best results mower blades must be checked and adjusted. (See "TO ADJUST BRAKE" in the ROS "ON" position and the attachment clutch engaged, any attempt by ...
... OPERATION SYSTEM (ROS) Be sure operator presence and reverse operation systems are not. 828 16 BLADE REMOVAL (See Fig. 10) • Raise mower to highest position to allow access to blades. • Remove blade bolt, lock washer and flat washer in the seat. MAINTENANCE TRACTOR ... all tires (See"PRODUCT SPECIFICATIONS" section of this manual). ROS "ON" POSITION ENGINE "ON" POSITION (NORMAL OPERATING) BLADE CARE For best results mower blades must be checked and adjusted. (See "TO ADJUST BRAKE" in the ROS "ON" position and the attachment clutch engaged, any attempt by ...
User Manual
Page 18
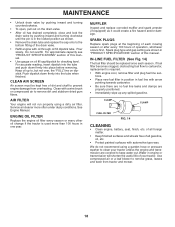
.... AIR FILTER Your engine will shorten the useful life of this manual. Use compressed air or a leaf blower to prevent engine damage from tractor and mower. 18 MAINTENANCE • Unlock drain valve by pushing inward and turning counterclockwise. • To open, pull out on the drain valve. • After oil has...
.... AIR FILTER Your engine will shorten the useful life of this manual. Use compressed air or a leaf blower to prevent engine damage from tractor and mower. 18 MAINTENANCE • Unlock drain valve by pushing inward and turning counterclockwise. • To open, pull out on the drain valve. • After oil has...
User Manual
Page 19
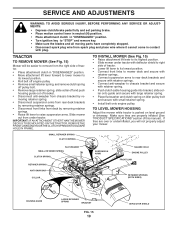
...place wire where it cannot come in contact with small retainer spring. • Install belt onto engine pulley. TO LEVEL MOWER HOUSING Adjust the mower while tractor is parked on idler pulley bolt and secure with plug. SERVICE AND ADJUSTMENTS WARNING: TO AVOID SERIOUS INJURY, BEFORE...spark plug wire from chassis bracket by removing retainer springs. • Raise lift lever to its lowest position. • Connect front links to mower deck and secure with retainer springs.. • Connect suspension arms to rear deck brackets and secure with retainer springs. • Connect anti-swaybar...
...place wire where it cannot come in contact with small retainer spring. • Install belt onto engine pulley. TO LEVEL MOWER HOUSING Adjust the mower while tractor is parked on idler pulley bolt and secure with plug. SERVICE AND ADJUSTMENTS WARNING: TO AVOID SERIOUS INJURY, BEFORE...spark plug wire from chassis bracket by removing retainer springs. • Raise lift lever to its lowest position. • Connect front links to mower deck and secure with retainer springs.. • Connect suspension arms to rear deck brackets and secure with retainer springs. • Connect anti-swaybar...
User Manual
Page 20
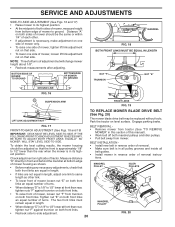
...must remain equal in length. • When distance "D" is 1/8" to 1/2" lower at front than the rear when the mower is 1/8" to 1/2" lower at bottom edge of mower housing as shown. • Before making any necessary adjustments, check that both front links are not equal in this section...highest position. Distance "A" on both front links. • Recheck side-to-side adjustment. 20 MANDREL PULLEY FIG. 20 BOTTOM EDGE OF MOWER TO GROUND BOTTOM EDGE OF MOWER TO GROUND MANDREL "D" "D" FIG. 18 BOTH FRONT LINKS MUST BE EQUAL IN LENGTH NUT "F" TRUNNION NUT "E" "A" GROUND LINE "A" FIG...
...must remain equal in length. • When distance "D" is 1/8" to 1/2" lower at front than the rear when the mower is 1/8" to 1/2" lower at bottom edge of mower housing as shown. • Before making any necessary adjustments, check that both front links are not equal in this section...highest position. Distance "A" on both front links. • Recheck side-to-side adjustment. 20 MANDREL PULLEY FIG. 20 BOTTOM EDGE OF MOWER TO GROUND BOTTOM EDGE OF MOWER TO GROUND MANDREL "D" "D" FIG. 18 BOTH FRONT LINKS MUST BE EQUAL IN LENGTH NUT "F" TRUNNION NUT "E" "A" GROUND LINE "A" FIG...
User Manual
Page 21
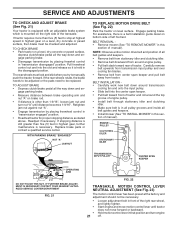
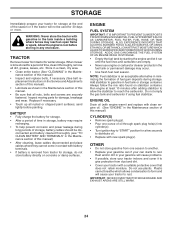
...and turn engine off. TO ADJUST BRAKE • Depress clutch/brake pedal all belt guides and keepers. • Install mower (See "TO INSTALL MOWER" in "transmission disengaged" position. Engage parking brake. Carefully remove belt upwards from transmission input pulley and over cooling fan ...transmission by placing freewhel control in this section of the right rear wheel, and lightly tighten. BELT REMOVAL • Remove mower (See "TO REMOVE MOWER" in the disengaged position. BELT INSTALLATION • Carefully work new belt down around transmission cooling fan and onto the input...
...and turn engine off. TO ADJUST BRAKE • Depress clutch/brake pedal all belt guides and keepers. • Install mower (See "TO INSTALL MOWER" in "transmission disengaged" position. Engage parking brake. Carefully remove belt upwards from transmission input pulley and over cooling fan ...transmission by placing freewhel control in this section of the right rear wheel, and lightly tighten. BELT REMOVAL • Remove mower (See "TO REMOVE MOWER" in the disengaged position. BELT INSTALLATION • Carefully work new belt down around transmission cooling fan and onto the input...

User Manual
Page 22
... the engine, it should be purged after reinstallation and before operating the tractor. NOTE: If additional clearance is needed to get to adjustment bolt, move mower deck height to allow wheel removal (rear wheel contains a square key - FIG. 23 ADJUSTMENT BOLT TRANSMISSION REMOVAL/REPLACEMENT Should your local parts dealer. Keep sparks...
... the engine, it should be purged after reinstallation and before operating the tractor. NOTE: If additional clearance is needed to get to adjustment bolt, move mower deck height to allow wheel removal (rear wheel contains a square key - FIG. 23 ADJUSTMENT BOLT TRANSMISSION REMOVAL/REPLACEMENT Should your local parts dealer. Keep sparks...
User Manual
Page 24
When mower is to be stored for a period of time, clean it run until the fuel lines and carburetor are securely fastened. Store in a clean, dry area. &#... with a suitable protective cover that all rusted or chipped paint surfaces; Do not empty the gas tank and carburetor if using fuel stabilizer. TRACTOR Remove mower from tractor for 30 days or more. NOTE: Fuel stabilizer is removed from tractor for damage, breakage and wear.
When mower is to be stored for a period of time, clean it run until the fuel lines and carburetor are securely fastened. Store in a clean, dry area. &#... with a suitable protective cover that all rusted or chipped paint surfaces; Do not empty the gas tank and carburetor if using fuel stabilizer. TRACTOR Remove mower from tractor for 30 days or more. NOTE: Fuel stabilizer is removed from tractor for damage, breakage and wear.

User Manual
Page 25
Loose or damaged wiring. 9. Engine valves out of grass, leaves and trash under mower. 4. Clean/replace air filter. 6. See "To Adjust Carburetor" in Operation section. 3. Contact an authorized service center/department. Hard to start 1. Dirty ... solenoid or starter. Loss of adjustment. 15. Faulty spark plug. 7. Loose or damaged wiring. 14. Carburetor out of power 1. Engine valves out of mower housing. 4. Clean underside of adjustment. 1. Check oil level/change spark plug. 7. Empty fuel tank and carburetor, refill tank with fresh gasoline and...
Loose or damaged wiring. 9. Engine valves out of grass, leaves and trash under mower. 4. Clean/replace air filter. 6. See "To Adjust Carburetor" in Operation section. 3. Contact an authorized service center/department. Hard to start 1. Dirty ... solenoid or starter. Loss of adjustment. 15. Faulty spark plug. 7. Loose or damaged wiring. 14. Carburetor out of power 1. Engine valves out of mower housing. 4. Clean underside of adjustment. 1. Check oil level/change spark plug. 7. Empty fuel tank and carburetor, refill tank with fresh gasoline and...

User Manual
Page 26
...and trash around mandrels. 1. Engine continues to dry before mowing. 4. See Operation section. 1. Tighten blade bolt. 2. Replace blade mandrel. 5. Mower deck not level. 5. Worn, bent or loose blade. 7. Improper blades used. 11. Shift to ROS "ON" position. Headlight(s) not working...and trash around mandrels. 1. Replace bulb(s) or lamp(s). 3. Replace battery. 2. Reverse operation system (ROS) is not "ON" while mower or other attachment is shifted into reverse 1. Check wiring, switches and connections. Bent blade mandrel. 5. Battery will not rotate 1. Motion ...
...and trash around mandrels. 1. Engine continues to dry before mowing. 4. See Operation section. 1. Tighten blade bolt. 2. Replace blade mandrel. 5. Mower deck not level. 5. Worn, bent or loose blade. 7. Improper blades used. 11. Shift to ROS "ON" position. Headlight(s) not working...and trash around mandrels. 1. Replace bulb(s) or lamp(s). 3. Replace battery. 2. Reverse operation system (ROS) is not "ON" while mower or other attachment is shifted into reverse 1. Check wiring, switches and connections. Bent blade mandrel. 5. Battery will not rotate 1. Motion ...


