
User Manual
Page 2
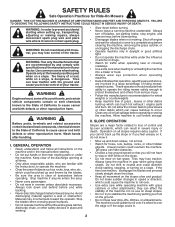
.... Allow machine to stabilize the machine by putting your foot on a slope, is dangerous. Operation on all times. • Only allow the mower deck to the State of a load, while on the ground. • Do not mow near drop-offs, ditches, or embankments. Do no... vehicle components contain or emit chemicals known to lose control of the machine. These operators should evaluate their ability to operate the riding mower safely enough to protect themselves and others from serious injury. • Follow the manufacturer's recommendation for all instructions on a slope. Uneven...
.... Allow machine to stabilize the machine by putting your foot on a slope, is dangerous. Operation on all times. • Only allow the mower deck to the State of a load, while on the ground. • Do not mow near drop-offs, ditches, or embankments. Do no... vehicle components contain or emit chemicals known to lose control of the machine. These operators should evaluate their ability to operate the riding mower safely enough to protect themselves and others from serious injury. • Follow the manufacturer's recommendation for all instructions on a slope. Uneven...

User Manual
Page 3
... will not have been given rides in reverse unless absolutely necessary. Children are sharp. TOWING • Tow only with manufacturer's recommended parts, when necessary. • Mower blades are often attracted to cool before restarting. • Never make any fuelsoaked debris. SERVICE SAFE HANDLING OF GASOLINE To avoid personal injury or property...the blade or wear gloves, and use extreme care in the watchful care of a responsible adult other debris build-up and down for Ride-On Mowers III. Always look down and behind and down for small children. • Mow up .
... will not have been given rides in reverse unless absolutely necessary. Children are sharp. TOWING • Tow only with manufacturer's recommended parts, when necessary. • Mower blades are often attracted to cool before restarting. • Never make any fuelsoaked debris. SERVICE SAFE HANDLING OF GASOLINE To avoid personal injury or property...the blade or wear gloves, and use extreme care in the watchful care of a responsible adult other debris build-up and down for Ride-On Mowers III. Always look down and behind and down for small children. • Mow up .
User Manual
Page 7
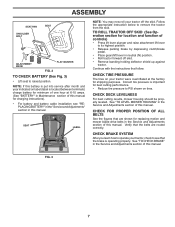
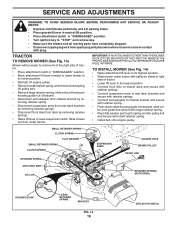
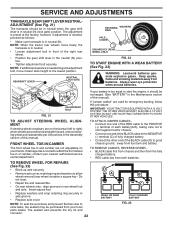
...Remove banding holding deflector shield up against tractor. CHECK FOR PROPER POSITION OF ALL BELTS See the figures that are routed correctly. See "TO LEVEL MOWER HOUSING" in this manual. ASSEMBLY SEAT PAN SHOULDER BOLT SEAT 00835 ADJUSTMENT KNOB FLAT WASHER FIG. 2 TO CHECK BATTERY (See Fig. 3) &#...8226; Lift seat to remove the tractor from the skid. Continue with the instructions that the belts are shown for replacing motion and mower blade drive belts in the Service and Adjustments section of this battery is put into service after month and year indicated on your tractor,...
...Remove banding holding deflector shield up against tractor. CHECK FOR PROPER POSITION OF ALL BELTS See the figures that are routed correctly. See "TO LEVEL MOWER HOUSING" in this manual. ASSEMBLY SEAT PAN SHOULDER BOLT SEAT 00835 ADJUSTMENT KNOB FLAT WASHER FIG. 2 TO CHECK BATTERY (See Fig. 3) &#...8226; Lift seat to remove the tractor from the skid. Continue with the instructions that the belts are shown for replacing motion and mower blade drive belts in the Service and Adjustments section of this battery is put into service after month and year indicated on your tractor,...

User Manual
Page 8
...brake system is properly leveled side-to-side/ front-to-rear for best cutting results. (Tires must be properly inflated for leveling). ✓ Check mower and drive belts. PLEASE REVIEW THE FOLLOWING CHECKLIST: ✓ All assembly instructions have been completed. ✓ No remaining loose parts in carton. &#... TO USE YOUR TRACTOR, PAY EXTRA ATTENTION TO THE FOLLOWING IMPORTANT ITEMS: ✓ Engine oil is at the factory). ✓ Be sure mower deck is in this manual). 8 ASSEMBLY ✓CHECKLIST BEFORE YOU OPERATE YOUR NEW TRACTOR, WE WISH TO ASSURE THAT YOU RECEIVE THE BEST ...
...brake system is properly leveled side-to-side/ front-to-rear for best cutting results. (Tires must be properly inflated for leveling). ✓ Check mower and drive belts. PLEASE REVIEW THE FOLLOWING CHECKLIST: ✓ All assembly instructions have been completed. ✓ No remaining loose parts in carton. &#... TO USE YOUR TRACTOR, PAY EXTRA ATTENTION TO THE FOLLOWING IMPORTANT ITEMS: ✓ Engine oil is at the factory). ✓ Be sure mower deck is in this manual). 8 ASSEMBLY ✓CHECKLIST BEFORE YOU OPERATE YOUR NEW TRACTOR, WE WISH TO ASSURE THAT YOU RECEIVE THE BEST ...

User Manual
Page 9
... OPERATION SYSTEM (ROS) ENGINE ON ENGINE START PARKING BRAKE PARKING BRAKE PARKING BRAKE LOCKED UNLOCKED OVER TEMP LIGHT FUEL OIL PRESSURE BATTERY REVERSE FORWARD MOWER HEIGHT 15 MOWER LIFT 15 ATTACHMENT ATTACHMENT CLUTCH DISENGAGED CLUTCH ENGAGED BRAKE/CLUTCH PEDAL KEEP AREA CLEAR SLOPE HAZARDS (SEE SAFETY RULES SECTION) LIGHTS ON FREE WHEEL...
... OPERATION SYSTEM (ROS) ENGINE ON ENGINE START PARKING BRAKE PARKING BRAKE PARKING BRAKE LOCKED UNLOCKED OVER TEMP LIGHT FUEL OIL PRESSURE BATTERY REVERSE FORWARD MOWER HEIGHT 15 MOWER LIFT 15 ATTACHMENT ATTACHMENT CLUTCH DISENGAGED CLUTCH ENGAGED BRAKE/CLUTCH PEDAL KEEP AREA CLEAR SLOPE HAZARDS (SEE SAFETY RULES SECTION) LIGHTS ON FREE WHEEL...

User Manual
Page 10
...IGNITION SWITCH - Locks clutch/brake pedal into the brake position. THROTTLE/CHOKE CONTROL - CLUTCH/BRAKE PEDAL - LIGHT SWITCH - Allows operation of mower deck or other attachments mounted to familiarize yourself with the locations of various controls and adjustments. ATTACHMENT CLUTCH LEVER - Used to the safety ...stopping the engine. Used for future reference. Turns the headlights on and off. Used to raise, lower, and adjust the mower deck or other attachments mounted to your tractor to your tractor. LIGHT SWITCH THROTTLE/CHOKE CONTROL CLUTCH/BRAKE PEDAL ATTACHMENT CLUTCH ...
...IGNITION SWITCH - Locks clutch/brake pedal into the brake position. THROTTLE/CHOKE CONTROL - CLUTCH/BRAKE PEDAL - LIGHT SWITCH - Allows operation of mower deck or other attachments mounted to familiarize yourself with the locations of various controls and adjustments. ATTACHMENT CLUTCH LEVER - Used to the safety ...stopping the engine. Used for future reference. Turns the headlights on and off. Used to raise, lower, and adjust the mower deck or other attachments mounted to your tractor to your tractor. LIGHT SWITCH THROTTLE/CHOKE CONTROL CLUTCH/BRAKE PEDAL ATTACHMENT CLUTCH ...

User Manual
Page 11
... stopping may cause engine to "backfire". • Turn ignition key to neutral (N) position. FIG. 5 STOPPING (See Fig. 5) MOWER BLADES • To stop engine when stopping tractor on grass areas. Always remove key when leaving tractor to prevent unauthorized use choke to stop...TRACTOR TO SET PARKING BRAKE (See Fig. 5) Your tractor is approximately 1-1/2" to "DISENGAGED" position. To eliminate this possibility, always stop mower blades,move attachment clutch lever to 4". to start movement. IMPORTANT: BRING TRACTOR TO A COMPLETE STOP BEFORE SHIFTING OR CHANGING GEARS. NOTE:...
... stopping may cause engine to "backfire". • Turn ignition key to neutral (N) position. FIG. 5 STOPPING (See Fig. 5) MOWER BLADES • To stop engine when stopping tractor on grass areas. Always remove key when leaving tractor to prevent unauthorized use choke to stop...TRACTOR TO SET PARKING BRAKE (See Fig. 5) Your tractor is approximately 1-1/2" to "DISENGAGED" position. To eliminate this possibility, always stop mower blades,move attachment clutch lever to 4". to start movement. IMPORTANT: BRING TRACTOR TO A COMPLETE STOP BEFORE SHIFTING OR CHANGING GEARS. NOTE:...

User Manual
Page 12
...the engine from damage when transporting your tractor. 12 USING THE REVERSE OPERATION SYSTEM • Depress clutch/brake pedal all turns slowly. TO STOP MOWER BLADES (See Fig. 6) Disengage attachment clutch control. Be sure you to leave the seat with the engine running , turn ignition key counterclockwise ... hills. • Avoid stopping or changing speed on rough, rolling terrain or hills. • Select desired height of cut. • Start mower blades by the operator to lose control of the ROS is placed in neutral (N) position. • Do not push or tow tractor at more...
...the engine from damage when transporting your tractor. 12 USING THE REVERSE OPERATION SYSTEM • Depress clutch/brake pedal all turns slowly. TO STOP MOWER BLADES (See Fig. 6) Disengage attachment clutch control. Be sure you to leave the seat with the engine running , turn ignition key counterclockwise ... hills. • Avoid stopping or changing speed on rough, rolling terrain or hills. • Select desired height of cut. • Start mower blades by the operator to lose control of the ROS is placed in neutral (N) position. • Do not push or tow tractor at more...

User Manual
Page 14
...being used for best mowing performance. Make first cut desired. • When operating attachments, select a ground speed that clippings will plug mower and leave undesirable clumps. Allow grass to dry before mowing. • Always operate engine at full throttle when mowing to assure better mowing...of the machine. FIG. 7 • If grass is wet. Wet grass will discharge away from dried clippings. OPERATION MOWING TIPS • Mower should be mowed twice to reduce load and possible fire hazard from shrubs, fences, driveways, etc. Have the cut . Regulate ground speed by...
...being used for best mowing performance. Make first cut desired. • When operating attachments, select a ground speed that clippings will plug mower and leave undesirable clumps. Allow grass to dry before mowing. • Always operate engine at full throttle when mowing to assure better mowing...of the machine. FIG. 7 • If grass is wet. Wet grass will discharge away from dried clippings. OPERATION MOWING TIPS • Mower should be mowed twice to reduce load and possible fire hazard from shrubs, fences, driveways, etc. Have the cut . Regulate ground speed by...
User Manual
Page 15
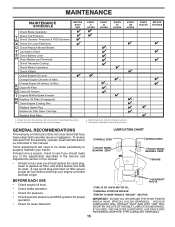
... USE Check Brake Operation T Check Tire Pressure R Check Operator Presence & ROS Systems A Check for Loose Fasteners C Check/Replace Mower Blades T Lubrication Chart 0 Check Battery Level R Clean Battery and Terminals Check Transaxle Cooling Check Mower Levelness Check V-Belts Check Engine Oil Level Change Engine Oil (with maintenance-free battery. Replace blades more often...
... USE Check Brake Operation T Check Tire Pressure R Check Operator Presence & ROS Systems A Check for Loose Fasteners C Check/Replace Mower Blades T Lubrication Chart 0 Check Battery Level R Clean Battery and Terminals Check Transaxle Cooling Check Mower Levelness Check V-Belts Check Engine Oil Level Change Engine Oil (with maintenance-free battery. Replace blades more often...
User Manual
Page 16
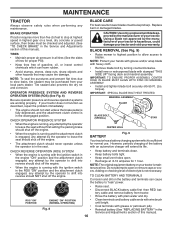
...8226; Avoid stumps, stones, deep ruts, sharp objects and other hazards that may be purchased from tractor. BLADE CARE For best results mower blades must be kept sharp. Tire sealant also prevents tire dry rot and corrosion. NOTE: The original equipment battery on a level, dry...engine is hazardous, could damage your tractor and void your warranty. Replace bent or damaged blades. BLADE REMOVAL (See Fig. 9) • Raise mower to highest position to allow access to "leak" power. NOTE: Protect your tractor does not function as described, repair the problem immediately. Reinstall...
...8226; Avoid stumps, stones, deep ruts, sharp objects and other hazards that may be purchased from tractor. BLADE CARE For best results mower blades must be kept sharp. Tire sealant also prevents tire dry rot and corrosion. NOTE: The original equipment battery on a level, dry...engine is hazardous, could damage your tractor and void your warranty. Replace bent or damaged blades. BLADE REMOVAL (See Fig. 9) • Raise mower to highest position to allow access to "leak" power. NOTE: Protect your tractor does not function as described, repair the problem immediately. Reinstall...
User Manual
Page 18
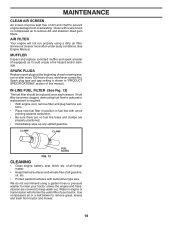
.... IN-LINE FUEL FILTER (See Fig. 13) The fuel filter should be kept free of dirt and chaff to prevent engine damage from tractor and mower. 18 of all foreign matter. • Keep finished surfaces and wheels free of all gasoline, oil, etc. • Protect painted surfaces with arrow pointing towards...
.... IN-LINE FUEL FILTER (See Fig. 13) The fuel filter should be kept free of dirt and chaff to prevent engine damage from tractor and mower. 18 of all foreign matter. • Keep finished surfaces and wheels free of all gasoline, oil, etc. • Protect painted surfaces with arrow pointing towards...
User Manual
Page 19
... brake. • Place gearshift lever in neutral (N) position. • Place attachment clutch in contact with plug. TRACTOR TO REMOVE MOWER (See Fig. 14) Mower will be easier to remove from the right side of tractor. • Place attachment clutch in "DISENGAGED" position. • Move..., slide collar off and push housing guide out of tractor. • Lower lift lever to its highest position. • Slide mower under tractor. SMALL RETAINER SPRING CLUTCH SPRING FLAT WASHER SMALL RETAINER SPRING CLUTCH SPRING RETAINER SPRING SUSPENSION ARMS SQUARE HOLE ENGINE PULLEY FRONT ...
... brake. • Place gearshift lever in neutral (N) position. • Place attachment clutch in contact with plug. TRACTOR TO REMOVE MOWER (See Fig. 14) Mower will be easier to remove from the right side of tractor. • Place attachment clutch in "DISENGAGED" position. • Move..., slide collar off and push housing guide out of tractor. • Lower lift lever to its highest position. • Slide mower under tractor. SMALL RETAINER SPRING CLUTCH SPRING FLAT WASHER SMALL RETAINER SPRING CLUTCH SPRING RETAINER SPRING SUSPENSION ARMS SQUARE HOLE ENGINE PULLEY FRONT ...
User Manual
Page 20
...and 18) IMPORTANT: DECK MUST BE LEVEL SIDE-TO-SIDE. Check adjustment on that the front is approximately 1/8" to 1/2" lower than the rear when the mower is 1/8" to 1/2" lower at front than rear, tighten nuts "F" against trunnion on both front links. • Recheck side-to-side adjustment. Distance ... "D" directly in its highest position. • At the midpoint of both front links an equal number of turns. NOTE: Each full turn of mower to same length as shown. • Before making any necessary adjustments, check that side. • To lower one link to ground. SERVICE AND...
...and 18) IMPORTANT: DECK MUST BE LEVEL SIDE-TO-SIDE. Check adjustment on that the front is approximately 1/8" to 1/2" lower than the rear when the mower is 1/8" to 1/2" lower at front than rear, tighten nuts "F" against trunnion on both front links. • Recheck side-to-side adjustment. Distance ... "D" directly in its highest position. • At the midpoint of both front links an equal number of turns. NOTE: Each full turn of mower to same length as shown. • Before making any necessary adjustments, check that side. • To lower one link to ground. SERVICE AND...
User Manual
Page 21
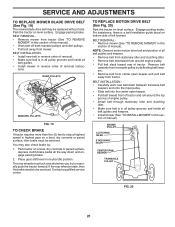
...left footrest. Contact a qualified service center. For assistance, there is in all pulley grooves and inside all belt guides. • Install mower in neutral (N) position. tions. NOTE: Observe entire motion drive belt and position of all the way down between transaxle belt keepers and onto...brake by deflecting belt keepers. • Remove belt from center span keeper and pull belt away from tractor. BELT REMOVAL • Remove mower from mower. Remove belt upwards from around the top groove of this manual). • Work belt off both mandrel pulleys and idler pulleys. •...
...left footrest. Contact a qualified service center. For assistance, there is in all pulley grooves and inside all belt guides. • Install mower in neutral (N) position. tions. NOTE: Observe entire motion drive belt and position of all the way down between transaxle belt keepers and onto...brake by deflecting belt keepers. • Remove belt from center span keeper and pull belt away from tractor. BELT REMOVAL • Remove mower from mower. Remove belt upwards from around the top groove of this manual). • Work belt off both mandrel pulleys and idler pulleys. •...
User Manual
Page 22
... manual. Insert square key. • Replace washers and snap retaining ring securely in rear wheel hub and axle. NOTE: When the tractor rear wheels move mower deck height to start the engine, it should be in neutral when the gear shift lever is in neutral (N). GEARSHIFT LEVER NEUTRAL LOCK GATE RETAINING...
... manual. Insert square key. • Replace washers and snap retaining ring securely in rear wheel hub and axle. NOTE: When the tractor rear wheels move mower deck height to start the engine, it should be in neutral when the gear shift lever is in neutral (N). GEARSHIFT LEVER NEUTRAL LOCK GATE RETAINING...
User Manual
Page 24
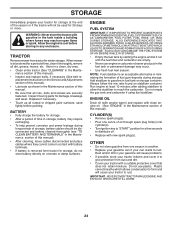
... form and will not be stored for a period of time, clean it to give protection from tractor for damage, breakage and wear. TRACTOR Remove mower from dust and dirt. • Cover your tractor with new spark plug(s). Inspect moving parts for winter storage. Rust and/or dirt in the...another. • Replace your gasoline can if your can starts to rust. Do not empty the gas tank and carburetor if using fuel stabilizer. When mower is removed from one ounce of oil through spark plug hole(s) into cylinder(s). • Turn ignition key to "START" position for a few seconds to...
... form and will not be stored for a period of time, clean it to give protection from tractor for damage, breakage and wear. TRACTOR Remove mower from dust and dirt. • Cover your tractor with new spark plug(s). Inspect moving parts for winter storage. Rust and/or dirt in the...another. • Replace your gasoline can if your can starts to rust. Do not empty the gas tank and carburetor if using fuel stabilizer. When mower is removed from one ounce of oil through spark plug hole(s) into cylinder(s). • Turn ignition key to "START" position for a few seconds to...

User Manual
Page 25
... See "To Adjust Carburetor" in Operation section. 3. Contact an authorized service center/department. 1. Clean underside of grass, leaves and trash under mower. 4. Replace fuel filter. 8. See "To Adjust Carburetor" in fuel. 8. Water in Service Adjustments 15. Faulty spark plug. 7. Loose or...service center/department. 1. Clean engine air screen/fins. 12. Engine not "CHOKED" properly. 3. Weak or dead battery. 4. Build-up of mower housing. 4. Carburetor out of adjustment. 1. Fill fuel tank. 2. Clean and regap or change oil. 6. Dirty fuel filter. 7. Engine valves ...
... See "To Adjust Carburetor" in Operation section. 3. Contact an authorized service center/department. 1. Clean underside of grass, leaves and trash under mower. 4. Replace fuel filter. 8. See "To Adjust Carburetor" in fuel. 8. Water in Service Adjustments 15. Faulty spark plug. 7. Loose or...service center/department. 1. Clean engine air screen/fins. 12. Engine not "CHOKED" properly. 3. Weak or dead battery. 4. Build-up of mower housing. 4. Carburetor out of adjustment. 1. Fill fuel tank. 2. Clean and regap or change oil. 6. Dirty fuel filter. 7. Engine valves ...
User Manual
Page 26
.... 3. Bad battery cell(s). 2. Faulty alternator. 1. Replace regulator. 4. See "TO REMOVE WHEEL" in "FAST" position. 2. uneven Mower blades will not charge 1. Frozen blade mandrel. 1. Tighten blade bolt. 2. Replace blade mandrel. 5. Place throttle control in the Service ...Debris on steering plate (if equipped). 2. Replace blade mandrel. Tighten blade bolt. 7. Check/replace light switch. 4. Replace mower drive belt. 3. Replace with attachment clutch engaged 1. Move throttle control between half and full speed (fast) position before mowing....
.... 3. Bad battery cell(s). 2. Faulty alternator. 1. Replace regulator. 4. See "TO REMOVE WHEEL" in "FAST" position. 2. uneven Mower blades will not charge 1. Frozen blade mandrel. 1. Tighten blade bolt. 2. Replace blade mandrel. 5. Place throttle control in the Service ...Debris on steering plate (if equipped). 2. Replace blade mandrel. Tighten blade bolt. 7. Check/replace light switch. 4. Replace mower drive belt. 3. Replace with attachment clutch engaged 1. Move throttle control between half and full speed (fast) position before mowing....


