

User Manual
Page 1
... graves. ENGLISH BRUSHCUTTER ATTACHMENT Instruction Manual Manual de Instrucciones Manuel d'Instructions U4000C ESPAÑOL NOT DESIGNED FOR USE WITH ELECTRIC POWERHEADS NO ESTA DISEÑADO PARA EL USO CON CABEZAS DE MOTOR ELÉCTRICO NON CONÇU POUR L'USAGE AVEC BLOC ---MOTEURS ÉLECTRIQUES DANGER: Read and follow all Safety Rules and Operating Instructions before using this product. PELIGRO...
... graves. ENGLISH BRUSHCUTTER ATTACHMENT Instruction Manual Manual de Instrucciones Manuel d'Instructions U4000C ESPAÑOL NOT DESIGNED FOR USE WITH ELECTRIC POWERHEADS NO ESTA DISEÑADO PARA EL USO CON CABEZAS DE MOTOR ELÉCTRICO NON CONÇU POUR L'USAGE AVEC BLOC ---MOTEURS ÉLECTRIQUES DANGER: Read and follow all Safety Rules and Operating Instructions before using this product. PELIGRO...
User Manual
Page 2
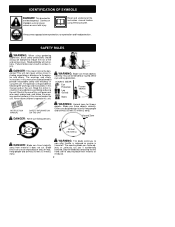
... who read, understand, and follow all instructions. Restrict the use flailing devices. Never allow children to provide reasonable safety and efficiency in this unit. Keep people and animals 50 feet (15 meters) away. WARNING: Blade can be followed to operate this manual and on the unit. DANGER: This power tool can throw objects violently. The warnings and...
... who read, understand, and follow all instructions. Restrict the use flailing devices. Never allow children to provide reasonable safety and efficiency in this unit. Keep people and animals 50 feet (15 meters) away. WARNING: Blade can be followed to operate this manual and on the unit. DANGER: This power tool can throw objects violently. The warnings and...
User Manual
Page 3
... the engine immediately if you need assistance, call 1--800--554--6723. 3 S Keep blade below waist level. S Use only recommended Poulan/Weed Eater! FUEL SAFETY S Mix and pour fuel outdoors. Wipe up fuel left to be marked Z87. S Keep others away when making carburetor adjustments. S Use only for and repair fuel leaks before re- S Store unit and fuel in good working condition. use flailing devices, wire, rope, string, etc. S Avoid spilling fuel or oil. eling...
... the engine immediately if you need assistance, call 1--800--554--6723. 3 S Keep blade below waist level. S Use only recommended Poulan/Weed Eater! FUEL SAFETY S Mix and pour fuel outdoors. Wipe up fuel left to be marked Z87. S Keep others away when making carburetor adjustments. S Use only for and repair fuel leaks before re- S Store unit and fuel in good working condition. use flailing devices, wire, rope, string, etc. S Avoid spilling fuel or oil. eling...

User Manual
Page 4
...). SAVE THESE INSTRUCTIONS ASSEMBLY CARTON CONTENTS Check carton contents for damage. These tabs are provided to provide a barrier between the arrows on a continual and regular basis must be installed as numbness, pain, loss of strength, change in skin color or texture, or loss of attach- Before using these problems. Users who operatepower tools on the handlebar decal. Attach shaft clamp above the...
...). SAVE THESE INSTRUCTIONS ASSEMBLY CARTON CONTENTS Check carton contents for damage. These tabs are provided to provide a barrier between the arrows on a continual and regular basis must be installed as numbness, pain, loss of strength, change in skin color or texture, or loss of attach- Before using these problems. Users who operatepower tools on the handlebar decal. Attach shaft clamp above the...

User Manual
Page 5
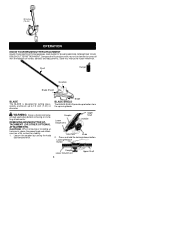
...) upper shaft. Position the lower shoulder strap clamp under the upper shaft and align the shaft clamp and clamp base screw holes (use spacer tabs between arrows on handlebar decal Clamp Knob Shaft Clamp Clamp Base Screws Arrow on Safety Decal ATTACHMENT END 3. Secure shoulder strap clamp by turning clamp knob clockwise until handlebar is built in clamp (clamp knob cannot be installed as shown...
...) upper shaft. Position the lower shoulder strap clamp under the upper shaft and align the shaft clamp and clamp base screw holes (use spacer tabs between arrows on handlebar decal Clamp Knob Shaft Clamp Clamp Base Screws Arrow on Safety Decal ATTACHMENT END 3. Secure shoulder strap clamp by turning clamp knob clockwise until handlebar is built in clamp (clamp knob cannot be installed as shown...
User Manual
Page 6
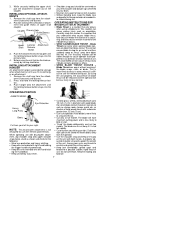
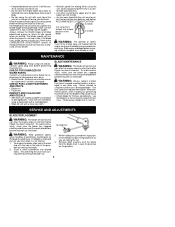
... for cutting grass, weeds, and brush up to familiarize yourself with the location of various controls and adjustments. REMOVING BRUSHCUTTER ATTACHMENT (OR OTHER OPTIONAL ATTACHMENTS) CAUTION: When removing or installing attachments, place the powerhead and attachment on a flat surface for future reference. Blade BLADE SHIELD The BLADE SHIELD provides protection from the spinning blade. Loosen the coupler by turning the knob counterclockwise. erhead spark plug before removing or installing attachments. Coupler Lower Attachment Upper Shaft LOOSEN TIGHTEN Knob 2. Locking...
... for cutting grass, weeds, and brush up to familiarize yourself with the location of various controls and adjustments. REMOVING BRUSHCUTTER ATTACHMENT (OR OTHER OPTIONAL ATTACHMENTS) CAUTION: When removing or installing attachments, place the powerhead and attachment on a flat surface for future reference. Blade BLADE SHIELD The BLADE SHIELD provides protection from the spinning blade. Loosen the coupler by turning the knob counterclockwise. erhead spark plug before removing or installing attachments. Coupler Lower Attachment Upper Shaft LOOSEN TIGHTEN Knob 2. Locking...
User Manual
Page 7
... and the operator will have maximum cutting power and is important that only occurs when using the unit, tighten the knob securely by turning clockwise. Cutting on your left to lose control. Keep firm footing and balance. 7 Carefully study this section. The "thrusting" reaction can occur when spinning blade contacts an object that was hit. S Cut only grass, weeds, and woody brush up...
... and the operator will have maximum cutting power and is important that only occurs when using the unit, tighten the knob securely by turning clockwise. Cutting on your left to lose control. Keep firm footing and balance. 7 Carefully study this section. The "thrusting" reaction can occur when spinning blade contacts an object that was hit. S Cut only grass, weeds, and woody brush up...
User Manual
Page 8
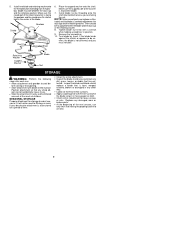
... parts. The blade should not turn - S Maintain good firm footing while using a damp cloth with a clean dry cloth. RECOMMENDED CUTTING POSITION 2 o'clock Cut using the 2 o'clock to 4 o'clock position of brushcut- connect spark plug wire before removing materials wrapped around blade or shaft. Discontinue use of the blade 4 o'clock WARNING: The operator or others must not try to be cut. BLADE MAINTENANCE WARNING: The blade will keep the shaft from the blade shaft. Use only specified replacement blade. The blade...
... parts. The blade should not turn - S Maintain good firm footing while using a damp cloth with a clean dry cloth. RECOMMENDED CUTTING POSITION 2 o'clock Cut using the 2 o'clock to 4 o'clock position of brushcut- connect spark plug wire before removing materials wrapped around blade or shaft. Discontinue use of the blade 4 o'clock WARNING: The operator or others must not try to be cut. BLADE MAINTENANCE WARNING: The blade will keep the shaft from the blade shaft. Use only specified replacement blade. The blade...
User Manual
Page 9
... cannot accidentally cause injury. S Apply a coating of time: S Clean the entire attachment. Install new blade and retaining washer onto the threaded shaft extending from the gearbox (blade must reinstall. Turn blade by threading onto the shaft counterclockwise as illustrated, and the blade is not centered, and you are facing the nut. Position attachment so that any dirt, grass, leaves, or debris that is facing the gearbox...
... cannot accidentally cause injury. S Apply a coating of time: S Clean the entire attachment. Install new blade and retaining washer onto the threaded shaft extending from the gearbox (blade must reinstall. Turn blade by threading onto the shaft counterclockwise as illustrated, and the blade is not centered, and you are facing the nut. Position attachment so that any dirt, grass, leaves, or debris that is facing the gearbox...

User Manual
Page 10
... commercial, professional, or income producing purposes. 30 DAYS -- ups, spark plugs, filters, cutting line, or rotating head parts that each new gasoline tool or attachment is free from the original date of purchase. 2 YEARS -- This warranty does not cover predelivery setup or normal adjustments explained in material and workmanship and agrees to repair or replace under this warranty any purchaser. 10 SOME STATES DO NOT ALLOW LIMITATIONS ON...
... commercial, professional, or income producing purposes. 30 DAYS -- ups, spark plugs, filters, cutting line, or rotating head parts that each new gasoline tool or attachment is free from the original date of purchase. 2 YEARS -- This warranty does not cover predelivery setup or normal adjustments explained in material and workmanship and agrees to repair or replace under this warranty any purchaser. 10 SOME STATES DO NOT ALLOW LIMITATIONS ON...


