
User Manual
Page 1
... avertissements et toutes les instructions de sécurité. ENGLISH R Instruction Manual Manual de Instrucciones Manuel d'Instructions SM132 ESPAÑOL For Occasional Use Only WARNING: Read and follow all Safety Rules and Operating Instructions before using this product. El no hacerlo puede resultar en lesiones graves. Electrolux Home Products, Inc. 250 Bobby Jones Expressway Augusta, GA 30907 Copyright E2003 Electrolux...
... avertissements et toutes les instructions de sécurité. ENGLISH R Instruction Manual Manual de Instrucciones Manuel d'Instructions SM132 ESPAÑOL For Occasional Use Only WARNING: Read and follow all Safety Rules and Operating Instructions before using this product. El no hacerlo puede resultar en lesiones graves. Electrolux Home Products, Inc. 250 Bobby Jones Expressway Augusta, GA 30907 Copyright E2003 Electrolux...
User Manual
Page 2
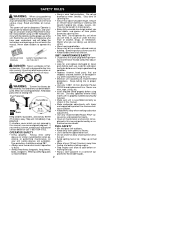
... Alert. S Look for and repair fuel leaks before starting engine. S Use only 0.080! (2 mm) diameter Poulan PRO" brand replacement line. S Make sure unit is properly installed and securely fastened. S Use only recommended Poulan PROr accessories and replacement parts. Do not operate this unit when you need assistance, contact your unit (safety glasses are doing; Wipe up all maintenance and service not explained in the manual. OPERATOR SAFETY S Dress properly. S Keep...
... Alert. S Look for and repair fuel leaks before starting engine. S Use only 0.080! (2 mm) diameter Poulan PRO" brand replacement line. S Make sure unit is properly installed and securely fastened. S Use only recommended Poulan PROr accessories and replacement parts. Do not operate this unit when you need assistance, contact your unit (safety glasses are doing; Wipe up all maintenance and service not explained in the manual. OPERATOR SAFETY S Dress properly. S Keep...
User Manual
Page 3
... service. Cutting on right side of the law. S Empty the fuel tank before storing or trans- Prolonged use of these problems. Users who operate power tools on handle. 2. ments of shield, see KNOW YOUR TRIMMER illustration in the carburetor by the manufacturer. All U.S. retighten wing nut. The shield provides partial protection to the operator and others from your left in OPERATION section. 1. Remove wing nut from water heaters, electric motors...
... service. Cutting on right side of the law. S Empty the fuel tank before storing or trans- Prolonged use of these problems. Users who operate power tools on handle. 2. ments of shield, see KNOW YOUR TRIMMER illustration in the carburetor by the manufacturer. All U.S. retighten wing nut. The shield provides partial protection to the operator and others from your left in OPERATION section. 1. Remove wing nut from water heaters, electric motors...
User Manual
Page 4
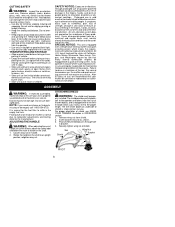
... located on unleaded gasoline. Mix gasoline and oil at a ratio of 40:1. Always read the fuel information in storage. Drain the gas tank, start the engine with fuel. HOW TO STOP YOUR UNIT S To stop the engine. S If engine does not stop the engine. OPERATION KNOW YOUR TRIMMER READ THIS INSTRUCTION MANUAL AND SAFETY RULES BEFORE OPERATING YOUR UNIT. Save this manual for additional information. Assist Handle Trimmer Head Shaft Shield Starter Handle ON/OFF Switch Primer Bulb Line Limiter Blade Throttle Trigger Choke Lever Muffler...
... located on unleaded gasoline. Mix gasoline and oil at a ratio of 40:1. Always read the fuel information in storage. Drain the gas tank, start the engine with fuel. HOW TO STOP YOUR UNIT S To stop the engine. S If engine does not stop the engine. OPERATION KNOW YOUR TRIMMER READ THIS INSTRUCTION MANUAL AND SAFETY RULES BEFORE OPERATING YOUR UNIT. Save this manual for additional information. Assist Handle Trimmer Head Shaft Shield Starter Handle ON/OFF Switch Primer Bulb Line Limiter Blade Throttle Trigger Choke Lever Muffler...
User Manual
Page 5
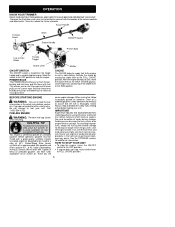
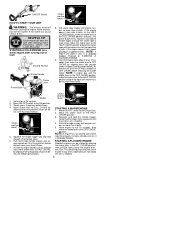
... muffler can be started , pull starter rope 5 more times. Pull starter rope sharply until the engine runs smoothly. 4. NOTE: If engine still doesn't start, it to run 15 seconds, then move choke lever to the FULL CHOKE position and press the primer bulb 6 times. Slowly press the primer bulb 6 times. 4. If the engine doesn't start , move the choke lever to OFF CHOKE by aligning lever with position shown on decal (see illustration below ). Move ON/OFF switch to the ON position. 3. Choke position decal 5. Keep throttle trigger...
... muffler can be started , pull starter rope 5 more times. Pull starter rope sharply until the engine runs smoothly. 4. NOTE: If engine still doesn't start, it to run 15 seconds, then move choke lever to the FULL CHOKE position and press the primer bulb 6 times. Slowly press the primer bulb 6 times. 4. If the engine doesn't start , move the choke lever to OFF CHOKE by aligning lever with position shown on decal (see illustration below ). Move ON/OFF switch to the ON position. 3. Choke position decal 5. Keep throttle trigger...
User Manual
Page 6
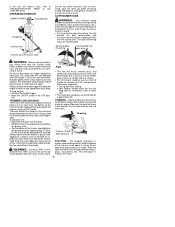
... most efficient line length is run the engine at full throttle. S Tap the bottom of the trimmer head about 3 inches (8 cm) above ground SCALPING -- Tapping on the ground with each time the bottom of line will cut the tender bark of the trimmer head about 3 inches (8 cm) above the grassy area. If the line is being operated. S For trimming or scalping, use full throttle for a good clean job...
... most efficient line length is run the engine at full throttle. S Tap the bottom of the trimmer head about 3 inches (8 cm) above ground SCALPING -- Tapping on the ground with each time the bottom of line will cut the tender bark of the trimmer head about 3 inches (8 cm) above the grassy area. If the line is being operated. S For trimming or scalping, use full throttle for a good clean job...

User Manual
Page 7
... OFF position. CHECK FOR LOOSE FASTENERS AND PARTS S Spark Plug Boot S Air Filter S Housing Screws S Assist Handle Screw S Debris Shield CHECK FOR DAMAGED OR WORN PARTS Contact an authorized service dealer for carburetor adjustments. S Wipe off unit with a mild detergent. Always clean after every 5 hours of damage or leaks. then restart engine and continue. Discontinue use of damaged or worn parts. INSPECT AND CLEAN UNIT AND DE- Remove parts by moving the switch to...
... OFF position. CHECK FOR LOOSE FASTENERS AND PARTS S Spark Plug Boot S Air Filter S Housing Screws S Assist Handle Screw S Debris Shield CHECK FOR DAMAGED OR WORN PARTS Contact an authorized service dealer for carburetor adjustments. S Wipe off unit with a mild detergent. Always clean after every 5 hours of damage or leaks. then restart engine and continue. Discontinue use of damaged or worn parts. INSPECT AND CLEAN UNIT AND DE- Remove parts by moving the switch to...

User Manual
Page 8
... installing the trimmer head. Hold the unit by rotating the dust cup. 2. S Turn idle speed screw clockwise to ensure the engine starts easier and runs better. Air Filter Cover REPLACING THE TRIMMER HEAD 1. Replace with Champion RCJ-6Y spark plug and tighten securely with a pre-wound spool, or cut two lengths of 12-1/2 feet of your protective equipment and observe all parts of 0.080! (2 mm) diameter Poulan PROr brand line. SERVICE AND ADJUSTMENTS REPLACING THE LINE 1. Thread replacement trimmer head onto the shaft...
... installing the trimmer head. Hold the unit by rotating the dust cup. 2. S Turn idle speed screw clockwise to ensure the engine starts easier and runs better. Air Filter Cover REPLACING THE TRIMMER HEAD 1. Replace with Champion RCJ-6Y spark plug and tighten securely with a pre-wound spool, or cut two lengths of 12-1/2 feet of your protective equipment and observe all parts of 0.080! (2 mm) diameter Poulan PROr brand line. SERVICE AND ADJUSTMENTS REPLACING THE LINE 1. Thread replacement trimmer head onto the shaft...

User Manual
Page 9
... out of the reach of 40:1, 2-cycle engine oil (air cooled) through the spark plug opening. S Store in a well ventilated area where fuel vapors cannot reach sparks or open flames from water heaters, electric motors or switches, furnaces, etc. ENGINE S Remove spark plug and pour 1 teaspoon of children. S Clean air filter. S Check entire unit for 30 days or more. Replace any sharp object cannot accidentally cause injury. Add stabilizer to...
... out of the reach of 40:1, 2-cycle engine oil (air cooled) through the spark plug opening. S Store in a well ventilated area where fuel vapors cannot reach sparks or open flames from water heaters, electric motors or switches, furnaces, etc. ENGINE S Remove spark plug and pour 1 teaspoon of children. S Clean air filter. S Check entire unit for 30 days or more. Replace any sharp object cannot accidentally cause injury. Add stabilizer to...

User Manual
Page 10
.... 5. REMEDY 1. Carburetor requires adjustment. 2. Contact an authorized service dealer. 3. Spark plug fouled. 3. Carbon build-up on muffler outlet screen. 5. Clean or replace air filter. 2. Engine smokes excessively. 1. Fuel mixture incorrect. 2. Contact an authorized service dealer. 10 See "Starting a Flooded Engine" in Operation section. 2. Check for kinked or split fuel line; Crankshaft seals worn. 3. Compression low. 1. Contact an authorized service dealer. 4. Air filter dirty. 4. See "Fueling Engine" in Operation Section. 3. Install new spark plug...
.... 5. REMEDY 1. Carburetor requires adjustment. 2. Contact an authorized service dealer. 3. Spark plug fouled. 3. Carbon build-up on muffler outlet screen. 5. Clean or replace air filter. 2. Engine smokes excessively. 1. Fuel mixture incorrect. 2. Contact an authorized service dealer. 10 See "Starting a Flooded Engine" in Operation section. 2. Check for kinked or split fuel line; Crankshaft seals worn. 3. Compression low. 1. Contact an authorized service dealer. 4. Air filter dirty. 4. See "Fueling Engine" in Operation Section. 3. Install new spark plug...

User Manual
Page 11
... repair or replace under warranty include diagnosis, parts and labor. If you have any defective gasoline product or attachment as the carburetor and the ignition system. S. Environmental Protection Agency and ELECTROLUX HOME PRODUCTS, INC., are responsible for the performance of the required maintenance listed in a reasonable amount of purchase. Expenses covered under this warranty does not cover tuneups, spark plugs, filters, cutting line, or rotating head parts that each new Poulan PRO...
... repair or replace under warranty include diagnosis, parts and labor. If you have any defective gasoline product or attachment as the carburetor and the ignition system. S. Environmental Protection Agency and ELECTROLUX HOME PRODUCTS, INC., are responsible for the performance of the required maintenance listed in a reasonable amount of purchase. Expenses covered under this warranty does not cover tuneups, spark plugs, filters, cutting line, or rotating head parts that each new Poulan PRO...

User Manual
Page 12
... not liable to the owner if the part is certified to maintenance schedule), Ignition Module. ON OR MODIFIED PARTS: The use : Moderate (50 hours) Intermediate (125 hours) Extended (300 hours) 12 Call 1--800--554--6723. EMISSION CONTROL WARRANTY PARTS LIST: Carburetor, Ignition System: Spark Plug (covered up to the effect of "repair or replace as defined in the performance of a warranted part still under warranty. service center or call ELECTROLUX...
... not liable to the owner if the part is certified to maintenance schedule), Ignition Module. ON OR MODIFIED PARTS: The use : Moderate (50 hours) Intermediate (125 hours) Extended (300 hours) 12 Call 1--800--554--6723. EMISSION CONTROL WARRANTY PARTS LIST: Carburetor, Ignition System: Spark Plug (covered up to the effect of "repair or replace as defined in the performance of a warranted part still under warranty. service center or call ELECTROLUX...


