

User Manual
Page 1
.... Check bag frequently. Use only DWoAnoRt oNpeINratGe mower unless a recommended replacement container. ID No. 96072001300 46 Inch Mower Grass Catcher • Assembly • Operation • Customer Responsibilities • Repair Parts 4532411426 01.08.07 BY Printed in U.S.A. DWoAnoRt oNpeINratGe mower unless container is properlyissubject to wear and detierioration. Replace whencracked or damaged. container is properlyissubject to wear and detierioration. Use only a recommended replacement container. 02084 OWNER'S MANUAL Model QCT46 Product...
.... Check bag frequently. Use only DWoAnoRt oNpeINratGe mower unless a recommended replacement container. ID No. 96072001300 46 Inch Mower Grass Catcher • Assembly • Operation • Customer Responsibilities • Repair Parts 4532411426 01.08.07 BY Printed in U.S.A. DWoAnoRt oNpeINratGe mower unless container is properlyissubject to wear and detierioration. Replace whencracked or damaged. container is properlyissubject to wear and detierioration. Use only a recommended replacement container. 02084 OWNER'S MANUAL Model QCT46 Product...
User Manual
Page 2
... the attachments that operators, age 60 years and above, are familiar with safe machine operation. a slope, is clear of bystanders before turning. • Never leave a running machine unattended. Uneven terrain could suddenly roll over if a wheel is not alert to neutral and coast downhill. • Avoid starting when setting up, transporting, adjusting or making repairs, always disconnect spark plug wire and place wire where...
... the attachments that operators, age 60 years and above, are familiar with safe machine operation. a slope, is clear of bystanders before turning. • Never leave a running machine unattended. Uneven terrain could suddenly roll over if a wheel is not alert to neutral and coast downhill. • Avoid starting when setting up, transporting, adjusting or making repairs, always disconnect spark plug wire and place wire where...
User Manual
Page 3
... bolts tight to cool before restarting. • Never make any fuelsoaked debris. CONGRATULATIONS on slopes unless necessary, and then, turn on your Grass Catcher properly. Replace gas cap and tighten securely. Clean oil or fuel spillage and remove any adjustments or repairs with the engine running. • Check grass catcher components and the discharge guard frequently and replace with manufacturer's recommended parts, when necessary. • Mower blades are explosive. • Extinguish all times until fueling...
... bolts tight to cool before restarting. • Never make any fuelsoaked debris. CONGRATULATIONS on slopes unless necessary, and then, turn on your Grass Catcher properly. Replace gas cap and tighten securely. Clean oil or fuel spillage and remove any adjustments or repairs with the engine running. • Check grass catcher components and the discharge guard frequently and replace with manufacturer's recommended parts, when necessary. • Mower blades are explosive. • Extinguish all times until fueling...
User Manual
Page 4
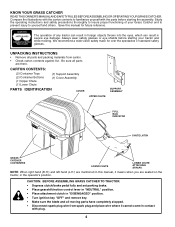
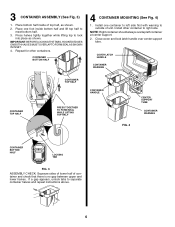
... ASSEMBLING GRASS CATCHER TO TRACTOR: • Depress clutch/brake pedal fully and set parking brake. • Place gearshift/motion control lever in "NEUTRAL" position. • Place attachment clutch in "DISENGAGED" position. • Turn ignition key "OFF" and remove key. • Make sure the blade and all parts and packing materials from spark plug and place wire where it means when you are there. CARTON CONTENTS: (2) Container Tops (2) Container Bottoms (1) Upper Chute (1) Lower Chute (1) Support Assembly (1) Cover Assembly PARTS IDENTIFICATION COVER...
... ASSEMBLING GRASS CATCHER TO TRACTOR: • Depress clutch/brake pedal fully and set parking brake. • Place gearshift/motion control lever in "NEUTRAL" position. • Place attachment clutch in "DISENGAGED" position. • Turn ignition key "OFF" and remove key. • Make sure the blade and all parts and packing materials from spark plug and place wire where it means when you are there. CARTON CONTENTS: (2) Container Tops (2) Container Bottoms (1) Upper Chute (1) Lower Chute (1) Support Assembly (1) Cover Assembly PARTS IDENTIFICATION COVER...
User Manual
Page 5
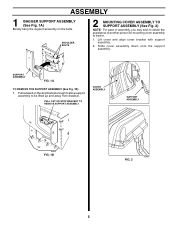
Lift cover and align cover bracket with support assembly. 2. PULL OUT ON STOP BRACKET TO REMOVE SUPPORT ASSEMBLY COVER ASSEMBLY SUPPORT ASSEMBLY 02643 FIG. 1B FIG. 2 02646 5 Slide cover assembly down onto the support assembly. 02645 SUPPORT ASSEMBLY FIG. 1A TO REMOVE THE SUPPORT ASSEMBLY (See Fig. 1B) 1. Pull outward on the bolts. ASSEMBLY 1 BAGGER SUPPORT ASSEMBLY (See Fig. 1A) Simply hang the support assembly on the stop bracket enough to allow support assembly to tractor. 1. SHOULDER BOLTS 2 MOUNTING COVER ASSEMBLY TO SUPPORT ASSEMBLY (See Fig. 2) NOTE...
Lift cover and align cover bracket with support assembly. 2. PULL OUT ON STOP BRACKET TO REMOVE SUPPORT ASSEMBLY COVER ASSEMBLY SUPPORT ASSEMBLY 02643 FIG. 1B FIG. 2 02646 5 Slide cover assembly down onto the support assembly. 02645 SUPPORT ASSEMBLY FIG. 1A TO REMOVE THE SUPPORT ASSEMBLY (See Fig. 1B) 1. Pull outward on the bolts. ASSEMBLY 1 BAGGER SUPPORT ASSEMBLY (See Fig. 1A) Simply hang the support assembly on the stop bracket enough to allow support assembly to tractor. 1. SHOULDER BOLTS 2 MOUNTING COVER ASSEMBLY TO SUPPORT ASSEMBLY (See Fig. 2) NOTE...
User Manual
Page 6
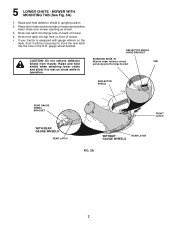
... container at center support. 2. IMPORTANT: BEFORE LOCKING THE TABS, HOOKED EDGES ON BOTH HALVES MUST OVERLAP TO FORM SEALAS SHOWN IN INSET. 4. Install other containers. Repeat for other container to separate container halves and repeat instructions above. 02097 nW DreldnyoietsAlnyds.ouRrRteboepjNepplacelIatcrNcaetoetmGewwemenhaoterwcnoacennrratduacnkidneleeedtsrie.sorricodoraanmttiaoainng.eeCrdih.seUpcsrkoebpoaenglyfraeqreucomme 6 If a gap appears, unlock tabs to right side. COVER LATCH HANDLE CONTAINER WARNING...
... container at center support. 2. IMPORTANT: BEFORE LOCKING THE TABS, HOOKED EDGES ON BOTH HALVES MUST OVERLAP TO FORM SEALAS SHOWN IN INSET. 4. Install other containers. Repeat for other container to separate container halves and repeat instructions above. 02097 nW DreldnyoietsAlnyds.ouRrRteboepjNepplacelIatcrNcaetoetmGewwemenhaoterwcnoacennrratduacnkidneleeedtsrie.sorricodoraanmttiaoainng.eeCrdih.seUpcsrkoebpoaenglyfraeqreucomme 6 If a gap appears, unlock tabs to right side. COVER LATCH HANDLE CONTAINER WARNING...
User Manual
Page 7
... hole on chute while in the R.H. Raise and hold deflector shield in lower chute over tab on the deck, then it to hook the rear latch into the hole in operation. Hook front latch into flange hole on back of mower. • If your tractor is equipped with gauge wheels on mower and position lower chute over mower opening...
... hole on chute while in the R.H. Raise and hold deflector shield in lower chute over tab on the deck, then it to hook the rear latch into the hole in operation. Hook front latch into flange hole on back of mower. • If your tractor is equipped with gauge wheels on mower and position lower chute over mower opening...
User Manual
Page 8
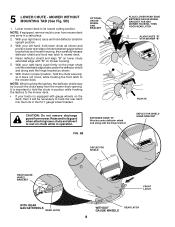
... equipped, remove mulch cover from mower deck and store in operation. gauge wheel bracket. Raise deflector shield and align "B" on lower chute extended edge with gauge wheels on the lower chute until the extended edge slides under deflector shield and along side the hinge bracket as shown and position lower rear edge of chute between gauge wheel bracket tab and mower housing, then...
... equipped, remove mulch cover from mower deck and store in operation. gauge wheel bracket. Raise deflector shield and align "B" on lower chute extended edge with gauge wheels on the lower chute until the extended edge slides under deflector shield and along side the hinge bracket as shown and position lower rear edge of chute between gauge wheel bracket tab and mower housing, then...
User Manual
Page 9
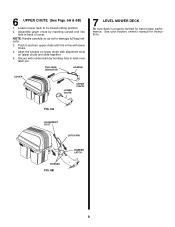
... turn upper chute until it is properly leveled for instructions. FULL BAG INDICATOR HANDLE COVER UPPER 02099 CHUTE LOWER CHUTE 7 LEVEL MOWER DECK Be sure deck is in line with alignment slots on lower chute with lower chute. 4. See your tractors owner's manual for best mower performance. NOTE: Handle carefully so as not to its lowest cutting position. 2. Secure with rubber latch by inserting curved end into hole in latch over latch pin...
... turn upper chute until it is properly leveled for instructions. FULL BAG INDICATOR HANDLE COVER UPPER 02099 CHUTE LOWER CHUTE 7 LEVEL MOWER DECK Be sure deck is in line with alignment slots on lower chute with lower chute. 4. See your tractors owner's manual for best mower performance. NOTE: Handle carefully so as not to its lowest cutting position. 2. Secure with rubber latch by inserting curved end into hole in latch over latch pin...
User Manual
Page 10
... parking brake and stop the engine. - Remove one container at a time by the stopped movement of the tube rails. Tip the container on a lawn where grass and leaf bagging equipment has not been used, you the best time to suit your grass catcher on its side and slide the filled bag from the container. g. Movement of chutes, check/empty bags when the wheel...
... parking brake and stop the engine. - Remove one container at a time by the stopped movement of the tube rails. Tip the container on a lawn where grass and leaf bagging equipment has not been used, you the best time to suit your grass catcher on its side and slide the filled bag from the container. g. Movement of chutes, check/empty bags when the wheel...
User Manual
Page 11
... blades. • See BLADE CARE instructions in spontaneous combustion which could develop into a fire. Frequently check components and replace with plug. CAUTION: BEFORE PERFORMING ANY MAINTENANCE, SERVICE ORADJUSTMENTS: • Depress clutch brake pedal fully and set parking brake. • Place gearshift/motion control lever in "NEUTRAL" position. • Place clutch control in "DISENGAGED" position. • Turn ignition key to "OFF" position. • Make sure blades and all dirt, grass, leaves, etc. CAUTION: Grass catcher...
... blades. • See BLADE CARE instructions in spontaneous combustion which could develop into a fire. Frequently check components and replace with plug. CAUTION: BEFORE PERFORMING ANY MAINTENANCE, SERVICE ORADJUSTMENTS: • Depress clutch brake pedal fully and set parking brake. • Place gearshift/motion control lever in "NEUTRAL" position. • Place clutch control in "DISENGAGED" position. • Turn ignition key to "OFF" position. • Make sure blades and all dirt, grass, leaves, etc. CAUTION: Grass catcher...


