

User Manual
Page 1
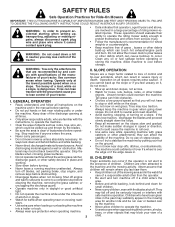
Use only a recommended replacement container. 02084 OWNER'S MANUAL Model QCT42 Mfg. Replace whencracked or damaged. Check bag frequently. Check bag frequently. DWoAnoRt oNpeINratGe mower unless container is properlyissubject to wear and detierioration. ID No. 96072000600 Product No. 960 72 00-06 42 Inch Mower Grass Catcher • Assembly • Operation • Customer Responsibilities • Repair Parts 402338 11.23.05 rad Printed in U.S.A. Use only a recommended replacement container. DWoAnoRt oNpeINratGe mower unless...
Use only a recommended replacement container. 02084 OWNER'S MANUAL Model QCT42 Mfg. Replace whencracked or damaged. Check bag frequently. Check bag frequently. DWoAnoRt oNpeINratGe mower unless container is properlyissubject to wear and detierioration. ID No. 96072000600 Product No. 960 72 00-06 42 Inch Mower Grass Catcher • Assembly • Operation • Customer Responsibilities • Repair Parts 402338 11.23.05 rad Printed in U.S.A. Use only a recommended replacement container. DWoAnoRt oNpeINratGe mower unless...
User Manual
Page 2
... hot exhaust/engine parts and burn. I. Stop the blades when crossing gravel surfaces. • Choose a low ground speed so that operators, age 60 years and above, are often attracted to lose control of a load, while on a slope. Do not shift to a complete stop engine, and remove keys before starting , stopping, or turning on do not mow it cannot contact spark plug. Uneven...
... hot exhaust/engine parts and burn. I. Stop the blades when crossing gravel surfaces. • Choose a low ground speed so that operators, age 60 years and above, are often attracted to lose control of a load, while on a slope. Do not shift to a complete stop engine, and remove keys before starting , stopping, or turning on do not mow it cannot contact spark plug. Uneven...
User Manual
Page 3
.... • If you the best possible dependability and performance. ning. Do not use extra caution when servicing them. • Check brake operation frequently. Replace gas cap and tighten securely. Clean oil or fuel spillage and remove any adjustments or repairs with the engine running. • Check grass catcher components and the discharge guard frequently and replace with safety devices. Repair, if necessary, before and while backing. • Never carry children, even with...
.... • If you the best possible dependability and performance. ning. Do not use extra caution when servicing them. • Check brake operation frequently. Replace gas cap and tighten securely. Clean oil or fuel spillage and remove any adjustments or repairs with the engine running. • Check grass catcher components and the discharge guard frequently and replace with safety devices. Repair, if necessary, before and while backing. • Never carry children, even with...
User Manual
Page 4
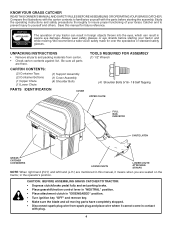
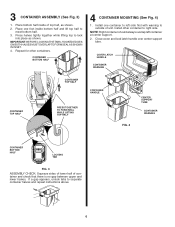
... and detierioration. CAUTION: BEFORE ASSEMBLING GRASS CATCHER TO TRACTOR: • Depress clutch/brake pedal fully and set parking brake. • Place gearshift/motion control lever in "NEUTRAL" position. • Place attachment clutch in "DISENGAGED" position. • Turn ignition key "OFF" and remove key. • Make sure the blade and all moving parts have completely stopped. • Disconnect spark plug wire from carton. • Check carton contents against list. Study the operating instructions and safety precautions thoroughly...
... and detierioration. CAUTION: BEFORE ASSEMBLING GRASS CATCHER TO TRACTOR: • Depress clutch/brake pedal fully and set parking brake. • Place gearshift/motion control lever in "NEUTRAL" position. • Place attachment clutch in "DISENGAGED" position. • Turn ignition key "OFF" and remove key. • Make sure the blade and all moving parts have completely stopped. • Disconnect spark plug wire from carton. • Check carton contents against list. Study the operating instructions and safety precautions thoroughly...
User Manual
Page 5
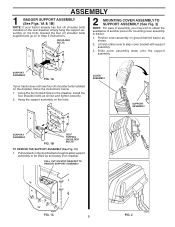
... hang the support assembly on the bolts. PULL OUT ON STOP BRACKET TO REMOVE SUPPORT ASSEMBLY 02643 FIG. 1C 5 FIG. 2 02646 Hang the support assembly on the bolts. COVER ASSEMBLY SUPPORT ASSEMBLY 02644 SUPPORT ASSEMBLY FIG. 1B SELF TAPPING SHOULDER BOLTS TO REMOVE THE SUPPORT ASSEMBLY (See Fig. 1C) 1. Pull outward on the stop bracket enough to allow support assembly to align cover bracket with support assembly. 3. Position cover assembly on ground behind tractor as shown and tighten securely. 2. Using the...
... hang the support assembly on the bolts. PULL OUT ON STOP BRACKET TO REMOVE SUPPORT ASSEMBLY 02643 FIG. 1C 5 FIG. 2 02646 Hang the support assembly on the bolts. COVER ASSEMBLY SUPPORT ASSEMBLY 02644 SUPPORT ASSEMBLY FIG. 1B SELF TAPPING SHOULDER BOLTS TO REMOVE THE SUPPORT ASSEMBLY (See Fig. 1C) 1. Pull outward on the stop bracket enough to allow support assembly to align cover bracket with support assembly. 3. Position cover assembly on ground behind tractor as shown and tighten securely. 2. Using the...
User Manual
Page 6
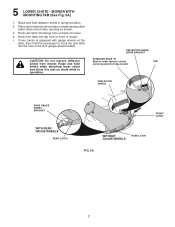
... ONBOTHHALVESMUSTOVERLAPTO FORMSEALASSHOWN IN INSET. 4. Close cover and lock latch handle over center support tube. COVER LATCH HANDLE CONTAINER WARNING WARNING CONTAINER TOP HALF 02739 CONTAINER TOP HALF CONTAINER HANDLE PRESS TOGETHER TO FORM SEAL WHILE LIFTING TOP HALF csDWruaobcAjnkeoecRtdt otNooprewIdrNeaaatmeGramagnoedwdd.eUertsuieenrlioeonsraslytcioaonnr.etCaciohnmeecrmkisebnpadrgoepfdreerrqelyupielsanctelym. Install one foot inside of container and check that there is no gap between upper and lower halves...
... ONBOTHHALVESMUSTOVERLAPTO FORMSEALASSHOWN IN INSET. 4. Close cover and lock latch handle over center support tube. COVER LATCH HANDLE CONTAINER WARNING WARNING CONTAINER TOP HALF 02739 CONTAINER TOP HALF CONTAINER HANDLE PRESS TOGETHER TO FORM SEAL WHILE LIFTING TOP HALF csDWruaobcAjnkeoecRtdt otNooprewIdrNeaaatmeGramagnoedwdd.eUertsuieenrlioeonsraslytcioaonnr.etCaciohnmeecrmkisebnpadrgoepfdreerrqelyupielsanctelym. Install one foot inside of container and check that there is no gap between upper and lower halves...
User Manual
Page 7
... front of mower. 4. Raise and hold shield when attaching lower chute and allow it to hook the rear latch into flange hole on back of mower. • If your tractor is equipped with gauge wheels on mower and position lower chute over mower opening as shown. 3. Hook rear latch into the hole in lower chute over tab on the deck, then it...
... front of mower. 4. Raise and hold shield when attaching lower chute and allow it to hook the rear latch into flange hole on back of mower. • If your tractor is equipped with gauge wheels on mower and position lower chute over mower opening as shown. 3. Hook rear latch into the hole in lower chute over tab on the deck, then it...

User Manual
Page 8
... chute extended edge with gauge wheels on mower housing. With your tractor is important to hook the rear latch into the hole in upright position. 3. PUSH IN 02558 CAUTION: Do not remove discharge guard from mower deck and store in position while hooking the latches to the mower deck. • If your right hand, push firmly on chute while in proper position, hold guard when attaching lower chute...
... chute extended edge with gauge wheels on mower housing. With your tractor is important to hook the rear latch into the hole in upright position. 3. PUSH IN 02558 CAUTION: Do not remove discharge guard from mower deck and store in position while hooking the latches to the mower deck. • If your right hand, push firmly on chute while in proper position, hold guard when attaching lower chute...
User Manual
Page 9
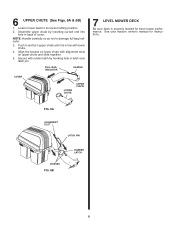
... its lowest cutting position. 2. Align the bosses on lower chute with rubber latch by inserting curved end into hole in and turn upper chute until it is properly leveled for instructions. FULL BAG INDICATOR HANDLE COVER UPPER 02099 CHUTE LOWER CHUTE 7 LEVEL MOWER DECK Be sure deck is in latch over latch pin. See your tractors owner's manual for best mower performance. Assemble upper chute by hooking hole in line with lower chute. 4. Secure...
... its lowest cutting position. 2. Align the bosses on lower chute with rubber latch by inserting curved end into hole in and turn upper chute until it is properly leveled for instructions. FULL BAG INDICATOR HANDLE COVER UPPER 02099 CHUTE LOWER CHUTE 7 LEVEL MOWER DECK Be sure deck is in latch over latch pin. See your tractors owner's manual for best mower performance. Assemble upper chute by hooking hole in line with lower chute. 4. Secure...
User Manual
Page 10
... with grass catcher partially installed. • Disengage blades and stop engine before leaving tractor seat to empty containers, unclogging chutes, etc. • Close cover before the bags fill completely. The first time relatively high, the second time to desired height. • Use left container at center supports. The amount collected and the total time of operation may be taken not to damage the parts...
... with grass catcher partially installed. • Disengage blades and stop engine before leaving tractor seat to empty containers, unclogging chutes, etc. • Close cover before the bags fill completely. The first time relatively high, the second time to desired height. • Use left container at center supports. The amount collected and the total time of operation may be taken not to damage the parts...
User Manual
Page 11
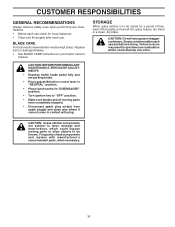
... ANY MAINTENANCE,SERVICE OR ADJUSTMENTS: • Depress clutch brake pedal fully and set parking brake. • Place gearshift/motion control lever in "NEUTRAL" position. • Place clutch control in "DISENGAGED" position. • Turn ignition key to be stored for loose fasteners. • Clean unit thoroughly after each use and before storing. BLADE CARE For best results mower blades must be thrown. STORAGE When grass catcher is to "OFF" position. • Make sure blades and...
... ANY MAINTENANCE,SERVICE OR ADJUSTMENTS: • Depress clutch brake pedal fully and set parking brake. • Place gearshift/motion control lever in "NEUTRAL" position. • Place clutch control in "DISENGAGED" position. • Turn ignition key to be stored for loose fasteners. • Clean unit thoroughly after each use and before storing. BLADE CARE For best results mower blades must be thrown. STORAGE When grass catcher is to "OFF" position. • Make sure blades and...


