
User Manual
Page 5
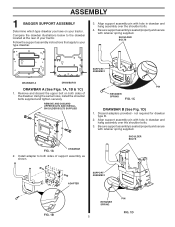
... support assembly pin with retainer spring supplied. Using the same holes, install the shoulder bolts supplied and tighten securely. SHOULDER BOLTS FIG. 1A DRAWBAR 2. ASSEMBLY 1 BAGGER SUPPORT ASSEMBLY Determine which type drawbar you have on both sides of support assembly as shown. Be sure support assembly is seated properly and secure...
... support assembly pin with retainer spring supplied. Using the same holes, install the shoulder bolts supplied and tighten securely. SHOULDER BOLTS FIG. 1A DRAWBAR 2. ASSEMBLY 1 BAGGER SUPPORT ASSEMBLY Determine which type drawbar you have on both sides of support assembly as shown. Be sure support assembly is seated properly and secure...
User Manual
Page 7
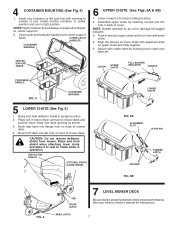
... (See Fig. 4) 1. Close cover and lock latch handles over deck opening as not to damage full bagger indicator. 3. Assemble upper chute by hooking hole in latch over latch pin. Push in operation. erUtuisenerlieoosrnaslytcioaonnr.etaCcihonemecrmkisebpnardgoepfdreerrqelyupiselannctsleytma... tab hole on upper chute and slide together. 5. lRelenedtp.cClaoocnnettaawinihneeernr. DEFLECTOR SHIELD OPTIONAL FRONT GAUGE WHEEL COVER UPPER CHUTE FULL BAGGER INDICATOR HANDLE LOWER CHUTE 03029 FIG. 6A ALIGNMENT SLOT LATCH PIN 03023 RUBBER LATCH BOSSES FIG. 6B 02552 FIG. 5 TAB...
... (See Fig. 4) 1. Close cover and lock latch handles over deck opening as not to damage full bagger indicator. 3. Assemble upper chute by hooking hole in latch over latch pin. Push in operation. erUtuisenerlieoosrnaslytcioaonnr.etaCcihonemecrmkisebpnardgoepfdreerrqelyupiselannctsleytma... tab hole on upper chute and slide together. 5. lRelenedtp.cClaoocnnettaawinihneeernr. DEFLECTOR SHIELD OPTIONAL FRONT GAUGE WHEEL COVER UPPER CHUTE FULL BAGGER INDICATOR HANDLE LOWER CHUTE 03029 FIG. 6A ALIGNMENT SLOT LATCH PIN 03023 RUBBER LATCH BOSSES FIG. 6B 02552 FIG. 5 TAB...
User Manual
Page 8
... been used, you the best time to empty the bags. When the wheel stops, it should be mowed twice. Experience will experience with a full bagger indicator. b. Gently insert a small twig or wire into passageway to suit your grass catcher. • Always run throttle at center supports. NOTE: ... the parts and that the grass catcher containers are full. The wheel will be a hazard. • Do not attempt to insure full bagger indicator has not become clogged. Reassemble and latch chutes c. Check to vacuum up thatch and debris that has accumulated for ease of each use...
... been used, you the best time to empty the bags. When the wheel stops, it should be mowed twice. Experience will experience with a full bagger indicator. b. Gently insert a small twig or wire into passageway to suit your grass catcher. • Always run throttle at center supports. NOTE: ... the parts and that the grass catcher containers are full. The wheel will be a hazard. • Do not attempt to insure full bagger indicator has not become clogged. Reassemble and latch chutes c. Check to vacuum up thatch and debris that has accumulated for ease of each use...
User Manual
Page 9
... control in contact with manufacturer's recommended parts, when necessary. 9 Empty containers after each use . Replace bent or damaged blades. • See BLADE CARE instructions in bagger containers. STORAGE When grass catcher is to "OFF" position. • Make sure blades and all dirt, grass, leaves, etc. CAUTION: Grass catcher components are subject...
... control in contact with manufacturer's recommended parts, when necessary. 9 Empty containers after each use . Replace bent or damaged blades. • See BLADE CARE instructions in bagger containers. STORAGE When grass catcher is to "OFF" position. • Make sure blades and all dirt, grass, leaves, etc. CAUTION: Grass catcher components are subject...
