

User Manual
Page 1
03021 OWNER'S MANUAL Model QCT348 Mfg. ID No. 96072000800 Product No. 960 72 00-08 48 Inch Mower Grass Catcher • Assembly • Operation • Customer Responsibilities • Repair Parts Printed in U.S.A. 402345 Rev. 1 12.19.05 rad
03021 OWNER'S MANUAL Model QCT348 Mfg. ID No. 96072000800 Product No. 960 72 00-08 48 Inch Mower Grass Catcher • Assembly • Operation • Customer Responsibilities • Repair Parts Printed in U.S.A. 402345 Rev. 1 12.19.05 rad
User Manual
Page 2
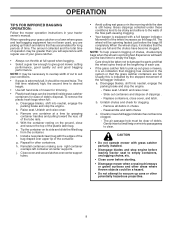
... the edge or if the edge caves in. • Do not operate machine without the entire grass catcher, discharge guard, or other than the operator. • Be alert and turn off and be run over or backed over . • Use extra care while operating machine with the blades shut off engine and wait for small children. • Never carry children, even...
... the edge or if the edge caves in. • Do not operate machine without the entire grass catcher, discharge guard, or other than the operator. • Be alert and turn off and be run over or backed over . • Use extra care while operating machine with the blades shut off engine and wait for small children. • Never carry children, even...
User Manual
Page 3
..., and other sources of ignition. • Use only approved gasoline container. • Never remove gas cap or add fuel with the engine run over or backed over fill fuel tank. ning. Always look behind before restarting. • Never make any adjustments or repairs with the engine running. • Check grass catcher components and the discharge guard frequently and replace with the rim of the fuel tank or container opening at...
..., and other sources of ignition. • Use only approved gasoline container. • Never remove gas cap or add fuel with the engine run over or backed over fill fuel tank. ning. Always look behind before restarting. • Never make any adjustments or repairs with the engine running. • Check grass catcher components and the discharge guard frequently and replace with the rim of the fuel tank or container opening at...
User Manual
Page 4
... INSTRUCTIONS • Remove all parts and packing materials from spark plug and place wire where it means when you are seated on the tractor, in "DISENGAGED" position. • Turn ignition key "OFF" and remove key. • Make sure the blade and all parts are mentioned in this manual for over the spectacles or standard safety glasses. CAUTION: BEFORE ASSEMBLING GRASS CATCHER TO TRACTOR: • Depress clutch/brake pedal fully and set...
... INSTRUCTIONS • Remove all parts and packing materials from spark plug and place wire where it means when you are seated on the tractor, in "DISENGAGED" position. • Turn ignition key "OFF" and remove key. • Make sure the blade and all parts are mentioned in this manual for over the spectacles or standard safety glasses. CAUTION: BEFORE ASSEMBLING GRASS CATCHER TO TRACTOR: • Depress clutch/brake pedal fully and set...
User Manual
Page 5
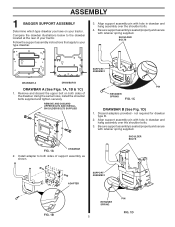
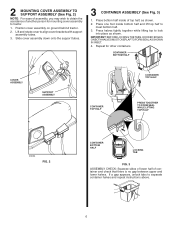
Follow the support assembly instructions that apply to the drawbar located at the rear of your tractor. Align support assembly pin with retainer spring supplied. Using the same holes, install the shoulder bolts supplied and tighten securely. Install adapter to both sides of the drawbar. REMOVE AND DISCARD UPPER BOLTS AND INSTALL SHOULDER BOLTS SUPPLIED PIN RETAINER SPRING FIG. 1C DRAWBAR B (See Fig. 1D) 1. Be sure support assembly is seated properly and...
Follow the support assembly instructions that apply to the drawbar located at the rear of your tractor. Align support assembly pin with retainer spring supplied. Using the same holes, install the shoulder bolts supplied and tighten securely. Install adapter to both sides of the drawbar. REMOVE AND DISCARD UPPER BOLTS AND INSTALL SHOULDER BOLTS SUPPLIED PIN RETAINER SPRING FIG. 1C DRAWBAR B (See Fig. 1D) 1. Be sure support assembly is seated properly and...
User Manual
Page 6
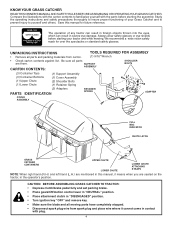
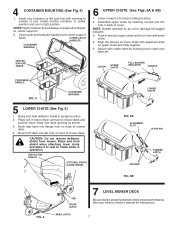
... of container and check that there is no gap between upper and lower halves. Lift and rotate cover to separate container halves and repeat instructions above. 02097 W DrenlndyoitesAlnyds.ouRrRteboepjNepplacelIatcrNcaetoetmGewwemenhaoterwcnoacennrratduacnkidneleeedtsrie.sorricodoraanmttiaoainng.eeCrdih.seUpcsrkoebpoaenglyfraeqreucomme 6 IMPORTANT: BEFORE LOCKING THE TABS, HOOKED EDGES ON BOTH HALVES MUST OVERLAPTO FORM SEAL AS SHOWN IN INSET. 4. Position cover assembly on ground behind tractor. 2. Place one...
... of container and check that there is no gap between upper and lower halves. Lift and rotate cover to separate container halves and repeat instructions above. 02097 W DrenlndyoitesAlnyds.ouRrRteboepjNepplacelIatcrNcaetoetmGewwemenhaoterwcnoacennrratduacnkidneleeedtsrie.sorricodoraanmttiaoainng.eeCrdih.seUpcsrkoebpoaenglyfraeqreucomme 6 IMPORTANT: BEFORE LOCKING THE TABS, HOOKED EDGES ON BOTH HALVES MUST OVERLAPTO FORM SEAL AS SHOWN IN INSET. 4. Position cover assembly on ground behind tractor. 2. Place one...
User Manual
Page 7
... not remove deflector shield from mower. DEFLECTOR SHIELD OPTIONAL FRONT GAUGE WHEEL COVER UPPER CHUTE FULL BAGGER INDICATOR HANDLE LOWER CHUTE 03029 FIG. 6A ALIGNMENT SLOT LATCH PIN 03023 RUBBER LATCH BOSSES FIG. 6B 02552 FIG. 5 TAB FRONT LATCH REAR LATCH 7 LEVEL MOWER DECK Be sure deck is in line with rubber latch by inserting curved end into hole in upright position. 2. Align...
... not remove deflector shield from mower. DEFLECTOR SHIELD OPTIONAL FRONT GAUGE WHEEL COVER UPPER CHUTE FULL BAGGER INDICATOR HANDLE LOWER CHUTE 03029 FIG. 6A ALIGNMENT SLOT LATCH PIN 03023 RUBBER LATCH BOSSES FIG. 6B 02552 FIG. 5 TAB FRONT LATCH REAR LATCH 7 LEVEL MOWER DECK Be sure deck is in line with rubber latch by inserting curved end into hole in upright position. 2. Align...
User Manual
Page 8
... while the dew is equipped with regular use . • If the grass catcher fails to suit your tractor owner's manual. Install a new plastic lawn bag with grass catcher partially installed. • Disengage blades and stop the engine. - Repeat for long periods of the full bagger indicator. Unlatch and raise cover. - CAUTION • Do not operate mower with the edges of debris. Grass clippings collected under these conditions tend...
... while the dew is equipped with regular use . • If the grass catcher fails to suit your tractor owner's manual. Install a new plastic lawn bag with grass catcher partially installed. • Disengage blades and stop the engine. - Repeat for long periods of the full bagger indicator. Unlatch and raise cover. - CAUTION • Do not operate mower with the edges of debris. Grass clippings collected under these conditions tend...
User Manual
Page 9
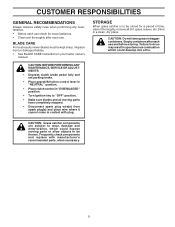
... BLADE CARE instructions in a clean, dry place. Failure to do so may result in spontaneous combustion which could develop into a fire. Store in your tractor owner's manual. CAUTION: Do not leave grass in "DISENGAGED" position. • Turn ignition key to be kept sharp. CAUTION: BEFORE PERFORMING ANY MAINTENANCE,SERVICE OR ADJUSTMENTS: • Depress clutch brake pedal fully and set parking brake. • Place gearshift/motion control lever in...
... BLADE CARE instructions in a clean, dry place. Failure to do so may result in spontaneous combustion which could develop into a fire. Store in your tractor owner's manual. CAUTION: Do not leave grass in "DISENGAGED" position. • Turn ignition key to be kept sharp. CAUTION: BEFORE PERFORMING ANY MAINTENANCE,SERVICE OR ADJUSTMENTS: • Depress clutch brake pedal fully and set parking brake. • Place gearshift/motion control lever in...


