
User Manual
Page 1
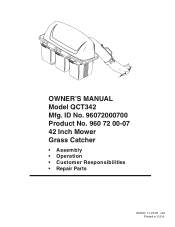
03021 OWNER'S MANUAL Model QCT342 Mfg. ID No. 96072000700 Product No. 960 72 00-07 42 Inch Mower Grass Catcher • Assembly • Operation • Customer Responsibilities • Repair Parts 402337 11.23.05 rad Printed in U.S.A.
03021 OWNER'S MANUAL Model QCT342 Mfg. ID No. 96072000700 Product No. 960 72 00-07 42 Inch Mower Grass Catcher • Assembly • Operation • Customer Responsibilities • Repair Parts 402337 11.23.05 rad Printed in U.S.A.
User Manual
Page 2
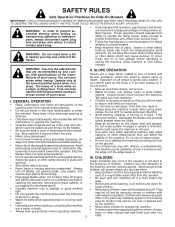
... Ride-On Mowers IMPORTANT: THIS CUTTING MACHINE IS CAPABLE OF AMPUTATING HANDS AND FEET AND THROWING OBJECTS. WARNING: Tow only the attachments that may fall off engine and wait for another ride and be run over or backed over if a wheel is dangerous. Use common sense when towing. Operate only at all parts to come to loss of control and...
... Ride-On Mowers IMPORTANT: THIS CUTTING MACHINE IS CAPABLE OF AMPUTATING HANDS AND FEET AND THROWING OBJECTS. WARNING: Tow only the attachments that may fall off engine and wait for another ride and be run over or backed over if a wheel is dangerous. Use common sense when towing. Operate only at all parts to come to loss of control and...
User Manual
Page 3
... • Tow only with the engine run over or backed over fill fuel tank. Allow engine to service or repair this manual.The instructions will not have competent, well trained technicians and the proper tools to cool before restarting. • Never make any adjustments or repairs with the engine running. • Check grass catcher components and the discharge guard frequently and replace with the blades shut off if a child...
... • Tow only with the engine run over or backed over fill fuel tank. Allow engine to service or repair this manual.The instructions will not have competent, well trained technicians and the proper tools to cool before restarting. • Never make any adjustments or repairs with the engine running. • Check grass catcher components and the discharge guard frequently and replace with the blades shut off if a child...
User Manual
Page 4
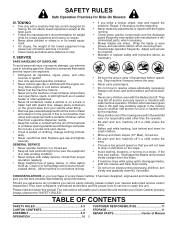
... hand (L.H.) are mentioned in this manual for over the spectacles or standard safety glasses. CAUTION: BEFORE ASSEMBLING GRASS CATCHER TO TRACTOR: • Depress clutch/brake pedal fully and set parking brake. • Place gearshift/motion control lever in "NEUTRAL" position. • Place attachment clutch in contact with the parts before starting the assembly. UNPACKING INSTRUCTIONS • Remove all parts and packing materials from spark plug and place wire where it means when you...
... hand (L.H.) are mentioned in this manual for over the spectacles or standard safety glasses. CAUTION: BEFORE ASSEMBLING GRASS CATCHER TO TRACTOR: • Depress clutch/brake pedal fully and set parking brake. • Place gearshift/motion control lever in "NEUTRAL" position. • Place attachment clutch in contact with the parts before starting the assembly. UNPACKING INSTRUCTIONS • Remove all parts and packing materials from spark plug and place wire where it means when you...
User Manual
Page 5
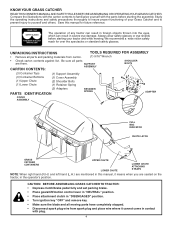
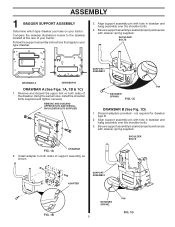
REMOVE AND DISCARD UPPER BOLTS AND INSTALL SHOULDER BOLTS SUPPLIED PIN RETAINER SPRING FIG. 1C DRAWBAR B (See Fig. 1D) 1. Align support assembly pin with retainer spring supplied. Be sure support assembly is seated properly and secure with hole in drawbar and hang assembly over the shoulder bolts. 3. Follow the support assembly instructions that apply to the drawbar located at the rear of your tractor. Discard adapters provided - Compare the drawbar...
REMOVE AND DISCARD UPPER BOLTS AND INSTALL SHOULDER BOLTS SUPPLIED PIN RETAINER SPRING FIG. 1C DRAWBAR B (See Fig. 1D) 1. Align support assembly pin with retainer spring supplied. Be sure support assembly is seated properly and secure with hole in drawbar and hang assembly over the shoulder bolts. 3. Follow the support assembly instructions that apply to the drawbar located at the rear of your tractor. Discard adapters provided - Compare the drawbar...
User Manual
Page 6
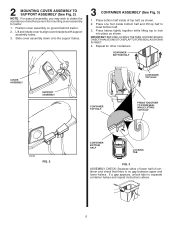
... 03024 FIG. 2 CONTAINER BOTTOM HALF LOCKING TAB FIG. 3 ASSEMBLY CHECK: Squeeze sides of lower half of top half, as shown. If a gap appears, unlock tabs to align cover brackets with support assembly tubes. 3. 2 MOUNTING COVER ASSEMBLY TO SUPPORT ASSEMBLY (See Fig. 2) NOTE: For ease of assembly, you may wish to obtain the assistance of another person for other containers. Position cover assembly on ground behind tractor. 2.
... 03024 FIG. 2 CONTAINER BOTTOM HALF LOCKING TAB FIG. 3 ASSEMBLY CHECK: Squeeze sides of lower half of top half, as shown. If a gap appears, unlock tabs to align cover brackets with support assembly tubes. 3. 2 MOUNTING COVER ASSEMBLY TO SUPPORT ASSEMBLY (See Fig. 2) NOTE: For ease of assembly, you may wish to obtain the assistance of another person for other containers. Position cover assembly on ground behind tractor. 2.
User Manual
Page 7
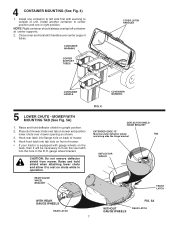
... on chute while in upright position. 2. REAR GAUGE WHEEL BRACKET FIG. 4 DEFLECTOR SHIELD HINGE BRACKET EXTENDED EDGE "B" Must be necessary to center position and one container to left container at center supports. 2. CONTAINER WARNING COVER LATCH HANDLES CENTER SUPPORT TUBES 03022 CONTAINER HANDLE csDWruoabcAnjekoecRttdotNooprewIdrNaeatameGr amagnoedwdde. Install another container to hook the rear latch into flange hole on back of mower. •...
... on chute while in upright position. 2. REAR GAUGE WHEEL BRACKET FIG. 4 DEFLECTOR SHIELD HINGE BRACKET EXTENDED EDGE "B" Must be necessary to center position and one container to left container at center supports. 2. CONTAINER WARNING COVER LATCH HANDLES CENTER SUPPORT TUBES 03022 CONTAINER HANDLE csDWruoabcAnjekoecRttdotNooprewIdrNaeatameGr amagnoedwdde. Install another container to hook the rear latch into flange hole on back of mower. •...
User Manual
Page 8
... may try to mower deck. 4. MOWER WITHOUT MOUNTING TAB (See Fig. 5B) 1. With chute in proper position, hold the chute in a safe place. 2. OPTIONAL GAUGE WHEEL AND BRACKET PLACE LOWER REAR EDGE BETWEEN GAUGE WHEEL BRACKET TAB AND MOWER HOUSING, THEN HOOK REAR LATCH NOTE: If equipped, remove mulch cover from mower deck and store in position while hooking the latches to its lowest cutting position. With your right...
... may try to mower deck. 4. MOWER WITHOUT MOUNTING TAB (See Fig. 5B) 1. With chute in proper position, hold the chute in a safe place. 2. OPTIONAL GAUGE WHEEL AND BRACKET PLACE LOWER REAR EDGE BETWEEN GAUGE WHEEL BRACKET TAB AND MOWER HOUSING, THEN HOOK REAR LATCH NOTE: If equipped, remove mulch cover from mower deck and store in position while hooking the latches to its lowest cutting position. With your right...

User Manual
Page 9
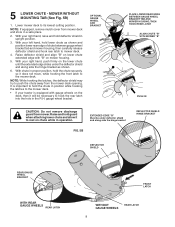
... tractors owner's manual for best mower performance. Push in and turn upper chute until it is in latch over latch pin. 7 LEVEL MOWER • Be sure mower is properly leveled for instructions COVER UPPER CHUTE FULL BAGGER INDICATOR HANDLE LOWER CHUTE 03029 FIG. 6A ALIGNMENT SLOT LATCH PIN 03023 RUBBER LATCH BOSSES FIG. 6B 9 Align the bosses on lower chute with lower chute. 4. 6 UPPER CHUTE (See Figs. 6A & 6B) 1. Assemble upper chute...
... tractors owner's manual for best mower performance. Push in and turn upper chute until it is in latch over latch pin. 7 LEVEL MOWER • Be sure mower is properly leveled for instructions COVER UPPER CHUTE FULL BAGGER INDICATOR HANDLE LOWER CHUTE 03029 FIG. 6A ALIGNMENT SLOT LATCH PIN 03023 RUBBER LATCH BOSSES FIG. 6B 9 Align the bosses on lower chute with lower chute. 4. 6 UPPER CHUTE (See Figs. 6A & 6B) 1. Assemble upper chute...
User Manual
Page 10
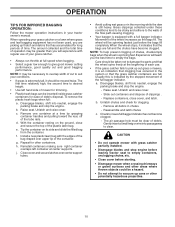
... speed when bagging. • Select a gear low enough to vacuum up thatch and debris that the bags are full. Disengage blades, shift into neutral, engage the parking brake and stop the engine. - NOTE: It may be inserted inside grass catcher containers for long periods of the tube rails. b. g. Install a new plastic lawn bag with regular use of your grass catcher on a lawn where grass and leaf...
... speed when bagging. • Select a gear low enough to vacuum up thatch and debris that the bags are full. Disengage blades, shift into neutral, engage the parking brake and stop the engine. - NOTE: It may be inserted inside grass catcher containers for long periods of the tube rails. b. g. Install a new plastic lawn bag with regular use of your grass catcher on a lawn where grass and leaf...
User Manual
Page 11
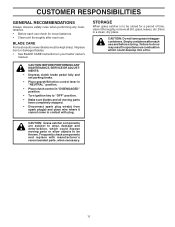
CAUTION: BEFORE PERFORMING ANY MAINTENANCE,SERVICE OR ADJUSTMENTS: • Depress clutch brake pedal fully and set parking brake. • Place gearshift/motion control lever in "NEUTRAL" position. • Place clutch control in "DISENGAGED" position. • Turn ignition key to be stored for loose fasteners. • Clean unit thoroughly after each use and before storing. STORAGE When grass catcher is to "OFF" position. • Make sure blades and all moving parts or allow objects...
CAUTION: BEFORE PERFORMING ANY MAINTENANCE,SERVICE OR ADJUSTMENTS: • Depress clutch brake pedal fully and set parking brake. • Place gearshift/motion control lever in "NEUTRAL" position. • Place clutch control in "DISENGAGED" position. • Turn ignition key to be stored for loose fasteners. • Clean unit thoroughly after each use and before storing. STORAGE When grass catcher is to "OFF" position. • Make sure blades and all moving parts or allow objects...


