
User Manual
Page 2
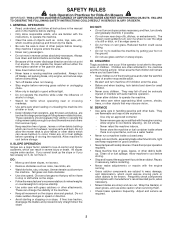
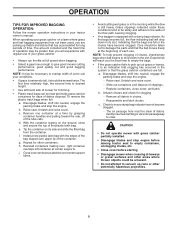
... Mowers IMPORTANT: THIS CUTTING MACHINE IS CAPABLE OF AMPUTATING HANDS AND FEET AND THROWING OBJECTS. Never refuel the machine indoors. - Clean oil or fuel spillage. These can touch hot exhaust / engine parts and burn. Children are explosive. - SLOPE OPERATION Slopes are subject to wear, damage, and deterioration, which could suddenly turn off blades, set parking brake, stop or shift while on wet grass...
... Mowers IMPORTANT: THIS CUTTING MACHINE IS CAPABLE OF AMPUTATING HANDS AND FEET AND THROWING OBJECTS. Never refuel the machine indoors. - Clean oil or fuel spillage. These can touch hot exhaust / engine parts and burn. Children are explosive. - SLOPE OPERATION Slopes are subject to wear, damage, and deterioration, which could suddenly turn off blades, set parking brake, stop or shift while on wet grass...
User Manual
Page 3
... lose control of other people before and while backing. • Never carry children. Should you experience any problems you the best possible dependability and performance. TABLE OF CONTENTS SAFETY RULES 2-3 ASSEMBLY 5-8 OPERATION 9 CUSTOMER RESPONSIBILITIES 10 STORAGE 10 REPAIR PARTS Center of a new Grass Catcher. Tires can hide obstacles. • Use slow speed. CAUTION: Do not coast down slowly. • Do not turn...
... lose control of other people before and while backing. • Never carry children. Should you experience any problems you the best possible dependability and performance. TABLE OF CONTENTS SAFETY RULES 2-3 ASSEMBLY 5-8 OPERATION 9 CUSTOMER RESPONSIBILITIES 10 STORAGE 10 REPAIR PARTS Center of a new Grass Catcher. Tires can hide obstacles. • Use slow speed. CAUTION: Do not coast down slowly. • Do not turn...
User Manual
Page 4
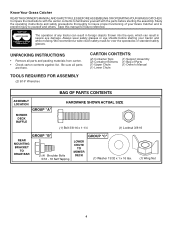
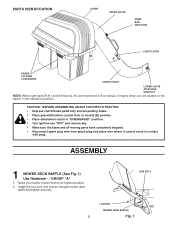
... the operating instructions and safety precautions thoroughly to insure proper functioning of your tractor and while mowing. Be sure all parts and packing materials from carton. • Check carton contents against list. Know Your Grass Catcher READTHIS OWNER'S MANUAL AND SAFETY RULES BEFORE ASSEMBLING OR OPERATINGYOUR GRASS CATCHER. The operation of Parts (1) Owner's Manual TOOLS REQUIRED FOR ASSEMBLY (2) 9/16" Wrenches BAG OF PARTS CONTENTS ASSEMBLY LOCATION GROUP "A" MOWER DECK BAFFLE HARDWARE SHOWN ACTUAL SIZE (1) Bolt 3/8-16...
... the operating instructions and safety precautions thoroughly to insure proper functioning of your tractor and while mowing. Be sure all parts and packing materials from carton. • Check carton contents against list. Know Your Grass Catcher READTHIS OWNER'S MANUAL AND SAFETY RULES BEFORE ASSEMBLING OR OPERATINGYOUR GRASS CATCHER. The operation of Parts (1) Owner's Manual TOOLS REQUIRED FOR ASSEMBLY (2) 9/16" Wrenches BAG OF PARTS CONTENTS ASSEMBLY LOCATION GROUP "A" MOWER DECK BAFFLE HARDWARE SHOWN ACTUAL SIZE (1) Bolt 3/8-16...
User Manual
Page 5
CAUTION: BEFORE ASSEMBLING GRASS CATCHER TO TRACTOR: • Depress clutch/brake pedal fully and set parking brake. • Place gearshift/motion control lever in neutral (N) position. • Place attachment clutch in "DISENGAGED" position. • Turn ignition key "OFF" and remove key. • Make sure the blade and all moving parts have completely stopped. • Disconnect spark plug wire from spark plug and place wire where it means when you are seated on the tractor, in contact with...
CAUTION: BEFORE ASSEMBLING GRASS CATCHER TO TRACTOR: • Depress clutch/brake pedal fully and set parking brake. • Place gearshift/motion control lever in neutral (N) position. • Place attachment clutch in "DISENGAGED" position. • Turn ignition key "OFF" and remove key. • Make sure the blade and all moving parts have completely stopped. • Disconnect spark plug wire from spark plug and place wire where it means when you are seated on the tractor, in contact with...
User Manual
Page 6
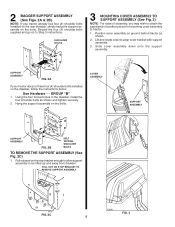
... cover assembly to align cover bracket with support assembly. 3. Hang the support assembly on ground behind tractor as shown and tighten securely. 2. Pull outward on the stop bracket enough to allow support assembly to Step 3 instructions. Position cover assembly on the bolts. Discard the four (4) shoulder bolts supplied and go on to be lifted up and away from drawbar. Use Hardware - - Using the four formed holes in the drawbar, install...
... cover assembly to align cover bracket with support assembly. 3. Hang the support assembly on ground behind tractor as shown and tighten securely. 2. Pull outward on the stop bracket enough to allow support assembly to Step 3 instructions. Position cover assembly on the bolts. Discard the four (4) shoulder bolts supplied and go on to be lifted up and away from drawbar. Use Hardware - - Using the four formed holes in the drawbar, install...
User Manual
Page 7
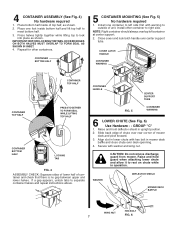
... chute over center support tube. CAUTION: Do not remove discharge guard from mower. Raise and hold deflector shield in operation. If a gap appears, unlock tabs to meet bottom half. 3. GROUP "C" 1. WASHER DEFLECTOR SHIELD MOWER DECK BAFFLE 02343 HEX BOLT WING NUT 7 FIG. 6 Press halves tightly together while lifting top to rest on chute while in upright position. 2. Close cover and lock latch handle over deck...
... chute over center support tube. CAUTION: Do not remove discharge guard from mower. Raise and hold deflector shield in operation. If a gap appears, unlock tabs to meet bottom half. 3. GROUP "C" 1. WASHER DEFLECTOR SHIELD MOWER DECK BAFFLE 02343 HEX BOLT WING NUT 7 FIG. 6 Press halves tightly together while lifting top to rest on chute while in upright position. 2. Close cover and lock latch handle over deck...

User Manual
Page 8
Push in and turn upper chute until it is BOSSES Fig. 7B RUBBER LATCH 8 See your tractors owner's manual for best mower performance. NOTE: Handle carefully so as not to its lowest cutting position. 2. DUMP BAG HANDLE INDICATOR COVER 8 LEVEL MOWER DECK No hardware required Be sure deck is properly leveled for instructions. 02344 WARNING csDruaobcjnkeoectdtotooprewdreaaatmeramagnoedwdd.eeUr tusieenrlieoosnraslytcioaonnr.etCaciohnmeecrmkisebnpadrgoepfdreerrqelyupieslannctelsytm.aRleleendpt .lcCaoconentatwainhineeern.r is WARNING csDruaobcjnkeoectdtotooprewdreaaatmeramagnoedwdd....
Push in and turn upper chute until it is BOSSES Fig. 7B RUBBER LATCH 8 See your tractors owner's manual for best mower performance. NOTE: Handle carefully so as not to its lowest cutting position. 2. DUMP BAG HANDLE INDICATOR COVER 8 LEVEL MOWER DECK No hardware required Be sure deck is properly leveled for instructions. 02344 WARNING csDruaobcjnkeoectdtotooprewdreaaatmeramagnoedwdd.eeUr tusieenrlieoosnraslytcioaonnr.etCaciohnmeecrmkisebnpadrgoepfdreerrqelyupieslannctelsytm.aRleleendpt .lcCaoconentatwainhineeern.r is WARNING csDruaobcjnkeoectdtotooprewdreaaatmeramagnoedwdd....
User Manual
Page 9
... chutes c. The air passage hole must be mowed twice. OPERATION TIPS FOR IMPROVED BAGGING OPERATION: Follow the mower operation instructions in chutes. - NOTE: It may be inserted inside grass catcher containers for clogging - The first time relatively high, the second time to suit your tractor owner's manual. To remove the plastic trash bags when full: a. Raise seat. Install a new plastic lawn bag with grass catcher partially installed. • Disengage blades and stop the engine...
... chutes c. The air passage hole must be mowed twice. OPERATION TIPS FOR IMPROVED BAGGING OPERATION: Follow the mower operation instructions in chutes. - NOTE: It may be inserted inside grass catcher containers for clogging - The first time relatively high, the second time to suit your tractor owner's manual. To remove the plastic trash bags when full: a. Raise seat. Install a new plastic lawn bag with grass catcher partially installed. • Disengage blades and stop the engine...

User Manual
Page 10
... each use and before storing. CAUTION: BEFORE PERFORMING ANY MAINTENANCE,SERVICE OR ADJUSTMENTS: • Depress clutch brake pedal fully and set parking brake. • Place gearshift/motion control lever in "NEUTRAL" position. • Place clutch control in your tractor owner's manual. Replace bent or damaged blades. • See BLADE CARE instructions in "DISENGAGED" position. • Turn ignition key to "OFF" position. • Make sure blades and all dirt, grass, leaves, etc. BLADE CARE For best results mower blades must...
... each use and before storing. CAUTION: BEFORE PERFORMING ANY MAINTENANCE,SERVICE OR ADJUSTMENTS: • Depress clutch brake pedal fully and set parking brake. • Place gearshift/motion control lever in "NEUTRAL" position. • Place clutch control in your tractor owner's manual. Replace bent or damaged blades. • See BLADE CARE instructions in "DISENGAGED" position. • Turn ignition key to "OFF" position. • Make sure blades and all dirt, grass, leaves, etc. BLADE CARE For best results mower blades must...


