
User Manual
Page 1
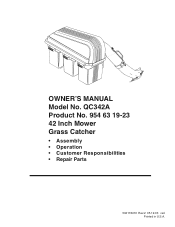
...; Repair Parts 532178476 Rev.2 05.19.03 rad Printed in U.S.A. Use only DWoAnoRt oNpeIrNatGe mower unless a recommended replacement container. DWoAnoRt oNpeIrNatGe mower unless container is properlyissubject to wear and detierioration. Use only a recommended replacement container. Replace whencracked or damaged. Check bag frequently. Check bag frequently. Check bag frequently. DWoAnoRt oNpeIrNatGe mower unless container is properlyissubject to wear and detierioration. Use only a recommended replacement container. 02079 OWNER'S MANUAL Model...
...; Repair Parts 532178476 Rev.2 05.19.03 rad Printed in U.S.A. Use only DWoAnoRt oNpeIrNatGe mower unless a recommended replacement container. DWoAnoRt oNpeIrNatGe mower unless container is properlyissubject to wear and detierioration. Use only a recommended replacement container. Replace whencracked or damaged. Check bag frequently. Check bag frequently. Check bag frequently. DWoAnoRt oNpeIrNatGe mower unless container is properlyissubject to wear and detierioration. Use only a recommended replacement container. 02079 OWNER'S MANUAL Model...

User Manual
Page 2
... starting . • Only allow the mower deck to be picked up and down before refueling. Clean oil or fuel spillage. Uneven terrain could suddenly turn off blades, set parking brake, stop or shift while on steep slopes. Do not allow responsible adults, who are familiar with the engine running machine unattended. Clean any oil or fuel spillage before storage. Do not make adjustments or repairs with the instructions...
... starting . • Only allow the mower deck to be picked up and down before refueling. Clean oil or fuel spillage. Uneven terrain could suddenly turn off blades, set parking brake, stop or shift while on steep slopes. Do not allow responsible adults, who are familiar with the engine running machine unattended. Clean any oil or fuel spillage before storage. Do not make adjustments or repairs with the instructions...
User Manual
Page 3
.... They have competent, well trained technicians and the proper tools to service or repair this manual.The instructions will not have to lose control of a new Grass Catcher. Please read and retain this unit. Always look behind before mowing. Choose a low gear so that are recommended by and comply with specifications of the manufacturer of other people before and while backing...
.... They have competent, well trained technicians and the proper tools to service or repair this manual.The instructions will not have to lose control of a new Grass Catcher. Please read and retain this unit. Always look behind before mowing. Choose a low gear so that are recommended by and comply with specifications of the manufacturer of other people before and while backing...
User Manual
Page 4
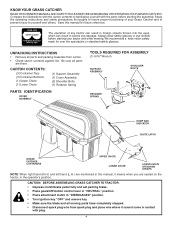
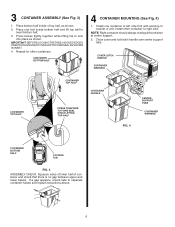
... COVER ASSEMBLY TOOLS REQUIRED FOR ASSEMBLY (1) 9/16" Wrench SUPPORT ASSEMBLY SHOULDER BOLTS RETAINER SPRING DWoAnoRt oNpeIrNatGe mower unless container is properlyissubject to familiarize yourself with plug. 4 Use only a recommended replacement container. Check bag frequently. Study the operating instructions and safety precautions thoroughly to wear and detierioration. Replace whencracked or damaged. Replace whencracked or damaged. Save this manual, it cannot come in contact with the parts before starting the assembly. KNOW YOUR GRASS CATCHER...
... COVER ASSEMBLY TOOLS REQUIRED FOR ASSEMBLY (1) 9/16" Wrench SUPPORT ASSEMBLY SHOULDER BOLTS RETAINER SPRING DWoAnoRt oNpeIrNatGe mower unless container is properlyissubject to familiarize yourself with plug. 4 Use only a recommended replacement container. Check bag frequently. Study the operating instructions and safety precautions thoroughly to wear and detierioration. Replace whencracked or damaged. Replace whencracked or damaged. Save this manual, it cannot come in contact with the parts before starting the assembly. KNOW YOUR GRASS CATCHER...
User Manual
Page 5
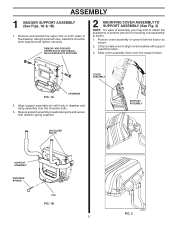
... behind tractor as shown. 2. REMOVE AND DISCARD UPPER BOLTS AND INSTALL SHOULDER BOLTS SUPPLIED 2 MOUNTING COVER ASSEMBLY TO SUPPORT ASSEMBLY (See Fig. 2) NOTE: For ease of assembly, you may wish to obtain the assistance of the drawbar. Using the same holes, install the shoulder bolts supplied and tighten securely. Slide cover assembly down onto the support tubes. SHOULDER BOLTS SUPPORT ASSEMBLY SUPPORT ASSEMBLY RETAINER SPRING PIN FIG. 1B 5 02530 FIG. 2 02532 Be sure support assembly...
... behind tractor as shown. 2. REMOVE AND DISCARD UPPER BOLTS AND INSTALL SHOULDER BOLTS SUPPLIED 2 MOUNTING COVER ASSEMBLY TO SUPPORT ASSEMBLY (See Fig. 2) NOTE: For ease of assembly, you may wish to obtain the assistance of the drawbar. Using the same holes, install the shoulder bolts supplied and tighten securely. Slide cover assembly down onto the support tubes. SHOULDER BOLTS SUPPORT ASSEMBLY SUPPORT ASSEMBLY RETAINER SPRING PIN FIG. 1B 5 02530 FIG. 2 02532 Be sure support assembly...
User Manual
Page 6
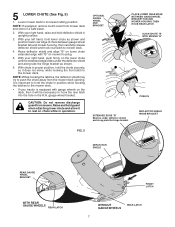
... other container to outside of container and check that there is no gap between upper and lower halves. Install one foot inside of top half, as shown. Close cover and lock latch handle over center support tube. Reenpt lcaocnetawinheern. 02082 FIG. 4 CENTER SUPPORT TUBE CONTAINER WARNING CONTAINER BOTTOM HALF LOCKING TAB FIG. 3 ASSEMBLY CHECK: Squeeze sides of lower half of unit...
... other container to outside of container and check that there is no gap between upper and lower halves. Install one foot inside of top half, as shown. Close cover and lock latch handle over center support tube. Reenpt lcaocnetawinheern. 02082 FIG. 4 CENTER SUPPORT TUBE CONTAINER WARNING CONTAINER BOTTOM HALF LOCKING TAB FIG. 3 ASSEMBLY CHECK: Squeeze sides of lower half of unit...
User Manual
Page 7
... rest on mower housing. 5. With chute in proper position, hold deflector shield in a safe place. 2. NOTE: If equipped, remove mulch cover from mower. With your right hand, raise and hold the chute securely, so it to mower deck. 4. gauge wheel bracket. Raise and hold lower chute as shown. 6. 5 LOWER CHUTE (See Fig. 5) 1. CAUTION: Do not remove discharge guard from mower deck and store in upright position. 3. It...
... rest on mower housing. 5. With chute in proper position, hold deflector shield in a safe place. 2. NOTE: If equipped, remove mulch cover from mower. With your right hand, raise and hold the chute securely, so it to mower deck. 4. gauge wheel bracket. Raise and hold lower chute as shown. 6. 5 LOWER CHUTE (See Fig. 5) 1. CAUTION: Do not remove discharge guard from mower deck and store in upright position. 3. It...
User Manual
Page 8
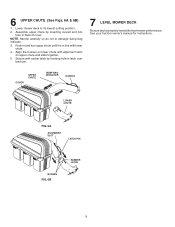
... lowest cutting position. 2. Align the bosses on upper chute and slide together. 5. Assemble upper chute by hooking hole in latch over latch pin. 7 LEVEL MOWER DECK Be sure deck is in and turn upper chute until it is properly leveled for instructions. Secure with alignment slots on lower chute with rubber latch by inserting curved end into hole in back of cover. COVER UPPER CHUTE DUMP BAG INDICATOR HANDLE...
... lowest cutting position. 2. Align the bosses on upper chute and slide together. 5. Assemble upper chute by hooking hole in latch over latch pin. 7 LEVEL MOWER DECK Be sure deck is in and turn upper chute until it is properly leveled for instructions. Secure with alignment slots on lower chute with rubber latch by inserting curved end into hole in back of cover. COVER UPPER CHUTE DUMP BAG INDICATOR HANDLE...
User Manual
Page 9
.... Install a new plastic lawn bag with regular use . NOTE: To help prevent clogging of the container. Replace containers, close and secure the top of the tube rails. Unlatch chutes and check for ease of cut to suit your grass catcher on the ground, close cover, and latch. The air passage hole must be mowed twice. OPERATION TIPS FOR IMPROVED BAGGING OPERATION: Follow the mower operation instructions in...
.... Install a new plastic lawn bag with regular use . NOTE: To help prevent clogging of the container. Replace containers, close and secure the top of the tube rails. Unlatch chutes and check for ease of cut to suit your grass catcher on the ground, close cover, and latch. The air passage hole must be mowed twice. OPERATION TIPS FOR IMPROVED BAGGING OPERATION: Follow the mower operation instructions in...
User Manual
Page 10
...: BEFORE PERFORMING ANY MAINTENANCE,SERVICE OR ADJUSTMENTS: • Depress clutch brake pedal fully and set parking brake. • Place gearshift/motion control lever in "NEUTRAL" position. • Place clutch control in "DISENGAGED" position. • Turn ignition key to be thrown. Frequently check components and replace with plug. CUSTOMER RESPONSIBILITIES GENERAL RECOMMENDATIONS Always observe safety rules when performing any maintenance. • Before each use check for a period of time, clean it cannot come in...
...: BEFORE PERFORMING ANY MAINTENANCE,SERVICE OR ADJUSTMENTS: • Depress clutch brake pedal fully and set parking brake. • Place gearshift/motion control lever in "NEUTRAL" position. • Place clutch control in "DISENGAGED" position. • Turn ignition key to be thrown. Frequently check components and replace with plug. CUSTOMER RESPONSIBILITIES GENERAL RECOMMENDATIONS Always observe safety rules when performing any maintenance. • Before each use check for a period of time, clean it cannot come in...


