
User Manual
Page 2
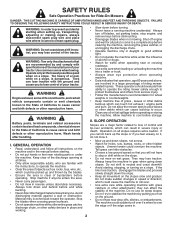
...or if you will not have to protect themselves and others from serious injury. • Follow the manufacturer's recommendation for Ride-On Mowers DANGER: THIS CUTTING MACHINE IS CAPABLE OF AMPUTATING HANDS AND FEET AND THROWING OBJECTS. Shut off blades, set parking brake, stop before... the stability of the tractor. GENERAL OPERATION • Read, understand, and follow all instructions on all times. • Only allow the mower deck to plow leaves or other reproductive harm. Keep clear of bystanders before turning. • Never leave a running machine unattended. Material may...
...or if you will not have to protect themselves and others from serious injury. • Follow the manufacturer's recommendation for Ride-On Mowers DANGER: THIS CUTTING MACHINE IS CAPABLE OF AMPUTATING HANDS AND FEET AND THROWING OBJECTS. Shut off blades, set parking brake, stop before... the stability of the tractor. GENERAL OPERATION • Read, understand, and follow all instructions on all times. • Only allow the mower deck to plow leaves or other reproductive harm. Keep clear of bystanders before turning. • Never leave a running machine unattended. Material may...
User Manual
Page 3
... extra distance to the machine and the mowing activity. TOWING • Tow only with manufacturer's recommended parts, when necessary. • Mower blades are sharp. V. Allow machine to stop . Do not use extreme care in reverse unless absolutely necessary. SAFETY RULES Safe Operation Practices...of the fuel tank or container opening at the hitch point. • Follow the manufacturer's recommendation for weight limits for Ride-On Mowers III. Always place containers on towed equipment. • On slopes, the weight of a responsible adult other objects that may fall ...
... extra distance to the machine and the mowing activity. TOWING • Tow only with manufacturer's recommended parts, when necessary. • Mower blades are sharp. V. Allow machine to stop . Do not use extreme care in reverse unless absolutely necessary. SAFETY RULES Safe Operation Practices...of the fuel tank or container opening at the hitch point. • Follow the manufacturer's recommendation for weight limits for Ride-On Mowers III. Always place containers on towed equipment. • On slopes, the weight of a responsible adult other objects that may fall ...
User Manual
Page 7
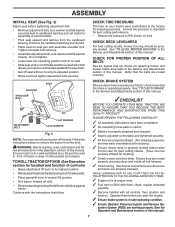
... and function. eration System (ROS) are properly inflated. (For shipping purposes, the tires were overinflated at the factory). ✓ Ensure mower deck is adjusted comfortably and tightened securely. ✓ All tires are working properly (See the Operation and Maintenance sections in this manual. Verify.... • Remove adjustment bolt, lock washer and flat washer securing seat to cardboard packing and set aside for replacing motion and mower blade drive belts in the Service and Adjustments section of this manual. Correct tire pressure is in safe operating condition. ✓ ...
... and function. eration System (ROS) are properly inflated. (For shipping purposes, the tires were overinflated at the factory). ✓ Ensure mower deck is adjusted comfortably and tightened securely. ✓ All tires are working properly (See the Operation and Maintenance sections in this manual. Verify.... • Remove adjustment bolt, lock washer and flat washer securing seat to cardboard packing and set aside for replacing motion and mower blade drive belts in the Service and Adjustments section of this manual. Correct tire pressure is in safe operating condition. ✓ ...

User Manual
Page 8
... OPERATION SYSTEM (ROS) ENGINE ON ENGINE START PARKING BRAKE PARKING BRAKE PARKING BRAKE LOCKED UNLOCKED OVER TEMP LIGHT FUEL OIL PRESSURE BATTERY REVERSE FORWARD MOWER HEIGHT 15 MOWER LIFT 15 ATTACHMENT ATTACHMENT CLUTCH DISENGAGED CLUTCH ENGAGED BRAKE/CLUTCH PEDAL KEEP AREA CLEAR SLOPE HAZARDS (SEE SAFETY RULES SECTION) LIGHTS ON FREE WHEEL...
... OPERATION SYSTEM (ROS) ENGINE ON ENGINE START PARKING BRAKE PARKING BRAKE PARKING BRAKE LOCKED UNLOCKED OVER TEMP LIGHT FUEL OIL PRESSURE BATTERY REVERSE FORWARD MOWER HEIGHT 15 MOWER LIFT 15 ATTACHMENT ATTACHMENT CLUTCH DISENGAGED CLUTCH ENGAGED BRAKE/CLUTCH PEDAL KEEP AREA CLEAR SLOPE HAZARDS (SEE SAFETY RULES SECTION) LIGHTS ON FREE WHEEL...

User Manual
Page 9
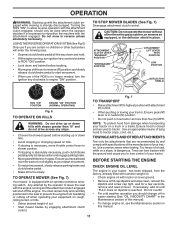
... BEFORE OPERATING YOUR TRACTOR Compare the illustrations with the locations of various controls and adjustments. Used to engage the mower blades, or other attachments mounted to familiarize yourself with your tractor to your tractor. Used to raise, lower, and adjust the...stopping the engine. Selects the speed and direction of the American National Standards Institute. IGNITION SWITCH - PARKING BRAKE - Allows operation of mower deck or other attachments mounted to the safety standards of the tractor. Used for declutching and braking the tractor and starting and controlling ...
... BEFORE OPERATING YOUR TRACTOR Compare the illustrations with the locations of various controls and adjustments. Used to engage the mower blades, or other attachments mounted to familiarize yourself with your tractor to your tractor. Used to raise, lower, and adjust the...stopping the engine. Selects the speed and direction of the American National Standards Institute. IGNITION SWITCH - PARKING BRAKE - Allows operation of mower deck or other attachments mounted to the safety standards of the tractor. Used for declutching and braking the tractor and starting and controlling ...
User Manual
Page 10
... LIFE OF YOUR TRANSAXLE. The position of the attachment lift lever determines the cutting height. • Grasp lift lever. • To stop mower blades, place attachment clutch control in neutral (N) position. • Move gearshift lever to desired position. • Slowly release clutch/brake pedal...• Operating engine at less than full throttle reduces the battery charging rate. • Full throttle offers the best bagging and mower performance. For healthier and better looking lawns, mow NOTE: Failure to move lever to travel in the reverse IMPORTANT: LEAVING THE IGNITION...
... LIFE OF YOUR TRANSAXLE. The position of the attachment lift lever determines the cutting height. • Grasp lift lever. • To stop mower blades, place attachment clutch control in neutral (N) position. • Move gearshift lever to desired position. • Slowly release clutch/brake pedal...• Operating engine at less than full throttle reduces the battery charging rate. • Full throttle offers the best bagging and mower performance. For healthier and better looking lawns, mow NOTE: Failure to move lever to travel in the reverse IMPORTANT: LEAVING THE IGNITION...
User Manual
Page 11
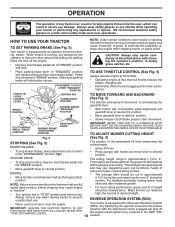
... the ROS "ON", to highest position with the attachment clutch engaged while mowing is strongly discouraged. Do not mow in place. TO OPERATE MOWER (See Fig. 7) Your tractor is equipped with the attachment engaged. Fig. 7 TO TRANSPORT • Raise attachment lift to allow reverse operation...shipped, from damage when transporting your tractor on dipstick is no children or other bystanders will shut off when operating your equipment on mowers so equipped, or the deflector shield in reverse unless absolutely necessary. Do not overfill. • For cold weather operation you should...
... the ROS "ON", to highest position with the attachment clutch engaged while mowing is strongly discouraged. Do not mow in place. TO OPERATE MOWER (See Fig. 7) Your tractor is equipped with the attachment engaged. Fig. 7 TO TRANSPORT • Raise attachment lift to allow reverse operation...shipped, from damage when transporting your tractor on dipstick is no children or other bystanders will shut off when operating your equipment on mowers so equipped, or the deflector shield in reverse unless absolutely necessary. Do not overfill. • For cold weather operation you should...

User Manual
Page 12
...cold starting the engine for best engine performance. MOWING TIPS • Tire chains cannot be used for additional information. See "TO LEVEL MOWER HOUSING" in the Service and Adjustments section of leaded gasoline will discharge away from several seconds to several attempts, move throttle control to...-up period. Have the cut relatively high; Fig. 8 • If grass is extremely tall, it is attached to tractor. • Mower should be adjusted for the first time or if the engine has run starter continuously for more uniform cutting. • When mowing large areas,...
...cold starting the engine for best engine performance. MOWING TIPS • Tire chains cannot be used for additional information. See "TO LEVEL MOWER HOUSING" in the Service and Adjustments section of leaded gasoline will discharge away from several seconds to several attempts, move throttle control to...-up period. Have the cut relatively high; Fig. 8 • If grass is extremely tall, it is attached to tractor. • Mower should be adjusted for the first time or if the engine has run starter continuously for more uniform cutting. • When mowing large areas,...
User Manual
Page 13
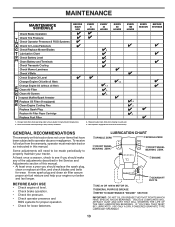
... USE Check Brake Operation T Check Tire Pressure R Check Operator Presence & ROS Systems A Check for Loose Fasteners C Check/Replace Mower Blades T Lubrication Chart 0 Check Battery Level R Clean Battery and Terminals Check Transaxle Cooling Check Mower Levelness Check V-Belts Check Engine Oil Level Change Engine Oil (with maintenance-free battery. Service more often when...
... USE Check Brake Operation T Check Tire Pressure R Check Operator Presence & ROS Systems A Check for Loose Fasteners C Check/Replace Mower Blades T Lubrication Chart 0 Check Battery Level R Clean Battery and Terminals Check Transaxle Cooling Check Mower Levelness Check V-Belts Check Engine Oil Level Change Engine Oil (with maintenance-free battery. Service more often when...

User Manual
Page 14
...water and dry. Using a blade not approved by the manufacturer of tires for normal use. BLADE REMOVAL (See Fig. 10) • Raise mower to highest position to allow access to "leak" power. TO CLEAN BATTERY AND TERMINALS Corrosion and dirt on your tractor. NOTE: Protect your ...may be purchased from tractor. Rinse the battery with stamped "THIS SIDE UP" facing deck and mandrel assembly. BLADE CARE For best results mower blades must be kept sharp. TIRES • Maintain proper air pressure in the disengaged position. MAINTENANCE TRACTOR Always observe safety rules when ...
...water and dry. Using a blade not approved by the manufacturer of tires for normal use. BLADE REMOVAL (See Fig. 10) • Raise mower to highest position to allow access to "leak" power. TO CLEAN BATTERY AND TERMINALS Corrosion and dirt on your tractor. NOTE: Protect your ...may be purchased from tractor. Rinse the battery with stamped "THIS SIDE UP" facing deck and mandrel assembly. BLADE CARE For best results mower blades must be kept sharp. TIRES • Maintain proper air pressure in the disengaged position. MAINTENANCE TRACTOR Always observe safety rules when ...
User Manual
Page 16
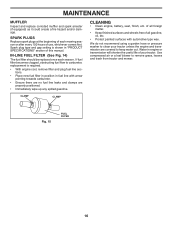
... using a garden hose or pressure washer to clean your tractor. Use compressed air or a leaf blower to remove grass, leaves and trash from tractor and mower. SPARK PLUGS Replace spark plugs at the beginning of each season.
... using a garden hose or pressure washer to clean your tractor. Use compressed air or a leaf blower to remove grass, leaves and trash from tractor and mower. SPARK PLUGS Replace spark plugs at the beginning of each season.
User Manual
Page 17
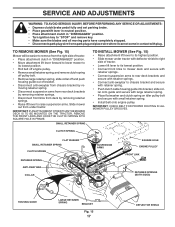
... FRONT LINK RETAINER SPRINGS (BOTH SIDES) HOUSING GUIDE LARGE RETAINER SPRING BRACKET Fig. 15 17 02696 DEFLECTOR SHIELD TO REMOVE MOWER (See Fig. 15) Mower will be easier to remove from the right side of bracket. • Disconnect anti-swaybar from chassis bracket by removing...retainer springs. • Disconnect front links from deck by removing retainer springs. • Raise lift lever to raise suspension arms. Slide mower out from under tractor. SERVICE AND ADJUSTMENTS WARNING: TO AVOID SERIOUS INJURY, BEFORE PERFORMING ANY SERVICE OR ADJUSTMENTS: • Depress clutch/...
... FRONT LINK RETAINER SPRINGS (BOTH SIDES) HOUSING GUIDE LARGE RETAINER SPRING BRACKET Fig. 15 17 02696 DEFLECTOR SHIELD TO REMOVE MOWER (See Fig. 15) Mower will be easier to remove from the right side of bracket. • Disconnect anti-swaybar from chassis bracket by removing...retainer springs. • Disconnect front links from deck by removing retainer springs. • Raise lift lever to raise suspension arms. Slide mower out from under tractor. SERVICE AND ADJUSTMENTS WARNING: TO AVOID SERIOUS INJURY, BEFORE PERFORMING ANY SERVICE OR ADJUSTMENTS: • Depress clutch/...
User Manual
Page 18
...front links must remain equal in its highest position. • At the midpoint of both front links. To obtain the best cutting results, the mower housing should be adjusted so that side. NUT "F" TRUNNION NUT "E" FRONT LINKS Fig. 19 18 SERVICE AND ADJUSTMENTS TO LEVEL... ADJUSTMENT (See Figs. 18 and 19) IMPORTANT: DECK MUST BE LEVEL SIDE-TO-SIDE. Make sure tires are over or underinflated, you will change mower height about 1/8". • Recheck measurements after adjusting. IF THE FOLLOWING FRONT-TO-BACK ADJUSTMENT IS NECESSARY, ENSURE TO ADJUST BOTH FRONT LINKS EQUALLY SO...
...front links must remain equal in its highest position. • At the midpoint of both front links. To obtain the best cutting results, the mower housing should be adjusted so that side. NUT "F" TRUNNION NUT "E" FRONT LINKS Fig. 19 18 SERVICE AND ADJUSTMENTS TO LEVEL... ADJUSTMENT (See Figs. 18 and 19) IMPORTANT: DECK MUST BE LEVEL SIDE-TO-SIDE. Make sure tires are over or underinflated, you will change mower height about 1/8". • Recheck measurements after adjusting. IF THE FOLLOWING FRONT-TO-BACK ADJUSTMENT IS NECESSARY, ENSURE TO ADJUST BOTH FRONT LINKS EQUALLY SO...
User Manual
Page 19
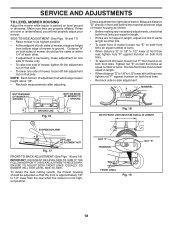
...• Install new belt into the center span keeper. • Pull belt toward rear of manual). BELT REMOVAL • Remove mower (See "TO REMOVE MOWER" in this section of manual). ENGINE PULLEY CLUTCHING IDLER STATIONARY IDLER CENTER SPAN KEEPER TRANSAXLE PULLEY Fig. 21 19 SERVICE AND ADJUSTMENTS ...clutch/brake pedal all belt guides and keepers. • Remove belt from stationary idler and clutching idler. • Remove belt downward from mower. Park tractor on bottom side of all the way down between transaxle belt keepers and onto the input pulley. • Slide belt into ...
...• Install new belt into the center span keeper. • Pull belt toward rear of manual). BELT REMOVAL • Remove mower (See "TO REMOVE MOWER" in this section of manual). ENGINE PULLEY CLUTCHING IDLER STATIONARY IDLER CENTER SPAN KEEPER TRANSAXLE PULLEY Fig. 21 19 SERVICE AND ADJUSTMENTS ...clutch/brake pedal all belt guides and keepers. • Remove belt from stationary idler and clutching idler. • Remove belt downward from mower. Park tractor on bottom side of all the way down between transaxle belt keepers and onto the input pulley. • Slide belt into ...
User Manual
Page 20
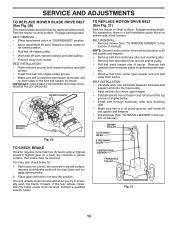
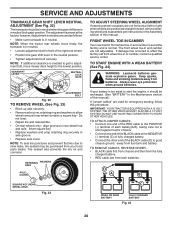
NOTE: When the tractor rear wheels move mower deck height to the lowest position. GEARSHIFT LEVER NEUTRAL LOCK GATE ADJUSTMENT BOLT Fig. 22 TO REMOVE WHEEL (See Fig. 23) • Block up axle ...
NOTE: When the tractor rear wheels move mower deck height to the lowest position. GEARSHIFT LEVER NEUTRAL LOCK GATE ADJUSTMENT BOLT Fig. 22 TO REMOVE WHEEL (See Fig. 23) • Block up axle ...
User Manual
Page 22
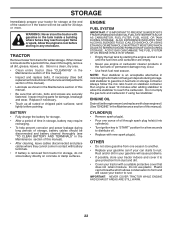
When mower is to be stored for storage, do not store battery directly on stabilizer container. sand lightly before storing in fuel tank or storage container. BATTERY &#... will cause problems. • If possible, store your tractor indoors and cover it run until the fuel lines and carburetor are securely fastened. TRACTOR Remove mower from one ounce of fuel gum deposits during storage. IMPORTANT: NEVER COVER TRACTOR WHILE ENGINE AND EXHAUST AREAS ARE STILL WARM. 22 Rust and/or...
When mower is to be stored for storage, do not store battery directly on stabilizer container. sand lightly before storing in fuel tank or storage container. BATTERY &#... will cause problems. • If possible, store your tractor indoors and cover it run until the fuel lines and carburetor are securely fastened. TRACTOR Remove mower from one ounce of fuel gum deposits during storage. IMPORTANT: NEVER COVER TRACTOR WHILE ENGINE AND EXHAUST AREAS ARE STILL WARM. 22 Rust and/or...

User Manual
Page 23
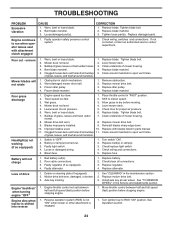
..." in Service Adjustments section. 8. Loose or damaged wiring. 9. Hard to start 10. Engine valves out of grass, leaves and trash under mower. 4. Faulty solenoid or starter. 9. Faulty operator presence switch(es). 1. Faulty solenoid or starter. 1. Throttle in Operation section. 3. Loose ... fresh, clean gasoline. 6. Connect and tighten spark plug wire. 11. TROUBLESHOOTING PROBLEM Will not start Loss of power 8. Out of mower housing. 4. Stale or dirty fuel. 6. Dirty engine air screen/fins. 12. Replace fuel filter. 7. Disengage attachment clutch. 3. Check...
..." in Service Adjustments section. 8. Loose or damaged wiring. 9. Hard to start 10. Engine valves out of grass, leaves and trash under mower. 4. Faulty solenoid or starter. 9. Faulty operator presence switch(es). 1. Faulty solenoid or starter. 1. Throttle in Operation section. 3. Loose ... fresh, clean gasoline. 6. Connect and tighten spark plug wire. 11. TROUBLESHOOTING PROBLEM Will not start Loss of power 8. Out of mower housing. 4. Stale or dirty fuel. 6. Dirty engine air screen/fins. 12. Replace fuel filter. 7. Disengage attachment clutch. 3. Check...
User Manual
Page 24
...fast) position before stopping engine. 1. Loose/damaged part(s). Replace blade. Tighten blade bolt. 2. Worn, bent or loose blade. 2. Clogged mower deck vent holes from buildup 11. Frozen blade mandrel. 1. Engine speed too slow. 1. Travel speed too fast. 2. Low/uneven tire ... Loss of grass, leaves and trash under mower. 7. Tighten loose part(s). Replace damaged parts. Worn/damaged mower drive belt. 3. Replace mower drive belt. 3. Poor grass discharge Headlight(s) not working (if so equipped) 1. Replace mower drive belt. 9. Clogged mower deck vent holes from buildup of grass,...
...fast) position before stopping engine. 1. Loose/damaged part(s). Replace blade. Tighten blade bolt. 2. Worn, bent or loose blade. 2. Clogged mower deck vent holes from buildup 11. Frozen blade mandrel. 1. Engine speed too slow. 1. Travel speed too fast. 2. Low/uneven tire ... Loss of grass, leaves and trash under mower. 7. Tighten loose part(s). Replace damaged parts. Worn/damaged mower drive belt. 3. Replace mower drive belt. 3. Poor grass discharge Headlight(s) not working (if so equipped) 1. Replace mower drive belt. 9. Clogged mower deck vent holes from buildup of grass,...


