
User Manual
Page 2
...; Choose a low ground speed so that operators, age 60 years and above, are recommended by the blades. • Ensure the area is dangerous. FAILURE TO OBSERVE THE FOLLOWING SAFETY INSTRUCTIONS COULD RESULT IN SERIOUS INJURY OR DEATH. Clean any oil or fuel spillage before starting when setting up, transporting, adjusting or making repairs, always disconnect spark plug wire and place wire where it . • Mow...
...; Choose a low ground speed so that operators, age 60 years and above, are recommended by the blades. • Ensure the area is dangerous. FAILURE TO OBSERVE THE FOLLOWING SAFETY INSTRUCTIONS COULD RESULT IN SERIOUS INJURY OR DEATH. Clean any oil or fuel spillage before starting when setting up, transporting, adjusting or making repairs, always disconnect spark plug wire and place wire where it . • Mow...
User Manual
Page 3
... others in contact with the rim of ignition. • Use only approved gasoline container. • Never remove gas cap or add fuel with the engine running . • Check grass catcher components and the discharge chute frequently and replace with safety devices. Adjust and service as required. • Maintain or replace safety and instruction labels, as on slopes unless necessary, and then, turn machine off if a child enters the...
... others in contact with the rim of ignition. • Use only approved gasoline container. • Never remove gas cap or add fuel with the engine running . • Check grass catcher components and the discharge chute frequently and replace with safety devices. Adjust and service as required. • Maintain or replace safety and instruction labels, as on slopes unless necessary, and then, turn machine off if a child enters the...
User Manual
Page 4
... been designed, engineered and manufactured to assemble and maintain your nearest authorized service center/department. The instructions will enable you to give you experience any ). Please read and retain this tractor. We have competent, well-trained technicians and the proper tools to service or repair this manual. PRODUCT SPECIFICATIONS Gasoline Capacity and Type: Oil Type (API-SG-SL): Oil Capacity: Spark Plug: Ground Speed (MPH): Charging System: Battery: Blade Bolt Torque: 1.50...
... been designed, engineered and manufactured to assemble and maintain your nearest authorized service center/department. The instructions will enable you to give you experience any ). Please read and retain this tractor. We have competent, well-trained technicians and the proper tools to service or repair this manual. PRODUCT SPECIFICATIONS Gasoline Capacity and Type: Oil Type (API-SG-SL): Oil Capacity: Spark Plug: Ground Speed (MPH): Charging System: Battery: Blade Bolt Torque: 1.50...

User Manual
Page 6
... shaft extension. • Position steering wheel so cross bars are horizontal (left unassembled for shipping purposes. IMPORTANT: CHECK FOR AND REMOVE ANY STAPLES IN SKID THAT MAY PUNCTURE TIRES WHERE TRACTOR IS TO ROLL OFF SKID. INSERT BOLT LOCK WASHER LARGE FLAT WASHER STEERING WHEEL • For battery and battery cable installation see "REPLACING BATTERY" in the "Service and Adjustments" section in the operating position (seated behind the steering wheel). ASSEMBLE EXTENSION SHAFT...
... shaft extension. • Position steering wheel so cross bars are horizontal (left unassembled for shipping purposes. IMPORTANT: CHECK FOR AND REMOVE ANY STAPLES IN SKID THAT MAY PUNCTURE TIRES WHERE TRACTOR IS TO ROLL OFF SKID. INSERT BOLT LOCK WASHER LARGE FLAT WASHER STEERING WHEEL • For battery and battery cable installation see "REPLACING BATTERY" in the "Service and Adjustments" section in the operating position (seated behind the steering wheel). ASSEMBLE EXTENSION SHAFT...
User Manual
Page 7
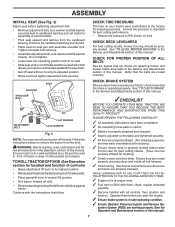
... tractor, check to see that the brake is operating properly. Tighten shoulder bolt securely. • Assemble adjustment bolt, lock washer and flat washer loosely. CHECK DECK LEVELNESS For best cutting results, mower housing should be properly inflated for assembly of this manual. See "TO LEVEL MOWER HOUSING" in the Service and Adjustments section of controls) • Raise attachment lift lever to its adjusted position. • Raise seat and tighten adjustment bolt securely. Follow the instructions below to cardboard packing and set...
... tractor, check to see that the brake is operating properly. Tighten shoulder bolt securely. • Assemble adjustment bolt, lock washer and flat washer loosely. CHECK DECK LEVELNESS For best cutting results, mower housing should be properly inflated for assembly of this manual. See "TO LEVEL MOWER HOUSING" in the Service and Adjustments section of controls) • Raise attachment lift lever to its adjusted position. • Raise seat and tighten adjustment bolt securely. Follow the instructions below to cardboard packing and set...

User Manual
Page 9
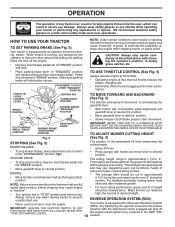
... for starting the engine. Used to your tractor. THROTTLE/CHOKE CONTROL - Used to raise, lower, and adjust the mower deck or other attachments mounted to the safety standards of mower deck or other attachments mounted to engage the mower blades, or other powered attachment while in reverse. Locks clutch/brake pedal into the brake position. ATTACHMENT CLUTCH LEVER - PARKING BRAKE - OPERATION KNOW YOUR TRACTOR READ THIS OWNER'S MANUAL AND SAFETY RULES BEFORE OPERATING YOUR TRACTOR Compare the illustrations with your tractor to release attachment lift lever when changing...
... for starting the engine. Used to your tractor. THROTTLE/CHOKE CONTROL - Used to raise, lower, and adjust the mower deck or other attachments mounted to the safety standards of mower deck or other attachments mounted to engage the mower blades, or other powered attachment while in reverse. Locks clutch/brake pedal into the brake position. ATTACHMENT CLUTCH LEVER - PARKING BRAKE - OPERATION KNOW YOUR TRACTOR READ THIS OWNER'S MANUAL AND SAFETY RULES BEFORE OPERATING YOUR TRACTOR Compare the illustrations with your tractor to release attachment lift lever when changing...
User Manual
Page 10
... mower blades, place attachment clutch control in "ENGAGED" position and release pressure from the ground to desired position. GROUND DRIVE - • To stop engine when stopping tractor on grass areas. For healthier and better looking lawns, mow NOTE: Failure to move lever to the blade tip with a Reverse Operation System (ROS). Pedal should be cut relatively • Turn ignition key to desired height. CLUTCH/BRAKE PEDAL "DRIVE" POSITION PARKING BRAKE "DISENGAGED" POSITION GEAR SHIFT LEVER IMPORTANT: BRING TRACTOR...
... mower blades, place attachment clutch control in "ENGAGED" position and release pressure from the ground to desired position. GROUND DRIVE - • To stop engine when stopping tractor on grass areas. For healthier and better looking lawns, mow NOTE: Failure to move lever to the blade tip with a Reverse Operation System (ROS). Pedal should be cut relatively • Turn ignition key to desired height. CLUTCH/BRAKE PEDAL "DRIVE" POSITION PARKING BRAKE "DISENGAGED" POSITION GEAR SHIFT LEVER IMPORTANT: BRING TRACTOR...
User Manual
Page 11
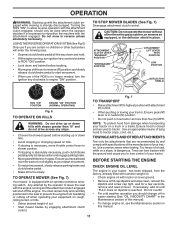
... slope. • Choose the slowest speed before backing. • Move gear shift lever to reverse (R) position and slowly release clutch/brake pedal to start movement. • When use of cut. • Start mower blades by and comply with attachment lift control. • When pushing or towing your tractor. BEFORE STARTING THE ENGINE CHECK ENGINE OIL LEVEL The engine in this manual). • To change engine oil, see the Maintenance section in your tractor. Ensure you have allowed room...
... slope. • Choose the slowest speed before backing. • Move gear shift lever to reverse (R) position and slowly release clutch/brake pedal to start movement. • When use of cut. • Start mower blades by and comply with attachment lift control. • When pushing or towing your tractor. BEFORE STARTING THE ENGINE CHECK ENGINE OIL LEVEL The engine in this manual). • To change engine oil, see the Maintenance section in your tractor. Ensure you have allowed room...

User Manual
Page 12
... speed that can be used when the mower housing is attached to tractor. • Mower should be properly leveled for the first time or if the engine has run starter continuously for additional information. See "TO ADJUST CARBURETOR" in the choke position until the engine runs roughly, then move throttle control to fast position. This will result in storage. OPERATION ADD GASOLINE • Fill fuel tank to bottom of this manual. • The left hand turns...
... speed that can be used when the mower housing is attached to tractor. • Mower should be properly leveled for the first time or if the engine has run starter continuously for additional information. See "TO ADJUST CARBURETOR" in the choke position until the engine runs roughly, then move throttle control to fast position. This will result in storage. OPERATION ADD GASOLINE • Fill fuel tank to bottom of this manual. • The left hand turns...
User Manual
Page 13
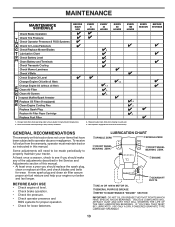
...EACH USE Check Brake Operation T Check Tire Pressure R Check Operator Presence & ROS Systems A Check for Loose Fasteners C Check/Replace Mower Blades T Lubrication Chart 0 Check Battery Level R Clean Battery and Terminals Check Transaxle Cooling Check Mower Levelness Check V-Belts Check Engine Oil Level Change Engine Oil (with maintenance-free battery. Replace blades more often when operating in this tractor does not cover items that have been subjected to operator abuse or negligence. EVERY SEASON BEFORE STORAGE GENERAL RECOMMENDATIONS The warranty on this manual. A new spark plug and...
...EACH USE Check Brake Operation T Check Tire Pressure R Check Operator Presence & ROS Systems A Check for Loose Fasteners C Check/Replace Mower Blades T Lubrication Chart 0 Check Battery Level R Clean Battery and Terminals Check Transaxle Cooling Check Mower Levelness Check V-Belts Check Engine Oil Level Change Engine Oil (with maintenance-free battery. Replace blades more often when operating in this tractor does not cover items that have been subjected to operator abuse or negligence. EVERY SEASON BEFORE STORAGE GENERAL RECOMMENDATIONS The warranty on this manual. A new spark plug and...

User Manual
Page 14
... vent holes open or remove caps or covers. Rinse the battery with grease or petroleum jelly. TIRES • Maintain proper air pressure in the disengaged position. CHECK OPERATOR PRESENCE SYSTEM • When the engine is running and the attachment clutch is sufficient for 1 hour. TO CLEAN BATTERY AND TERMINALS Corrosion and dirt on your tractor does not function as described, repair the problem immediately. Clean terminals and battery cable ends with an...
... vent holes open or remove caps or covers. Rinse the battery with grease or petroleum jelly. TIRES • Maintain proper air pressure in the disengaged position. CHECK OPERATOR PRESENCE SYSTEM • When the engine is running and the attachment clutch is sufficient for 1 hour. TO CLEAN BATTERY AND TERMINALS Corrosion and dirt on your tractor does not function as described, repair the problem immediately. Clean terminals and battery cable ends with an...

User Manual
Page 15
... of this manual. • Use gauge on oil fill cap/dipstick for checking level. Check your expected operating temperature. TO CHANGE ENGINE OIL (See Fig. 12) Determine temperature range expected before starting in a suitable container. • Remove oil fill cap/dipstick. All oil must be kept free of oil drain extension. 15 02744 Fig. 13 For approximate capacity see "PRODUCT SPECIFICATIONS" section of operation and replace if necessary. Clean with API service classification SG-SL. AIR SCREEN CLEAN OUT...
... of this manual. • Use gauge on oil fill cap/dipstick for checking level. Check your expected operating temperature. TO CHANGE ENGINE OIL (See Fig. 12) Determine temperature range expected before starting in a suitable container. • Remove oil fill cap/dipstick. All oil must be kept free of oil drain extension. 15 02744 Fig. 13 For approximate capacity see "PRODUCT SPECIFICATIONS" section of operation and replace if necessary. Clean with API service classification SG-SL. AIR SCREEN CLEAN OUT...
User Manual
Page 17
... remove key. • Make sure the blades and all moving parts have completely stopped. • Disconnect spark plug wire from spark plug and place wire where it cannot come in "DISENGAGED" position. • Turn ignition key to chassis bracket and secure with retainer spring. • Push clutch cable housing guide into bracket, slide collar onto guide and secure with large retainer spring. • Place flat washer and clutch spring on idler pulley bolt...
... remove key. • Make sure the blades and all moving parts have completely stopped. • Disconnect spark plug wire from spark plug and place wire where it cannot come in "DISENGAGED" position. • Turn ignition key to chassis bracket and secure with retainer spring. • Push clutch cable housing guide into bracket, slide collar onto guide and secure with large retainer spring. • Place flat washer and clutch spring on idler pulley bolt...
User Manual
Page 19
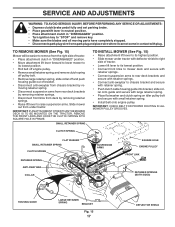
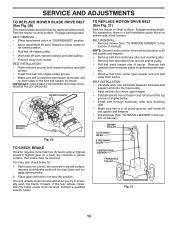
... parking brake. Remove belt upwards from transaxle pulley by : 1. SERVICE AND ADJUSTMENTS TO REPLACE MOWER BLADE DRIVE BELT (See Fig. 20) The mower blade drive belt may also check brake by deflecting belt keepers. • Remove belt from center span keeper and pull belt away from tractor. IDLER PULLEYS MANDREL PULLEY 02314 Fig. 20 TO CHECK BRAKE If tractor requires more than five (5) feet to manually push the tractor forward. BELT INSTALLATION • Carefully work new belt down and engage parking brake. 2. Park the tractor on level...
... parking brake. Remove belt upwards from transaxle pulley by : 1. SERVICE AND ADJUSTMENTS TO REPLACE MOWER BLADE DRIVE BELT (See Fig. 20) The mower blade drive belt may also check brake by deflecting belt keepers. • Remove belt from center span keeper and pull belt away from tractor. IDLER PULLEYS MANDREL PULLEY 02314 Fig. 20 TO CHECK BRAKE If tractor requires more than five (5) feet to manually push the tractor forward. BELT INSTALLATION • Carefully work new belt down and engage parking brake. 2. Park the tractor on level...
User Manual
Page 20
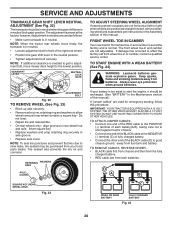
... materials away from fuel tank and battery. If your local parts dealer. DO NOT USE YOUR TRACTOR BATTERY TO START OTHER VEHICLES. The front wheel toe-in neutral. TO REMOVE CABLES, REVERSE ORDER • BLACK cable first from chassis and then from the fully charged battery. • RED cable last from your battery is in neutral (lock gate) position. however, if adjustment is needed to get to adjustment bolt, move freely...
... materials away from fuel tank and battery. If your local parts dealer. DO NOT USE YOUR TRACTOR BATTERY TO START OTHER VEHICLES. The front wheel toe-in neutral. TO REMOVE CABLES, REVERSE ORDER • BLACK cable first from chassis and then from the fully charged battery. • RED cable last from your battery is in neutral (lock gate) position. however, if adjustment is needed to get to adjustment bolt, move freely...

User Manual
Page 21
... sides, tilt toward engine and lift off of tractor. • To replace, reverse above procedure. TO ADJUST CARBURETOR Your carburetor is located behind the dash. If adjustment is necessary, see engine manual. If adjustment is necessary, see engne manual. Tighten securely. HOOD SEAT PAN 01536 TERMINAL COVER 02602 NUT BOLT POSITIVE (RED) CABLE 02603 Fig. 25 NEGATIVE (BLACK) CABLE TO REPLACE HEADLIGHT BULB • Raise hood. • Pull bulb holder out of...
... sides, tilt toward engine and lift off of tractor. • To replace, reverse above procedure. TO ADJUST CARBURETOR Your carburetor is located behind the dash. If adjustment is necessary, see engine manual. If adjustment is necessary, see engne manual. Tighten securely. HOOD SEAT PAN 01536 TERMINAL COVER 02602 NUT BOLT POSITIVE (RED) CABLE 02603 Fig. 25 NEGATIVE (BLACK) CABLE TO REPLACE HEADLIGHT BULB • Raise hood. • Pull bulb holder out of...
User Manual
Page 22
..., battery may reach an open flame or spark. ENGINE FUEL SYSTEM IMPORTANT: IT IS IMPORTANT TO PREVENT GUM DEPOSITS FROM FORMING IN ESSENTIAL FUEL SYSTEM PARTS SUCH AS CARBURETOR, FUEL FILTER, FUEL HOSE, OR TANK DURING STORAGE. ENGINE OIL Drain oil (with engine warm) and replace with clean engine oil. (See "ENGINE" in the Maintenance section of time in your gasoline will cause problems. • If possible, store your tractor indoors and cover it thoroughly, remove all...
..., battery may reach an open flame or spark. ENGINE FUEL SYSTEM IMPORTANT: IT IS IMPORTANT TO PREVENT GUM DEPOSITS FROM FORMING IN ESSENTIAL FUEL SYSTEM PARTS SUCH AS CARBURETOR, FUEL FILTER, FUEL HOSE, OR TANK DURING STORAGE. ENGINE OIL Drain oil (with engine warm) and replace with clean engine oil. (See "ENGINE" in the Maintenance section of time in your gasoline will cause problems. • If possible, store your tractor indoors and cover it thoroughly, remove all...
User Manual
Page 23
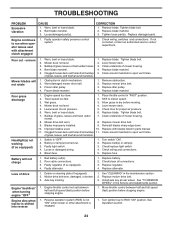
... engine air screen/fins. 12. Engine valves out of mower housing. 4. Fill fuel tank. 2. Replace spark plug. 5. Check all wiring. 7. See "To Adjust Carburetor" in "CHOKE" position. 3. Contact an authorized service center/department. 1. Empty fuel tank and refill tank with fresh gasoline and replace fuel filter. 8. Check all wiring. 9. See "To Adjust Carburetor" in Service Adjustments section. 8. Depress clutch/brake pedal. 2. Replace fuse. 5. Contact an authorized service center/department. 1. Check/replace solenoid or starter. 1. Adjust throttle control. 3. Clean...
... engine air screen/fins. 12. Engine valves out of mower housing. 4. Fill fuel tank. 2. Replace spark plug. 5. Check all wiring. 7. See "To Adjust Carburetor" in "CHOKE" position. 3. Contact an authorized service center/department. 1. Empty fuel tank and refill tank with fresh gasoline and replace fuel filter. 8. Check all wiring. 9. See "To Adjust Carburetor" in Service Adjustments section. 8. Depress clutch/brake pedal. 2. Replace fuse. 5. Contact an authorized service center/department. 1. Check/replace solenoid or starter. 1. Adjust throttle control. 3. Clean...
User Manual
Page 24
...TO REMOVE WHEEL" in the maintenance section. 2. Tighten blade bolt. 2. uneven Mower blades will not charge 1. Clogged mower deck vent holes from buildup 11. Blades improperly installed. 9. Check/replace light switch. 4. Check wiring, switches and connections. Poor cut - Replace blade. Clean underside of mower housing. 8. Mower deck not level. 4. Bulb(s) or lamp(s) burned out. 3. Tighten blade bolt. 7. Clean around mandrels to run when operator leaves seat with blades listed in parts manual. 11. Worn/damaged mower drive belt. 3. Mower drive belt...
...TO REMOVE WHEEL" in the maintenance section. 2. Tighten blade bolt. 2. uneven Mower blades will not charge 1. Clogged mower deck vent holes from buildup 11. Blades improperly installed. 9. Check/replace light switch. 4. Check wiring, switches and connections. Poor cut - Replace blade. Clean underside of mower housing. 8. Mower deck not level. 4. Bulb(s) or lamp(s) burned out. 3. Tighten blade bolt. 7. Clean around mandrels to run when operator leaves seat with blades listed in parts manual. 11. Worn/damaged mower drive belt. 3. Mower drive belt...
User Manual
Page 26
... the original consumer purchaser, we will exchange the Battery, charging you . This Warranty does not apply to any product which we will repair or replace, at our option, without charge to you, any power equipment unit or attachment are belts, blades, blade adapters, normal wear, normal adjustments, standard hardware and normal maintenance. 7. THIS WARRANTY DOES NOT APPLY TO INCIDENTAL OR CONSEQUENTIAL DAMAGES...
... the original consumer purchaser, we will exchange the Battery, charging you . This Warranty does not apply to any product which we will repair or replace, at our option, without charge to you, any power equipment unit or attachment are belts, blades, blade adapters, normal wear, normal adjustments, standard hardware and normal maintenance. 7. THIS WARRANTY DOES NOT APPLY TO INCIDENTAL OR CONSEQUENTIAL DAMAGES...


