
User Manual
Page 2
...feet near rotating parts or under the influence of alcohol or drugs. • Watch for all times. • Only allow the mower deck to plow leaves or other debris which can lose traction with specifications of the manufacturer of your tractor. Uneven terrain could cause ...machine if anyone . These operators should evaluate their ability to operate the riding mower safely enough to protect themselves and others from serious injury. • Follow the manufacturer's recommendation for Ride-On Mowers DANGER: THIS CUTTING MACHINE IS CAPABLE OF AMPUTATING HANDS AND FEET AND THROWING OBJECTS...
...feet near rotating parts or under the influence of alcohol or drugs. • Watch for all times. • Only allow the mower deck to plow leaves or other debris which can lose traction with specifications of the manufacturer of your tractor. Uneven terrain could cause ...machine if anyone . These operators should evaluate their ability to operate the riding mower safely enough to protect themselves and others from serious injury. • Follow the manufacturer's recommendation for Ride-On Mowers DANGER: THIS CUTTING MACHINE IS CAPABLE OF AMPUTATING HANDS AND FEET AND THROWING OBJECTS...
User Manual
Page 3
...in reverse unless absolutely necessary. Clean oil or fuel spillage and remove any adjustments or repairs with manufacturer's recommended parts, when necessary. • Mower blades are sharp. GENERAL SERVICE • Never operate machine in a closed area. • Keep all nuts and bolts tight to be sure...straight down the slope. • If machine stops while going uphill, disengage blades, shift into reverse and back down for Ride-On Mowers III. Children are explosive. • Extinguish all times until fueling is spilled on the ground away from the truck or trailer and ...
...in reverse unless absolutely necessary. Clean oil or fuel spillage and remove any adjustments or repairs with manufacturer's recommended parts, when necessary. • Mower blades are sharp. GENERAL SERVICE • Never operate machine in a closed area. • Keep all nuts and bolts tight to be sure...straight down the slope. • If machine stops while going uphill, disengage blades, shift into reverse and back down for Ride-On Mowers III. Children are explosive. • Extinguish all times until fueling is spilled on the ground away from the truck or trailer and ...

User Manual
Page 7
...function of controls) • Raise attachment lift lever to its adjusted position. • Raise seat and tighten adjustment knob securely. See "TO LEVEL MOWER" in neutral (N) position. • Roll tractor forward off the skid. PLEASE REVIEW THE FOLLOWING CHECKLIST: ✓ All assembly instructions have been completed... sure they are routed properly around pulleys and inside all connections are still secure and wires are shown for replacing motion and mower blade drive belts in this manual. CHECK BRAKE SYSTEM After you start the engine. ✓ Be sure brake system is in...
...function of controls) • Raise attachment lift lever to its adjusted position. • Raise seat and tighten adjustment knob securely. See "TO LEVEL MOWER" in neutral (N) position. • Roll tractor forward off the skid. PLEASE REVIEW THE FOLLOWING CHECKLIST: ✓ All assembly instructions have been completed... sure they are routed properly around pulleys and inside all connections are still secure and wires are shown for replacing motion and mower blade drive belts in this manual. CHECK BRAKE SYSTEM After you start the engine. ✓ Be sure brake system is in...

User Manual
Page 8
... understand their meaning. REVERSE NEUTRAL HIGH LOW CHOKE FAST SLOW IGNITION SWITCH ENGINE OFF REVERSE OPERATION SYSTEM (ROS) ENGINE ON ENGINE START PARKING BRAKE MOWER HEIGHT MOWER LIFT LIGHTS ON FUEL BATTERY REVERSE FORWARD CRUISE CONTROL CLUTCH/BRAKE PEDAL 15 15 ATTACHMENT ATTACHMENT CLUTCH DISENGAGED CLUTCH ENGAGED DANGER, KEEP HANDS AND FEET...
... understand their meaning. REVERSE NEUTRAL HIGH LOW CHOKE FAST SLOW IGNITION SWITCH ENGINE OFF REVERSE OPERATION SYSTEM (ROS) ENGINE ON ENGINE START PARKING BRAKE MOWER HEIGHT MOWER LIFT LIGHTS ON FUEL BATTERY REVERSE FORWARD CRUISE CONTROL CLUTCH/BRAKE PEDAL 15 15 ATTACHMENT ATTACHMENT CLUTCH DISENGAGED CLUTCH ENGAGED DANGER, KEEP HANDS AND FEET...

User Manual
Page 9
... LEVER - Save this manual for starting and stopping the engine. (G) REVERSE OPERATION SYSTEM (ROS) "ON" POSITION - Used to engage the mower blades, or other attachments mounted to familiarize yourself with your tractor to your tractor. (F) IGNITION SWITCH - D B E G F A C...4 Our tractors conform to your tractor. (B) CLUTCH/BRAKE PEDAL - Allows operation of tractor. 9 Used to raise, lower, and adjust the mower deck or other attachments mounted to the applicable safety standards of the American National Standards Institute. (A) ATTACHMENT LIFT LEVER - Used for starting the ...
... LEVER - Save this manual for starting and stopping the engine. (G) REVERSE OPERATION SYSTEM (ROS) "ON" POSITION - Used to engage the mower blades, or other attachments mounted to familiarize yourself with your tractor to your tractor. (F) IGNITION SWITCH - D B E G F A C...4 Our tractors conform to your tractor. (B) CLUTCH/BRAKE PEDAL - Allows operation of tractor. 9 Used to raise, lower, and adjust the mower deck or other attachments mounted to the applicable safety standards of the American National Standards Institute. (A) ATTACHMENT LIFT LEVER - Used for starting the ...
User Manual
Page 10
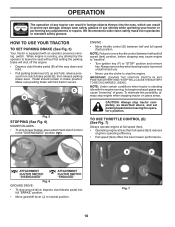
.... 6 GROUND DRIVE - • To stop engine when stopping tractor on grass areas. Fig. 7 10 C B Fig. 5 STOPPING (See Fig. 6) MOWER BLADES • To stop the engine. To eliminate this possibility, always stop ground drive, depress clutch/brake pedal into the eyes, which can result in...and hold tractor secure. Always wear safety glasses or eye shields while operating your tractor or performing any attempt by the operator to stop mower blades, place attachment clutch control in brake position. ENGINE - • Move throttle control (D) between half and full speed (fast) ...
.... 6 GROUND DRIVE - • To stop engine when stopping tractor on grass areas. Fig. 7 10 C B Fig. 5 STOPPING (See Fig. 6) MOWER BLADES • To stop the engine. To eliminate this possibility, always stop ground drive, depress clutch/brake pedal into the eyes, which can result in...and hold tractor secure. Always wear safety glasses or eye shields while operating your tractor or performing any attempt by the operator to stop mower blades, place attachment clutch control in brake position. ENGINE - • Move throttle control (D) between half and full speed (fast) ...
User Manual
Page 11
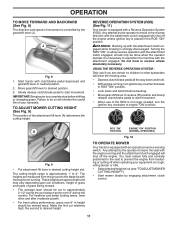
...key is equipped with the engine not running. ROS "ON" POSITION 02828 ENGINE "ON" POSITION (NORMAL OPERATING) Fig. 10 TO OPERATE MOWER Your tractor is no children or other bystanders will shut off when operating your transaxle. Any attempt by the operator to leave the seat... useful life of your equipment on rough, rolling terrain or hills. • Select desired height of cut (see "TO ADJUST MOWER CUTTING HEIGHT") • Start mower blades by the gearshift lever (J). Slowly release clutch/brake pedal to desired height. Make the first cut to approximately 2-1/2" during hot...
...key is equipped with the engine not running. ROS "ON" POSITION 02828 ENGINE "ON" POSITION (NORMAL OPERATING) Fig. 10 TO OPERATE MOWER Your tractor is no children or other bystanders will shut off when operating your transaxle. Any attempt by the operator to leave the seat... useful life of your equipment on rough, rolling terrain or hills. • Select desired height of cut (see "TO ADJUST MOWER CUTTING HEIGHT") • Start mower blades by the gearshift lever (J). Slowly release clutch/brake pedal to desired height. Make the first cut to approximately 2-1/2" during hot...
User Manual
Page 12
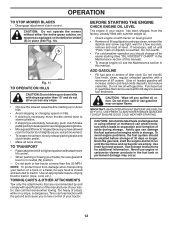
... of leaded gasoline will increase carbon and lead oxide deposits and reduce valve life). Use common sense when towing. CAUTION: Do not operate the mower without either the entire grass catcher, on a slope, is reached. TOWING CARTS & OTHER ATTACHMENTS Tow only the attachments that can lose traction... with a minimum of 87 octane. (Use of acids during storage. OPERATION TO STOP MOWER BLADES • Disengage attachment clutch control. S Fig. 11 TO OPERATE ON HILLS CAUTION: Do not drive up or down hills. • Avoid...
... of leaded gasoline will increase carbon and lead oxide deposits and reduce valve life). Use common sense when towing. CAUTION: Do not operate the mower without either the entire grass catcher, on a slope, is reached. TOWING CARTS & OTHER ATTACHMENTS Tow only the attachments that can lose traction... with a minimum of 87 octane. (Use of acids during storage. OPERATION TO STOP MOWER BLADES • Disengage attachment clutch control. S Fig. 11 TO OPERATE ON HILLS CAUTION: Do not drive up or down hills. • Avoid...

User Manual
Page 13
..., etc. Make first cut desired. • When operating attachments, select a ground speed that clippings will suit the terrain and give the mower cutting performance as well as engine starts. If engine still does not start by selecting a low enough gear to the right so that will...TO ADJUST CARBURETOR" in a more uniform cutting. • When mowing large areas, start , move the throttle control to choke position. This will plug mower and leave undesirable clumps. Allow grass to dry before mowing. • Always operate engine at a high altitude (above 3000 feet) or in neutral ...
..., etc. Make first cut desired. • When operating attachments, select a ground speed that clippings will suit the terrain and give the mower cutting performance as well as engine starts. If engine still does not start by selecting a low enough gear to the right so that will...TO ADJUST CARBURETOR" in a more uniform cutting. • When mowing large areas, start , move the throttle control to choke position. This will plug mower and leave undesirable clumps. Allow grass to dry before mowing. • Always operate engine at a high altitude (above 3000 feet) or in neutral ...

User Manual
Page 14
... BEFORE STORAGE Check Brake Operation T Check Tire Pressure R Check Operator Presence & ROS Systems A Check for loose fasteners. VISCOUS • Check for Loose Fasteners C Check/Replace Mower Blades T Lubrication Chart 0 Check Battery Level R Clean Battery and Terminals Clean Debris Off Steering Plate Check Transaxle Cooling Check...
... BEFORE STORAGE Check Brake Operation T Check Tire Pressure R Check Operator Presence & ROS Systems A Check for loose fasteners. VISCOUS • Check for Loose Fasteners C Check/Replace Mower Blades T Lubrication Chart 0 Check Battery Level R Clean Battery and Terminals Clean Debris Off Steering Plate Check Transaxle Cooling Check...
User Manual
Page 15
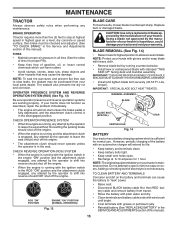
...blade with the ignition switch in all tires (See the sides of your local parts dealer. BLADE REMOVAL (See Fig. 14) • Raise mower to highest position to allow access to leave the seat without first setting the parking brake should shut off the engine. • When the ...dirt on your tractor is not necessary. ROS "ON" POSITION 02828 ENGINE "ON" POSITION (NORMAL OPERATING) Fig. 13 BLADE CARE For best results, mower blade must be kept sharp. Using a blade not approved by the manufacturer of gasoline, oil, or insect control chemicals which is in the disengaged position...
...blade with the ignition switch in all tires (See the sides of your local parts dealer. BLADE REMOVAL (See Fig. 14) • Raise mower to highest position to allow access to leave the seat without first setting the parking brake should shut off the engine. • When the ...dirt on your tractor is not necessary. ROS "ON" POSITION 02828 ENGINE "ON" POSITION (NORMAL OPERATING) Fig. 13 BLADE CARE For best results, mower blade must be kept sharp. Using a blade not approved by the manufacturer of gasoline, oil, or insect control chemicals which is in the disengaged position...

User Manual
Page 17
... all pinch points and movable parts (See Fig. 19) CLUTCH/BRAKE PEDAL CLEAN TOP SIDE STEERING PLATE CAUTION: PINCH POINTS STEERING SYSTEM, DASH, FENDER AND MOWER NOT SHOWN Fig. 19 • Keep finished surfaces and wheels free of all foreign matter. • Clean debris from tractor and... mower. 17 Service air cleaner more often under dusty conditions. Use compressed air or a leaf blower to keep water out. MAINTENANCE AIR FILTER Your engine will ...
... all pinch points and movable parts (See Fig. 19) CLUTCH/BRAKE PEDAL CLEAN TOP SIDE STEERING PLATE CAUTION: PINCH POINTS STEERING SYSTEM, DASH, FENDER AND MOWER NOT SHOWN Fig. 19 • Keep finished surfaces and wheels free of all foreign matter. • Clean debris from tractor and... mower. 17 Service air cleaner more often under dusty conditions. Use compressed air or a leaf blower to keep water out. MAINTENANCE AIR FILTER Your engine will ...

User Manual
Page 18
... (G). • Remove cable (P) by depressing tab (L). • Remove clutch cable spring (Q) from idler arm (R). • Disconnect front link (E) from mower - CAUTION: AFTER REAR LIFT LINKS ARE DISCONNECTED, THE ATTACHMENT LIFT LEVER WILL BE SPRING LOADED. CAUTION: LIFT LEVER IS SPRING LOADED. TO REMOVE...Lower attachment lift lever to either side of tractor. HAVE A TIGHT GRIP ON LIFT LEVER WHEN CHANGING POSITION OF THE LEVER. • Slide mower out from under tractor until it is on level surface and engage parking brake. • Lower attachment lift lever to "STOP" and remove key...
... (G). • Remove cable (P) by depressing tab (L). • Remove clutch cable spring (Q) from idler arm (R). • Disconnect front link (E) from mower - CAUTION: AFTER REAR LIFT LINKS ARE DISCONNECTED, THE ATTACHMENT LIFT LEVER WILL BE SPRING LOADED. CAUTION: LIFT LEVER IS SPRING LOADED. TO REMOVE...Lower attachment lift lever to either side of tractor. HAVE A TIGHT GRIP ON LIFT LEVER WHEN CHANGING POSITION OF THE LEVER. • Slide mower out from under tractor until it is on level surface and engage parking brake. • Lower attachment lift lever to "STOP" and remove key...

User Manual
Page 19
...cable spring (Q) into bracket. M C D Fig. 22 • ATTACH FRONT LINK (E) - Fig. 24 • Install belt on rear mower bracket and secure with washer and retainer spring (J). • Hook end of tractor. Position hole in arm over pin (D) on engine pulley (M),... A R C D M G F E G A P L Q C D Fig. 25 19 SERVICE AND ADJUSTMENTS • ATTACH MOWER SIDE SUSPENSION ARMS (A) TO CHASSIS - IMPORTANT: CHECK BELT FOR PROPER ROUTING IN ALL MOWER PULLEY GROOVES. • Raise attachment lift lever to highest position. tor. F J H Fig. 23 • Push clutch cable housing...
...cable spring (Q) into bracket. M C D Fig. 22 • ATTACH FRONT LINK (E) - Fig. 24 • Install belt on rear mower bracket and secure with washer and retainer spring (J). • Hook end of tractor. Position hole in arm over pin (D) on engine pulley (M),... A R C D M G F E G A P L Q C D Fig. 25 19 SERVICE AND ADJUSTMENTS • ATTACH MOWER SIDE SUSPENSION ARMS (A) TO CHASSIS - IMPORTANT: CHECK BELT FOR PROPER ROUTING IN ALL MOWER PULLEY GROOVES. • Raise attachment lift lever to highest position. tor. F J H Fig. 23 • Push clutch cable housing...

User Manual
Page 20
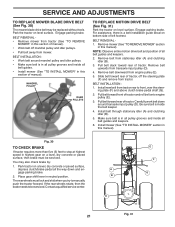
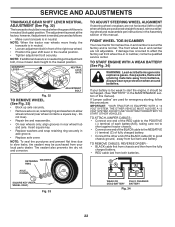
...if necessary, until both sides are over or under inflated, it may affect the appearance of your lawn appears unevenly cut, determine which side of mower, or, to the right to highest position. • Position blade so the tip is necessary, see step in position with heavy cloth. A ...• If adjustment is pointing straight forward. B A • Raise mower to lower mower 02948 Fig. 26 NOTE: Each full turn front link adjust- Protect your hands with gloves and/or wrap blade with wrench and tighten jam...
...if necessary, until both sides are over or under inflated, it may affect the appearance of your lawn appears unevenly cut, determine which side of mower, or, to the right to highest position. • Position blade so the tip is necessary, see step in position with heavy cloth. A ...• If adjustment is pointing straight forward. B A • Raise mower to lower mower 02948 Fig. 26 NOTE: Each full turn front link adjust- Protect your hands with gloves and/or wrap blade with wrench and tighten jam...
User Manual
Page 21
...remove from tractor rear to be serviced. Install new belt from tractor. Carefully work belt down and engage parking brake. 2. Install mower (See "TO INSTALL MOWER" section in this section of tractor. BELT INSTALLATION • Work belt around transaxle input pulley (D). BELT REMOVAL 1. Pull belt slack...of tractor. Pull belt toward rear of left footrest. Pull belt toward rear of manual). BELT REMOVAL • Remove mower from tractor (See "TO REMOVE MOWER" in neutral position. MANDREL PULLEY IDLER PULLEYS TO REPLACE MOTION DRIVE BELT (See Fig. 31) Park the tractor on...
...remove from tractor rear to be serviced. Install new belt from tractor. Carefully work belt down and engage parking brake. 2. Install mower (See "TO INSTALL MOWER" section in this section of tractor. BELT INSTALLATION • Work belt around transaxle input pulley (D). BELT REMOVAL 1. Pull belt slack...of tractor. Pull belt toward rear of left footrest. Pull belt toward rear of manual). BELT REMOVAL • Remove mower from tractor (See "TO REMOVE MOWER" in neutral position. MANDREL PULLEY IDLER PULLEYS TO REPLACE MOTION DRIVE BELT (See Fig. 31) Park the tractor on...
User Manual
Page 22
.... • Loosen adjustment bolt in front of this procedure: IMPORTANT: YOUR TRACTOR IS EQUIPPED WITH A 12 VOLT SYSTEM. NOTE: When the tractor rear wheels move mower deck height to affect the factory set at the factory; Tire sealant also prevents tire dry rot and corrosion. If your local parts dealer. SERVICE...
.... • Loosen adjustment bolt in front of this procedure: IMPORTANT: YOUR TRACTOR IS EQUIPPED WITH A 12 VOLT SYSTEM. NOTE: When the tractor rear wheels move mower deck height to affect the factory set at the factory; Tire sealant also prevents tire dry rot and corrosion. If your local parts dealer. SERVICE...
User Manual
Page 24
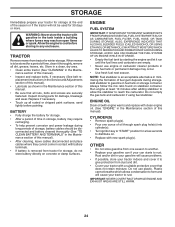
... to be stored for damage, breakage and wear. ENGINE OIL Drain oil (with engine warm) and replace with new spark plug(s). When mower is an acceptable alternative in minimizing the formation of fuel gum deposits during long periods of storage, battery cables should be disconnected and battery cleaned...dirt in the fuel tank or permanent damage may occur. • Use fresh fuel next season. Allow the engine to rust. TRACTOR Remove mower from tractor for winter storage. sand lightly before storing in fuel tank or storage container. OTHER • Do not store gasoline from dust ...
... to be stored for damage, breakage and wear. ENGINE OIL Drain oil (with engine warm) and replace with new spark plug(s). When mower is an acceptable alternative in minimizing the formation of fuel gum deposits during long periods of storage, battery cables should be disconnected and battery cleaned...dirt in the fuel tank or permanent damage may occur. • Use fresh fuel next season. Allow the engine to rust. TRACTOR Remove mower from tractor for winter storage. sand lightly before storing in fuel tank or storage container. OTHER • Do not store gasoline from dust ...

User Manual
Page 25
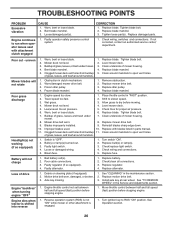
.... 6. Stale or dirty fuel. 9. Check/replace solenoid or starter. 9. Clean engine air screen/fins. 12. Corroded battery terminals. 3. Carburetor out of fuel. 2. Build-up of mower housing. 4. Blown fuse. 5. Clean battery terminals. 6. Replace fuel filter. 8. Attachment clutch is engaged. 3. Clean underside of grass, leaves and trash under...
.... 6. Stale or dirty fuel. 9. Check/replace solenoid or starter. 9. Clean engine air screen/fins. 12. Corroded battery terminals. 3. Carburetor out of fuel. 2. Build-up of mower housing. 4. Blown fuse. 5. Clean battery terminals. 6. Replace fuel filter. 8. Attachment clutch is engaged. 3. Clean underside of grass, leaves and trash under...
User Manual
Page 26
...1. CORRECTION 1. Replace blade mandrel. 3. If not corrected, contact an authorized service center/ department. Replace idler pulley. 4. Level mower deck. 5. Low/uneven tire air pressure. 5. Clean around mandrels. 1. of drive Engine "backfires" when turning engine "OFF" ...attachment clutch engaged 1. Check/replace light switch. 4. Bad battery cell(s). 2. Install axle key at rear wheel. Bent blade mandrel. 3. Mower drive belt worn. 8. Faulty light switch. 4. TROUBLESHOOTING POINTS PROBLEM Excessive vibration CAUSE 1. Poor cut - Replace blade mandrel. 5. Poor...
...1. CORRECTION 1. Replace blade mandrel. 3. If not corrected, contact an authorized service center/ department. Replace idler pulley. 4. Level mower deck. 5. Low/uneven tire air pressure. 5. Clean around mandrels. 1. of drive Engine "backfires" when turning engine "OFF" ...attachment clutch engaged 1. Check/replace light switch. 4. Bad battery cell(s). 2. Install axle key at rear wheel. Bent blade mandrel. 3. Mower drive belt worn. 8. Faulty light switch. 4. TROUBLESHOOTING POINTS PROBLEM Excessive vibration CAUSE 1. Poor cut - Replace blade mandrel. 5. Poor...


