
User Manual
Page 2
... prevent accidental starting , stopping, or turning on a slope. I. Clean any oil or fuel spillage before and while backing. • Never direct discharged material toward the operator. II. Do not shift to neutral and coast downhill. • Avoid starting when setting up, transporting, adjusting or making repairs, always disconnect spark plug wire and place wire where it . • Mow up to occur. Do no use on...
... prevent accidental starting , stopping, or turning on a slope. I. Clean any oil or fuel spillage before and while backing. • Never direct discharged material toward the operator. II. Do not shift to neutral and coast downhill. • Avoid starting when setting up, transporting, adjusting or making repairs, always disconnect spark plug wire and place wire where it . • Mow up to occur. Do no use on...
User Manual
Page 3
... on clothing, change clothing immediately. • Never overfill fuel tank. Never assume that you will remain where you strike a foreign object, stop . IV. Adjust and service as required. • Maintain or replace safety and instruction labels, as on a water heater or other sources of ignition. • Use only approved gasoline container. • Never remove gas cap or add fuel with safe machine operation. Children...
... on clothing, change clothing immediately. • Never overfill fuel tank. Never assume that you will remain where you strike a foreign object, stop . IV. Adjust and service as required. • Maintain or replace safety and instruction labels, as on a water heater or other sources of ignition. • Use only approved gasoline container. • Never remove gas cap or add fuel with safe machine operation. Children...

User Manual
Page 6
... in this manual. BOLT LOCK WASHER LARGE FLAT WASHER • For battery and battery cable installation see "REPLACING BATTERY" in the "Service and Adjustments" section in the operating position (seated behind the steering wheel). TO REMOVE TRACTOR FROM CARTON UNPACK CARTON • Remove all accessible loose parts and parts cartons from carton . • Cut along dotted lines on label (label is mentioned in this manual for shipping purposes. Use the correct tools as necessary...
... in this manual. BOLT LOCK WASHER LARGE FLAT WASHER • For battery and battery cable installation see "REPLACING BATTERY" in the "Service and Adjustments" section in the operating position (seated behind the steering wheel). TO REMOVE TRACTOR FROM CARTON UNPACK CARTON • Remove all accessible loose parts and parts cartons from carton . • Cut along dotted lines on label (label is mentioned in this manual for shipping purposes. Use the correct tools as necessary...

User Manual
Page 7
... the skid. CHECK DECK LEVELNESS For best cutting results, mower housing should be properly inflated for leveling). ✓ Check mower and drive belts. Verify that the belts are routed properly around pulleys and inside all belt keepers. ✓ Check wiring. TO ROLL TRACTOR OFF SKID (See Operation section for location and function of controls) • Raise attachment lift lever to its adjusted position. • Raise seat and tighten adjustment knob securely. Correct tire pressure is reached which...
... the skid. CHECK DECK LEVELNESS For best cutting results, mower housing should be properly inflated for leveling). ✓ Check mower and drive belts. Verify that the belts are routed properly around pulleys and inside all belt keepers. ✓ Check wiring. TO ROLL TRACTOR OFF SKID (See Operation section for location and function of controls) • Raise attachment lift lever to its adjusted position. • Raise seat and tighten adjustment knob securely. Correct tire pressure is reached which...
User Manual
Page 12
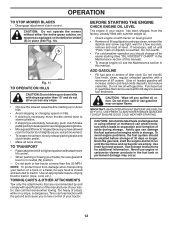
... clean, reinsert the dipstick and screw cap tight, wait for tractor to tractor (rope, cord, etc.). BEFORE STARTING THE ENGINE CHECK ENGINE OIL LEVEL The engine in quantities that are empty. Use fresh fuel next season. OPERATION TO STOP MOWER BLADES • Disengage attachment clutch control. TO TRANSPORT • Raise attachment lift to highest position with tractor on a truck or a trailer, be emptied before starting (See "OIL VISCOSITY CHART" in the Maintenance section of an engine while in this manual. Use...
... clean, reinsert the dipstick and screw cap tight, wait for tractor to tractor (rope, cord, etc.). BEFORE STARTING THE ENGINE CHECK ENGINE OIL LEVEL The engine in quantities that are empty. Use fresh fuel next season. OPERATION TO STOP MOWER BLADES • Disengage attachment clutch control. TO TRANSPORT • Raise attachment lift to highest position with tractor on a truck or a trailer, be emptied before starting (See "OIL VISCOSITY CHART" in the Maintenance section of an engine while in this manual. Use...

User Manual
Page 13
... key into ignition and turn key clockwise to fast position. See "TO ADJUST CARBURETOR" in the opposite direction making left hand side of mower should be properly leveled for best mowing performance. Wet grass will discharge away from dried clippings. Have the cut desired. • When operating attachments, select a ground speed that will take extra cranking time to move throttle control to fast position, wait a few...
... key into ignition and turn key clockwise to fast position. See "TO ADJUST CARBURETOR" in the opposite direction making left hand side of mower should be properly leveled for best mowing performance. Wet grass will discharge away from dried clippings. Have the cut desired. • When operating attachments, select a ground speed that will take extra cranking time to move throttle control to fast position, wait a few...

User Manual
Page 14
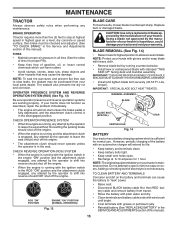
... DIRT THAT WILL SHORTEN THE LIFE OF THE SELF-LUBRICATING BEARINGS. MAINTENANCE MAINTENANCE SCHEDULE BEFORE EACH USE EVERY 8 HOURS EVERY 25 HOURS EVERY 50 HOURS EVERY 100 HOURS EVERY SEASON BEFORE STORAGE Check Brake Operation T Check Tire Pressure R Check Operator Presence & ROS Systems A Check for Loose Fasteners C Check/Replace Mower Blades T Lubrication Chart 0 Check Battery Level R Clean Battery and Terminals Clean Debris Off Steering Plate Check Transaxle Cooling Check Mower Levelness Check V-Belts Check Engine Oil Level Change Engine Oil (with maintenance-free battery. 5 -
... DIRT THAT WILL SHORTEN THE LIFE OF THE SELF-LUBRICATING BEARINGS. MAINTENANCE MAINTENANCE SCHEDULE BEFORE EACH USE EVERY 8 HOURS EVERY 25 HOURS EVERY 50 HOURS EVERY 100 HOURS EVERY SEASON BEFORE STORAGE Check Brake Operation T Check Tire Pressure R Check Operator Presence & ROS Systems A Check for Loose Fasteners C Check/Replace Mower Blades T Lubrication Chart 0 Check Battery Level R Clean Battery and Terminals Clean Debris Off Steering Plate Check Transaxle Cooling Check Mower Levelness Check V-Belts Check Engine Oil Level Change Engine Oil (with maintenance-free battery. 5 -
User Manual
Page 15
... or remove caps or covers. TIRES • Maintain proper air pressure in the disengaged position. ROS "ON" POSITION 02828 ENGINE "ON" POSITION (NORMAL OPERATING) Fig. 13 BLADE CARE For best results, mower blade must be purchased from tractor. • Rinse the battery with plain water and dry. • Clean terminals and battery cable ends with wire brush until bright. • Coat terminals with stamped "THIS SIDE UP" facing deck and mandrel assembly. Replace...
... or remove caps or covers. TIRES • Maintain proper air pressure in the disengaged position. ROS "ON" POSITION 02828 ENGINE "ON" POSITION (NORMAL OPERATING) Fig. 13 BLADE CARE For best results, mower blade must be purchased from tractor. • Rinse the battery with plain water and dry. • Clean terminals and battery cable ends with wire brush until bright. • Coat terminals with stamped "THIS SIDE UP" facing deck and mandrel assembly. Replace...
User Manual
Page 16
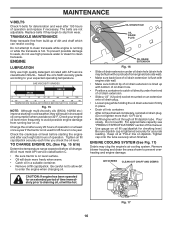
... operating temperature. TO CHANGE ENGINE OIL (See Fig. 15 &16) Determine temperature range expected before starting in a suitable container. • Remove oil fill cap/dipstick. Pour slowly. AIR SCREEN CLEAN OUT CHAFF AND DEBRIS 02744 Fig. 17 16 MAINTENANCE V-BELTS Check V-belts for deterioration and wear after each time you check the oil level. Do not attempt to draining oil, oil will be flush with or protrude from build-up with API service...
... operating temperature. TO CHANGE ENGINE OIL (See Fig. 15 &16) Determine temperature range expected before starting in a suitable container. • Remove oil fill cap/dipstick. Pour slowly. AIR SCREEN CLEAN OUT CHAFF AND DEBRIS 02744 Fig. 17 16 MAINTENANCE V-BELTS Check V-belts for deterioration and wear after each time you check the oil level. Do not attempt to draining oil, oil will be flush with or protrude from build-up with API service...

User Manual
Page 17
... carburetor, replacement is required. • With engine cool, remove filter and plug fuel line sections. • Place new fuel filter in position in engine or transmission will not run properly using a garden hose or pressure washer to clean your tractor unless the engine and transmission are shown in "PRODUCT SPECIFICATIONS" section of your tractor. CAUTION: Avoid all foreign matter. • Clean debris from tractor and mower. 17 Water in fuel line with a wire brush or compressed air to keep water out. MAINTENANCE AIR FILTER...
... carburetor, replacement is required. • With engine cool, remove filter and plug fuel line sections. • Place new fuel filter in position in engine or transmission will not run properly using a garden hose or pressure washer to clean your tractor unless the engine and transmission are shown in "PRODUCT SPECIFICATIONS" section of your tractor. CAUTION: Avoid all foreign matter. • Clean debris from tractor and mower. 17 Water in fuel line with a wire brush or compressed air to keep water out. MAINTENANCE AIR FILTER...

User Manual
Page 18
... of tractor. CAUTION: LIFT LEVER IS SPRING LOADED. TO REMOVE MOWER (See Fig. 20) • Place attachment clutch in contact with plug. SERVICE AND ADJUSTMENTS WARNING: TO AVOID SERIOUS INJURY, BEFORE PERFORMING ANY SERVICE OR ADJUSTMENTS: • Depress clutch/brake pedal fully and set parking brake. • Place gearshift lever in neutral position. • Place attachment clutch in "DISENGAGED" position. • Turn ignition key to "STOP" and remove key. • Make sure the blades and...
... of tractor. CAUTION: LIFT LEVER IS SPRING LOADED. TO REMOVE MOWER (See Fig. 20) • Place attachment clutch in contact with plug. SERVICE AND ADJUSTMENTS WARNING: TO AVOID SERIOUS INJURY, BEFORE PERFORMING ANY SERVICE OR ADJUSTMENTS: • Depress clutch/brake pedal fully and set parking brake. • Place gearshift lever in neutral position. • Place attachment clutch in "DISENGAGED" position. • Turn ignition key to "STOP" and remove key. • Make sure the blades and...

User Manual
Page 19
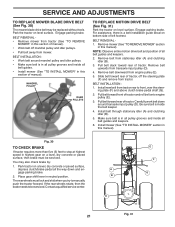
... tractor. IMPORTANT: CHECK BELT FOR PROPER ROUTING IN ALL MOWER PULLEY GROOVES. • Raise attachment lift lever to highest position. Work from left side of clutch cable spring (Q) into hole in tractor front suspension bracket (F). Fig. 24 • Install belt on opposite side of link assembly through front hole in idler arm (R). M C D Fig. 22 • ATTACH FRONT LINK (E) - F J H Fig. 23 • Push clutch cable housing guide (P) into hole in front mower...
... tractor. IMPORTANT: CHECK BELT FOR PROPER ROUTING IN ALL MOWER PULLEY GROOVES. • Raise attachment lift lever to highest position. Work from left side of clutch cable spring (Q) into hole in tractor front suspension bracket (F). Fig. 24 • Install belt on opposite side of link assembly through front hole in idler arm (R). M C D Fig. 22 • ATTACH FRONT LINK (E) - F J H Fig. 23 • Push clutch cable housing guide (P) into hole in front mower...
User Manual
Page 21
... highest gear on a level, dry concrete or paved surface, then brake must lock and skid when you try to be serviced. Remove belt upwards from engine pulley (E). 5. Engage parking brake. SERVICE AND ADJUSTMENTS TO REPLACE MOWER BLADE DRIVE BELT (See Fig. 30) The mower blade drive belt may also check brake by: 1. Park the tractor on a level, dry concrete or paved surface, depress clutch/brake pedal all belt guides and keepers. 2. BELT REMOVAL • Remove mower from tractor (See "TO REMOVE MOWER" in this section of manual...
... highest gear on a level, dry concrete or paved surface, then brake must lock and skid when you try to be serviced. Remove belt upwards from engine pulley (E). 5. Engage parking brake. SERVICE AND ADJUSTMENTS TO REPLACE MOWER BLADE DRIVE BELT (See Fig. 30) The mower blade drive belt may also check brake by: 1. Park the tractor on a level, dry concrete or paved surface, depress clutch/brake pedal all belt guides and keepers. 2. BELT REMOVAL • Remove mower from tractor (See "TO REMOVE MOWER" in this section of manual...
User Manual
Page 22
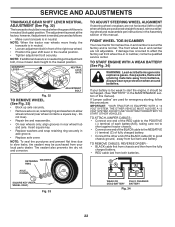
... BATTERY BATTERY Fig. 34 22 however, if adjustment is normal. GEARSHIFT LEVER NEUTRAL LOCK GATE ADJUSTMENT BOLT Fig. 32 TO REMOVE WHEEL (See Fig. 33) • Block up axle securely. • Remove axle cover, retaining ring and washers to the lowest position. NOTE: To seal tire punctures and prevent flat tires due to affect the factory set at the factory; TO START ENGINE WITH A WEAK BATTERY...
... BATTERY BATTERY Fig. 34 22 however, if adjustment is normal. GEARSHIFT LEVER NEUTRAL LOCK GATE ADJUSTMENT BOLT Fig. 32 TO REMOVE WHEEL (See Fig. 33) • Block up axle securely. • Remove axle cover, retaining ring and washers to the lowest position. NOTE: To seal tire punctures and prevent flat tires due to affect the factory set at the factory; TO START ENGINE WITH A WEAK BATTERY...
User Manual
Page 23
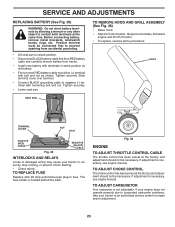
... PAN 01536 TERMINAL COVER 02602 NUT BOLT POSITIVE (RED) CABLE 02603 Fig. 35 NEGATIVE (BLACK) CABLE INTERLOCKS AND RELAYS Loose or damaged wiring may cause your tractor to an authorized service center for repair and/or adjustment. 23 Fig. 36 ENGINE TO ADJUST THROTTLE CONTROL CABLE The throttle control has been preset at the same time. TO REPLACE FUSE Replace with 20 amp automotive-type plug-in same position as shown. SERVICE AND ADJUSTMENTS REPLACING BATTERY (See Fig...
... PAN 01536 TERMINAL COVER 02602 NUT BOLT POSITIVE (RED) CABLE 02603 Fig. 35 NEGATIVE (BLACK) CABLE INTERLOCKS AND RELAYS Loose or damaged wiring may cause your tractor to an authorized service center for repair and/or adjustment. 23 Fig. 36 ENGINE TO ADJUST THROTTLE CONTROL CABLE The throttle control has been preset at the same time. TO REPLACE FUSE Replace with 20 amp automotive-type plug-in same position as shown. SERVICE AND ADJUSTMENTS REPLACING BATTERY (See Fig...
User Manual
Page 24
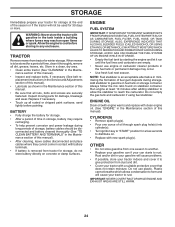
... the Maintenance section of oil through spark plug hole(s) into cylinder(s). • Turn ignition key to "START" position for a few seconds to distribute oil. • Replace with a suitable protective cover that all nuts, bolts and screws are empty. • Never use plastic. BATTERY • Fully charge the battery for storage. • After a period of this manual). Rust and/or dirt in the Mainte- nance section of time in storage, battery...
... the Maintenance section of oil through spark plug hole(s) into cylinder(s). • Turn ignition key to "START" position for a few seconds to distribute oil. • Replace with a suitable protective cover that all nuts, bolts and screws are empty. • Never use plastic. BATTERY • Fully charge the battery for storage. • After a period of this manual). Rust and/or dirt in the Mainte- nance section of time in storage, battery...

User Manual
Page 25
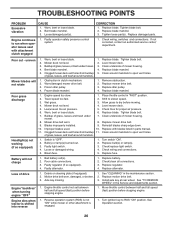
... starter. 1. Throttle in fuel. 10. Water in "CHOKE" position. 3. Dirty engine air screen/fins. 12. Loose or damaged wiring. 14. Carburetor out of fuel. 2. CORRECTION 1. See "TO START ENGINE" in Operation section. 3. Replace spark plug. 3. Replace fuel filter. 5. Contact an authorized service center/department. 1. Recharge or replace battery. 4. Replace fuse. 5. Contact an authorized service center/department. 1. Clean battery terminals. 3. Raise cutting height/reduce speed. 2. Clean underside of power 8. Check oil level/change spark plug. 7. Empty fuel tank...
... starter. 1. Throttle in fuel. 10. Water in "CHOKE" position. 3. Dirty engine air screen/fins. 12. Loose or damaged wiring. 14. Carburetor out of fuel. 2. CORRECTION 1. See "TO START ENGINE" in Operation section. 3. Replace spark plug. 3. Replace fuel filter. 5. Contact an authorized service center/department. 1. Recharge or replace battery. 4. Replace fuse. 5. Contact an authorized service center/department. 1. Clean battery terminals. 3. Raise cutting height/reduce speed. 2. Clean underside of power 8. Check oil level/change spark plug. 7. Empty fuel tank...
User Manual
Page 26
... engine "OFF" Engine dies when tractor is shifted into reverse 1. Switch is engaged. 1. Loose or damaged wiring. 5. Replace fuse. Faulty alternator. 1. Replace regulator. 4. TROUBLESHOOTING POINTS PROBLEM Excessive vibration CAUSE 1. CORRECTION 1. If not corrected, contact an authorized service center/ department. Mower deck not level. 3. Worn/damaged mower drive belt. 3. Level mower deck. 3. Check tires for proper air pressure. 6. Replace mower drive belt. 9. Turn switch "ON". 2. Install axle key at rear wheel. Bent blade mandrel. 5. Clean...
... engine "OFF" Engine dies when tractor is shifted into reverse 1. Switch is engaged. 1. Loose or damaged wiring. 5. Replace fuse. Faulty alternator. 1. Replace regulator. 4. TROUBLESHOOTING POINTS PROBLEM Excessive vibration CAUSE 1. CORRECTION 1. If not corrected, contact an authorized service center/ department. Mower deck not level. 3. Worn/damaged mower drive belt. 3. Level mower deck. 3. Check tires for proper air pressure. 6. Replace mower drive belt. 9. Turn switch "ON". 2. Install axle key at rear wheel. Bent blade mandrel. 5. Clean...
User Manual
Page 28
... warrants to the original consumer purchaser that term as defined in replacing parts, any power equipment unit or attachment are belts, blades, blade adapters, normal wear, normal adjustments, standard hardware and normal maintenance. 7. Exclusions: Excluded from locale to the engine, transaxle/transmission components, battery (except as noted below) or components parts thereof. THIS WARRANTY DOES NOT APPLY TO INCIDENTAL OR CONSEQUENTIAL DAMAGES AND ANY...
... warrants to the original consumer purchaser that term as defined in replacing parts, any power equipment unit or attachment are belts, blades, blade adapters, normal wear, normal adjustments, standard hardware and normal maintenance. 7. Exclusions: Excluded from locale to the engine, transaxle/transmission components, battery (except as noted below) or components parts thereof. THIS WARRANTY DOES NOT APPLY TO INCIDENTAL OR CONSEQUENTIAL DAMAGES AND ANY...

Parts Manual
Page 11
... 19-22 Extension Drain Oil NOTE: AllcomponentdimensionsgiveninU.S.inches 1 inch = 25.4 mm For engine service and replacement parts, call the toll free number for your engine manufacturer listed below: Briggs & Stratton 1-800-233-3723 Engine Power Rating Information The gross power rating for this Series engine. 11 Due to manufacturing and capacity limitations, Briggs & Stratton may substitute an engine of factors including, but not limited to -engine variability. PXT12530 (96046003000), PRODUCT NO...
... 19-22 Extension Drain Oil NOTE: AllcomponentdimensionsgiveninU.S.inches 1 inch = 25.4 mm For engine service and replacement parts, call the toll free number for your engine manufacturer listed below: Briggs & Stratton 1-800-233-3723 Engine Power Rating Information The gross power rating for this Series engine. 11 Due to manufacturing and capacity limitations, Briggs & Stratton may substitute an engine of factors including, but not limited to -engine variability. PXT12530 (96046003000), PRODUCT NO...


