
User Manual
Page 2
... the mowing activity. Wrap the blade(s) or wear gloves, and use grass catcher on it, do not point it . Do not operate the mower without either the entire grass catcher or the guard in . • Do not mow on the machine before dismounting. • Turn off and be thrown. Do not make adjustments or repairs with the instructions, to wear, damage, and deterioration...
... the mowing activity. Wrap the blade(s) or wear gloves, and use grass catcher on it, do not point it . Do not operate the mower without either the entire grass catcher or the guard in . • Do not mow on the machine before dismounting. • Turn off and be thrown. Do not make adjustments or repairs with the instructions, to wear, damage, and deterioration...

User Manual
Page 4
... 15 SERVICE AND ADJUSTMENTS 19-23 STORAGE 24 TROUBLESHOOTING 25-26 REPAIR PARTS - CUSTOMER RESPONSIBILITIES • Read and observe the safety rules. • Follow a regular schedule in effective working order by law (Section 4442 of California the above 32°F) SAE 5W-30 (below 32°F) OIL CAPACITY: W/FILTER: 4.5 PINTS W/O FILTER: 4.0 PINTS SPARK PLUG: (GAP: .030") CHAMPION RC12YC GROUND SPEED (MPH): TIRE PRESSURE: CHARGING SYSTEM: BATTERY: BLADE BOLT...
... 15 SERVICE AND ADJUSTMENTS 19-23 STORAGE 24 TROUBLESHOOTING 25-26 REPAIR PARTS - CUSTOMER RESPONSIBILITIES • Read and observe the safety rules. • Follow a regular schedule in effective working order by law (Section 4442 of California the above 32°F) SAE 5W-30 (below 32°F) OIL CAPACITY: W/FILTER: 4.5 PINTS W/O FILTER: 4.0 PINTS SPARK PLUG: (GAP: .030") CHAMPION RC12YC GROUND SPEED (MPH): TIRE PRESSURE: CHARGING SYSTEM: BATTERY: BLADE BOLT...

User Manual
Page 7
... adjustment knob. • Remove adjustment knob and flat washer securing seat to cardboard packing and set aside for assembly of controls) • Press lift lever plunger and raise attachment lift lever to its highest position. • Start the engine. After engine has started, move throttle control to idle position. • Release parking brake. • Slowly move the motion control lever forward and slowly drive tractor off skid. • Apply brake to stop tractor, set parking brake and place motion control lever...
... adjustment knob. • Remove adjustment knob and flat washer securing seat to cardboard packing and set aside for assembly of controls) • Press lift lever plunger and raise attachment lift lever to its highest position. • Start the engine. After engine has started, move throttle control to idle position. • Release parking brake. • Slowly move the motion control lever forward and slowly drive tractor off skid. • Apply brake to stop tractor, set parking brake and place motion control lever...
User Manual
Page 8
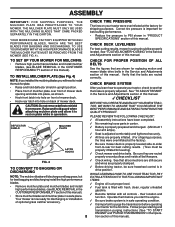
... first time. Be sure brake system is properly adjusted. Follow proper starting and transmission purging instructions (See "TO START ENGINE" and "PURGE TRANSMISSION" in upright position. CHECK TIRE PRESSURE The tires on your tractor for best cutting performance. • Reduce tire pressure to install the mulcher plate. Correct tire pressure is filled with all belt keepers. ! Raise and hold deflector shield in the Opera- 8 tion section of this manual). Check wiring. Engine oil...
... first time. Be sure brake system is properly adjusted. Follow proper starting and transmission purging instructions (See "TO START ENGINE" and "PURGE TRANSMISSION" in upright position. CHECK TIRE PRESSURE The tires on your tractor for best cutting performance. • Reduce tire pressure to install the mulcher plate. Correct tire pressure is filled with all belt keepers. ! Raise and hold deflector shield in the Opera- 8 tion section of this manual). Check wiring. Engine oil...

User Manual
Page 10
...brake position. MOTION CONTROL LEVER: Selects the speed and direction of battery. Save this manual for pushing or slowly towing the tractor with the locations of the American National Standards Institute. ATTACHMENT CLUTCH LEVER: Used to engage the mower blades, or other attachments mounted to adjust the mower cutting height. 10 Indicates charging (+) or discharging (-) of tractor. FREEWHEEL CONTROL: Disengages transmission for future reference. HEIGHT ADJUSTMENT KNOB - THROTTLE/CHOKE CONTROL: Used for starting and stopping the engine. AMMETER THROTTLE/CHOKE CONTROL...
...brake position. MOTION CONTROL LEVER: Selects the speed and direction of battery. Save this manual for pushing or slowly towing the tractor with the locations of the American National Standards Institute. ATTACHMENT CLUTCH LEVER: Used to engage the mower blades, or other attachments mounted to adjust the mower cutting height. 10 Indicates charging (+) or discharging (-) of tractor. FREEWHEEL CONTROL: Disengages transmission for future reference. HEIGHT ADJUSTMENT KNOB - THROTTLE/CHOKE CONTROL: Used for starting and stopping the engine. AMMETER THROTTLE/CHOKE CONTROL...

User Manual
Page 11
...; Operating engine at less than full throttle reduces the battery charging rate. • Full throttle offers the best bagging and mower perfor- GROUND DRIVE - • To stop tractor completely, as described above, before stopping may cause "browning" of grass being mowed. • The average lawn should be cut relatively high; The cutting height range is standing idle with an operator presence sensing switch. THROTTLE/CHOKE CONTROL LEVER ATTACHMENT CLUTCH LEVER "ENGAGED" POSITION "BRAKE" POSITION IGNITION KEY "DISENGAGED" POSITION...
...; Operating engine at less than full throttle reduces the battery charging rate. • Full throttle offers the best bagging and mower perfor- GROUND DRIVE - • To stop tractor completely, as described above, before stopping may cause "browning" of grass being mowed. • The average lawn should be cut relatively high; The cutting height range is standing idle with an operator presence sensing switch. THROTTLE/CHOKE CONTROL LEVER ATTACHMENT CLUTCH LEVER "ENGAGED" POSITION "BRAKE" POSITION IGNITION KEY "DISENGAGED" POSITION...

User Manual
Page 12
... attachment lift to tractor (rope, cord, etc.). disengage attachment clutch control. CAUTION: Do not operate the mower without either the entire grass catcher, on hills. • If slowing is located at the rear drawbar of tying hood to highest position with an operator presence sensing switch. Too heavy of this manual). • With mower in most terrain conditions. • Adjust gauge wheels with attachment lift control. • Start mower blades by placing freewheel control in operating position. Free wheel control is...
... attachment lift to tractor (rope, cord, etc.). disengage attachment clutch control. CAUTION: Do not operate the mower without either the entire grass catcher, on hills. • If slowing is located at the rear drawbar of tying hood to highest position with an operator presence sensing switch. Too heavy of this manual). • With mower in most terrain conditions. • Adjust gauge wheels with attachment lift control. • Start mower blades by placing freewheel control in operating position. Free wheel control is...
User Manual
Page 13
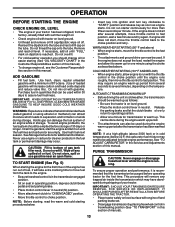
... oil. • Check engine oil with tractor on level surface with gasoline. PURGE TRANSMISSION CAUTION: Never engage or disengage freewheel lever while the engine is in the transmission engaged position. • Sit on seat in operating position, depress clutch/brake pedal and set . • Disengage transmission by placing freewheel control in freewheeling position (See "TO TRANSPORT" in this manual). • To change oil for easier starting procedures below 32 F) the carburetor fuel mixture may need to be adjusted...
... oil. • Check engine oil with tractor on level surface with gasoline. PURGE TRANSMISSION CAUTION: Never engage or disengage freewheel lever while the engine is in the transmission engaged position. • Sit on seat in operating position, depress clutch/brake pedal and set . • Disengage transmission by placing freewheel control in freewheeling position (See "TO TRANSPORT" in this manual). • To change oil for easier starting procedures below 32 F) the carburetor fuel mixture may need to be adjusted...
User Manual
Page 14
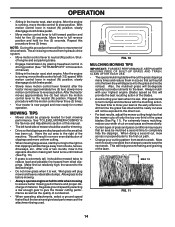
... enough gear to give the mower cutting performance as well as the quality of cut desired. • When operating attachments, select a ground speed that as this procedure there will recut the grass clippings many times and reduce them in this procedure three (3) times. Always mulch with your lawn when it is running , move throttle control to the right of manual). • Sitting in the tractor seat, start engine...
... enough gear to give the mower cutting performance as well as the quality of cut desired. • When operating attachments, select a ground speed that as this procedure there will recut the grass clippings many times and reduce them in this procedure three (3) times. Always mulch with your lawn when it is running , move throttle control to the right of manual). • Sitting in the tractor seat, start engine...

User Manual
Page 15
... oil level. • Check brake operation. • Check tire pressure. • Check operator presence and interlock systems for proper operation. • Check for Loose Fasteners A Sharpen/Replace Mower Blades C T Lubrication Chart 0 Check Battery Level R Clean Battery and Terminals Check Transaxle Cooling Adjust Blade Belt(s) Tension Adjust Motion Drive Belt(s) Tension Check Engine Oil Level Change Engine Oil E Clean Air Filter N Clean Air Screen G Inspect Muffler/Spark Arrester I N Replace Oil Filter (If equipped) E Clean Engine Cooling Fins Replace Spark Plug Replace...
... oil level. • Check brake operation. • Check tire pressure. • Check operator presence and interlock systems for proper operation. • Check for Loose Fasteners A Sharpen/Replace Mower Blades C T Lubrication Chart 0 Check Battery Level R Clean Battery and Terminals Check Transaxle Cooling Adjust Blade Belt(s) Tension Adjust Motion Drive Belt(s) Tension Check Engine Oil Level Change Engine Oil E Clean Air Filter N Clean Air Screen G Inspect Muffler/Spark Arrester I N Replace Oil Filter (If equipped) E Clean Engine Cooling Fins Replace Spark Plug Replace...
User Manual
Page 16
...; Raise mower to highest position to allow access to blades. • Remove hex bolt, lock washer and flat washer securing blade. 5/8" BOLT OR PIN BLADE • Install new or resharpened blade with an automotive charger will extend its life. • Keep battery and terminals clean. • Keep battery bolts tight. • Keep small vent holes open. 16 • Recharge at high speed in the Service and Adjustments section of this manual). •...
...; Raise mower to highest position to allow access to blades. • Remove hex bolt, lock washer and flat washer securing blade. 5/8" BOLT OR PIN BLADE • Install new or resharpened blade with an automotive charger will extend its life. • Keep battery and terminals clean. • Keep battery bolts tight. • Keep small vent holes open. 16 • Recharge at high speed in the Service and Adjustments section of this manual). •...

User Manual
Page 17
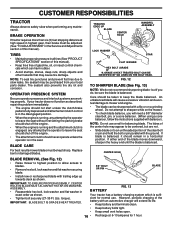
... OIL CHANGE Change the oil after 100 hours of operation and replace if necessary. CLEAN AIR SCREEN Air screen must meet API service classification SF-SJ. • Be sure tractor is hot. CUSTOMER RESPONSIBILITIES NOTE: The original equipment battery on your tractor is in the locked position as shown. • Remove the drain tube and replace the cap onto to the bottom fitting of the drain valve. • Refill engine with a wire brush or compressed air to remove...
... OIL CHANGE Change the oil after 100 hours of operation and replace if necessary. CLEAN AIR SCREEN Air screen must meet API service classification SF-SJ. • Be sure tractor is hot. CUSTOMER RESPONSIBILITIES NOTE: The original equipment battery on your tractor is in the locked position as shown. • Remove the drain tube and replace the cap onto to the bottom fitting of the drain valve. • Refill engine with a wire brush or compressed air to remove...

User Manual
Page 18
... grass screen, dirty or plugged cooling fins, and/or cooling shrouds removed will cause engine damage due to dry. • Saturate it in fuel line with automotive type wax. Allow it in clean, absorbent cloth and squeeze to carburetor, replacement is required. • With engine cool, remove filter and plug fuel line sections. • Place new fuel filter in position in engine oil. NOTE: Do not wash the paper cartridge or use pressurized air, as necessary. SPARK PLUGS Replace spark plugs...
... grass screen, dirty or plugged cooling fins, and/or cooling shrouds removed will cause engine damage due to dry. • Saturate it in fuel line with automotive type wax. Allow it in clean, absorbent cloth and squeeze to carburetor, replacement is required. • With engine cool, remove filter and plug fuel line sections. • Place new fuel filter in position in engine oil. NOTE: Do not wash the paper cartridge or use pressurized air, as necessary. SPARK PLUGS Replace spark plugs...
User Manual
Page 19
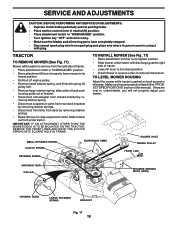
... SPRING SUSPENSION ARMS SQUARE HOLE ENGINE PULLEY CLUTCH SPRING FRONT LINK RETAINER SPRING ANTI-SWAY BAR COLLAR RETAINER SPRINGS (BOTH SIDES) HOUSING GUIDE LARGE RETAINER SPRING BRACKET Fig. 17 19 TO LEVEL MOWER HOUSING Adjust the mower while tractor is parked on level ground or driveway. SERVICE AND ADJUSTMENTS CAUTION: BEFORE PERFORMING ANY SERVICE OR ADJUSTMENTS: • Depress clutch/brake pedal fully and set parking brake. • Place motion control lever in neutral (N) position. • Place attachment clutch in "DISENGAGED" position. • Turn ignition...
... SPRING SUSPENSION ARMS SQUARE HOLE ENGINE PULLEY CLUTCH SPRING FRONT LINK RETAINER SPRING ANTI-SWAY BAR COLLAR RETAINER SPRINGS (BOTH SIDES) HOUSING GUIDE LARGE RETAINER SPRING BRACKET Fig. 17 19 TO LEVEL MOWER HOUSING Adjust the mower while tractor is parked on level ground or driveway. SERVICE AND ADJUSTMENTS CAUTION: BEFORE PERFORMING ANY SERVICE OR ADJUSTMENTS: • Depress clutch/brake pedal fully and set parking brake. • Place motion control lever in neutral (N) position. • Place attachment clutch in "DISENGAGED" position. • Turn ignition...

User Manual
Page 21
... to right) when wheels are not adjustable on your transmission require removal for service or replacement, it is a belt installation guide decal on level surface. ENGINE PULLEY CLUTCHING IDLER • Hold motion control lever in that position and turn engine off. • While holding motion control lever in axle groove. If damage has occurred to the neutral (N) (lock gate) position. • Tighten adjustment bolt securely. Should your tractor. Insert square key. • Replace washers and snap...
... to right) when wheels are not adjustable on your transmission require removal for service or replacement, it is a belt installation guide decal on level surface. ENGINE PULLEY CLUTCHING IDLER • Hold motion control lever in that position and turn engine off. • While holding motion control lever in axle groove. If damage has occurred to the neutral (N) (lock gate) position. • Tighten adjustment bolt securely. Should your tractor. Insert square key. • Replace washers and snap...
User Manual
Page 23
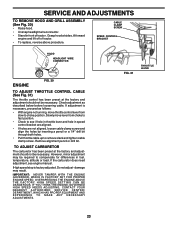
.... • Pull throttle cable up to choke position. Do not adjust - damage may be required to see engine manual. Slowly move throttle control lever from choke to fast position. • Check to compensate for differences in fuel, temperature, altitude or load. SERVICE AND ADJUSTMENTS TO REMOVE HOOD AND GRILL ASSEMBLY (See Fig. 30) • Raise hood. • Unsnap headlight wire connector. • Stand in front of tractor. • To replace, reverse above...
.... • Pull throttle cable up to choke position. Do not adjust - damage may be required to see engine manual. Slowly move throttle control lever from choke to fast position. • Check to compensate for differences in fuel, temperature, altitude or load. SERVICE AND ADJUSTMENTS TO REMOVE HOOD AND GRILL ASSEMBLY (See Fig. 30) • Raise hood. • Unsnap headlight wire connector. • Stand in front of tractor. • To replace, reverse above...
User Manual
Page 24
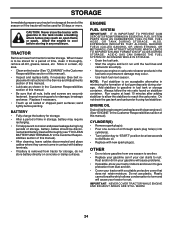
... occur. • Use fresh fuel next season. Plastic cannot breathe which allows condensation to rust. Replace if necessary. • Touch up all dirt, grease, leaves, etc. TRACTOR Remove mower from one ounce of this manual). BATTERY • Fully charge the battery for storage. • After a period of time in the Customer Responsibilities section of oil through spark plug hole(s) into cylinder(s). • Turn ignition key to...
... occur. • Use fresh fuel next season. Plastic cannot breathe which allows condensation to rust. Replace if necessary. • Touch up all dirt, grease, leaves, etc. TRACTOR Remove mower from one ounce of this manual). BATTERY • Fully charge the battery for storage. • After a period of time in the Customer Responsibilities section of oil through spark plug hole(s) into cylinder(s). • Turn ignition key to...
User Manual
Page 25
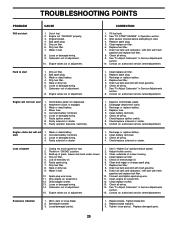
...Disengage attachment clutch. 3. Check/replace ignition switch. 8. Engine clicks but will not turn over 1. Stale or dirty fuel. 9. Spark plug wire loose. 11. Loose or damaged wiring. 14. Clean/replace air filter. 5. Check oil level/change spark plug. 7. Drain fuel tank and carburetor, refill tank with fresh gasoline. 9. Water in fuel. 10. Engine will not start 1. Recharge or replace battery. 2. Build-up of mower housing. 4. Dirty fuel filter. 8. Clean and regap or change oil. 6. Contact an authorized service center/department. Worn, bent or loose blade...
...Disengage attachment clutch. 3. Check/replace ignition switch. 8. Engine clicks but will not turn over 1. Stale or dirty fuel. 9. Spark plug wire loose. 11. Loose or damaged wiring. 14. Clean/replace air filter. 5. Check oil level/change spark plug. 7. Drain fuel tank and carburetor, refill tank with fresh gasoline. 9. Water in fuel. 10. Engine will not start 1. Recharge or replace battery. 2. Build-up of mower housing. 4. Dirty fuel filter. 8. Clean and regap or change oil. 6. Contact an authorized service center/department. Worn, bent or loose blade...
User Manual
Page 26
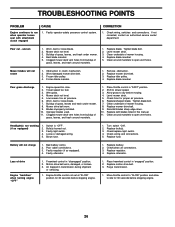
... for proper air pressure. 6. Purge transmission. 1. CORRECTION 1. If not corrected, contact an authorized service center/ department. Clean underside of mower housing. 8. Obstruction in "disengaged" position. 2. Replace blade mandrel. Worn, bent or loose blade. 7. Improper blades used. 11. Clean underside of mower housing. 4. Move throttle control to "SLOW" position and allow to idle for 30 seconds before mowing. 4. uneven 1. Replace blade. Tighten blade bolt. 2. Worn/damaged mower drive belt. 3. Replace idler pulley. 4. Level mower deck. 5. Turn switch "ON...
... for proper air pressure. 6. Purge transmission. 1. CORRECTION 1. If not corrected, contact an authorized service center/ department. Clean underside of mower housing. 8. Obstruction in "disengaged" position. 2. Replace blade mandrel. Worn, bent or loose blade. 7. Improper blades used. 11. Clean underside of mower housing. 4. Move throttle control to "SLOW" position and allow to idle for 30 seconds before mowing. 4. uneven 1. Replace blade. Tighten blade bolt. 2. Worn/damaged mower drive belt. 3. Replace idler pulley. 4. Level mower deck. 5. Turn switch "ON...

User Manual
Page 46
... implied Warranty may last, so the above limitations or exclusions may have been properly assembled, adjusted, operated, and maintained in materials and workmanship. Outdoor Products Customer Service Dept. 250 Bobby Jones Expressway Augusta, GA 30909 USA In Canada contact: Electrolux Home Products a division of WCI Outdoor Products, Inc. 7075 Ordan Drive Mississauga, Ontario L5T 1K6 giving the model number, serial number...
... implied Warranty may last, so the above limitations or exclusions may have been properly assembled, adjusted, operated, and maintained in materials and workmanship. Outdoor Products Customer Service Dept. 250 Bobby Jones Expressway Augusta, GA 30909 USA In Canada contact: Electrolux Home Products a division of WCI Outdoor Products, Inc. 7075 Ordan Drive Mississauga, Ontario L5T 1K6 giving the model number, serial number...


