

User Manual
Page 2
...machine. GENERAL OPERATION DO NOT: • Read, understand, and follow all movement on steep slopes. Check their ability to operate the riding mower safely enough to the presence of the machine. • Keep all instructions in reverse unless absolutely necessary. • Do not mow near...Frequently check components and replace with safety devices. If tires lose traction, disengage the blades and proceed slowly straight down for Ride-On Mowers IMPORTANT: THIS CUTTING MACHINE IS CAPABLE OF AMPUTATING HANDS AND FEET AND THROWING OBJECTS. Wrap the blade(s) or wear gloves, and use...
...machine. GENERAL OPERATION DO NOT: • Read, understand, and follow all movement on steep slopes. Check their ability to operate the riding mower safely enough to the presence of the machine. • Keep all instructions in reverse unless absolutely necessary. • Do not mow near...Frequently check components and replace with safety devices. If tires lose traction, disengage the blades and proceed slowly straight down for Ride-On Mowers IMPORTANT: THIS CUTTING MACHINE IS CAPABLE OF AMPUTATING HANDS AND FEET AND THROWING OBJECTS. Wrap the blade(s) or wear gloves, and use...

User Manual
Page 3
.... • If machine stops while going uphill, disengage blades, shift into reverse and back down a hill in reverse unless absolutely necessary. Look for Ride-On Mowers • Check brake operation frequently. CAUTION: Tow only the attachments that you may fall off and be seriously injured or interfere with the blades off...
.... • If machine stops while going uphill, disengage blades, shift into reverse and back down a hill in reverse unless absolutely necessary. Look for Ride-On Mowers • Check brake operation frequently. CAUTION: Tow only the attachments that you may fall off and be seriously injured or interfere with the blades off...

User Manual
Page 8
... around pulleys and inside all controls - See that are shown for leveling). ! CAUTION: Do not remove deflector shield from mower. Your mower is now ready for best bagging and discharging install the high performance blades. • Remove mulcher plate and mulcher blades and...prepared and charged. (Minimum 1 hour at the factory). ! Become familiar with fresh, clean, regular unleaded gasoline. ! TO SET UP YOUR MOWER FOR MULCHING • Remove high performance blades and install mulcher blades, (see that the belts are properly inflated. (For shipping purposes, the...
... around pulleys and inside all controls - See that are shown for leveling). ! CAUTION: Do not remove deflector shield from mower. Your mower is now ready for best bagging and discharging install the high performance blades. • Remove mulcher plate and mulcher blades and...prepared and charged. (Minimum 1 hour at the factory). ! Become familiar with fresh, clean, regular unleaded gasoline. ! TO SET UP YOUR MOWER FOR MULCHING • Remove high performance blades and install mulcher blades, (see that the belts are properly inflated. (For shipping purposes, the...

User Manual
Page 9
Learn and understand their meaning. BATTERY CAUTION OR WARNING REVERSE FORWARD FAST SLOW ENGINE ON ENGINE OFF OIL PRESSURE LIGHTS ON OVER TEMP LIGHT FUEL CHOKE MOWER HEIGHT PARKING BRAKE LOCKED UNLOCKED MOWER LIFT ATTACHMENT REVERSE CLUTCH ENGAGED NEUTRAL HIGH LOW P PARKING BRAKE 15 15 15 IGNITION ATTACHMENT CLUTCH DISENGAGED KEEP AREA CLEAR SLOPE HAZARDS (SEE SAFETY RULES SECTION) DANGER, KEEP HANDS AND FEET AWAY 9 FREE WHEEL (Automatic Models only) OPERATION These symbols may appear on your tractor or in literature supplied with the product.
Learn and understand their meaning. BATTERY CAUTION OR WARNING REVERSE FORWARD FAST SLOW ENGINE ON ENGINE OFF OIL PRESSURE LIGHTS ON OVER TEMP LIGHT FUEL CHOKE MOWER HEIGHT PARKING BRAKE LOCKED UNLOCKED MOWER LIFT ATTACHMENT REVERSE CLUTCH ENGAGED NEUTRAL HIGH LOW P PARKING BRAKE 15 15 15 IGNITION ATTACHMENT CLUTCH DISENGAGED KEEP AREA CLEAR SLOPE HAZARDS (SEE SAFETY RULES SECTION) DANGER, KEEP HANDS AND FEET AWAY 9 FREE WHEEL (Automatic Models only) OPERATION These symbols may appear on your tractor or in literature supplied with the product.

User Manual
Page 10
.... Used to release attachment lift lever when changing its position. LIFT LEVER PLUNGER: Used to adjust the mower cutting height. ATTACHMENT CLUTCH LEVER: Used to engage the mower blades, or other attachments mounted to your tractor. CLUTCH/BRAKE PEDAL: Used for starting and stopping the engine...your tractor. Selects the speed and direction of battery. 10 ATTACHMENT LIFT LEVER: Used to raise, lower, and adjust the mower deck or other attachments mounted to the safety standards of various controls and adjustments. Indicates charging (+) or discharging (-) of the tractor.
.... Used to release attachment lift lever when changing its position. LIFT LEVER PLUNGER: Used to adjust the mower cutting height. ATTACHMENT CLUTCH LEVER: Used to engage the mower blades, or other attachments mounted to your tractor. CLUTCH/BRAKE PEDAL: Used for starting and stopping the engine...your tractor. Selects the speed and direction of battery. 10 ATTACHMENT LIFT LEVER: Used to raise, lower, and adjust the mower deck or other attachments mounted to the safety standards of various controls and adjustments. Indicates charging (+) or discharging (-) of the tractor.

User Manual
Page 11
... release clutch/brake pedal to start movement. CLUTCH/BRAKE PEDAL "DRIVE" POSITION HEIGHT ADJUSTMENT KNOB FIG. 6 PARKING BRAKE "DISENGAGED" POSITION TO ADJUST MOWER CUTTING HEIGHT (See Fig. 6) The cutting height is approximately 1-1/2" to neutral (N) position. GROUND DRIVE • To stop ground drive, depress clutch... or eye shields while operating your tractor or performing any tractor can result in "BRAKE" position. Pedal should be mowed twice. MOWER BLADES • To stop engine. Make the first cut to approximately 2-1/2 inches during the cool season and to leave the seat...
... release clutch/brake pedal to start movement. CLUTCH/BRAKE PEDAL "DRIVE" POSITION HEIGHT ADJUSTMENT KNOB FIG. 6 PARKING BRAKE "DISENGAGED" POSITION TO ADJUST MOWER CUTTING HEIGHT (See Fig. 6) The cutting height is approximately 1-1/2" to neutral (N) position. GROUND DRIVE • To stop ground drive, depress clutch... or eye shields while operating your tractor or performing any tractor can result in "BRAKE" position. Pedal should be mowed twice. MOWER BLADES • To stop engine. Make the first cut to approximately 2-1/2 inches during the cool season and to leave the seat...

User Manual
Page 12
... gas can be used within 30 days to help prevent scalping in operating position. the fuel lines and carburetor are slightly off the ground when mower is in neutral (N) position. • Do not push or tow tractor at the desired cutting height in most terrain conditions. • Adjust... with a minimum of 87 octane. (Use of an engine while in quantities that are recommended by engaging attachment clutch control. • TO STOP MOWER BLADES - To avoid engine problems, the fuel system should be emptied before storage of 30 days or • Choose the slowest speed before starting ...
... gas can be used within 30 days to help prevent scalping in operating position. the fuel lines and carburetor are slightly off the ground when mower is in neutral (N) position. • Do not push or tow tractor at the desired cutting height in most terrain conditions. • Adjust... with a minimum of 87 octane. (Use of an engine while in quantities that are recommended by engaging attachment clutch control. • TO STOP MOWER BLADES - To avoid engine problems, the fuel system should be emptied before storage of 30 days or • Choose the slowest speed before starting ...

User Manual
Page 13
... WARM WEATHER STARTING (50° F and above 3000 feet) or in the Service and Adjustments section of this manual. See "TO LEVEL MOWER HOUSING" in cold temperatures (below ) • When engine starts, allow it to warm up period from week to run starter continuously for more... ) • When engine starts, move throttle control to assure better mowing performance and proper discharge of the lawn. This will plug mower and leave undesirable clumps. OPERATION CAUTION: Fill to provide nutrients for the lawn. Do not overfill. Wet grass will help prevent matting and...
... WARM WEATHER STARTING (50° F and above 3000 feet) or in the Service and Adjustments section of this manual. See "TO LEVEL MOWER HOUSING" in cold temperatures (below ) • When engine starts, allow it to warm up period from week to run starter continuously for more... ) • When engine starts, move throttle control to assure better mowing performance and proper discharge of the lawn. This will plug mower and leave undesirable clumps. OPERATION CAUTION: Fill to provide nutrients for the lawn. Do not overfill. Wet grass will help prevent matting and...

User Manual
Page 14
.... • Check brake operation. • Check tire pressure. • Check operator presence and interlock systems for proper operation. • Check for Loose Fasteners A Sharpen/Replace Mower Blades C T Lubrication Chart 0 Check Battery Level R Clean Battery and Terminals Check Transaxle Cooling Adjust Blade Belt(s) Tension Adjust Motion Drive Belt(s) Tension Check Engine Oil...
.... • Check brake operation. • Check tire pressure. • Check operator presence and interlock systems for proper operation. • Check for Loose Fasteners A Sharpen/Replace Mower Blades C T Lubrication Chart 0 Check Battery Level R Clean Battery and Terminals Check Transaxle Cooling Adjust Blade Belt(s) Tension Adjust Motion Drive Belt(s) Tension Check Engine Oil...

User Manual
Page 15
...attachment clutch should shut off the engine. • When the engine is running , any maintenance. CENTER HOLE BLADE CARE For best results mower blades must be adjusted. (See "TO ADJUST BRAKE" in the seat. However, periodic charging of this manual). OPERATOR PRESENCE SYSTEM Be sure...operator is maintenance free. CUSTOMER RESPONSIBILITIES TRACTOR Always observe safety rules when performing any attempt by the operator to sharpen while on the mower. • To check blade balance, you do not recommend sharpening blade - TRAILING EDGE UP BLADE FLAT WASHER LOCK WASHER CENTER...
...attachment clutch should shut off the engine. • When the engine is running , any maintenance. CENTER HOLE BLADE CARE For best results mower blades must be adjusted. (See "TO ADJUST BRAKE" in the seat. However, periodic charging of this manual). OPERATOR PRESENCE SYSTEM Be sure...operator is maintenance free. CUSTOMER RESPONSIBILITIES TRACTOR Always observe safety rules when performing any attempt by the operator to sharpen while on the mower. • To check blade balance, you do not recommend sharpening blade - TRAILING EDGE UP BLADE FLAT WASHER LOCK WASHER CENTER...

User Manual
Page 18
... come in contact with deflector shield to right side of tractor. • Lower lift lever to its highest position. • Slide mower under tractor. SMALL RETAINER SPRING CLUTCH SPRING RETAINER SPRING ANTI-SWAY BAR COLLAR SUSPENSION ARMS SQUARE HOLE ENGINE PULLEY FRONT LINK RETAINER SPRINGS (...to remove from the right side of tractor. • Place attachment clutch in "DISENGAGED" position. • Move attachment lift lever forward to lower mower to its lowest position. • Roll belt off engine pulley. • Remove small retainer spring, and lift clutch spring off pulley bolt. ...
... come in contact with deflector shield to right side of tractor. • Lower lift lever to its highest position. • Slide mower under tractor. SMALL RETAINER SPRING CLUTCH SPRING RETAINER SPRING ANTI-SWAY BAR COLLAR SUSPENSION ARMS SQUARE HOLE ENGINE PULLEY FRONT LINK RETAINER SPRINGS (...to remove from the right side of tractor. • Place attachment clutch in "DISENGAGED" position. • Move attachment lift lever forward to lower mower to its lowest position. • Roll belt off engine pulley. • Remove small retainer spring, and lift clutch spring off pulley bolt. ...
User Manual
Page 19
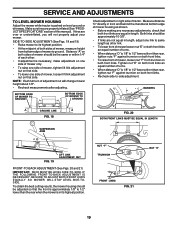
...THE FOLLOWING FRONT-TO-BACK ADJUSTMENT IS NECESSARY, BE SURE TO ADJUST BOTH FRONT LINKS EQUALLY SO MOWER WILL STAY LEVEL SIDE-TOSIDE. SERVICE AND ADJUSTMENTS TO LEVEL MOWER HOUSING Adjust the mower while tractor is parked on right side of tractor. Make sure tires are over or underinflated, ... length as shown. • Before making any necessary adjustments, check that both front links. • To raise front of mower, loosen nut "F" from bottom edge of mower to -side adjustment. Both links should be approximately 10-3/8". • If links are equal in length, adjust one side of...
...THE FOLLOWING FRONT-TO-BACK ADJUSTMENT IS NECESSARY, BE SURE TO ADJUST BOTH FRONT LINKS EQUALLY SO MOWER WILL STAY LEVEL SIDE-TOSIDE. SERVICE AND ADJUSTMENTS TO LEVEL MOWER HOUSING Adjust the mower while tractor is parked on right side of tractor. Make sure tires are over or underinflated, ... length as shown. • Before making any necessary adjustments, check that both front links. • To raise front of mower, loosen nut "F" from bottom edge of mower to -side adjustment. Both links should be approximately 10-3/8". • If links are equal in length, adjust one side of...
User Manual
Page 20
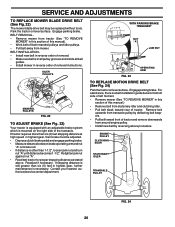
...distance as stated above procedure. For assistance, there is a belt installation guide decal on the right side of tractor and remove downwards from mower. Remove belt upwards from transaxle pulley by reversing above . If stopping distance is still greater than six (6) feet in highest gear, ...further maintenance is mounted on bottom side of left footrest. • Remove mower (See "TO REMOVE MOWER" in this section of this manual.) • Remove belt from stationary idler and clutching idler. • Pull belt slack toward front...
...distance as stated above procedure. For assistance, there is a belt installation guide decal on the right side of tractor and remove downwards from mower. Remove belt upwards from transaxle pulley by reversing above . If stopping distance is still greater than six (6) feet in highest gear, ...further maintenance is mounted on bottom side of left footrest. • Remove mower (See "TO REMOVE MOWER" in this section of this manual.) • Remove belt from stationary idler and clutching idler. • Pull belt slack toward front...
User Manual
Page 21
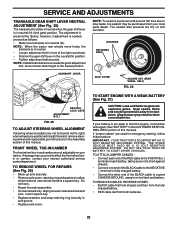
... end of the right rear wheel. • Position the gear shift lever in rear wheel hub and axle. NOTE: When the tractor rear wheels move mower deck height to start the engine, it should be purchased from your local parts dealer. Do not lose). • Repair tire and reassemble. • On...
... end of the right rear wheel. • Position the gear shift lever in rear wheel hub and axle. NOTE: When the tractor rear wheels move mower deck height to start the engine, it should be purchased from your local parts dealer. Do not lose). • Repair tire and reassemble. • On...
User Manual
Page 24
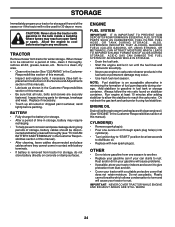
TRACTOR Remove mower from tractor for damage, breakage and wear. sand lightly before storing in any enclosure. Add stabilizer to distribute oil. • Replace with new spark plug(s). ...) and replace with gasoline in the tank inside a building where fumes may require recharging. • To help prevent corrosion and power leakage during storage. When mower is an acceptable alternative in minimizing the formation of fuel gum deposits during long periods of storage, battery cables should be used for 30 days...
TRACTOR Remove mower from tractor for damage, breakage and wear. sand lightly before storing in any enclosure. Add stabilizer to distribute oil. • Replace with new spark plug(s). ...) and replace with gasoline in the tank inside a building where fumes may require recharging. • To help prevent corrosion and power leakage during storage. When mower is an acceptable alternative in minimizing the formation of fuel gum deposits during long periods of storage, battery cables should be used for 30 days...
User Manual
Page 25
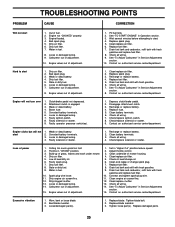
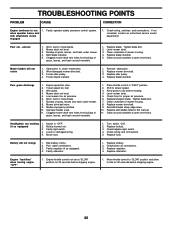
... 1. Engine not "CHOKED" properly. 3. Engine flooded. 4. Bad spark plug. 5. Dirty fuel filter. 7. Water in Operation section. 3. Carburetor out of mower housing. 4. Engine valves out of adjustment. 1. Fill fuel tank. 2. See "TO START ENGINE" in fuel. 8. Replace spark plug. 5. Replace fuel ...fuel. 9. Spark plug wire loose. 11. Dirty engine air screen/fins. 12. Engine valves out of grass, leaves and trash under mower. 4. Set in Service Adjustments section. 15. Adjust throttle control. 3. Clean/replace air filter. 5. Check oil level/change spark plug. ...
... 1. Engine not "CHOKED" properly. 3. Engine flooded. 4. Bad spark plug. 5. Dirty fuel filter. 7. Water in Operation section. 3. Carburetor out of mower housing. 4. Engine valves out of adjustment. 1. Fill fuel tank. 2. See "TO START ENGINE" in fuel. 8. Replace spark plug. 5. Replace fuel ...fuel. 9. Spark plug wire loose. 11. Dirty engine air screen/fins. 12. Engine valves out of grass, leaves and trash under mower. 4. Set in Service Adjustments section. 15. Adjust throttle control. 3. Clean/replace air filter. 5. Check oil level/change spark plug. ...
User Manual
Page 26
.... 6. when operator leaves seat with blades listed in "FAST" position. 2. Worn, bent or loose blade. 2. Worn/damaged mower drive belt. 3. Low/uneven tire air pressure. 6. Reinstall blades sharp edge down. 10. Poor cable connections. 3. Move throttle...idler pulley. 4. Engine speed too slow. 2. Bulb(s) burned out. 3. Faulty alternator. 1. Engine "backfires" when turning engine "OFF" 1. Mower deck not level. 3. Mower deck not level. 5. Faulty light switch. 4. Bad battery cell(s). 2. Remove obstruction. 2. Loose or damaged wiring. 5. Faulty regulator (if ...
.... 6. when operator leaves seat with blades listed in "FAST" position. 2. Worn, bent or loose blade. 2. Worn/damaged mower drive belt. 3. Low/uneven tire air pressure. 6. Reinstall blades sharp edge down. 10. Poor cable connections. 3. Move throttle...idler pulley. 4. Engine speed too slow. 2. Bulb(s) burned out. 3. Faulty alternator. 1. Engine "backfires" when turning engine "OFF" 1. Mower deck not level. 3. Mower deck not level. 5. Faulty light switch. 4. Bad battery cell(s). 2. Remove obstruction. 2. Loose or damaged wiring. 5. Faulty regulator (if ...

User Manual
Page 31
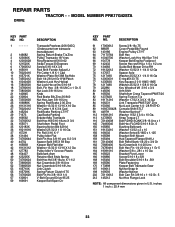
... Sht Sqnk 3/8-16 x 3/4 37 17490508 Screw Thdrol 6/16-18 x 1/2 TYT 38 169834 Bracket Asm. NO. MODEL NUMBER PRK17G42STA CHASSIS AND ENCLOSURES KEY PART NO. REPAIR PARTS TRACTOR - - inches 1 inch = 25.4 mm 31 Pivot Mower Rear 51 73800400 Nut Lock Hex W/Ins 1/4-20 52 19091416 Washer 9/32 x 7/8 x 16 Ga. 53 144697 Bracjet Grukke...
... Sht Sqnk 3/8-16 x 3/4 37 17490508 Screw Thdrol 6/16-18 x 1/2 TYT 38 169834 Bracket Asm. NO. MODEL NUMBER PRK17G42STA CHASSIS AND ENCLOSURES KEY PART NO. REPAIR PARTS TRACTOR - - inches 1 inch = 25.4 mm 31 Pivot Mower Rear 51 73800400 Nut Lock Hex W/Ins 1/4-20 52 19091416 Washer 9/32 x 7/8 x 16 Ga. 53 144697 Bracjet Grukke...
User Manual
Page 33
... 65 10040700 Washer Lock Hvy Hlcl Spr 7/16 66 154778 Keeper Belt Engine Foolproof 69 142432 Screw Hex wsh HiLo 1/4 x 1/2 unc 70 134683 Guide Belt Mower Drive RH 72 19132012 Washer 13/32 X 1-1/4 X 12 Ga 74 137057 Spacer Axle 75 121749X Washer 25/32 X 1 1/4 X 16 Ga 76 12000001 E-ring #5133-75... Unc Link Clutch Spring Return Clutch 6 75 Bolt Fin Hx 3/8-16 X 1/4 V-Belt Ground Drive 95 25 Keeper Belt Span Ctr KEY PART NO. MODEL NUMBER PRK17G42STA DRIVE KEY PART NO. NO.
... 65 10040700 Washer Lock Hvy Hlcl Spr 7/16 66 154778 Keeper Belt Engine Foolproof 69 142432 Screw Hex wsh HiLo 1/4 x 1/2 unc 70 134683 Guide Belt Mower Drive RH 72 19132012 Washer 13/32 X 1-1/4 X 12 Ga 74 137057 Spacer Axle 75 121749X Washer 25/32 X 1 1/4 X 16 Ga 76 12000001 E-ring #5133-75... Unc Link Clutch Spring Return Clutch 6 75 Bolt Fin Hx 3/8-16 X 1/4 V-Belt Ground Drive 95 25 Keeper Belt Span Ctr KEY PART NO. MODEL NUMBER PRK17G42STA DRIVE KEY PART NO. NO.

User Manual
Page 41
... Cut 1/4-20 x 5/8 159 72140614 Bolt Rdhd Sqn 3/8-16 UNC x 1-3/4 - - 130794 Mandrel Assembly (Includes Key Numbers 8-10,13-15, 31 and 33) - - 172559 Mower Deck, Complete (Standard Deck - MODEL NUMBER PRK17G42STA KEY PART NO. Order separately mulcher plate and gauge wheel components Key Nos. 101-106, and 111-121) NOTE: All component dimensions...
... Cut 1/4-20 x 5/8 159 72140614 Bolt Rdhd Sqn 3/8-16 UNC x 1-3/4 - - 130794 Mandrel Assembly (Includes Key Numbers 8-10,13-15, 31 and 33) - - 172559 Mower Deck, Complete (Standard Deck - MODEL NUMBER PRK17G42STA KEY PART NO. Order separately mulcher plate and gauge wheel components Key Nos. 101-106, and 111-121) NOTE: All component dimensions...


