
User Manual
Page 2
..., not across. • Remove obstacles such as a water heater. • Never run a machine inside a closed area. • Keep nuts and bolts, especially blade attachment bolts, tight and keep equipment in speed or direction. • Avoid starting . • Do not turn on slopes unless necessary, and then, turn machine off and be seriously injured or interfere with the engine running. • Grass catcher components are a major...
..., not across. • Remove obstacles such as a water heater. • Never run a machine inside a closed area. • Keep nuts and bolts, especially blade attachment bolts, tight and keep equipment in speed or direction. • Avoid starting . • Do not turn on slopes unless necessary, and then, turn machine off and be seriously injured or interfere with the engine running. • Grass catcher components are a major...

User Manual
Page 7
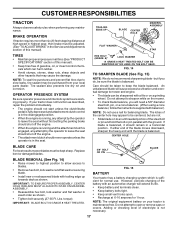
...; Check engine oil level and fill fuel tank with clevis pins and spring retainers. • Adjust gauge wheels before tightening adjustment knob. • Remove adjustment knob and flat washer securing seat to cardboard packing and set parking brake and place gearshift lever in the Operation section of +controls) REMOVE THE FOLLOWING BULLET FOR MODELS WITH ELECTRIC LIFT. • Press lift lever plunger and raise attachment lift lever to keep the mower deck in a well-ventilated area. Assemble gauge wheels as shown using shoulder bolts...
...; Check engine oil level and fill fuel tank with clevis pins and spring retainers. • Adjust gauge wheels before tightening adjustment knob. • Remove adjustment knob and flat washer securing seat to cardboard packing and set parking brake and place gearshift lever in the Operation section of +controls) REMOVE THE FOLLOWING BULLET FOR MODELS WITH ELECTRIC LIFT. • Press lift lever plunger and raise attachment lift lever to keep the mower deck in a well-ventilated area. Assemble gauge wheels as shown using shoulder bolts...

User Manual
Page 8
... removed. Engage parking brake. • Cut and remove ties securing anti-sway bar and belts. TO SET UP YOUR MOWER FOR MULCHING (See Fig. 5) • Turn the mower over front of mower deck opening and slide into place, as shown. 8 torque). INSTALL BELT INTO ELECTRIC CLUTCH PULLEY GROOVE. • Install one front link in R.H. Retain with deflector sheild to blades. • Remove hex bolt, lock washer and flat washer and remove high performance blades. INSTALL MOWER AND DRIVE BELT...
... removed. Engage parking brake. • Cut and remove ties securing anti-sway bar and belts. TO SET UP YOUR MOWER FOR MULCHING (See Fig. 5) • Turn the mower over front of mower deck opening and slide into place, as shown. 8 torque). INSTALL BELT INTO ELECTRIC CLUTCH PULLEY GROOVE. • Install one front link in R.H. Retain with deflector sheild to blades. • Remove hex bolt, lock washer and flat washer and remove high performance blades. INSTALL MOWER AND DRIVE BELT...

User Manual
Page 9
... pointing deck pins. Correct tire pressure is properly adjusted. See "TO LEVEL MOWER HOUSING" in the Service and Adjustments section of this manual. Verify that the belts are shown for replacing motion, mower drive, and mower blade drive belts in the Service and Adjustments section of this manual. CHASSIS BRACKET DOUBLE LOOP RETAINER SPRING (Inward pointing deck pins) SUSPENSION ARMS ELECTRIC CLUTCH PULLEY FRONT MOWER BRACKET GAUGE WHEEL DOUBLE LOOP RETAINER SPRING USE PLIERS FOR RETAINER SPRINGS ANTI-SWAY BAR LOOP DOWN IDLER PULLEY FIG...
... pointing deck pins. Correct tire pressure is properly adjusted. See "TO LEVEL MOWER HOUSING" in the Service and Adjustments section of this manual. Verify that the belts are shown for replacing motion, mower drive, and mower blade drive belts in the Service and Adjustments section of this manual. CHASSIS BRACKET DOUBLE LOOP RETAINER SPRING (Inward pointing deck pins) SUSPENSION ARMS ELECTRIC CLUTCH PULLEY FRONT MOWER BRACKET GAUGE WHEEL DOUBLE LOOP RETAINER SPRING USE PLIERS FOR RETAINER SPRINGS ANTI-SWAY BAR LOOP DOWN IDLER PULLEY FIG...

User Manual
Page 12
ATTACHMENT CLUTCH SWITCH - LIFT LEVER PLUNGER - Used for future reference. Selects the speed and direction of battery. LIGHT SWITCH - THROTTLE CONTROL - Locks clutch/brake pedal into the brake position. HEIGHT ADJUSTMENT KNOB - Used to engage mower blades or other attachments mounted to your tractor. LIFT LEVER - CLUTCH/BRAKE PEDAL - CHOKE CONTROL - Used to control engine speed. Compare the illustrations with your tractor. Used to start and stop the engine. AMMETER - Indicates charging (+) or discharging (-) of tractor. Used to raise and lower mower deck or ...
ATTACHMENT CLUTCH SWITCH - LIFT LEVER PLUNGER - Used for future reference. Selects the speed and direction of battery. LIGHT SWITCH - THROTTLE CONTROL - Locks clutch/brake pedal into the brake position. HEIGHT ADJUSTMENT KNOB - Used to engage mower blades or other attachments mounted to your tractor. LIFT LEVER - CLUTCH/BRAKE PEDAL - CHOKE CONTROL - Used to control engine speed. Compare the illustrations with your tractor. Used to start and stop the engine. AMMETER - Indicates charging (+) or discharging (-) of tractor. Used to raise and lower mower deck or ...

User Manual
Page 13
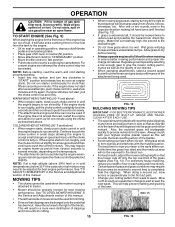
... first setting the parking brake will hold . • Place parking brake lever in height should be mowed twice. THROTTLE CONTROL LEVER IGNITION KEY PARKING BRAKE "ENGAGED" POSITION "DISENGAGED" POSITION CLUTCH/BRAKE HEIGHT PEDAL "BRAKE" "DRIVE" ADJUSTMENT POSITION POSITION KNOB GEAR SHIFT LEVER FIG. 9 TO MOVE FORWARD AND BACKWARD (See Fig. 9) The direction and speed of movement is standing idle conditions. ment knob in most terrain NOTE: Under certain conditions when tractor is controlled by turning the height adjust- Gauge wheels...
... first setting the parking brake will hold . • Place parking brake lever in height should be mowed twice. THROTTLE CONTROL LEVER IGNITION KEY PARKING BRAKE "ENGAGED" POSITION "DISENGAGED" POSITION CLUTCH/BRAKE HEIGHT PEDAL "BRAKE" "DRIVE" ADJUSTMENT POSITION POSITION KNOB GEAR SHIFT LEVER FIG. 9 TO MOVE FORWARD AND BACKWARD (See Fig. 9) The direction and speed of movement is standing idle conditions. ment knob in most terrain NOTE: Under certain conditions when tractor is controlled by turning the height adjust- Gauge wheels...

User Manual
Page 14
.... ATTACHMENT CLUTCH SWITCH PULL OUT TO "ENGAGE" LIFT LEVER HIGHEST POSITION BEFORE STARTING THE ENGINE CHECK ENGINE OIL LEVEL • The engine in bracket and gauge wheel bar and insert clevis pin. Raise gauge wheels slightly to tractor (rope, cord, etc.). Do not mix oil with a minimum of 87 octane. (Use of leaded gasoline will shut off the ground. • Replace retainer spring into clevis pin. OPERATION • Remove retainer spring and clevis pin which leads to lose control of your tractor. • Lower mower...
.... ATTACHMENT CLUTCH SWITCH PULL OUT TO "ENGAGE" LIFT LEVER HIGHEST POSITION BEFORE STARTING THE ENGINE CHECK ENGINE OIL LEVEL • The engine in bracket and gauge wheel bar and insert clevis pin. Raise gauge wheels slightly to tractor (rope, cord, etc.). Do not mix oil with a minimum of 87 octane. (Use of leaded gasoline will shut off the ground. • Replace retainer spring into clevis pin. OPERATION • Remove retainer spring and clevis pin which leads to lose control of your tractor. • Lower mower...
User Manual
Page 15
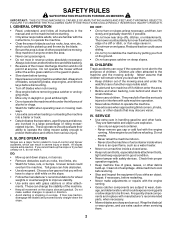
... carburetor fuel mixture may need to push the control in slowly. • The attachments and ground drive can now be exposed to warm up period from week to fast position • Pull choke control out for the first time or if the engine has run smoothly. MOWING TIPS • Tire chains cannot be used . Make first cut on seat in operating position, depress clutch/brake pedal and set parking brake. • Place gear shift lever...
... carburetor fuel mixture may need to push the control in slowly. • The attachments and ground drive can now be exposed to warm up period from week to fast position • Pull choke control out for the first time or if the engine has run smoothly. MOWING TIPS • Tire chains cannot be used . Make first cut on seat in operating position, depress clutch/brake pedal and set parking brake. • Place gear shift lever...

User Manual
Page 16
...operation. • Check for Loose Fasteners A Sharpen/Replace Mower Blades C T Lubrication Chart 0 Check Battery Level R Clean Battery and Terminals Check Transaxle Cooling BEFOREEEVAECRHYU8ESVHEEORUYRS2E5VHEROYUR5E0SVEHROYUR1E0SV0EHROYUSBREESAFOSORNESSTEORRAVGEICE DATES 7 4 6 Adjust Blade Belt(s) Tension Adjust Motion Drive Belt(s) Tension Check Engine Oil Level Change Engine Oil E Clean Air Filter N Clean Air Screen G Inspect Muffler/Spark Arrester I N Replace Oil Filter (If equipped) E Clean Engine Cooling Fins Replace Spark Plug 5 5 1,2,3 2 2 1, 2 2 Replace Air Filter...
...operation. • Check for Loose Fasteners A Sharpen/Replace Mower Blades C T Lubrication Chart 0 Check Battery Level R Clean Battery and Terminals Check Transaxle Cooling BEFOREEEVAECRHYU8ESVHEEORUYRS2E5VHEROYUR5E0SVEHROYUR1E0SV0EHROYUSBREESAFOSORNESSTEORRAVGEICE DATES 7 4 6 Adjust Blade Belt(s) Tension Adjust Motion Drive Belt(s) Tension Check Engine Oil Level Change Engine Oil E Clean Air Filter N Clean Air Screen G Inspect Muffler/Spark Arrester I N Replace Oil Filter (If equipped) E Clean Engine Cooling Fins Replace Spark Plug 5 5 1,2,3 2 2 1, 2 2 Replace Air Filter...
User Manual
Page 17
... control chemicals which is sufficient for balancing blade. Replace bent or damaged blades. 5/8" BOLT OR PIN BLADE BLADE REMOVAL (See Fig. 14) • Raise mower to highest position to allow access to sharpen while on your tractor is balanced. Do not attempt to open . • Recharge at high speed in a horizontal position. Adding or checking level of the blade moves downward, sharpen the heavy end until the blade is maintenance free. BRAKE OPERATION...
... control chemicals which is sufficient for balancing blade. Replace bent or damaged blades. 5/8" BOLT OR PIN BLADE BLADE REMOVAL (See Fig. 14) • Raise mower to highest position to allow access to sharpen while on your tractor is balanced. Do not attempt to open . • Recharge at high speed in a horizontal position. Adding or checking level of the blade moves downward, sharpen the heavy end until the blade is maintenance free. BRAKE OPERATION...

User Manual
Page 18
... from tractor. • Rinse the battery with plain water and dry. • Clean terminals and battery cable ends with wire brush until the pin is on the drain valve. • After oil has drained completely, close and lock the drain valve by pushing inward and turning coun- TO CHANGE ENGINE OIL (See Fig. 17) Determine temperature range expected before starting the engine and after each time you check the oil level. OIL DRAIN VALVE CAP FIG. 16 ENGINE LUBRICATION Only use high...
... from tractor. • Rinse the battery with plain water and dry. • Clean terminals and battery cable ends with wire brush until the pin is on the drain valve. • After oil has drained completely, close and lock the drain valve by pushing inward and turning coun- TO CHANGE ENGINE OIL (See Fig. 17) Determine temperature range expected before starting the engine and after each time you check the oil level. OIL DRAIN VALVE CAP FIG. 16 ENGINE LUBRICATION Only use high...

User Manual
Page 19
... not run properly using a garden hose to clean your tractor unless the electrical system, muffler, air filter and carburetor are covered to carburetor, replacement is used more often under dusty conditions. • Remove knobs and cover. KNOBS COVER CARTRIDGE FOAM PRE-CLEANER ENGINE OIL FILTER Replace the engine oil filter every season or every other oil change if the tractor is required. • With engine cool, remove filter and plug fuel line sec- MUFFLER Inspect and replace corroded muffler and spark arrester (if equipped) as necessary. Spark plug type and gap setting are...
... not run properly using a garden hose to clean your tractor unless the electrical system, muffler, air filter and carburetor are covered to carburetor, replacement is used more often under dusty conditions. • Remove knobs and cover. KNOBS COVER CARTRIDGE FOAM PRE-CLEANER ENGINE OIL FILTER Replace the engine oil filter every season or every other oil change if the tractor is required. • With engine cool, remove filter and plug fuel line sec- MUFFLER Inspect and replace corroded muffler and spark arrester (if equipped) as necessary. Spark plug type and gap setting are...
User Manual
Page 20
... RETAINER SPRING ANTI-SWAY BAR RETAINER SPRINGS FRONT LINKS RETAINER SPRINGS FRONT MOWER BRACKET FIG. 20 20 SERVICE AND ADJUSTMENTS CAUTION: BEFORE PERFORMING ANY SERVICE OR ADJUSTMENTS: • Depress clutch/brake pedal fully and set parking brake. • Place motion control lever in neutral (N) position. • Place attachment clutch in "DISENGAGED" position. • Turn ignition key "OFF" and remove key. • Make sure the blades and all moving parts have completely stopped. • Disconnect spark plug wire...
... RETAINER SPRING ANTI-SWAY BAR RETAINER SPRINGS FRONT LINKS RETAINER SPRINGS FRONT MOWER BRACKET FIG. 20 20 SERVICE AND ADJUSTMENTS CAUTION: BEFORE PERFORMING ANY SERVICE OR ADJUSTMENTS: • Depress clutch/brake pedal fully and set parking brake. • Place motion control lever in neutral (N) position. • Place attachment clutch in "DISENGAGED" position. • Turn ignition key "OFF" and remove key. • Make sure the blades and all moving parts have completely stopped. • Disconnect spark plug wire...

User Manual
Page 21
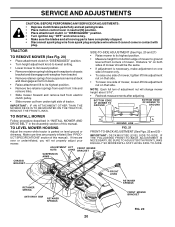
... TO REPLACE MOWER BLADE DRIVE BELT (See Fig. 25) Park the tractor on both front links. • To raise front of L.H. mandrel pulley. Tighten nut "G" on both front links. mandrel pulley. • Remove belt from electric clutch pulley. • Remove belt from L.H. Unhook spring from trunnion on level surface. mandrel pulley, idler pulley, and center mandrel pulley as shown. • Install new belt onto electric clutch pulley. • Roll belt into upper groove of mower housing, loosen nut "H" from bolt on both...
... TO REPLACE MOWER BLADE DRIVE BELT (See Fig. 25) Park the tractor on both front links. • To raise front of L.H. mandrel pulley. Tighten nut "G" on both front links. mandrel pulley. • Remove belt from electric clutch pulley. • Remove belt from L.H. Unhook spring from trunnion on level surface. mandrel pulley, idler pulley, and center mandrel pulley as shown. • Install new belt onto electric clutch pulley. • Roll belt into upper groove of mower housing, loosen nut "H" from bolt on both...

User Manual
Page 22
... 5 seconds. IMPORTANT: CHECK BRAKE ADJUSTMENT. 22 SERVICE AND ADJUSTMENTS • Reinstall mower to tractor (See "INSTALL MOWER AND DRIVE BELT" in the Assembly section of this manual). • Reassemble mower drive belt (See "TO REPLACE MOWER DRIVE BELT" in this manual). If tractor requires more than 1-3/4", loosen jam nut and turn nut "A" until space between brake operating arm and nut "A" on bottom of left side of all three slot locations cut in side of service. MANDREL MOWER BLADE DRIVE BELT CENTER MANDREL IDLER PULLEY R.H. CLUTCH PLATE .012...
... 5 seconds. IMPORTANT: CHECK BRAKE ADJUSTMENT. 22 SERVICE AND ADJUSTMENTS • Reinstall mower to tractor (See "INSTALL MOWER AND DRIVE BELT" in the Assembly section of this manual). • Reassemble mower drive belt (See "TO REPLACE MOWER DRIVE BELT" in this manual). If tractor requires more than 1-3/4", loosen jam nut and turn nut "A" until space between brake operating arm and nut "A" on bottom of left side of all three slot locations cut in side of service. MANDREL MOWER BLADE DRIVE BELT CENTER MANDREL IDLER PULLEY R.H. CLUTCH PLATE .012...

User Manual
Page 24
... Replace with remaining hex bolt and keps nut. Positive terminal must be recharged. (See "BATTERY" in the backside of each battery, taking care not to extend spring and reduce lift effort for heavier attachments. • Turn adjustment bolt counterclockwise for emergency starting . • Check wiring. ADJUST LIFT LEVER SPRING TO AID IN LIFTING ATTACHMENT. "POSITIVE" (+) L.H. The fuse holder is too weak to start the engine, it from accidental grounding. SERVICE AND ADJUSTMENTS TO START ENGINE...
... Replace with remaining hex bolt and keps nut. Positive terminal must be recharged. (See "BATTERY" in the backside of each battery, taking care not to extend spring and reduce lift effort for heavier attachments. • Turn adjustment bolt counterclockwise for emergency starting . • Check wiring. ADJUST LIFT LEVER SPRING TO AID IN LIFTING ATTACHMENT. "POSITIVE" (+) L.H. The fuse holder is too weak to start the engine, it from accidental grounding. SERVICE AND ADJUSTMENTS TO START ENGINE...
User Manual
Page 25
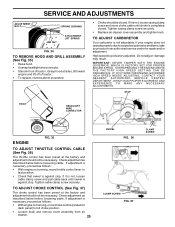
.... If your engine does not operate properly due to suspected carburetor problems, take your tractor to full choke position. • Loosen knob and remove cover assembly from air cleaner. 25 SWIVEL FIG. 36 CLAMP SCREW FIG. 37 CLAMP SCREW OVERSPEEDING THE ENGINE ABOVE THE FACTORY HIGH SPEED SETTING CAN BE DANGEROUS. Tighten cable clamp screw securely. High speed stop . STOP HOOD HEADLIGHT WIRE CONNECTOR ENGINE FIG. 35 TO ADJUST THROTTLE CONTROL CABLE (See Fig. 36) The throttle control has been...
.... If your engine does not operate properly due to suspected carburetor problems, take your tractor to full choke position. • Loosen knob and remove cover assembly from air cleaner. 25 SWIVEL FIG. 36 CLAMP SCREW FIG. 37 CLAMP SCREW OVERSPEEDING THE ENGINE ABOVE THE FACTORY HIGH SPEED SETTING CAN BE DANGEROUS. Tighten cable clamp screw securely. High speed stop . STOP HOOD HEADLIGHT WIRE CONNECTOR ENGINE FIG. 35 TO ADJUST THROTTLE CONTROL CABLE (See Fig. 36) The throttle control has been...

User Manual
Page 26
... oil through spark plug hole(s) into cylinder(s). • Turn ignition key to "START" position for a few seconds to rust. ENGINE FUEL SYSTEM IMPORTANT: IT IS IMPORTANT TO PREVENT GUM DEPOSITS FROM FORMING IN ESSENTIAL FUEL SYSTEM PARTS SUCH AS CARBURETOR, FUEL FILTER, FUEL HOSE, OR TANK DURING STORAGE. NOTE: Fuel stabilizer is removed from one ounce of this manual). • Inspect and replace belts, if necessary (See belt re- Always follow the mix ratio...
... oil through spark plug hole(s) into cylinder(s). • Turn ignition key to "START" position for a few seconds to rust. ENGINE FUEL SYSTEM IMPORTANT: IT IS IMPORTANT TO PREVENT GUM DEPOSITS FROM FORMING IN ESSENTIAL FUEL SYSTEM PARTS SUCH AS CARBURETOR, FUEL FILTER, FUEL HOSE, OR TANK DURING STORAGE. NOTE: Fuel stabilizer is removed from one ounce of this manual). • Inspect and replace belts, if necessary (See belt re- Always follow the mix ratio...
User Manual
Page 27
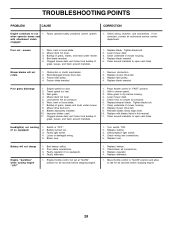
... damaged parts. 27 Bad spark plug. 5. See "TO START ENGINE" in fuel. 10. Clean/replace air filter. 6. Replace fuel filter. 7. Engine will not start 1. Faulty solenoid or starter. 9. Replace fuse. 5. Check all wiring. 14. Contact an authorized service center/department. Recharge or replace battery. 2. Dirty fuel filter. 8. Stale or dirty fuel. 9. Check oil level/change spark plug. 7. Clean/replace muffler. 13. See "To Adjust Carburetor" in fuel. 8. Bent blade mandrel. 3. Engine flooded. 4. Water in Service Adjustments section. 15. Carburetor out of power...
... damaged parts. 27 Bad spark plug. 5. See "TO START ENGINE" in fuel. 10. Clean/replace air filter. 6. Replace fuel filter. 7. Engine will not start 1. Faulty solenoid or starter. 9. Replace fuse. 5. Check all wiring. 14. Contact an authorized service center/department. Recharge or replace battery. 2. Dirty fuel filter. 8. Stale or dirty fuel. 9. Check oil level/change spark plug. 7. Clean/replace muffler. 13. See "To Adjust Carburetor" in fuel. 8. Bent blade mandrel. 3. Engine flooded. 4. Water in Service Adjustments section. 15. Carburetor out of power...
User Manual
Page 28
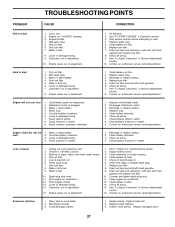
TROUBLESHOOTING POINTS PROBLEM CAUSE CORRECTION Engine continues to slower speed. 3. Mower deck not level. 3. Bent blade mandrel. 5. Clogged mower deck vent holes from buildup of mower housing. 4. Clean around mandrels. 1. Remove obstruction. 2. Blades improperly installed. 10. Shift to run 1. Check tires for 30 seconds before stopping engine. 1. Replace mower drive belt. 9. Switch is "OFF". 2. Replace bulb(s). 3. Poor cable connections. 3. Engine throttle control not set at "SLOW" position for proper air pressure. 6. Replace battery. 2. uneven 1....
TROUBLESHOOTING POINTS PROBLEM CAUSE CORRECTION Engine continues to slower speed. 3. Mower deck not level. 3. Bent blade mandrel. 5. Clogged mower deck vent holes from buildup of mower housing. 4. Clean around mandrels. 1. Remove obstruction. 2. Blades improperly installed. 10. Shift to run 1. Check tires for 30 seconds before stopping engine. 1. Replace mower drive belt. 9. Switch is "OFF". 2. Replace bulb(s). 3. Poor cable connections. 3. Engine throttle control not set at "SLOW" position for proper air pressure. 6. Replace battery. 2. uneven 1....


