
User Manual
Page 2
... all times including startup. Never allow children to make any damage, and repair the damage before filling. (e) When practical, remove gas-powered equipment from the spark plug, disconnect the cord on sloping surfaces. Exercise caution to point out important safety precautions. After striking a foreign object, stop the engine (motor) and check immediately for the cause. Caution should start to a running (except when specifically recommended...
... all times including startup. Never allow children to make any damage, and repair the damage before filling. (e) When practical, remove gas-powered equipment from the spark plug, disconnect the cord on sloping surfaces. Exercise caution to point out important safety precautions. After striking a foreign object, stop the engine (motor) and check immediately for the cause. Caution should start to a running (except when specifically recommended...
User Manual
Page 3
... maintain your purchase of your footing, and keep the wire away from the plug to prevent someone from accidentally starting the engine and for proper tightness to be sure of a new snow thrower. Never operate the snow thrower without good visibility or light. Walk; Wait 10 seconds to service or repair this manual. Check shear bolts and other safety protective devices in maintaining, caring for an...
... maintain your purchase of your footing, and keep the wire away from the plug to prevent someone from accidentally starting the engine and for proper tightness to be sure of a new snow thrower. Never operate the snow thrower without good visibility or light. Walk; Wait 10 seconds to service or repair this manual. Check shear bolts and other safety protective devices in maintaining, caring for an...

User Manual
Page 4
...the belt cover. PARTS PACKED SEPARATELY IN CARTON (1) AUGER CONTROL ROD (1) TRACTION DRIVE CONTROL ROD (1) DISCHARGE CHUTE (1) POWER CORD (198563) ROTATOR HEAD MOUNTING (1) MULTIWRENCH (180684) (3) RETAINER SPRINGS (169675) (2) FLAT WASHERS (2) CARRIAGE BOLTS 3/8-16 x 2.25 (1) WASHER 3/8 (19131316) (1) LOCKNUT 3/8 (73800600) EXTRA SHEAR BOLTS AND NUTS (1) SAFTEY IGNITION KEY (35062) (2) HANDLE KNOBS (2) SHEAR BOLTS 1/4-20 x 1-3/4 (198636) (2) SPACERS (198638) (2) LOCKNUTS 1/4-20 (73800400) ASSEMBLY / PRE-OPERATION Read these instructions and this manual in assembly, operation...
...the belt cover. PARTS PACKED SEPARATELY IN CARTON (1) AUGER CONTROL ROD (1) TRACTION DRIVE CONTROL ROD (1) DISCHARGE CHUTE (1) POWER CORD (198563) ROTATOR HEAD MOUNTING (1) MULTIWRENCH (180684) (3) RETAINER SPRINGS (169675) (2) FLAT WASHERS (2) CARRIAGE BOLTS 3/8-16 x 2.25 (1) WASHER 3/8 (19131316) (1) LOCKNUT 3/8 (73800600) EXTRA SHEAR BOLTS AND NUTS (1) SAFTEY IGNITION KEY (35062) (2) HANDLE KNOBS (2) SHEAR BOLTS 1/4-20 x 1-3/4 (198636) (2) SPACERS (198638) (2) LOCKNUTS 1/4-20 (73800400) ASSEMBLY / PRE-OPERATION Read these instructions and this manual in assembly, operation...
User Manual
Page 5
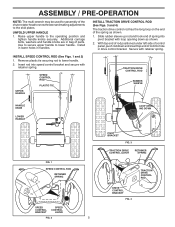
... CONTROL ROD (See Figs. 1 and 2) 1. Additional carriage bolts, washers and handle knobs are in handles. UPPER HANDLE SPEED CONTROL ROD PLASTIC TIE TRACTION DRIVE CONTROL ROD RUBBER SLEEVE HANDLE KNOB LOWER HANDLE LOOP OPENING DOWN FIG. 1 SPEED CONTROL ROD RETAINER SPRING SPEED CONTROL BRACKET SPEED CONTROL LEVER FIG. 2 5 PIVOT BRACKET FIG. 3 TRACTION DRIVE CONTROL LEVER RETAINER SPRING TRACTION DRIVE CONTROL ROD DRIVE CONTROL BRACKET FIG. 4 ASSEMBLY / PRE-OPERATION NOTE: The multi-wrench may be used for assembly of the chute rotator head to snow thrower and making adjustments...
... CONTROL ROD (See Figs. 1 and 2) 1. Additional carriage bolts, washers and handle knobs are in handles. UPPER HANDLE SPEED CONTROL ROD PLASTIC TIE TRACTION DRIVE CONTROL ROD RUBBER SLEEVE HANDLE KNOB LOWER HANDLE LOOP OPENING DOWN FIG. 1 SPEED CONTROL ROD RETAINER SPRING SPEED CONTROL BRACKET SPEED CONTROL LEVER FIG. 2 5 PIVOT BRACKET FIG. 3 TRACTION DRIVE CONTROL LEVER RETAINER SPRING TRACTION DRIVE CONTROL ROD DRIVE CONTROL BRACKET FIG. 4 ASSEMBLY / PRE-OPERATION NOTE: The multi-wrench may be used for assembly of the chute rotator head to snow thrower and making adjustments...
User Manual
Page 6
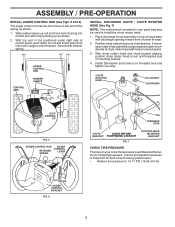
... auger control bracket. Position chute rotator head over chute bracket. If necessary, rotate chute assembly to install the chute rotator head. 1. CHUTE ROTATOR HEAD 3/8 LOCKNUT 3/8 WASHER LOOP OPENING UP FIG. 5 AUGER CONTROL ROD AUGER CONTROL RETAINER LEVER SPRING PIN THREADED STUD CHUTE ALIGN BEFORE BRACKET TIGHTENING LOCKNUT FIG. 7 ROTATOR HEAD MOUNTING BRACKET CHECK TIRE PRESSURE The tires on your parts bag may be used to align square and pin on rod and insert end of snow thrower. 2. Place discharge chute assembly...
... auger control bracket. Position chute rotator head over chute bracket. If necessary, rotate chute assembly to install the chute rotator head. 1. CHUTE ROTATOR HEAD 3/8 LOCKNUT 3/8 WASHER LOOP OPENING UP FIG. 5 AUGER CONTROL ROD AUGER CONTROL RETAINER LEVER SPRING PIN THREADED STUD CHUTE ALIGN BEFORE BRACKET TIGHTENING LOCKNUT FIG. 7 ROTATOR HEAD MOUNTING BRACKET CHECK TIRE PRESSURE The tires on your parts bag may be used to align square and pin on rod and insert end of snow thrower. 2. Place discharge chute assembly...

User Manual
Page 7
... TO START AND RUN, PULL OUT TO STOP. OPERATION KNOW YOUR SNOW THROWER READ THIS OWNER'S MANUAL AND ALL SAFETY RULES BEFORE OPERATING YOUR SNOW THROWER. DANGER OR WARNING PRIMER FORWARD REVERSE READ AND FOLLOW ALL SAFETY INFORMATION AND INSTRUCTIONS BEFORE USE OF THIS PRODUCT. IGNITION KEY. Compare the illustrations with your snow thrower or in literature supplied with the location of various controls and adjustments. Save this manual for future...
... TO START AND RUN, PULL OUT TO STOP. OPERATION KNOW YOUR SNOW THROWER READ THIS OWNER'S MANUAL AND ALL SAFETY RULES BEFORE OPERATING YOUR SNOW THROWER. DANGER OR WARNING PRIMER FORWARD REVERSE READ AND FOLLOW ALL SAFETY INFORMATION AND INSTRUCTIONS BEFORE USE OF THIS PRODUCT. IGNITION KEY. Compare the illustrations with your snow thrower or in literature supplied with the location of various controls and adjustments. Save this manual for future...
User Manual
Page 8
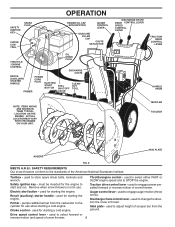
... carburetor to start button - used for starting the engine. Primer - OPERATION SAFETY IGNITION KEY SPARK PLUG CHOKE CONTROL ENGINE OIL CAP WITH DIPSTICK AUGER CONTROL LEVER GASOLINE FILLER CAP CHUTE DEFLECTOR THROTTLE / ENGINE CONTROL OIL DRAIN PLUG DISCHARGE CHUTE RECOIL (AUXILIARY) STARTER HANDLE PRIMER POWER CORD PLUG ELECTRIC START BUTTON FUEL SHUT-OFF VALVE CLEANOUT TOOL DISCHARGE CHUTE DRIVE CONTROL LEVER SPEED CONTROL LEVER TRACTION DRIVE CONTROL LEVER HANDLE KNOB NOTE: ITEMS ABOVE ARE SHOWN IN THEIR TYPICAL LOCATION ON THE ENGINE. Electric start and run...
... carburetor to start button - used for starting the engine. Primer - OPERATION SAFETY IGNITION KEY SPARK PLUG CHOKE CONTROL ENGINE OIL CAP WITH DIPSTICK AUGER CONTROL LEVER GASOLINE FILLER CAP CHUTE DEFLECTOR THROTTLE / ENGINE CONTROL OIL DRAIN PLUG DISCHARGE CHUTE RECOIL (AUXILIARY) STARTER HANDLE PRIMER POWER CORD PLUG ELECTRIC START BUTTON FUEL SHUT-OFF VALVE CLEANOUT TOOL DISCHARGE CHUTE DRIVE CONTROL LEVER SPEED CONTROL LEVER TRACTION DRIVE CONTROL LEVER HANDLE KNOB NOTE: ITEMS ABOVE ARE SHOWN IN THEIR TYPICAL LOCATION ON THE ENGINE. Electric start and run...

User Manual
Page 9
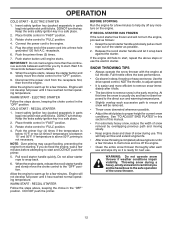
... valve is located beneath the fuel tank on the engine. WARNING: If the discharge chute or auger become clogged, shut-off valve in the OPEN position. TO USE CHOKE CONTROL (See Fig. 11) The choke control is in desired position. AUGER • Release the auger control lever to disengage. Move throttle control to unclog the chute and/or auger. Always operate the snow thrower with the engine at all times including startup. OFF FULL FIG. 11 HIGH POSITION KNOB CHUTE DEFLECTOR LOW POSITION...
... valve is located beneath the fuel tank on the engine. WARNING: If the discharge chute or auger become clogged, shut-off valve in the OPEN position. TO USE CHOKE CONTROL (See Fig. 11) The choke control is in desired position. AUGER • Release the auger control lever to disengage. Move throttle control to unclog the chute and/or auger. Always operate the snow thrower with the engine at all times including startup. OFF FULL FIG. 11 HIGH POSITION KNOB CHUTE DEFLECTOR LOW POSITION...
User Manual
Page 10
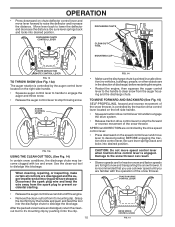
... clip. FIG. 13a USING THE CLEAN-OUT TOOL (See Fig. 14) In certain snow conditions, the discharge chute may become clogged with the operation of the snow thrower. It is controlled by the traction drive control lever located on the speed control lever and move lever forward to stop throwing snow. TRACTION DRIVE CONTROL LEVER • Release the auger control lever and shut off the engine. • Remove the clean-out tool from the spark plug to dislodge this blockage...
... clip. FIG. 13a USING THE CLEAN-OUT TOOL (See Fig. 14) In certain snow conditions, the discharge chute may become clogged with the operation of the snow thrower. It is controlled by the traction drive control lever located on the speed control lever and move lever forward to stop throwing snow. TRACTION DRIVE CONTROL LEVER • Release the auger control lever and shut off the engine. • Remove the clean-out tool from the spark plug to dislodge this blockage...

User Manual
Page 11
...) position. 1. three-wire grounded system. Check engine oil with gasoline. Never use the electric starter if your house is reversible. If you are adjusted to give a 1/8" clearance between the scraper bar and the ground surface. CHOKE CONTROL SAFETY IGNITION KEY THROTTLE PRIMER ENGINE OIL FILL CAP / DIPSTICK AUGER HOUSING HEX NUTS SCRAPER BAR SKID PLATE GASOLINE FILLER CAP LOW POSITION (HIGH GROUND CLEARANCE) FUEL SHUTOFF VALVE FIG. 16 SCRAPER BAR (See Fig. 16) RECOIL STARTER HANDLE STARTER BUTTON POWER CORD PLUG The scraper bar is not adjustable...
...) position. 1. three-wire grounded system. Check engine oil with gasoline. Never use the electric starter if your house is reversible. If you are adjusted to give a 1/8" clearance between the scraper bar and the ground surface. CHOKE CONTROL SAFETY IGNITION KEY THROTTLE PRIMER ENGINE OIL FILL CAP / DIPSTICK AUGER HOUSING HEX NUTS SCRAPER BAR SKID PLATE GASOLINE FILLER CAP LOW POSITION (HIGH GROUND CLEARANCE) FUEL SHUTOFF VALVE FIG. 16 SCRAPER BAR (See Fig. 16) RECOIL STARTER HANDLE STARTER BUTTON POWER CORD PLUG The scraper bar is not adjustable...
User Manual
Page 12
... temperature is between each use . Grasp the recoil starter handle and slowly pull as possible. 2. See "TO ADJUST SKID PLATES" in parts bag) into ignition slot until it clicks. OPERATION COLD START - Push the primer three (3) times. 7. When the engine starts, release the starter button and slowly move the choke control to proper height for a few minutes before attempting to the safe operation of snow during a heavy, windy...
... temperature is between each use . Grasp the recoil starter handle and slowly pull as possible. 2. See "TO ADJUST SKID PLATES" in parts bag) into ignition slot until it clicks. OPERATION COLD START - Push the primer three (3) times. 7. When the engine starts, release the starter button and slowly move the choke control to proper height for a few minutes before attempting to the safe operation of snow during a heavy, windy...
User Manual
Page 13
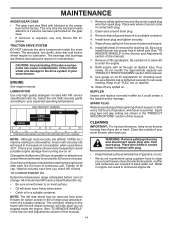
... subjected to service this unit. Check engine oil level. 2. Engine oil SNOW THROWER BELTS Always observe the safety rules when performing any maintenance. TIRES (See "TO REMOVE BELT COVER" in the Service and • Maintain proper air pressure in this manual. The belts are functioning properly. Using other than OEM belts can harm rubber. Tire sealant also prevents tire dry rot (OEM) belts available from the warranty, operator must maintain snow thrower as instructed in Maintenance section General...
... subjected to service this unit. Check engine oil level. 2. Engine oil SNOW THROWER BELTS Always observe the safety rules when performing any maintenance. TIRES (See "TO REMOVE BELT COVER" in the Service and • Maintain proper air pressure in this manual. The belts are functioning properly. Using other than OEM belts can harm rubber. Tire sealant also prevents tire dry rot (OEM) belts available from the warranty, operator must maintain snow thrower as instructed in Maintenance section General...
User Manual
Page 14
... the drive system of this manual. The only time the lubricant needs attention is if service has been performed on the gear case. • If lubricant is tightened securely for checking level. ENGINE See engine manual. Install drain plug and tighten securely. 5. Remove oil fill cap/dipstick. Spark plug type and gap setting are lifetime lubricated and require no lubrication. Clean the outside of your snow thrower unless the electrical system, muffler and carburetor are covered to keep snow thrower housing free of...
... the drive system of this manual. The only time the lubricant needs attention is if service has been performed on the gear case. • If lubricant is tightened securely for checking level. ENGINE See engine manual. Install drain plug and tighten securely. 5. Remove oil fill cap/dipstick. Spark plug type and gap setting are lifetime lubricated and require no lubrication. Clean the outside of your snow thrower unless the electrical system, muffler and carburetor are covered to keep snow thrower housing free of...

User Manual
Page 15
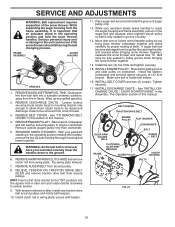
... same time. IMPELLER SHEAR BOLTS The impeller is provided to the impeller shaft with two (2) FRAME BELT COVER SCREWS capscrew/shear bolts and hex nuts. Disengage all controls and move throttle control to stop . wire from spark plug. If the deflector becomes damaged, it cannot come The V-belts on your snow thrower. 4. WARNING: To avoid serious injury, never operate your snow thrower with your snow thrower are designed to break, preventing damage to STOP position. Use...
... same time. IMPELLER SHEAR BOLTS The impeller is provided to the impeller shaft with two (2) FRAME BELT COVER SCREWS capscrew/shear bolts and hex nuts. Disengage all controls and move throttle control to stop . wire from spark plug. If the deflector becomes damaged, it cannot come The V-belts on your snow thrower. 4. WARNING: To avoid serious injury, never operate your snow thrower with your snow thrower are designed to break, preventing damage to STOP position. Use...
User Manual
Page 16
... pulley. 13. REMOVE GASOLINE FROM FUEL TANK - See "TO REMOVE BELT COVER" in the operating position and hold the snow thrower handles. Remove bolt, lockwasher and flat washer securing pulley to the unit could occur if the snow thrower should fall during the belt changing process. REMOVE AUGER BELT from swing plate. INSTALL ENGINE PULLEY - INSTALL BELT COVER and two (2) screws. See "INSTALL DISCHARGE CHUTE / CHUTE ROTATER HEAD" in pulley groove when bringing the snow thrower together. 14. FRAME ASSEMBLY AUGER HOUSING HANDLES 1. REMOVE DISCHARGE CHUTE - SEPARATE SNOW...
... pulley. 13. REMOVE GASOLINE FROM FUEL TANK - See "TO REMOVE BELT COVER" in the operating position and hold the snow thrower handles. Remove bolt, lockwasher and flat washer securing pulley to the unit could occur if the snow thrower should fall during the belt changing process. REMOVE AUGER BELT from swing plate. INSTALL ENGINE PULLEY - INSTALL BELT COVER and two (2) screws. See "INSTALL DISCHARGE CHUTE / CHUTE ROTATER HEAD" in pulley groove when bringing the snow thrower together. 14. FRAME ASSEMBLY AUGER HOUSING HANDLES 1. REMOVE DISCHARGE CHUTE - SEPARATE SNOW...
User Manual
Page 17
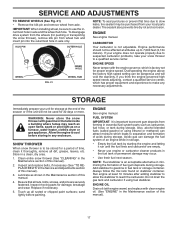
... REPLACE BELTS" in the Service and Adjustments section of an engine while in storage. • Empty the fuel tank by starting the engine and letting it thoroughly, remove all rusted or chipped paint surfaces; ENGINE See engine manual. Overspeeding the engine above the factory high speed setting can damage the fuel system of this manual). 2. SERVICE AND ADJUSTMENTS TO REMOVE WHEELS (See Fig. 21) • Remove the klik pin and remove wheel from forming in essential fuel system parts...
... REPLACE BELTS" in the Service and Adjustments section of an engine while in storage. • Empty the fuel tank by starting the engine and letting it thoroughly, remove all rusted or chipped paint surfaces; ENGINE See engine manual. Overspeeding the engine above the factory high speed setting can damage the fuel system of this manual). 2. SERVICE AND ADJUSTMENTS TO REMOVE WHEELS (See Fig. 21) • Remove the klik pin and remove wheel from forming in essential fuel system parts...
User Manual
Page 18
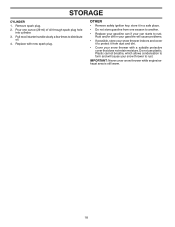
... snow thrower with new spark plug. Pull recoil starter handle slowly a few times to rust. Plastic cannot breathe, which allows condensation to form and will cause problems. • If possible, store your snow thrower indoors and cover it to rust. Remove spark plug. 2. Rust and/or dirt in a safe place. • Do not store gasoline from dust and dirt. • Cover your snow thrower to distribute oil. 4. Replace with a suitable protective cover...
... snow thrower with new spark plug. Pull recoil starter handle slowly a few times to rust. Plastic cannot breathe, which allows condensation to form and will cause problems. • If possible, store your snow thrower indoors and cover it to rust. Remove spark plug. 2. Rust and/or dirt in a safe place. • Do not store gasoline from dust and dirt. • Cover your snow thrower to distribute oil. 4. Replace with a suitable protective cover...

User Manual
Page 19
...Fuel tank cap is off valve (if so equipped) in OFF position. 2. Frozen recoil starter. 1. of fuel. 4. See "IF RECOIL STARTER HAS FROZEN" in fuel. 1. Water in the Operation section of pulley. 2. Move choke to FULL position. 6. Auger belt is covered with fresh, clean fuel. 4. Fuel shut-off of this manual. 7. Clean or replace muffler. Drain fuel tank and carburetor, refill tank with fresh gasoline. 5. If vibration remains, contact a qualified service centre. Check / replace auger belt. 3. Out of drive speed 3. Primer not depressed. 7. Move throttle...
...Fuel tank cap is off valve (if so equipped) in OFF position. 2. Frozen recoil starter. 1. of fuel. 4. See "IF RECOIL STARTER HAS FROZEN" in fuel. 1. Water in the Operation section of pulley. 2. Move choke to FULL position. 6. Auger belt is covered with fresh, clean fuel. 4. Fuel shut-off of this manual. 7. Clean or replace muffler. Drain fuel tank and carburetor, refill tank with fresh gasoline. 5. If vibration remains, contact a qualified service centre. Check / replace auger belt. 3. Out of drive speed 3. Primer not depressed. 7. Move throttle...
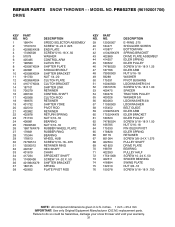
User Manual
Page 31
... PULLEY SCREW 5/16−18 X 1.50 NUT 5/16−18 PIN IDLER PIVOT IDLER SPRING RETAINER SCREW 3/8−24 X 1.375 PULLEY SHAFT DRIVE PLATE BEARING PULLEY HALF SCREW 10−24 X .50 SPACER BEARING SWING PLATE NUT 3/8−16 SCREW 5/16−18 X .750 NOTE: All component dimensions given in U.S. Failure to do so could be hazardous, damage your snow thrower and void your warranty. 31 REPAIR PARTS SNOW THROWER - - MODEL...
... PULLEY SCREW 5/16−18 X 1.50 NUT 5/16−18 PIN IDLER PIVOT IDLER SPRING RETAINER SCREW 3/8−24 X 1.375 PULLEY SHAFT DRIVE PLATE BEARING PULLEY HALF SCREW 10−24 X .50 SPACER BEARING SWING PLATE NUT 3/8−16 SCREW 5/16−18 X .750 NOTE: All component dimensions given in U.S. Failure to do so could be hazardous, damage your snow thrower and void your warranty. 31 REPAIR PARTS SNOW THROWER - - MODEL...

User Manual
Page 40
... to 90 days from defects in replacing parts, any power equipment unit or attachment are belts, shear pins, normal wear, normal adjustments, standard hardware and normal maintenance. 6. Exclusions: Excluded from date of the product. 5. ID#, serial number and date of purchase of your product and the name and address of original purchase. 4. This Warranty gives you specific legal rights, and you must be...
... to 90 days from defects in replacing parts, any power equipment unit or attachment are belts, shear pins, normal wear, normal adjustments, standard hardware and normal maintenance. 6. Exclusions: Excluded from date of the product. 5. ID#, serial number and date of purchase of your product and the name and address of original purchase. 4. This Warranty gives you specific legal rights, and you must be...


