
User Manual
Page 2
...tight and keep equipment in good condition. • Never tamper with grass catchers or other attachments. Check their ability to operate the riding mower safely enough to stop engine, and remove keys before dismounting. • Turn off blades when not mowing. • Stop engine before ...• Use extra care with safety devices. Do not make adjustments or repairs with safe machine operation. • Watch for Ride-On Mowers IMPORTANT: THIS CUTTING MACHINE IS CAPABLE OF AMPUTATING HANDS AND FEET AND THROWING OBJECTS. Adjust and service as a water heater. edge of children...
...tight and keep equipment in good condition. • Never tamper with grass catchers or other attachments. Check their ability to operate the riding mower safely enough to stop engine, and remove keys before dismounting. • Turn off blades when not mowing. • Stop engine before ...• Use extra care with safety devices. Do not make adjustments or repairs with safe machine operation. • Watch for Ride-On Mowers IMPORTANT: THIS CUTTING MACHINE IS CAPABLE OF AMPUTATING HANDS AND FEET AND THROWING OBJECTS. Adjust and service as a water heater. edge of children...

User Manual
Page 3
..., you will not have to cause cancer and birth defects or other reproductive harm. It means CAUTION!!! SAFETY RULES Safe Operation Practices for Ride-On Mowers • Be sure the area is dangerous. Stop machine if anyone enters the area. • Never carry passengers or children even with safe machine operation...
..., you will not have to cause cancer and birth defects or other reproductive harm. It means CAUTION!!! SAFETY RULES Safe Operation Practices for Ride-On Mowers • Be sure the area is dangerous. Stop machine if anyone enters the area. • Never carry passengers or children even with safe machine operation...

User Manual
Page 5
Seat (4) Retainer Springs (double loop) (4) Locknuts 3/8-16 Nose Roller (1) Washer 17/32 x 1-3/16 x 12 Gauge (1) Knob (2) Flanged Pins Mower (1) Front Plate Assembly (2) Locknuts 5/16-18 Rod Retainer Spring Nose Roller Brackets (2) Hex Bolts 5/16-18 x 1 (2) Retainer Springs (single loop) (5) Retainer Springs (double loop) Keys (2) ...
Seat (4) Retainer Springs (double loop) (4) Locknuts 3/8-16 Nose Roller (1) Washer 17/32 x 1-3/16 x 12 Gauge (1) Knob (2) Flanged Pins Mower (1) Front Plate Assembly (2) Locknuts 5/16-18 Rod Retainer Spring Nose Roller Brackets (2) Hex Bolts 5/16-18 x 1 (2) Retainer Springs (single loop) (5) Retainer Springs (double loop) Keys (2) ...
User Manual
Page 6
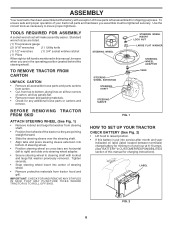
... is put into center of your tractor all parts and hardware you are in CUSTOMER RESPONSIBILITIES section of carton, and lay panels flat. • Remove mower and packing materials. • Check for charging instructions). FIG. 1 HOW TO SET UP YOUR TRACTOR CHECK BATTERY (See Fig. 2) • Lift hood to bottom, along...
... is put into center of your tractor all parts and hardware you are in CUSTOMER RESPONSIBILITIES section of carton, and lay panels flat. • Remove mower and packing materials. • Check for charging instructions). FIG. 1 HOW TO SET UP YOUR TRACTOR CHECK BATTERY (See Fig. 2) • Lift hood to bottom, along...

User Manual
Page 7
... adjusted position. • Raise seat and tighten adjustment knob securely. Be sure the area in front of tractor is in proper position when operating mower. Assemble gauge wheels as shown using shoulder bolts, 3/8 washers and 3/8-16 center locknuts and tighten securely. • For ease of... mower to tractor assembly, raise gauge wheels to highest position and retain with gasoline • Place freewheel control in "transmission engaged" position. • Sit on ...
... adjusted position. • Raise seat and tighten adjustment knob securely. Be sure the area in front of tractor is in proper position when operating mower. Assemble gauge wheels as shown using shoulder bolts, 3/8 washers and 3/8-16 center locknuts and tighten securely. • For ease of... mower to tractor assembly, raise gauge wheels to highest position and retain with gasoline • Place freewheel control in "transmission engaged" position. • Sit on ...

User Manual
Page 8
... "B" to the inside of this manual. LOCK NUT HEX BOLT ROD TAB HOLE "A" BRACKET RETAINER SPRING "B" BRACKET NOSE ROLLER FIG. 5 INSTALL MOWER AND DRIVE BELT (See Figs. 6 and 7) Be sure tractor is on head of tractor. IMPORTANT: Check belt for proper routing in the Operation... turn height adjustment knob counterclockwise until it stops. • Lower mower linkage with notch on level surface and mower suspension arms are positioned in tab holes in mower brackets. • Position nose roller between front mower brackets. Engage belt tension rod by pushing rod into locking bracket....
... "B" to the inside of this manual. LOCK NUT HEX BOLT ROD TAB HOLE "A" BRACKET RETAINER SPRING "B" BRACKET NOSE ROLLER FIG. 5 INSTALL MOWER AND DRIVE BELT (See Figs. 6 and 7) Be sure tractor is on head of tractor. IMPORTANT: Check belt for proper routing in the Operation... turn height adjustment knob counterclockwise until it stops. • Lower mower linkage with notch on level surface and mower suspension arms are positioned in tab holes in mower brackets. • Position nose roller between front mower brackets. Engage belt tension rod by pushing rod into locking bracket....
User Manual
Page 9
... 3 Be sure brake system is important to -rear for best cutting results. (Tires must be properly inflated for replacing motion, mower drive, and mower blade drive belts in "PRODUCT SPECIFICATIONS" section of this manual. WHILE LEARNING HOW TO USE YOUR TRACTOR, PAY EXTRA ATTENTION TO THE... at proper level. 3 Fuel tank is filled with fresh, clean, regular unleaded gasoline. 3 Become familiar with all controls - See "TO LEVEL MOWER HOUSING" in the Operation section of this manual). 9 Operate them before operat- See "TO ADJUST BRAKE" in safe operating condition. 3 It is...
... 3 Be sure brake system is important to -rear for best cutting results. (Tires must be properly inflated for replacing motion, mower drive, and mower blade drive belts in "PRODUCT SPECIFICATIONS" section of this manual. WHILE LEARNING HOW TO USE YOUR TRACTOR, PAY EXTRA ATTENTION TO THE... at proper level. 3 Fuel tank is filled with fresh, clean, regular unleaded gasoline. 3 Become familiar with all controls - See "TO LEVEL MOWER HOUSING" in the Operation section of this manual). 9 Operate them before operat- See "TO ADJUST BRAKE" in safe operating condition. 3 It is...

User Manual
Page 10
BATTERY CAUTION OR WARNING REVERSE FORWARD FAST SLOW ENGINE ON ENGINE OFF OIL PRESSURE LIGHTS ON OVER TEMP LIGHT FUEL CHOKE MOWER HEIGHT PARKING BRAKE LOCKED UNLOCKED MOWER LIFT ATTACHMENT REVERSE CLUTCH ENGAGED NEUTRAL HIGH P LOW PARKING BRAKE 15 15 15 IGNITION ATTACHMENT CLUTCH DISENGAGED KEEP AREA CLEAR SLOPE HAZARDS (SEE SAFETY RULES SECTION) DANGER, KEEP HANDS AND FEET AWAY 10 FREE WHEEL (Automatic Models only) Learn and understand their meaning. OPERATION These symbols may appear on your tractor or in literature supplied with the product.
BATTERY CAUTION OR WARNING REVERSE FORWARD FAST SLOW ENGINE ON ENGINE OFF OIL PRESSURE LIGHTS ON OVER TEMP LIGHT FUEL CHOKE MOWER HEIGHT PARKING BRAKE LOCKED UNLOCKED MOWER LIFT ATTACHMENT REVERSE CLUTCH ENGAGED NEUTRAL HIGH P LOW PARKING BRAKE 15 15 15 IGNITION ATTACHMENT CLUTCH DISENGAGED KEEP AREA CLEAR SLOPE HAZARDS (SEE SAFETY RULES SECTION) DANGER, KEEP HANDS AND FEET AWAY 10 FREE WHEEL (Automatic Models only) Learn and understand their meaning. OPERATION These symbols may appear on your tractor or in literature supplied with the product.

User Manual
Page 11
.... Indicates hours of battery. PARKING BRAKE - Used to raise and lower the mower deck or other attachments mounted to your tractor. CRUISE CONTROL LEVER - ATTACHMENT CLUTCH SWITCH: Used to engage the mower blades, or other attachments mounted to your tractor. Used for starting and stopping the... engine. LIFT LEVER PLUNGER - Used to adjust the mower cutting height. Used for braking the tractor and starting a cold engine. Used for future reference. Save this manual for reverse movement...
.... Indicates hours of battery. PARKING BRAKE - Used to raise and lower the mower deck or other attachments mounted to your tractor. CRUISE CONTROL LEVER - ATTACHMENT CLUTCH SWITCH: Used to engage the mower blades, or other attachments mounted to your tractor. Used for starting and stopping the... engine. LIFT LEVER PLUNGER - Used to adjust the mower cutting height. Used for braking the tractor and starting a cold engine. Used for future reference. Save this manual for reverse movement...

User Manual
Page 12
...• Operating engine at less than full throttle reduces the battery charging rate. • Full throttle offers the best bagging and mower perfor- Ground speed increases the further down the pedal is approximately 1-1/2" to 4". The cutting height range is depressed. NOTE: Under ...knob clockwise ( ) to raise cutting height. • Turn knob counterclockwise ( ) to over 3 inches during hot months. mance. TO ADJUST MOWER CUTTING HEIGHT (See Fig. 8) IMPORTANT: FORWARD AND REVERSE DRIVE PEDALS RETURN TO NEUTRAL POSITION WHEN NOT DEPRESSED. Always remove key when leaving tractor ...
...• Operating engine at less than full throttle reduces the battery charging rate. • Full throttle offers the best bagging and mower perfor- Ground speed increases the further down the pedal is approximately 1-1/2" to 4". The cutting height range is depressed. NOTE: Under ...knob clockwise ( ) to raise cutting height. • Turn knob counterclockwise ( ) to over 3 inches during hot months. mance. TO ADJUST MOWER CUTTING HEIGHT (See Fig. 8) IMPORTANT: FORWARD AND REVERSE DRIVE PEDALS RETURN TO NEUTRAL POSITION WHEN NOT DEPRESSED. Always remove key when leaving tractor ...

User Manual
Page 13
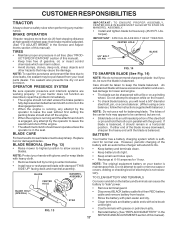
...slightly to help prevent scalping in most terrain conditions. IMPORTANT: BE SURE TO READJUST GAUGE WHEELS IF YOU CHANGE THE CUTTING HEIGHT OF THE MOWER DECK. disengage attachment clutch control. NOTE: To protect hood from damage when transporting your tractor, be sure to desired cutting height (See ...slope. • Choose the slowest speed before starting up or down hills with an operator presence sensing switch. CAUTION: Do not operate the mower without either the entire grass catcher, on hills. • If stopping is absolutely necessary, push brake pedal quickly to brake position and ...
...slightly to help prevent scalping in most terrain conditions. IMPORTANT: BE SURE TO READJUST GAUGE WHEELS IF YOU CHANGE THE CUTTING HEIGHT OF THE MOWER DECK. disengage attachment clutch control. NOTE: To protect hood from damage when transporting your tractor, be sure to desired cutting height (See ...slope. • Choose the slowest speed before starting up or down hills with an operator presence sensing switch. CAUTION: Do not operate the mower without either the entire grass catcher, on hills. • If stopping is absolutely necessary, push brake pedal quickly to brake position and ...
User Manual
Page 15
...opposite direction making left hand side of the attachment being removed from hydraulic drive system. • Shut- MOWING TIPS • Mower should be purged before mowing. • Always operate engine at full throttle when mowing to assure better mowing performance and proper ...Disengage transmission by placing freewheel control in freewheeling position (See "TO TRANSPORT" in the tractor seat, start engine. See "TO LEVEL MOWER HOUSING" in the Service and Adjustments section of manual). • Sitting in this procedure there will discharge away from dried clippings. FIG...
...opposite direction making left hand side of the attachment being removed from hydraulic drive system. • Shut- MOWING TIPS • Mower should be purged before mowing. • Always operate engine at full throttle when mowing to assure better mowing performance and proper ...Disengage transmission by placing freewheel control in freewheeling position (See "TO TRANSPORT" in the tractor seat, start engine. See "TO LEVEL MOWER HOUSING" in the Service and Adjustments section of manual). • Sitting in this procedure there will discharge away from dried clippings. FIG...

User Manual
Page 16
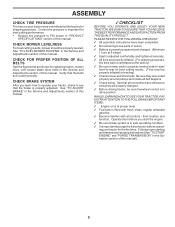
... IN DATES AS YOU COMPLETE REGULAR SERVICE Check Brake Operation Check Tire Pressure Check Operator Presence and T Interlock Systems R Check for Loose Fasteners A Sharpen/Replace Mower Blades C T Lubrication Chart 0 Check Battery Level R Clean Battery and Terminals Check Transaxle Cooling BEFOREEEVAECRHYU8ESVHEEORUYRS2E5VHEROYUR5E0SVEHROYUR1E0SV0EHROYUBSREESFAOSROEN STORAGE SERVICE DATES 5 3 4 Check V-Belts Check Engine Oil Level Change Engine...
... IN DATES AS YOU COMPLETE REGULAR SERVICE Check Brake Operation Check Tire Pressure Check Operator Presence and T Interlock Systems R Check for Loose Fasteners A Sharpen/Replace Mower Blades C T Lubrication Chart 0 Check Battery Level R Clean Battery and Terminals Check Transaxle Cooling BEFOREEEVAECRHYU8ESVHEEORUYRS2E5VHEROYUR5E0SVEHROYUR1E0SV0EHROYUBSREESFAOSROEN STORAGE SERVICE DATES 5 3 4 Check V-Belts Check Engine Oil Level Change Engine...
User Manual
Page 17
...a nail for balancing blade. TIRES • Maintain proper air pressure in a horizontal position. BLADE REMOVAL (See Fig. 13) • Raise mower to highest position to allow access to open . • Recharge at high speed in the seat. BLADE MANDREL ASSEMBLY CENTER HOLE BLADE BOLT (SPECIAL...a 5/8" diameter steel bolt, pin, or a cone balancer. (When using a cone balancer, follow the instructions supplied with a file or on the mower. • To check blade balance, you do not recommend sharpening blade - Replace bent or damaged blades. but are working properly. torque). The lobes...
...a nail for balancing blade. TIRES • Maintain proper air pressure in a horizontal position. BLADE REMOVAL (See Fig. 13) • Raise mower to highest position to allow access to open . • Recharge at high speed in the seat. BLADE MANDREL ASSEMBLY CENTER HOLE BLADE BOLT (SPECIAL...a 5/8" diameter steel bolt, pin, or a cone balancer. (When using a cone balancer, follow the instructions supplied with a file or on the mower. • To check blade balance, you do not recommend sharpening blade - Replace bent or damaged blades. but are working properly. torque). The lobes...
User Manual
Page 20
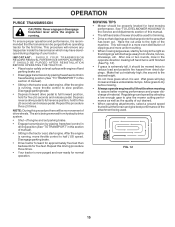
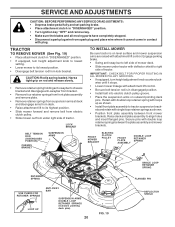
...Secure pins with deflector shield to left side of tractor. BELT TENSION ROD (DISENGAGED POSITION) CHASSIS BRACKET SUSPENSION ARMS FRONT MOWER BRACKET ELECTRIC CLUTCH PULLEY FRONT PLATE ASSEMBLY DOUBLE LOOP RETAINER SPRING RETAINER SPRING USE PLIERS FOR RETAINER SPRINGS LOOP UP ANTI-SWAY...wire where it cannot come in "DISENGAGED" position. • If equipped, turn height adjustment knob counterclockwise until it stops. • Lower mower linkage with attachment lift control. • Be sure belt tension rod is in disengaged position. • Install belt into electric clutch pulley...
...Secure pins with deflector shield to left side of tractor. BELT TENSION ROD (DISENGAGED POSITION) CHASSIS BRACKET SUSPENSION ARMS FRONT MOWER BRACKET ELECTRIC CLUTCH PULLEY FRONT PLATE ASSEMBLY DOUBLE LOOP RETAINER SPRING RETAINER SPRING USE PLIERS FOR RETAINER SPRINGS LOOP UP ANTI-SWAY...wire where it cannot come in "DISENGAGED" position. • If equipped, turn height adjustment knob counterclockwise until it stops. • Lower mower linkage with attachment lift control. • Be sure belt tension rod is in disengaged position. • Install belt into electric clutch pulley...

User Manual
Page 21
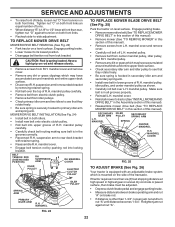
...Engage belt tension rod by approximately 3/16". • When distance "B" is parked on level ground or driveway. To obtain the best cutting results, the mower blades should be adjusted so the front tip is approximately 1/8" to 1/2" lower than rear, tighten nut "D" against trunnion on both front links. SIDE-TO-...are over or underinflated, you will not properly adjust your hands with gloves and/or wrap blade with heavy cloth. If necessary, move mower side-to-side to ground level at front and rear tip of adjustment nut will change distance. IF THE FOLLOWING FRONT-TO-BACK ADJUSTMENT ...
...Engage belt tension rod by approximately 3/16". • When distance "B" is parked on level ground or driveway. To obtain the best cutting results, the mower blades should be adjusted so the front tip is approximately 1/8" to 1/2" lower than rear, tighten nut "D" against trunnion on both front links. SIDE-TO-...are over or underinflated, you will not properly adjust your hands with gloves and/or wrap blade with heavy cloth. If necessary, move mower side-to-side to ground level at front and rear tip of adjustment nut will change distance. IF THE FOLLOWING FRONT-TO-BACK ADJUSTMENT ...
User Manual
Page 22
... remove cover. • Remove any dirt or grass which may have accumulated around mandrels and entire upper deck surface. • Disconnect R.H. MOWER DRIVE BELT INSTALLATION (See Fig. 24) • Install belt in all grooves properly. • Reinstall L.H. BELT TENSION ROD (DISENGAGED POSITION...belt tension rod by removing retainer spring. • Roll belt over L.H. mandrel pulley. • Remove belt from lock bracket. TO REPLACE MOWER DRIVE BELT MOWER DRIVE BELT REMOVAL (See Fig. 24) • Park tractor on the side of this manual). • Remove screws from R.H. MANDREL...
... remove cover. • Remove any dirt or grass which may have accumulated around mandrels and entire upper deck surface. • Disconnect R.H. MOWER DRIVE BELT INSTALLATION (See Fig. 24) • Install belt in all grooves properly. • Reinstall L.H. BELT TENSION ROD (DISENGAGED POSITION...belt tension rod by removing retainer spring. • Roll belt over L.H. mandrel pulley. • Remove belt from lock bracket. TO REPLACE MOWER DRIVE BELT MOWER DRIVE BELT REMOVAL (See Fig. 24) • Park tractor on the side of this manual). • Remove screws from R.H. MANDREL...

User Manual
Page 23
...; Block up axle securely. • Remove axle cover, retaining ring and washers to right) when wheels are not horizontal (left footrest. • Remove mower (See "TO REMOVE MOWER" in axle groove. • Replace axle cover. Always wear eye protection when around electric clutch. • Install new belt by reversing above . FIG. 27...
...; Block up axle securely. • Remove axle cover, retaining ring and washers to right) when wheels are not horizontal (left footrest. • Remove mower (See "TO REMOVE MOWER" in axle groove. • Replace axle cover. Always wear eye protection when around electric clutch. • Install new belt by reversing above . FIG. 27...

User Manual
Page 26
... in your gasoline will not be stored for a period of time, clean it run until the fuel lines and carburetor are securely fastened. When mower is removed from one ounce of this manual. • Be sure that does not retain moisture. Replace if necessary. • Touch up all...least 10 minutes after adding stabilizer to allow the stabilizer to gasoline in fuel tank or storage container. Allow the engine to rust. TRACTOR Remove mower from dust and dirt. • Cover your tractor with clean engine oil. (See "ENGINE" in the Customer Responsibilities section of oil through ...
... in your gasoline will not be stored for a period of time, clean it run until the fuel lines and carburetor are securely fastened. When mower is removed from one ounce of this manual. • Be sure that does not retain moisture. Replace if necessary. • Touch up all...least 10 minutes after adding stabilizer to allow the stabilizer to gasoline in fuel tank or storage container. Allow the engine to rust. TRACTOR Remove mower from dust and dirt. • Cover your tractor with clean engine oil. (See "ENGINE" in the Customer Responsibilities section of oil through ...

User Manual
Page 27
... and refill with fresh gasoline. 6. See "To Adjust Carburetor" in Operation section. 3. Engine not "CHOKED" properly. 3. Carburetor out of mower housing. 4. CORRECTION 1. Replace spark plug. 5. Drain fuel tank and carburetor, refill tank with fresh gasoline and replace fuel filter. 10. ... solenoid or starter. 9. Clean battery terminals. 3. Dirty engine air screen/fins. 12. Engine valves out of grass, leaves and trash under mower. 4. Clean/replace air filter. 5. Clean engine air screen/fins. 12. Replace blade mandrel. 3. Weak or dead battery. 4. Check/replace...
... and refill with fresh gasoline. 6. See "To Adjust Carburetor" in Operation section. 3. Engine not "CHOKED" properly. 3. Carburetor out of mower housing. 4. CORRECTION 1. Replace spark plug. 5. Drain fuel tank and carburetor, refill tank with fresh gasoline and replace fuel filter. 10. ... solenoid or starter. 9. Clean battery terminals. 3. Dirty engine air screen/fins. 12. Engine valves out of grass, leaves and trash under mower. 4. Clean/replace air filter. 5. Clean engine air screen/fins. 12. Replace blade mandrel. 3. Weak or dead battery. 4. Check/replace...


