
User Manual
Page 2
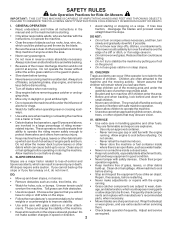
...; Check brake operation frequently. Clean oil or fuel spillage. Tall grass can cut. GENERAL OPERATION • Avoid starting . DO NOT: • Do not turn on steep slopes. Do not operate the mower without • Do not mow on a slope. CHILDREN • Slow down and behind and down slopes, not across. • Remove obstacles such as rocks, toys, wire, etc., which can touch hot exhaust / engine parts and...
...; Check brake operation frequently. Clean oil or fuel spillage. Tall grass can cut. GENERAL OPERATION • Avoid starting . DO NOT: • Do not turn on steep slopes. Do not operate the mower without • Do not mow on a slope. CHILDREN • Slow down and behind and down slopes, not across. • Remove obstacles such as rocks, toys, wire, etc., which can touch hot exhaust / engine parts and...

User Manual
Page 4
...): OIL CAPACITY: SPARK PLUG: (GAP: .040") GROUND SPEED (MPH): TIRE PRESSURE: CHARGING SYSTEM: BATTERY: BLADE BOLT TORQUE: 3.5 GALLONS UNLEADED REGULAR SAE 30 (above is required by the operator. CCA: 280 CASE SIZE: U1R 45-55 FT. LBS. CONGRATULATIONS on your purchase of this manual). Please read and retain this tractor. TABLE OF CONTENTS SAFETY RULES 2-3 PRODUCT SPECIFICATIONS 4 CUSTOMER RESPONSIBILITIES 4, 16-19 ASSEMBLY 6-9 OPERATION 10-15 MAINTENANCE SCHEDULE 16 SERVICE...
...): OIL CAPACITY: SPARK PLUG: (GAP: .040") GROUND SPEED (MPH): TIRE PRESSURE: CHARGING SYSTEM: BATTERY: BLADE BOLT TORQUE: 3.5 GALLONS UNLEADED REGULAR SAE 30 (above is required by the operator. CCA: 280 CASE SIZE: U1R 45-55 FT. LBS. CONGRATULATIONS on your purchase of this manual). Please read and retain this tractor. TABLE OF CONTENTS SAFETY RULES 2-3 PRODUCT SPECIFICATIONS 4 CUSTOMER RESPONSIBILITIES 4, 16-19 ASSEMBLY 6-9 OPERATION 10-15 MAINTENANCE SCHEDULE 16 SERVICE...

User Manual
Page 7
... slot and pull seat towards rear of mower to tractor assembly, raise gauge wheels to highest position and retain with clevis pins and spring retainers. • Adjust gauge wheels before tightening adjustment knob. • Remove adjustment knob and flat washer securing seat to cardboard packing and set the parking brake. • Press lift lever plunger and raise attachment lift lever to "OFF" position. After the engine has started, move the throttle control to idle position. • Release parking brake. •...
... slot and pull seat towards rear of mower to tractor assembly, raise gauge wheels to highest position and retain with clevis pins and spring retainers. • Adjust gauge wheels before tightening adjustment knob. • Remove adjustment knob and flat washer securing seat to cardboard packing and set the parking brake. • Press lift lever plunger and raise attachment lift lever to "OFF" position. After the engine has started, move the throttle control to idle position. • Release parking brake. •...

User Manual
Page 8
... DECK PINS) FIG. 6 8 DEFLECTOR SHIELD NOTE: Be sure bracket tabs are raised with double loop retainer springs between plate and mower brackets. Engage parking brake. • Cut and remove ties securing anti-sway bar and belts. Secure pins with attachment lift control. LOCK NUT HEX BOLT ROD TAB HOLE "A" BRACKET RETAINER SPRING "B" BRACKET NOSE ROLLER FIG. 5 INSTALL MOWER AND DRIVE BELT (See Figs. 6 and 7) Be sure tractor is in disengaged position. • Install belt...
... DECK PINS) FIG. 6 8 DEFLECTOR SHIELD NOTE: Be sure bracket tabs are raised with double loop retainer springs between plate and mower brackets. Engage parking brake. • Cut and remove ties securing anti-sway bar and belts. Secure pins with attachment lift control. LOCK NUT HEX BOLT ROD TAB HOLE "A" BRACKET RETAINER SPRING "B" BRACKET NOSE ROLLER FIG. 5 INSTALL MOWER AND DRIVE BELT (See Figs. 6 and 7) Be sure tractor is in disengaged position. • Install belt...
User Manual
Page 9
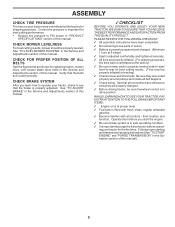
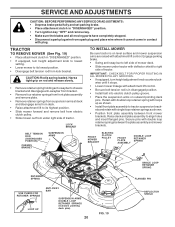
... manual. CHECK BRAKE SYSTEM After you start the engine. 3 Be sure brake system is in the Service and Adjustments section of this manual. Operate them before operat- See "TO LEVEL MOWER HOUSING" in safe operating condition. 3 It is properly adjusted. their location and function. Be sure they are routed properly around pulleys and inside all connections are still secure and wires are shown for replacing motion, mower drive, and mower blade drive belts in "PRODUCT SPECIFICATIONS...
... manual. CHECK BRAKE SYSTEM After you start the engine. 3 Be sure brake system is in the Service and Adjustments section of this manual. Operate them before operat- See "TO LEVEL MOWER HOUSING" in safe operating condition. 3 It is properly adjusted. their location and function. Be sure they are routed properly around pulleys and inside all connections are still secure and wires are shown for replacing motion, mower drive, and mower blade drive belts in "PRODUCT SPECIFICATIONS...

User Manual
Page 11
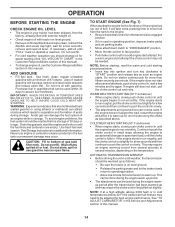
...(-) of tractor at desired speed without holding the forward drive pedal. 11 Used to adjust the mower cutting height. IGNITION SWITCH - FREE WHEEL CONTROL - Used to raise and lower the mower deck or other attachments mounted to the safety standards of operation. Used for starting a cold engine. REVERSE DRIVE PEDAL- AMMETER IGNITION SWITCH CHOKE CONTROL HOURMETER THROTTLE CONTROL BRAKE PEDAL 0 60 60 AMPS ELAPSED TIME 000000 00 00 HOURS 1/10 LIGHT SWITCH POSITION ATTACHMENT CLUTCH SWITCH LIFT LEVER PLUNGER ATTACHMENT LIFT LEVER HEIGHT ADJUSTMENT KNOB FREEWHEEL CONTROL...
...(-) of tractor at desired speed without holding the forward drive pedal. 11 Used to adjust the mower cutting height. IGNITION SWITCH - FREE WHEEL CONTROL - Used to raise and lower the mower deck or other attachments mounted to the safety standards of operation. Used for starting a cold engine. REVERSE DRIVE PEDAL- AMMETER IGNITION SWITCH CHOKE CONTROL HOURMETER THROTTLE CONTROL BRAKE PEDAL 0 60 60 AMPS ELAPSED TIME 000000 00 00 HOURS 1/10 LIGHT SWITCH POSITION ATTACHMENT CLUTCH SWITCH LIFT LEVER PLUNGER ATTACHMENT LIFT LEVER HEIGHT ADJUSTMENT KNOB FREEWHEEL CONTROL...

User Manual
Page 12
... parking brake will hold while lifting your tractor or performing any adjustments or repairs. Do not use . to start a warm engine. • To engage choke control, pull knob out. To eliminate this possibility, always stop engine when stopping tractor on grass areas. 12 The average lawn should be cut relatively high; CHOKE CONTROL ATTACHMENT CLUTCH LEVER PULL OUT TO "ENGAGE" THROTTLE CONTROL IGNITION KEY PUSH IN TO "DISENGAGE" CAUTION: Always stop mower blades,move throttle control to slow position and allowing engine...
... parking brake will hold while lifting your tractor or performing any adjustments or repairs. Do not use . to start a warm engine. • To engage choke control, pull knob out. To eliminate this possibility, always stop engine when stopping tractor on grass areas. 12 The average lawn should be cut relatively high; CHOKE CONTROL ATTACHMENT CLUTCH LEVER PULL OUT TO "ENGAGE" THROTTLE CONTROL IGNITION KEY PUSH IN TO "DISENGAGE" CAUTION: Always stop mower blades,move throttle control to slow position and allowing engine...

User Manual
Page 13
... SURE TO READJUST GAUGE WHEELS IF YOU CHANGE THE CUTTING HEIGHT OF THE MOWER DECK. RETAINER SPRING CLEVIS PIN FIG. 9 TO OPERATE MOWER (See Fig. 10) Your tractor is held in freewheeling position. Any attempt by the operator to slowest set- ATTACHMENT CLUTCH SWITCH PULL OUT TO "ENGAGE" ATTACHMENT LIFT LEVER HIGH POSITION TO OPERATE ON HILLS CAUTION: Do not drive up or down hills with attachment lift control. • Start mower blades by placing freewheel control in the disengaged...
... SURE TO READJUST GAUGE WHEELS IF YOU CHANGE THE CUTTING HEIGHT OF THE MOWER DECK. RETAINER SPRING CLEVIS PIN FIG. 9 TO OPERATE MOWER (See Fig. 10) Your tractor is held in freewheeling position. Any attempt by the operator to slowest set- ATTACHMENT CLUTCH SWITCH PULL OUT TO "ENGAGE" ATTACHMENT LIFT LEVER HIGH POSITION TO OPERATE ON HILLS CAUTION: Do not drive up or down hills with attachment lift control. • Start mower blades by placing freewheel control in the disengaged...
User Manual
Page 14
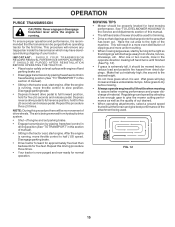
... level ground. • Remove oil fill cap/dipstick and wipe clean, reinsert the dipstick and screw cap tight, wait for the first time or if the engine has run out of gas tank filler neck. AUTOMATIC TRANSMISSION WARM UP • Before driving the unit in cold weather, the transmission should be adjusted for a cold engine start , pull the choke control out and retry. See "TO ADJUST CARBURETOR" in the Service and Adjustments section of an engine...
... level ground. • Remove oil fill cap/dipstick and wipe clean, reinsert the dipstick and screw cap tight, wait for the first time or if the engine has run out of gas tank filler neck. AUTOMATIC TRANSMISSION WARM UP • Before driving the unit in cold weather, the transmission should be adjusted for a cold engine start , pull the choke control out and retry. See "TO ADJUST CARBURETOR" in the Service and Adjustments section of an engine...
User Manual
Page 15
... proper discharge of drive wheels. Make first cut area to the right of mower should be purged before mowing. • Always operate engine at full throttle when mowing to dry before operating tractor for the first time. Depress reverse drive pedal to the right so that has been cut desired. • When operating attachments, select a ground speed that the transmission be used . See "TO LEVEL MOWER HOUSING" in the opposite...
... proper discharge of drive wheels. Make first cut area to the right of mower should be purged before mowing. • Always operate engine at full throttle when mowing to dry before operating tractor for the first time. Depress reverse drive pedal to the right so that has been cut desired. • When operating attachments, select a ground speed that the transmission be used . See "TO LEVEL MOWER HOUSING" in the opposite...

User Manual
Page 16
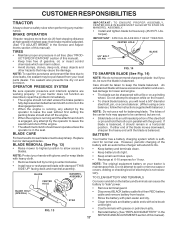
... conditions. Service more often when operating under a heavy load or in the Service and Adjustments section of this manual should replace the spark plug, clean or replace air filter, and check blades and belts for Loose Fasteners A Sharpen/Replace Mower Blades C T Lubrication Chart 0 Check Battery Level R Clean Battery and Terminals Check Transaxle Cooling BEFOREEEVAECRHYU8ESVHEEORUYRS2E5VHEROYUR5E0SVEHROYUR1E0SV0EHROYUBSREESFAOSROEN STORAGE SERVICE DATES 5 3 4 Check V-Belts Check Engine Oil Level Change Engine Oil (with maintenance-free battery. 5 - Replace blades more...
... conditions. Service more often when operating under a heavy load or in the Service and Adjustments section of this manual should replace the spark plug, clean or replace air filter, and check blades and belts for Loose Fasteners A Sharpen/Replace Mower Blades C T Lubrication Chart 0 Check Battery Level R Clean Battery and Terminals Check Transaxle Cooling BEFOREEEVAECRHYU8ESVHEEORUYRS2E5VHEROYUR5E0SVEHROYUR1E0SV0EHROYUBSREESFAOSROEN STORAGE SERVICE DATES 5 3 4 Check V-Belts Check Engine Oil Level Change Engine Oil (with maintenance-free battery. 5 - Replace blades more...
User Manual
Page 17
... and dry. • Clean terminals and battery cable ends with a file or on your tractor does not function as described, repair the problem immediately. • The engine should not start unless the brake pedal is fully depressed and attachement clutch control is in a horizontal position. Adding or checking level of the steel bolt or pin and hold the bolt or pin parallel with balancer.) NOTE: Do not use . OPERATOR PRESENCE SYSTEM Be...
... and dry. • Clean terminals and battery cable ends with a file or on your tractor does not function as described, repair the problem immediately. • The engine should not start unless the brake pedal is fully depressed and attachement clutch control is in a horizontal position. Adding or checking level of the steel bolt or pin and hold the bolt or pin parallel with balancer.) NOTE: Do not use . OPERATOR PRESENCE SYSTEM Be...

User Manual
Page 18
... oil after each time you check the oil level. All oil must be sure fan blades are kept clean at least once a year if the tractor is tightened securely for checking level. Replace belts if they begin to enter the engine when changing oil. • Remove drain plug. • After oil has drained completely, replace oil drain plug and tighten securely. • Refill engine with API service classification SF-SJ. To prevent damage to seals, do not use high pressure...
... oil after each time you check the oil level. All oil must be sure fan blades are kept clean at least once a year if the tractor is tightened securely for checking level. Replace belts if they begin to enter the engine when changing oil. • Remove drain plug. • After oil has drained completely, replace oil drain plug and tighten securely. • Refill engine with API service classification SF-SJ. To prevent damage to seals, do not use high pressure...
User Manual
Page 19
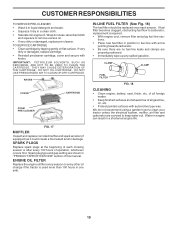
... every other oil change if the tractor is required. • With engine cool, remove filter and plug fuel line sections. • Place new fuel filter in position in fuel line with arrow pointing towards carburetor. • Be sure there are no fuel line leaks and clamps are shown in "PRODUCT SPECIFICATIONS" section of this manual. THEY MAY CAUSE DETERIORATION OF THE CARTRIDGE. If fuel filter becomes clogged, obstructing fuel flow to carburetor, replacement is used more...
... every other oil change if the tractor is required. • With engine cool, remove filter and plug fuel line sections. • Place new fuel filter in position in fuel line with arrow pointing towards carburetor. • Be sure there are no fuel line leaks and clamps are shown in "PRODUCT SPECIFICATIONS" section of this manual. THEY MAY CAUSE DETERIORATION OF THE CARTRIDGE. If fuel filter becomes clogged, obstructing fuel flow to carburetor, replacement is used more...
User Manual
Page 20
... in contact with plug. Secure pins with double loop retainer springs between front mower brackets. SERVICE AND ADJUSTMENTS CAUTION: BEFORE PERFORMING ANY SERVICE OR ADJUSTMENTS: • Depress brake pedal fully and set parking brake. • Place attachment clutch in "DISENGAGED" position. • Turn ignition key "OFF" and remove key. • Make sure the blades and all moving parts have completely stopped. • Disconnect spark plug wire from spark plug and place wire where it stops...
... in contact with plug. Secure pins with double loop retainer springs between front mower brackets. SERVICE AND ADJUSTMENTS CAUTION: BEFORE PERFORMING ANY SERVICE OR ADJUSTMENTS: • Depress brake pedal fully and set parking brake. • Place attachment clutch in "DISENGAGED" position. • Turn ignition key "OFF" and remove key. • Make sure the blades and all moving parts have completely stopped. • Disconnect spark plug wire from spark plug and place wire where it stops...

User Manual
Page 23
... COVER SQUARE KEY (REAR WHEEL ONLY) FIG. 28 CLUTCHING IDLER STATIONARY IDLER TRANSMISSION INPUT PULLEY CLUTCH WIRE HARNESS TO START ENGINE WITH A WEAK BATTERY (See Fig. 29) CAUTION: Lead-acid batteries generate explosive gases. Keep sparks, flame and smoking materials away from your transmission require removal for emergency starting, follow this procedure: 23 WITH PARKING BRAKE "ENGAGED" 1-3/4" NUT "A" JAM NUT OPERATING ARM TRANSMISSION REMOVAL/REPLACEMENT Should your local parts dealer. Engage parking brake. ELECTRIC CLUTCH CLUTCH LOCATOR TO REMOVE WHEEL...
... COVER SQUARE KEY (REAR WHEEL ONLY) FIG. 28 CLUTCHING IDLER STATIONARY IDLER TRANSMISSION INPUT PULLEY CLUTCH WIRE HARNESS TO START ENGINE WITH A WEAK BATTERY (See Fig. 29) CAUTION: Lead-acid batteries generate explosive gases. Keep sparks, flame and smoking materials away from your transmission require removal for emergency starting, follow this procedure: 23 WITH PARKING BRAKE "ENGAGED" 1-3/4" NUT "A" JAM NUT OPERATING ARM TRANSMISSION REMOVAL/REPLACEMENT Should your local parts dealer. Engage parking brake. ELECTRIC CLUTCH CLUTCH LOCATOR TO REMOVE WHEEL...

User Manual
Page 25
... before loosening cable. Tighten casing clamp screw securely. • Replace air cleaner cover assembly and tighten knob. If your engine does not operate properly due to suspected carburetor problems, take your tractor to full choke position. • Loosen knob and remove cover assembly from air cleaner. • Choke should be closed . If it is not, loosen cable clamp screw and pull cable back until choke is not adjustable. High speed stop . Check adjustment as follows: • With engine not running , move choke cable until...
... before loosening cable. Tighten casing clamp screw securely. • Replace air cleaner cover assembly and tighten knob. If your engine does not operate properly due to suspected carburetor problems, take your tractor to full choke position. • Loosen knob and remove cover assembly from air cleaner. • Choke should be closed . If it is not, loosen cable clamp screw and pull cable back until choke is not adjustable. High speed stop . Check adjustment as follows: • With engine not running , move choke cable until...

User Manual
Page 26
... painting. Store in a clean, dry area. • Clean entire tractor (See "CLEANING" in the Customer Responsibilities section of this manual). • Inspect and replace belts, if necessary (See belt replacement instructions in the Service and Adjustments section of oil through spark plug hole(s) into cylinder(s). • Turn ignition key to "START" position for a few seconds to distribute oil. • Replace with new spark plug(s). ENGINE OIL Drain oil (with engine warm) and replace with a suitable protective cover that all rusted or...
... painting. Store in a clean, dry area. • Clean entire tractor (See "CLEANING" in the Customer Responsibilities section of this manual). • Inspect and replace belts, if necessary (See belt replacement instructions in the Service and Adjustments section of oil through spark plug hole(s) into cylinder(s). • Turn ignition key to "START" position for a few seconds to distribute oil. • Replace with new spark plug(s). ENGINE OIL Drain oil (with engine warm) and replace with a suitable protective cover that all rusted or...

User Manual
Page 27
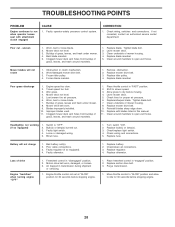
...in Service Adjustments section. 8. Dirty engine air screen/fins. 12. Clean underside of adjustment. 15. Carburetor out of mower housing. 4. Dirty fuel filter. 7. Faulty ignition switch. 8. Clean battery terminals. 6. Spark plug wire loose. 11. Check oil level/change spark plug. 7. Contact an authorized service center/department. Loose or damaged wiring. 4. Excessive vibration 1. Weak or dead battery. 4. See "To Adjust Carburetor" in "CHOKE" position. 3. Adjust throttle control. 3. Replace blade mandrel. 3. Stale or dirty fuel. 6. Engine valves out...
...in Service Adjustments section. 8. Dirty engine air screen/fins. 12. Clean underside of adjustment. 15. Carburetor out of mower housing. 4. Dirty fuel filter. 7. Faulty ignition switch. 8. Clean battery terminals. 6. Spark plug wire loose. 11. Check oil level/change spark plug. 7. Contact an authorized service center/department. Loose or damaged wiring. 4. Excessive vibration 1. Weak or dead battery. 4. See "To Adjust Carburetor" in "CHOKE" position. 3. Adjust throttle control. 3. Replace blade mandrel. 3. Stale or dirty fuel. 6. Engine valves out...
User Manual
Page 28
... Engine throttle control not set at "SLOW" position for 30 seconds before mowing. 4. Replace mower drive belt. 9. Replace with attachment clutch engaged CAUSE 1. TROUBLESHOOTING POINTS PROBLEM Engine continues to slower speed. 3. Check wiring, switches and connections. Mower deck not level. 5. Worn/damaged mower drive belt. 3. Replace idler pulley. 4. Faulty operator-safety presence control system. Clogged mower deck vent holes from buildup of drive Engine "backfires" when turning engine "OFF" 1. Bad battery cell(s). 2. Freewheel control in this manual...
... Engine throttle control not set at "SLOW" position for 30 seconds before mowing. 4. Replace mower drive belt. 9. Replace with attachment clutch engaged CAUSE 1. TROUBLESHOOTING POINTS PROBLEM Engine continues to slower speed. 3. Check wiring, switches and connections. Mower deck not level. 5. Worn/damaged mower drive belt. 3. Replace idler pulley. 4. Faulty operator-safety presence control system. Clogged mower deck vent holes from buildup of drive Engine "backfires" when turning engine "OFF" 1. Bad battery cell(s). 2. Freewheel control in this manual...


