
User Manual
Page 2
... with the engine running. • Grass catcher components are subject to the • Never leave a running . Clean any oil - All slopes require extra caution. If you cannot back up the slope or if you last saw them . • Check brake operation frequently. Check their ability to operate the riding mower safely enough to stabilize the machine by the blade. Do not make adjustments or repairs with safety...
... with the engine running. • Grass catcher components are subject to the • Never leave a running . Clean any oil - All slopes require extra caution. If you cannot back up the slope or if you last saw them . • Check brake operation frequently. Check their ability to operate the riding mower safely enough to stabilize the machine by the blade. Do not make adjustments or repairs with safety...
User Manual
Page 4
... any problem you the best possible dependability and performance. PRODUCT SPECIFICATIONS GASOLINE CAPACITY AND TYPE: OIL TYPE (API-SF-SJ): OIL CAPACITY: SPARK PLUG: (GAP: .040") GROUND SPEED (MPH): TIRE PRESSURE: CHARGING SYSTEM: BATTERY: BLADE BOLT TORQUE: 3.5 GALLONS UNLEADED REGULAR SAE 30 (above is required by the operator. Always observe the "SAFETY RULES". CCA: 280 CASE SIZE: U1R 45-55 FT. CONGRATULATIONS on your tractor. • Follow the instructions under...
... any problem you the best possible dependability and performance. PRODUCT SPECIFICATIONS GASOLINE CAPACITY AND TYPE: OIL TYPE (API-SF-SJ): OIL CAPACITY: SPARK PLUG: (GAP: .040") GROUND SPEED (MPH): TIRE PRESSURE: CHARGING SYSTEM: BATTERY: BLADE BOLT TORQUE: 3.5 GALLONS UNLEADED REGULAR SAE 30 (above is required by the operator. Always observe the "SAFETY RULES". CCA: 280 CASE SIZE: U1R 45-55 FT. CONGRATULATIONS on your tractor. • Follow the instructions under...

User Manual
Page 7
... assembly steps have been completed. • Check engine oil level and fill fuel tank with gasoline • Place freewheel control in "transmission engaged" position. • Sit on top. After the engine has started, move the throttle control to highest position and retain with the instructions that gauge wheel bar aligning holes are designed to press clutch/brake pedal all the way down into operating position and sit on seat pan so head of shoulder bolt...
... assembly steps have been completed. • Check engine oil level and fill fuel tank with gasoline • Place freewheel control in "transmission engaged" position. • Sit on top. After the engine has started, move the throttle control to highest position and retain with the instructions that gauge wheel bar aligning holes are designed to press clutch/brake pedal all the way down into operating position and sit on seat pan so head of shoulder bolt...

User Manual
Page 8
... tractor. Tighten securely. LOCK NUT HEX BOLT ROD TAB HOLE "A" BRACKET RETAINER SPRING "B" BRACKET NOSE ROLLER FIG. 5 INSTALL MOWER AND DRIVE BELT (See Figs. 6 and 7) Be sure tractor is on rod and engage slowly. •. Engage parking brake. • Cut and remove ties securing anti-sway bar and belts. Secure pins with notch on outward pointing deck pins. IMPORTANT: Check belt for proper routing in all mower pulley grooves. Swing anti-sway bar...
... tractor. Tighten securely. LOCK NUT HEX BOLT ROD TAB HOLE "A" BRACKET RETAINER SPRING "B" BRACKET NOSE ROLLER FIG. 5 INSTALL MOWER AND DRIVE BELT (See Figs. 6 and 7) Be sure tractor is on rod and engage slowly. •. Engage parking brake. • Cut and remove ties securing anti-sway bar and belts. Secure pins with notch on outward pointing deck pins. IMPORTANT: Check belt for proper routing in all mower pulley grooves. Swing anti-sway bar...
User Manual
Page 9
... tire pressure to operate your tractor for shipping purposes. PLEASE REVIEW THE FOLLOWING CHECKLIST: 3 All assembly instructions have been completed. 3 No remaining loose parts in "PRODUCT SPECIFICATIONS" section of this manual). 9 CHECK MOWER LEVELNESS For best cutting results, mower should be sure freewheel control is properly adjusted. See "TO ADJUST BRAKE" in the Operation section of this manual. Follow proper starting and transmission purging instructions (See "TO START ENGINE" and "PURGE TRANSMISSION" in the Service and Adjustments section...
... tire pressure to operate your tractor for shipping purposes. PLEASE REVIEW THE FOLLOWING CHECKLIST: 3 All assembly instructions have been completed. 3 No remaining loose parts in "PRODUCT SPECIFICATIONS" section of this manual). 9 CHECK MOWER LEVELNESS For best cutting results, mower should be sure freewheel control is properly adjusted. See "TO ADJUST BRAKE" in the Operation section of this manual. Follow proper starting and transmission purging instructions (See "TO START ENGINE" and "PURGE TRANSMISSION" in the Service and Adjustments section...
User Manual
Page 11
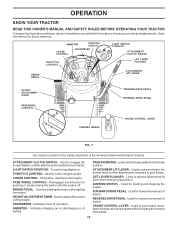
...AMMETER IGNITION SWITCH CHOKE CONTROL HOURMETER THROTTLE CONTROL BRAKE PEDAL 0 60 60 AMPS ELAPSED TIME 000000 00 00 HOURS 1/10 LIGHT SWITCH POSITION ATTACHMENT CLUTCH SWITCH LIFT LEVER PLUNGER ATTACHMENT LIFT LEVER HEIGHT ADJUSTMENT KNOB FREEWHEEL CONTROL PARKING BRAKE REVERSE DRIVE PEDAL FORWARD DRIVE PEDAL CRUISE CONTROL LEVER FIG. 7 Our tractors conform to control engine speed. Used to adjust the mower cutting height. Used to release attachment lift lever when changing its position. AMMETER - FREE WHEEL CONTROL - HOURMETER - OPERATION KNOW YOUR TRACTOR...
...AMMETER IGNITION SWITCH CHOKE CONTROL HOURMETER THROTTLE CONTROL BRAKE PEDAL 0 60 60 AMPS ELAPSED TIME 000000 00 00 HOURS 1/10 LIGHT SWITCH POSITION ATTACHMENT CLUTCH SWITCH LIFT LEVER PLUNGER ATTACHMENT LIFT LEVER HEIGHT ADJUSTMENT KNOB FREEWHEEL CONTROL PARKING BRAKE REVERSE DRIVE PEDAL FORWARD DRIVE PEDAL CRUISE CONTROL LEVER FIG. 7 Our tractors conform to control engine speed. Used to adjust the mower cutting height. Used to release attachment lift lever when changing its position. AMMETER - FREE WHEEL CONTROL - HOURMETER - OPERATION KNOW YOUR TRACTOR...

User Manual
Page 12
... cruise control lever. • To stop tractor completely, as described above, before stopping may vary depending upon soil conditions, height of grass and types of grass being mowed. • Never use . CHOKE CONTROL ATTACHMENT CLUTCH LEVER PULL OUT TO "ENGAGE" THROTTLE CONTROL IGNITION KEY PUSH IN TO "DISENGAGE" CAUTION: Always stop mower blades,move throttle control to slow position and allowing engine to disengage. For best cutting performance, grass over 6 inches in "ENGAGED" position and release pressure...
... cruise control lever. • To stop tractor completely, as described above, before stopping may vary depending upon soil conditions, height of grass and types of grass being mowed. • Never use . CHOKE CONTROL ATTACHMENT CLUTCH LEVER PULL OUT TO "ENGAGE" THROTTLE CONTROL IGNITION KEY PUSH IN TO "DISENGAGE" CAUTION: Always stop mower blades,move throttle control to slow position and allowing engine to disengage. For best cutting performance, grass over 6 inches in "ENGAGED" position and release pressure...

User Manual
Page 13
.... • Replace retainer spring into the slot and release so it is equipped with attachment lift control. • Pull freewheel control out and into clevis pin. • Be sure all turns slowly. Free wheel control is located at the desired cutting height in bracket and gauge wheel bar and insert clevis pin. Use an appropriate means of tying hood to align holes in operating position. NOTE:Adjust gauge wheels with tractor on mowers so equipped...
.... • Replace retainer spring into the slot and release so it is equipped with attachment lift control. • Pull freewheel control out and into clevis pin. • Be sure all turns slowly. Free wheel control is located at the desired cutting height in bracket and gauge wheel bar and insert clevis pin. Use an appropriate means of tying hood to align holes in operating position. NOTE:Adjust gauge wheels with tractor on mowers so equipped...
User Manual
Page 14
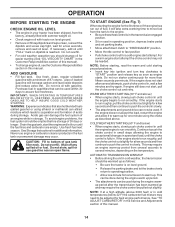
... this manual. 14 OPERATION BEFORE STARTING THE ENGINE CHECK ENGINE OIL LEVEL • The engine in your tractor has been shipped, from the tank to the engine. • Be sure freewheel control is in the transmission engaged position. • Sit on seat in operating position, depress brake pedal and set parking brake. • Move attachment clutch to "DISENGAGED" position. • Move throttle control to fast position • Pull choke control out for a cold engine start attempt. If necessary, add oil until the engine...
... this manual. 14 OPERATION BEFORE STARTING THE ENGINE CHECK ENGINE OIL LEVEL • The engine in your tractor has been shipped, from the tank to the engine. • Be sure freewheel control is in the transmission engaged position. • Sit on seat in operating position, depress brake pedal and set parking brake. • Move attachment clutch to "DISENGAGED" position. • Move throttle control to fast position • Pull choke control out for a cold engine start attempt. If necessary, add oil until the engine...

User Manual
Page 15
... speed that the transmission be used . IMPORTANT: SHOULD YOUR TRANSMISSION REQUIRE REMOVAL FOR SERVICE OR REPLACEMENT, IT SHOULD BE PURGED AFTER REINSTALLATION BEFORE OPERATING THE TRACTOR. • Place tractor safely on level surface with engine off engine and set . • Disengage transmission by turning to reduce load and possible fire hazard from dried clippings. Have the cut relatively high; Wet grass will suit the terrain and give the mower cutting performance...
... speed that the transmission be used . IMPORTANT: SHOULD YOUR TRANSMISSION REQUIRE REMOVAL FOR SERVICE OR REPLACEMENT, IT SHOULD BE PURGED AFTER REINSTALLATION BEFORE OPERATING THE TRACTOR. • Place tractor safely on level surface with engine off engine and set . • Disengage transmission by turning to reduce load and possible fire hazard from dried clippings. Have the cut relatively high; Wet grass will suit the terrain and give the mower cutting performance...

User Manual
Page 16
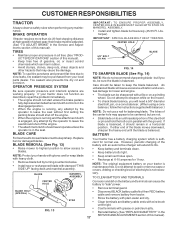
... USE • Check engine oil level. • Check brake operation. • Check tire pressure. • Check operator presence and interlock systems for proper operation. • Check for Loose Fasteners A Sharpen/Replace Mower Blades C T Lubrication Chart 0 Check Battery Level R Clean Battery and Terminals Check Transaxle Cooling BEFOREEEVAECRHYU8ESVHEEORUYRS2E5VHEROYUR5E0SVEHROYUR1E0SV0EHROYUBSREESFAOSROEN STORAGE SERVICE DATES 5 3 4 Check V-Belts Check Engine Oil Level Change Engine Oil (with maintenance-free battery. 5 - GENERAL RECOMMENDATIONS 2 3 - A new spark...
... USE • Check engine oil level. • Check brake operation. • Check tire pressure. • Check operator presence and interlock systems for proper operation. • Check for Loose Fasteners A Sharpen/Replace Mower Blades C T Lubrication Chart 0 Check Battery Level R Clean Battery and Terminals Check Transaxle Cooling BEFOREEEVAECRHYU8ESVHEEORUYRS2E5VHEROYUR5E0SVEHROYUR1E0SV0EHROYUBSREESFAOSROEN STORAGE SERVICE DATES 5 3 4 Check V-Belts Check Engine Oil Level Change Engine Oil (with maintenance-free battery. 5 - GENERAL RECOMMENDATIONS 2 3 - A new spark...
User Manual
Page 17
... problem immediately. • The engine should not start unless the brake pedal is fully depressed and attachement clutch control is in the disengaged position. • When the engine is running and the attachment clutch is in highest gear, then brake must be taken to "leak" power. • Remove terminal guard. • Disconnect BLACK battery cable first then RED battery cable and remove battery from your tractor is sufficient for normal use a nail for 1 hour. BLADE MANDREL ASSEMBLY...
... problem immediately. • The engine should not start unless the brake pedal is fully depressed and attachement clutch control is in the disengaged position. • When the engine is running and the attachment clutch is in highest gear, then brake must be taken to "leak" power. • Remove terminal guard. • Disconnect BLACK battery cable first then RED battery cable and remove battery from your tractor is sufficient for normal use a nail for 1 hour. BLADE MANDREL ASSEMBLY...

User Manual
Page 18
... grass screen, dirty or plugged cooling fins, and/or cooling shrouds removed will drain more often under dusty conditions. • Remove knobs and cover. 18 Every 100 hours of the engine are reinstalled. Clean the foam pre-cleaner after each time you check the oil level. CUSTOMER RESPONSIBILITIES V-BELTS Check V-belts for checking level. TRANSAXLE COOLING The transmission fan and cooling fins should be sure fan blades are not adjustable. TRANSAXLE PUMP FLUID...
... grass screen, dirty or plugged cooling fins, and/or cooling shrouds removed will drain more often under dusty conditions. • Remove knobs and cover. 18 Every 100 hours of the engine are reinstalled. Clean the foam pre-cleaner after each time you check the oil level. CUSTOMER RESPONSIBILITIES V-BELTS Check V-belts for checking level. TRANSAXLE COOLING The transmission fan and cooling fins should be sure fan blades are not adjustable. TRANSAXLE PUMP FLUID...

User Manual
Page 19
... SPECIFICATIONS" section of each season. of all foreign matter. • Keep finished surfaces and wheels free of operation, whichever occurs first. SPARK PLUGS Replace spark plugs at the beginning of this manual. Spark plug type and gap setting are covered to clean your tractor unless the electrical system, muffler, air filter and carburetor are shown in engine oil. We do not recommend using a garden hose to keep water out. IN-LINE FUEL FILTER (See Fig. 18) The fuel filter should be replaced...
... SPECIFICATIONS" section of each season. of all foreign matter. • Keep finished surfaces and wheels free of operation, whichever occurs first. SPARK PLUGS Replace spark plugs at the beginning of this manual. Spark plug type and gap setting are covered to clean your tractor unless the electrical system, muffler, air filter and carburetor are shown in engine oil. We do not recommend using a garden hose to keep water out. IN-LINE FUEL FILTER (See Fig. 18) The fuel filter should be replaced...

User Manual
Page 20
... side of tractor. SERVICE AND ADJUSTMENTS CAUTION: BEFORE PERFORMING ANY SERVICE OR ADJUSTMENTS: • Depress brake pedal fully and set parking brake. • Place attachment clutch in "DISENGAGED" position. • Turn ignition key "OFF" and remove key. • Make sure the blades and all moving parts have completely stopped. • Disconnect spark plug wire from lock bracket. TRACTOR TO REMOVE MOWER (See Fig. 19) • Place attachment clutch in "DISENGAGED" position. • If equipped, turn height adjustment knob counterclockwise...
... side of tractor. SERVICE AND ADJUSTMENTS CAUTION: BEFORE PERFORMING ANY SERVICE OR ADJUSTMENTS: • Depress brake pedal fully and set parking brake. • Place attachment clutch in "DISENGAGED" position. • Turn ignition key "OFF" and remove key. • Make sure the blades and all moving parts have completely stopped. • Disconnect spark plug wire from lock bracket. TRACTOR TO REMOVE MOWER (See Fig. 19) • Place attachment clutch in "DISENGAGED" position. • If equipped, turn height adjustment knob counterclockwise...

User Manual
Page 23
... manual.) • Disconnect clutch wire harness. • Remove clutch locator. • Remove belt from stationary idler and clutching idler. • Pull belt slack toward front of tractor and remove downwards from transmission input pulley and over cooling fan blades. • Pull belt toward rear of left to right) when wheels are not adjustable on level surface. If "jumper cables" are not horizontal (left footrest. • Remove mower (See "TO REMOVE MOWER" in axle groove. • Replace axle cover...
... manual.) • Disconnect clutch wire harness. • Remove clutch locator. • Remove belt from stationary idler and clutching idler. • Pull belt slack toward front of tractor and remove downwards from transmission input pulley and over cooling fan blades. • Pull belt toward rear of left to right) when wheels are not adjustable on level surface. If "jumper cables" are not horizontal (left footrest. • Remove mower (See "TO REMOVE MOWER" in axle groove. • Replace axle cover...

User Manual
Page 25
... an authorized service center for repair and/or adjustment. If it is not, loosen cable clamp screw and pull cable back until choke is against stop. High speed stop . Do not adjust damage may result. Tighten cable clamp screw securely. OVERSPEEDING THE ENGINE ABOVE THE FACTORY HIGH SPEED SETTING CAN BE DANGEROUS. If adjustment is necessary, proceed as follows: • With engine not running , move throttle control lever to fast position. • Check that swivel...
... an authorized service center for repair and/or adjustment. If it is not, loosen cable clamp screw and pull cable back until choke is against stop. High speed stop . Do not adjust damage may result. Tighten cable clamp screw securely. OVERSPEEDING THE ENGINE ABOVE THE FACTORY HIGH SPEED SETTING CAN BE DANGEROUS. If adjustment is necessary, proceed as follows: • With engine not running , move throttle control lever to fast position. • Check that swivel...
User Manual
Page 26
... cover it run until the fuel lines and carburetor are securely fastened. CAUTION: Never store the tractor with new spark plug(s). Store in a clean, dry area. • Clean entire tractor (See "CLEANING" in the Customer Responsibilities section of this manual). • Inspect and replace belts, if necessary (See belt replacement instructions in the Service and Adjustments section of this manual). • Lubricate as shown in the Customer Responsibilities section of time, clean it thoroughly, remove...
... cover it run until the fuel lines and carburetor are securely fastened. CAUTION: Never store the tractor with new spark plug(s). Store in a clean, dry area. • Clean entire tractor (See "CLEANING" in the Customer Responsibilities section of this manual). • Inspect and replace belts, if necessary (See belt replacement instructions in the Service and Adjustments section of this manual). • Lubricate as shown in the Customer Responsibilities section of time, clean it thoroughly, remove...
User Manual
Page 27
... Carburetor" in "Higher Cut" position/reduce speed. 2. Attachment clutch is engaged. 3. Corroded battery terminals. 6. Replace fuse. 5. Check/replace solenoid or starter. 9. Corroded battery terminals. 3. Recharge or replace battery. 2. Faulty spark plug. 7. Dirty/clogged muffler. 13. Set in Service Adjustments section. 8. Check oil level/change spark plug. 7. Drain fuel tank and refill with fresh gasoline and replace fuel filter. 8. Clean/replace muffler. 13. Tighten loose part(s). Water in Operation section. 3. Engine valves out of adjustment. 1. See "TO START...
... Carburetor" in "Higher Cut" position/reduce speed. 2. Attachment clutch is engaged. 3. Corroded battery terminals. 6. Replace fuse. 5. Check/replace solenoid or starter. 9. Corroded battery terminals. 3. Recharge or replace battery. 2. Faulty spark plug. 7. Dirty/clogged muffler. 13. Set in Service Adjustments section. 8. Check oil level/change spark plug. 7. Drain fuel tank and refill with fresh gasoline and replace fuel filter. 8. Clean/replace muffler. 13. Tighten loose part(s). Water in Operation section. 3. Engine valves out of adjustment. 1. See "TO START...

User Manual
Page 28
... blades used. 11. Allow grass to dry before stopping engine. 28 Replace mower drive belt. 9. Replace with attachment clutch engaged CAUSE 1. Faulty light switch. 4. Replace alternator. TROUBLESHOOTING POINTS PROBLEM Engine continues to run when operator leaves seat with blades listed in this manual. 11. Faulty operator-safety presence control system. Check wiring, switches and connections. If not corrected, contact an authorized service center/ department. Poor cut - Mower deck not level. 3. Tighten blade bolt. 2. Clean around mandrels to slower speed. 3. Mower blades...
... blades used. 11. Allow grass to dry before stopping engine. 28 Replace mower drive belt. 9. Replace with attachment clutch engaged CAUSE 1. Faulty light switch. 4. Replace alternator. TROUBLESHOOTING POINTS PROBLEM Engine continues to run when operator leaves seat with blades listed in this manual. 11. Faulty operator-safety presence control system. Check wiring, switches and connections. If not corrected, contact an authorized service center/ department. Poor cut - Mower deck not level. 3. Tighten blade bolt. 2. Clean around mandrels to slower speed. 3. Mower blades...


