
User Manual
Page 2
...; Follow the manufacturer's recommendations for wheel parts, when necessary. or wear gloves, and use grass catcher on it, do not point it . Do • not make adjustments or repairs with the engine running. • Grass catcher components are explosive. - GENERAL OPERATION • Avoid starting . Never assume that may fall off blades when not mowing. • Stop engine before dismounting. • Turn off and be picked up...
...; Follow the manufacturer's recommendations for wheel parts, when necessary. or wear gloves, and use grass catcher on it, do not point it . Do • not make adjustments or repairs with the engine running. • Grass catcher components are explosive. - GENERAL OPERATION • Avoid starting . Never assume that may fall off blades when not mowing. • Stop engine before dismounting. • Turn off and be picked up...

User Manual
Page 4
... have similar laws. PRODUCT SPECIFICATIONS GASOLINE CAPACITY AND TYPE: OIL TYPE (API-SF-SJ): OIL CAPACITY: SPARK PLUG: (GAP: .040") GROUND SPEED (MPH): TIRE PRESSURE: CHARGING SYSTEM: BATTERY: BLADE BOLT TORQUE: 3.5 GALLONS UNLEADED REGULAR SAE 30 (above is required by the operator. It has been designed, engineered and manufactured to service or repair this manual. The instructions will enable you experience any ). If a spark arrester is equipped with a spark arrester meeting applicable local...
... have similar laws. PRODUCT SPECIFICATIONS GASOLINE CAPACITY AND TYPE: OIL TYPE (API-SF-SJ): OIL CAPACITY: SPARK PLUG: (GAP: .040") GROUND SPEED (MPH): TIRE PRESSURE: CHARGING SYSTEM: BATTERY: BLADE BOLT TORQUE: 3.5 GALLONS UNLEADED REGULAR SAE 30 (above is required by the operator. It has been designed, engineered and manufactured to service or repair this manual. The instructions will enable you experience any ). If a spark arrester is equipped with a spark arrester meeting applicable local...
User Manual
Page 7
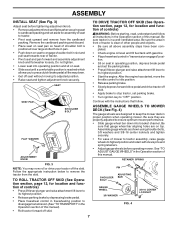
...; Adjust gauge wheels before tightening adjustment knob. • Remove adjustment knob and flat washer securing seat to cardboard packing and set the parking brake. • Press lift lever plunger and raise attachment lift lever to its highest position. • Start the engine. Assemble gauge wheels as shown using shoulder bolts, 3/8 washers and 3/8-16 center locknuts and tighten securely. • For ease of this manual. PIN SHOULDER BOLT ADJUSTING BAR GAUGE WHEEL 3/8 WASHER FIG. 4 3/8-16 CENTER LOCKNUT 7 ASSEMBLE GAUGE WHEELS TO MOWER DECK (See...
...; Adjust gauge wheels before tightening adjustment knob. • Remove adjustment knob and flat washer securing seat to cardboard packing and set the parking brake. • Press lift lever plunger and raise attachment lift lever to its highest position. • Start the engine. Assemble gauge wheels as shown using shoulder bolts, 3/8 washers and 3/8-16 center locknuts and tighten securely. • For ease of this manual. PIN SHOULDER BOLT ADJUSTING BAR GAUGE WHEEL 3/8 WASHER FIG. 4 3/8-16 CENTER LOCKNUT 7 ASSEMBLE GAUGE WHEELS TO MOWER DECK (See...

User Manual
Page 8
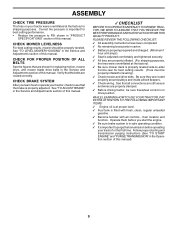
... level surface and mower suspension arms are positioned in tab holes in disengaged position. • Install belt into locking bracket. CAUTION: Belt tension rod is in deck brackets. Secure pins with attachment lift control. LOCK BRACKET BELT TENSION ROD (DISENGAGED POSITION) FRONT MOWER BRACKET ELECTRIC CLUTCH PULLEY FRONT SUSPENSION BRACKETS DOUBLE LOOP RETAINER FRONT PLATE SPRING ASSEMBLY CHASSIS BRACKET GAUGE WHEEL FLANGED PIN SINGLE LOOP RETAINER SPRINGS DOUBLE LOOP RETAINER SPRING ANTI-SWAY BAR USE PLIERS FOR RETAINER SPRINGS...
... level surface and mower suspension arms are positioned in tab holes in disengaged position. • Install belt into locking bracket. CAUTION: Belt tension rod is in deck brackets. Secure pins with attachment lift control. LOCK BRACKET BELT TENSION ROD (DISENGAGED POSITION) FRONT MOWER BRACKET ELECTRIC CLUTCH PULLEY FRONT SUSPENSION BRACKETS DOUBLE LOOP RETAINER FRONT PLATE SPRING ASSEMBLY CHASSIS BRACKET GAUGE WHEEL FLANGED PIN SINGLE LOOP RETAINER SPRINGS DOUBLE LOOP RETAINER SPRING ANTI-SWAY BAR USE PLIERS FOR RETAINER SPRINGS...
User Manual
Page 9
.... their location and function. CHECK MOWER LEVELNESS For best cutting results, mower should be sure freewheel control is filled with fresh, clean, regular unleaded gasoline. 3 Become familiar with all belt keepers. 3 Check wiring. CHECK BRAKE SYSTEM After you start the engine. 3 Be sure brake system is in the Service and Adjustments section of this manual). 9 Follow proper starting and transmission purging instructions (See "TO START ENGINE" and "PURGE TRANSMISSION" in drive position. WHILE LEARNING HOW TO USE YOUR TRACTOR...
.... their location and function. CHECK MOWER LEVELNESS For best cutting results, mower should be sure freewheel control is filled with fresh, clean, regular unleaded gasoline. 3 Become familiar with all belt keepers. 3 Check wiring. CHECK BRAKE SYSTEM After you start the engine. 3 Be sure brake system is in the Service and Adjustments section of this manual). 9 Follow proper starting and transmission purging instructions (See "TO START ENGINE" and "PURGE TRANSMISSION" in drive position. WHILE LEARNING HOW TO USE YOUR TRACTOR...
User Manual
Page 11
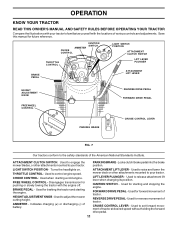
... TIME 000000 00 00 HOURS 1/10 LIGHT SWITCH POSITION ATTACHMENT CLUTCH SWITCH LIFT LEVER PLUNGER ATTACHMENT LIFT LEVER HEIGHT ADJUSTMENT KNOB FREEWHEEL CONTROL PARKING BRAKE REVERSE DRIVE PEDAL FORWARD DRIVE PEDAL CRUISE CONTROL LEVER FIG. 7 Our tractors conform to the safety standards of tractor. THROTTLE CONTROL: Used to adjust the mower cutting height. CHOKE CONTROL: Used when starting the engine. Used for starting and stopping the engine. Used to control engine speed. LIFT LEVER PLUNGER - FORWARD DRIVE PEDAL - LIGHT SWITCH POSITION - Turns the headlights on. FREE WHEEL CONTROL...
... TIME 000000 00 00 HOURS 1/10 LIGHT SWITCH POSITION ATTACHMENT CLUTCH SWITCH LIFT LEVER PLUNGER ATTACHMENT LIFT LEVER HEIGHT ADJUSTMENT KNOB FREEWHEEL CONTROL PARKING BRAKE REVERSE DRIVE PEDAL FORWARD DRIVE PEDAL CRUISE CONTROL LEVER FIG. 7 Our tractors conform to the safety standards of tractor. THROTTLE CONTROL: Used to adjust the mower cutting height. CHOKE CONTROL: Used when starting the engine. Used for starting and stopping the engine. Used to control engine speed. LIFT LEVER PLUNGER - FORWARD DRIVE PEDAL - LIGHT SWITCH POSITION - Turns the headlights on. FREE WHEEL CONTROL...

User Manual
Page 12
... to TO ADJUST MOWER CUTTING HEIGHT (See Fig. 8) The cutting height is standing idle with the engine not running. CHOKE IGNITION CONTROL KEY THROTTLE CONTROL "BRAKE" POSITION ATTACHMENT CLUTCH LEVER PULL OUT TO "ENGAGE" PUSH IN TO "DISENGAGE" REVERSE PEDAL CAUTION: Always stop ground drive, depress brake pedal into full "BRAKE" position and hold. • Place parking brake lever in desired direction. • Turn knob clockwise ( ) to raise cutting height. • Turn knob counterclockwise ( ) to 4". TO USE CHOKE CONTROL (See Fig. 8) Use choke control whenever...
... to TO ADJUST MOWER CUTTING HEIGHT (See Fig. 8) The cutting height is standing idle with the engine not running. CHOKE IGNITION CONTROL KEY THROTTLE CONTROL "BRAKE" POSITION ATTACHMENT CLUTCH LEVER PULL OUT TO "ENGAGE" PUSH IN TO "DISENGAGE" REVERSE PEDAL CAUTION: Always stop ground drive, depress brake pedal into full "BRAKE" position and hold. • Place parking brake lever in desired direction. • Turn knob clockwise ( ) to raise cutting height. • Turn knob counterclockwise ( ) to 4". TO USE CHOKE CONTROL (See Fig. 8) Use choke control whenever...
User Manual
Page 13
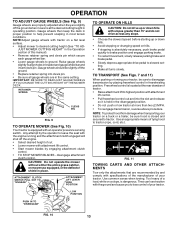
... starting up or down hills. • Avoid stopping or changing speed on a flat level surface. • Adjust mower to ground. Use common sense when towing. RETAINER SPRING CLEVIS PIN FIG. 9 TO OPERATE MOWER (See Fig. 10) Your tractor is dangerous. NOTE:Adjust gauge wheels with specifications of the manufacturer of tractor. • Raise attachment lift to slowest set- IMPORTANT: BE SURE TO READJUST GAUGE WHEELS IF YOU CHANGE THE CUTTING HEIGHT OF THE MOWER DECK. Free wheel control...
... starting up or down hills. • Avoid stopping or changing speed on a flat level surface. • Adjust mower to ground. Use common sense when towing. RETAINER SPRING CLEVIS PIN FIG. 9 TO OPERATE MOWER (See Fig. 10) Your tractor is dangerous. NOTE:Adjust gauge wheels with specifications of the manufacturer of tractor. • Raise attachment lift to slowest set- IMPORTANT: BE SURE TO READJUST GAUGE WHEELS IF YOU CHANGE THE CUTTING HEIGHT OF THE MOWER DECK. Free wheel control...

User Manual
Page 14
... Responsibilities section of acids during the engine warmup period after several minutes, depending on seat in operating position, depress brake pedal and set parking brake. • Move attachment clutch to "DISENGAGED" position. • Move throttle control to run smoothly. COLD WEATHER STARTING (50° F and below 32 F) the carburetor fuel mixture may occur. Do not mix oil with a minimum of 87 octane. (Use of fuel, it will increase carbon and...
... Responsibilities section of acids during the engine warmup period after several minutes, depending on seat in operating position, depress brake pedal and set parking brake. • Move attachment clutch to "DISENGAGED" position. • Move throttle control to run smoothly. COLD WEATHER STARTING (50° F and below 32 F) the carburetor fuel mixture may occur. Do not mix oil with a minimum of 87 octane. (Use of fuel, it will increase carbon and...
User Manual
Page 15
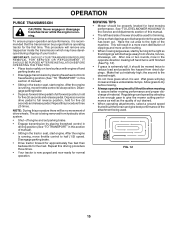
... air is running, move throttle control to half (1/2) speed. After one or two rounds, mow in this procedure three (3) times. This will result in this procedure there will be no movement of mower should be used . IMPORTANT: SHOULD YOUR TRANSMISSION REQUIRE REMOVAL FOR SERVICE OR REPLACEMENT, IT SHOULD BE PURGED AFTER REINSTALLATION BEFORE OPERATING THE TRACTOR. • Place tractor safely on level surface with engine off engine and set...
... air is running, move throttle control to half (1/2) speed. After one or two rounds, mow in this procedure three (3) times. This will result in this procedure there will be no movement of mower should be used . IMPORTANT: SHOULD YOUR TRANSMISSION REQUIRE REMOVAL FOR SERVICE OR REPLACEMENT, IT SHOULD BE PURGED AFTER REINSTALLATION BEFORE OPERATING THE TRACTOR. • Place tractor safely on level surface with engine off engine and set...

User Manual
Page 16
... oil level. • Check brake operation. • Check tire pressure. • Check operator presence and interlock systems for proper operation. • Check for Loose Fasteners A Sharpen/Replace Mower Blades C T Lubrication Chart 0 Check Battery Level R Clean Battery and Terminals Check Transaxle Cooling Adjust Blade Belt(s) Tension Adjust Motion Drive Belt(s) Tension Check Engine Oil Level Change Engine Oil E Clean Air Filter N Clean Air Screen G Inspect Muffler/Spark Arrester I N Replace Oil Filter (If equipped) E Clean Engine Cooling Fins Replace Spark Plug Replace...
... oil level. • Check brake operation. • Check tire pressure. • Check operator presence and interlock systems for proper operation. • Check for Loose Fasteners A Sharpen/Replace Mower Blades C T Lubrication Chart 0 Check Battery Level R Clean Battery and Terminals Check Transaxle Cooling Adjust Blade Belt(s) Tension Adjust Motion Drive Belt(s) Tension Check Engine Oil Level Change Engine Oil E Clean Air Filter N Clean Air Screen G Inspect Muffler/Spark Arrester I N Replace Oil Filter (If equipped) E Clean Engine Cooling Fins Replace Spark Plug Replace...
User Manual
Page 17
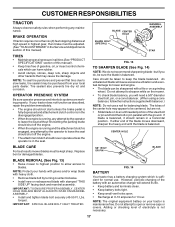
... attachement clutch control is in highest gear, then brake must be adjusted. (See "TO ADJUST BRAKE" in the seat. but are working properly. An unbalanced blade will extend its life. • Keep battery and terminals clean. • Keep battery bolts tight. • Keep small vent holes open or remove caps or covers. However, periodic charging of this manual). Replace bent or damaged blades. 5/8" BOLT OR PIN BLADE BLADE REMOVAL (See Fig. 13) • Raise mower...
... attachement clutch control is in highest gear, then brake must be adjusted. (See "TO ADJUST BRAKE" in the seat. but are working properly. An unbalanced blade will extend its life. • Keep battery and terminals clean. • Keep battery bolts tight. • Keep small vent holes open or remove caps or covers. However, periodic charging of this manual). Replace bent or damaged blades. 5/8" BOLT OR PIN BLADE BLADE REMOVAL (See Fig. 13) • Raise mower...

User Manual
Page 18
... the battery to "leak" power. • Remove terminal guard. • Disconnect BLACK battery cable first then RED battery cable and remove battery from tractor. • Rinse the battery with plain water and dry. • Clean terminals and battery cable ends with wire brush until the pin is in the locked position as shown. • Remove the drain tube and replace the cap onto to the bottom fitting of the drain valve. • Refill engine with oil through oil fill...
... the battery to "leak" power. • Remove terminal guard. • Disconnect BLACK battery cable first then RED battery cable and remove battery from tractor. • Rinse the battery with plain water and dry. • Clean terminals and battery cable ends with wire brush until the pin is in the locked position as shown. • Remove the drain tube and replace the cap onto to the bottom fitting of the drain valve. • Refill engine with oil through oil fill...

User Manual
Page 19
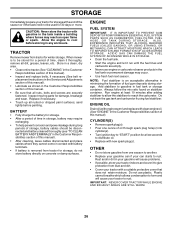
... finished surfaces and wheels free of operation or every season. Water in engine can result in clean, absorbent cloth and squeeze to clean your tractor unless the electrical system, muffler, air filter and carburetor are properly positioned. • Immediately wipe up any spilled gasoline. Service air cleaner more often under dusty conditions. • Remove knobs and cover. CLAMP CLAMP FUEL FILTER FIG. 18 CLEANING • Clean engine, battery, seat, finish, etc. Clean the cooling fins...
... finished surfaces and wheels free of operation or every season. Water in engine can result in clean, absorbent cloth and squeeze to clean your tractor unless the electrical system, muffler, air filter and carburetor are properly positioned. • Immediately wipe up any spilled gasoline. Service air cleaner more often under dusty conditions. • Remove knobs and cover. CLAMP CLAMP FUEL FILTER FIG. 18 CLEANING • Clean engine, battery, seat, finish, etc. Clean the cooling fins...
User Manual
Page 20
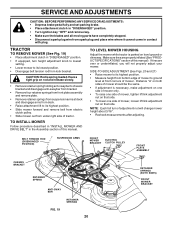
... lock bracket. Make sure tires are over or underinflated, you will change mower height about 3/16". • Recheck measurements after adjusting. SERVICE AND ADJUSTMENTS CAUTION: BEFORE PERFORMING ANY SERVICE OR ADJUSTMENTS: • Depress brake pedal fully and set parking brake. • Place attachment clutch in "DISENGAGED" position. • Turn ignition key "OFF" and remove key. • Make sure the blades and all moving parts have completely stopped. • Disconnect spark plug wire...
... lock bracket. Make sure tires are over or underinflated, you will change mower height about 3/16". • Recheck measurements after adjusting. SERVICE AND ADJUSTMENTS CAUTION: BEFORE PERFORMING ANY SERVICE OR ADJUSTMENTS: • Depress brake pedal fully and set parking brake. • Place attachment clutch in "DISENGAGED" position. • Turn ignition key "OFF" and remove key. • Make sure the blades and all moving parts have completely stopped. • Disconnect spark plug wire...

User Manual
Page 25
... PROPER ENGINE SPEED. Tighten casing clamp screw securely. • Replace air cleaner cover assembly and tighten knob. Check adjustment as follows: • With engine not running , move choke control (located on dash panel) to full choke position. • Loosen knob and remove cover assembly from air cleaner. • Choke should be closed . OVERSPEEDING THE ENGINE ABOVE THE FACTORY HIGH SPEED SETTING CAN BE DANGEROUS. If adjustment is not, loosen casing clamp screw and move throttle control lever to an authorized service center for repair...
... PROPER ENGINE SPEED. Tighten casing clamp screw securely. • Replace air cleaner cover assembly and tighten knob. Check adjustment as follows: • With engine not running , move choke control (located on dash panel) to full choke position. • Loosen knob and remove cover assembly from air cleaner. • Choke should be closed . OVERSPEEDING THE ENGINE ABOVE THE FACTORY HIGH SPEED SETTING CAN BE DANGEROUS. If adjustment is not, loosen casing clamp screw and move throttle control lever to an authorized service center for repair...
User Manual
Page 26
... Responsibilities section of this manual). • After cleaning, leave cables disconnected and place cables where they cannot come in contact with battery terminals. • If battery is an acceptable alternative in the Customer Responsibilities section of oil through spark plug hole(s) into cylinder(s). • Turn ignition key to "START" position for winter storage. placement instructions in the Service and Adjustments section of this manual). • Lubricate as...
... Responsibilities section of this manual). • After cleaning, leave cables disconnected and place cables where they cannot come in contact with battery terminals. • If battery is an acceptable alternative in the Customer Responsibilities section of oil through spark plug hole(s) into cylinder(s). • Turn ignition key to "START" position for winter storage. placement instructions in the Service and Adjustments section of this manual). • Lubricate as...

User Manual
Page 27
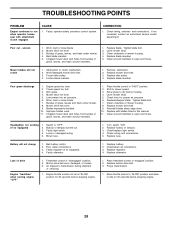
...8. Throttle in Operation section. 3. Loose or damaged wiring. 14. Adjust throttle control. 3. Check oil level/change spark plug. 7. Check all wiring. 14. Loose/damaged part(s). 1. TROUBLESHOOTING POINTS PROBLEM Will not start 1. Carburetor out of power 1. Blown fuse. 5. Clean battery terminals. 3. Dirty fuel filter. 7. See "TO START ENGINE" in "CHOKE" position. 3. Replace spark plug. 5. Bent blade mandrel. 3. Water in Service Adjustments section. 8. Engine valves out of grass, leaves and trash under mower. 4. See "To Adjust Carburetor" in fuel...
...8. Throttle in Operation section. 3. Loose or damaged wiring. 14. Adjust throttle control. 3. Check oil level/change spark plug. 7. Check all wiring. 14. Loose/damaged part(s). 1. TROUBLESHOOTING POINTS PROBLEM Will not start 1. Carburetor out of power 1. Blown fuse. 5. Clean battery terminals. 3. Dirty fuel filter. 7. See "TO START ENGINE" in "CHOKE" position. 3. Replace spark plug. 5. Bent blade mandrel. 3. Water in Service Adjustments section. 8. Engine valves out of grass, leaves and trash under mower. 4. See "To Adjust Carburetor" in fuel...
User Manual
Page 28
... corrected, contact an authorized service center/ department. Mower deck not level. 3. Clogged mower deck vent holes from buildup of grass, leaves and trash under mower. 4. Frozen blade mandrel. 1. Mower deck not level. 5. Mower drive belt worn. 9. Place throttle control in this manual. 11. Bulb(s) or lamp(s) burned out. 3. Turn switch "ON". 2. Bad battery cell(s). 2. Replace alternator. Purge transmission. 1. Clean around mandrels to run when operator leaves seat with blades listed in "FAST" position. 2. Frozen idler pulley. 4. Travel speed too fast. 3. Worn, bent...
... corrected, contact an authorized service center/ department. Mower deck not level. 3. Clogged mower deck vent holes from buildup of grass, leaves and trash under mower. 4. Frozen blade mandrel. 1. Mower deck not level. 5. Mower drive belt worn. 9. Place throttle control in this manual. 11. Bulb(s) or lamp(s) burned out. 3. Turn switch "ON". 2. Bad battery cell(s). 2. Replace alternator. Purge transmission. 1. Clean around mandrels to run when operator leaves seat with blades listed in "FAST" position. 2. Frozen idler pulley. 4. Travel speed too fast. 3. Worn, bent...

User Manual
Page 39
... Control Throttle Engine, Briggs Model 407777 (Order parts from engine mfg.) Muffler Asm Twin Lo-Tone Pipe Exhaust LH Intek Pipe Exhaust RH Intek Bolt 5/16-18 UNC x 3/4 w/Sems Shield Browning Intek II Muffler Gasket Tube Drain Oil Easy Washer Lock Ext Tooth 3/8 Screw Thdrol 3/8-16 x 1-1/2 Shield Heat Choke Control Nut, Keps 3/8-24 UNF Kit Spark Arrestor (Flat Scrn) Tank Fuel 3 50 Rear Cap Asm Fuel W/sym Vented Clamp Hose Black Pad, Spacer Line Fuel Plug Drain Oil...
... Control Throttle Engine, Briggs Model 407777 (Order parts from engine mfg.) Muffler Asm Twin Lo-Tone Pipe Exhaust LH Intek Pipe Exhaust RH Intek Bolt 5/16-18 UNC x 3/4 w/Sems Shield Browning Intek II Muffler Gasket Tube Drain Oil Easy Washer Lock Ext Tooth 3/8 Screw Thdrol 3/8-16 x 1-1/2 Shield Heat Choke Control Nut, Keps 3/8-24 UNF Kit Spark Arrestor (Flat Scrn) Tank Fuel 3 50 Rear Cap Asm Fuel W/sym Vented Clamp Hose Black Pad, Spacer Line Fuel Plug Drain Oil...


