
User Manual
Page 2
...corners, shrubs, trees, or other debris which can touch hot exhaust / engine parts and burn. Check their ability to operate the riding mower safely enough to stabilize the machine by the blade. Do not make adjustments or repairs with safe machine operation. • Watch for small... children. • Never carry children. FAILURE TO OBSERVE THE FOLLOWING SAFETY INSTRUCTIONS COULD RESULT IN SERIOUS INJURY OR DEATH. Do not operate the mower without • Do not mow on a slope. Wrap the blade(s) • Use extra care with the instructions, to the • Never leave...
...corners, shrubs, trees, or other debris which can touch hot exhaust / engine parts and burn. Check their ability to operate the riding mower safely enough to stabilize the machine by the blade. Do not make adjustments or repairs with safe machine operation. • Watch for small... children. • Never carry children. FAILURE TO OBSERVE THE FOLLOWING SAFETY INSTRUCTIONS COULD RESULT IN SERIOUS INJURY OR DEATH. Do not operate the mower without • Do not mow on a slope. Wrap the blade(s) • Use extra care with the instructions, to the • Never leave...

User Manual
Page 3
... down and behind and down slopes (15° Max), not across. • Remove obstacles such as rocks, tree limbs, etc. • Watch for Ride-On Mowers • Be sure the area is dangerous. WARNING: In order to cause cancer and birth defects or other reproductive harm. WARNING Battery posts, terminals and...
... down and behind and down slopes (15° Max), not across. • Remove obstacles such as rocks, tree limbs, etc. • Watch for Ride-On Mowers • Be sure the area is dangerous. WARNING: In order to cause cancer and birth defects or other reproductive harm. WARNING Battery posts, terminals and...
User Manual
Page 6
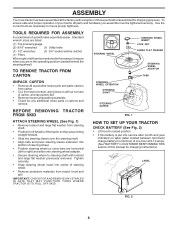
... set will make assembly easier. To ensure safe and proper operation of your tractor all four corners of carton, and lay panels flat. • Remove mower and packing materials. • Check for charging instructions). Tighten securely. • Snap steering wheel insert into bottom of steering wheel. • Position steering wheel so...
... set will make assembly easier. To ensure safe and proper operation of your tractor all four corners of carton, and lay panels flat. • Remove mower and packing materials. • Check for charging instructions). Tighten securely. • Snap steering wheel insert into bottom of steering wheel. • Position steering wheel so...

User Manual
Page 8
..."TO ADJUST GAUGE WHEELS" in the Operation section of this manual). .• Store mulcher blades and mulcher plate in proper position when operating mower. TO CONVERT TO BAGGING OR DISCHARGING NOTE: The mulcher blades will need to install the mulcher plate. • Raise and hold deflector shield... in upright position. • Place front of mulcher plate over front of mower deck opening and slide into place, as shown using shoulder bolts, 3/8 washers and 3/8-16 center locknuts and tighten securely. • Adjust gauge ...
..."TO ADJUST GAUGE WHEELS" in the Operation section of this manual). .• Store mulcher blades and mulcher plate in proper position when operating mower. TO CONVERT TO BAGGING OR DISCHARGING NOTE: The mulcher blades will need to install the mulcher plate. • Raise and hold deflector shield... in upright position. • Place front of mulcher plate over front of mower deck opening and slide into place, as shown using shoulder bolts, 3/8 washers and 3/8-16 center locknuts and tighten securely. • Adjust gauge ...

User Manual
Page 9
... pulleys and inside all connections are still secure and wires are shown for shipping purposes. their location and function. See "TO LEVEL MOWER HOUSING" in the Service and Adjustments section of this manual. See "TO ADJUST BRAKE" in the Service and Adjustments section of this...and tightened securely. ✓ All tires are routed correctly. ASSEMBLY CHECK TIRE PRESSURE The tires on your tractor for leveling). ✓ Check mower and drive belts. Correct tire pressure is important for best cutting performance. • Reduce tire pressure to -rear for best cutting results....
... pulleys and inside all connections are still secure and wires are shown for shipping purposes. their location and function. See "TO LEVEL MOWER HOUSING" in the Service and Adjustments section of this manual. See "TO ADJUST BRAKE" in the Service and Adjustments section of this...and tightened securely. ✓ All tires are routed correctly. ASSEMBLY CHECK TIRE PRESSURE The tires on your tractor for leveling). ✓ Check mower and drive belts. Correct tire pressure is important for best cutting performance. • Reduce tire pressure to -rear for best cutting results....

User Manual
Page 10
... ENGINE OFF LIGHTS ON P ENGINE ON ENGINE START PARKING BRAKE PARKING BRAKE PARKING BRAKE LOCKED UNLOCKED OVER TEMP LIGHT FUEL OIL PRESSURE BATTERY REVERSE FORWARD MOWER HEIGHT MOWER LIFT 15 15 15 ATTACHMENT ATTACHMENT CLUTCH ENGAGED CLUTCH DISENGAGED DANGER, KEEP HANDS AND FEET AWAY KEEP AREA CLEAR SLOPE HAZARDS (SEE SAFETY RULES...
... ENGINE OFF LIGHTS ON P ENGINE ON ENGINE START PARKING BRAKE PARKING BRAKE PARKING BRAKE LOCKED UNLOCKED OVER TEMP LIGHT FUEL OIL PRESSURE BATTERY REVERSE FORWARD MOWER HEIGHT MOWER LIFT 15 15 15 ATTACHMENT ATTACHMENT CLUTCH ENGAGED CLUTCH DISENGAGED DANGER, KEEP HANDS AND FEET AWAY KEEP AREA CLEAR SLOPE HAZARDS (SEE SAFETY RULES...

User Manual
Page 11
... lift lever when changing its position. Locks clutch/brake pedal into the brake position. ATTACHMENT LIFT LEVER - Used to adjust the mower cutting height. CRUISE CONTROL LEVER - Indicates charging (+) or discharging (-) of tractor at desired speed without holding the forward drive pedal...control engine speed. FORWARD DRIVE PEDAL - ATTACHMENT CLUTCH SWITCH: Used to engage the mower blades, or other attachments mounted to your tractor. Used to raise and lower the mower deck or other attachments mounted to your tractor. OPERATION KNOW YOUR TRACTOR READ THIS ...
... lift lever when changing its position. Locks clutch/brake pedal into the brake position. ATTACHMENT LIFT LEVER - Used to adjust the mower cutting height. CRUISE CONTROL LEVER - Indicates charging (+) or discharging (-) of tractor at desired speed without holding the forward drive pedal...control engine speed. FORWARD DRIVE PEDAL - ATTACHMENT CLUTCH SWITCH: Used to engage the mower blades, or other attachments mounted to your tractor. Used to raise and lower the mower deck or other attachments mounted to your tractor. OPERATION KNOW YOUR TRACTOR READ THIS ...

User Manual
Page 12
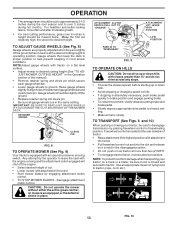
...pedal into the eyes, which can be used for forward travel only. Pedal should only be used while mowing or STOPPING (See Fig. 7) MOWER BLADES - CHOKE ATTACHMENT CLUTCH LEVER CONTROL PULL OUT TO "ENGAGE" THROTTLE CONTROL HEIGHT ADJUSTMENT KNOB "BRAKE" POSITION IGNITION KEY PUSH IN TO "...The cruise control feature can result in severe eye damage. When engine is controlled by turning the height adjustment knob in to stop mower blades,move attachment clutch switch slopes, rough terrain or while trimming or turning. mance. Do not use choke to disengage. Ground ...
...pedal into the eyes, which can be used for forward travel only. Pedal should only be used while mowing or STOPPING (See Fig. 7) MOWER BLADES - CHOKE ATTACHMENT CLUTCH LEVER CONTROL PULL OUT TO "ENGAGE" THROTTLE CONTROL HEIGHT ADJUSTMENT KNOB "BRAKE" POSITION IGNITION KEY PUSH IN TO "...The cruise control feature can result in severe eye damage. When engine is controlled by turning the height adjustment knob in to stop mower blades,move attachment clutch switch slopes, rough terrain or while trimming or turning. mance. Do not use choke to disengage. Ground ...
User Manual
Page 13
...Raise gauge wheels slightly to help prevent scalping in the Operation section of tying hood to ground. Make the first cut . • Lower mower with tractor on a truck or a trailer, be sure hood is absolutely necessary, push brake pedal quickly to brake position and engage parking brake...slowly release parking brake and brake pedal. • Slowly depress appropriate drive pedal to slowest set- RETAINER SPRING CLEVIS PIN FIG. 8 TO OPERATE MOWER (See Fig. 9) Your tractor is equipped with attachment lift control. • Pull freewheel control out and into clevis pin. • Be ...
...Raise gauge wheels slightly to help prevent scalping in the Operation section of tying hood to ground. Make the first cut . • Lower mower with tractor on a truck or a trailer, be sure hood is absolutely necessary, push brake pedal quickly to brake position and engage parking brake...slowly release parking brake and brake pedal. • Slowly depress appropriate drive pedal to slowest set- RETAINER SPRING CLEVIS PIN FIG. 8 TO OPERATE MOWER (See Fig. 9) Your tractor is equipped with attachment lift control. • Pull freewheel control out and into clevis pin. • Be ...
User Manual
Page 15
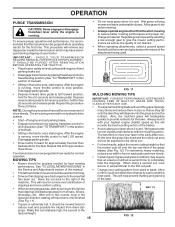
... off and parking brake set parking brake. • Engage transmission by selecting a low enough gear to west the next week. See "TO LEVEL MOWER HOUSING" in a more uniform cutting. • When mowing large areas, start by placing freewheel control in freewheeling position (See "TO TRANSPORT" in...assure better mowing performance and proper discharge of this section of manual). • Sitting in the opposite direction making left hand side of mower should be purged before mowing. • Always operate engine at full throttle when mowing to the first cut on level surface with ...
... off and parking brake set parking brake. • Engage transmission by selecting a low enough gear to west the next week. See "TO LEVEL MOWER HOUSING" in a more uniform cutting. • When mowing large areas, start by placing freewheel control in freewheeling position (See "TO TRANSPORT" in...assure better mowing performance and proper discharge of this section of manual). • Sitting in the opposite direction making left hand side of mower should be purged before mowing. • Always operate engine at full throttle when mowing to the first cut on level surface with ...

User Manual
Page 16
.... • Check brake operation. • Check tire pressure. • Check operator presence and interlock systems for proper operation. • Check for Loose Fasteners A Sharpen/Replace Mower Blades C T Lubrication Chart 0 Check Battery Level R Clean Battery and Terminals Check Transaxle Cooling Check V-Belts BEFOREEEVAECRHYU8ESVHEEORUYRS2E5VHEROYUR5E0SVEHROYUR1E0SV0EHROYUBSREESFAOSROEN STORAGE SERVICE DATES 5 3 4 Check Engine Oil Level Change Engine...
.... • Check brake operation. • Check tire pressure. • Check operator presence and interlock systems for proper operation. • Check for Loose Fasteners A Sharpen/Replace Mower Blades C T Lubrication Chart 0 Check Battery Level R Clean Battery and Terminals Check Transaxle Cooling Check V-Belts BEFOREEEVAECRHYU8ESVHEEORUYRS2E5VHEROYUR5E0SVEHROYUR1E0SV0EHROYUBSREESFAOSROEN STORAGE SERVICE DATES 5 3 4 Check Engine Oil Level Change Engine...
User Manual
Page 17
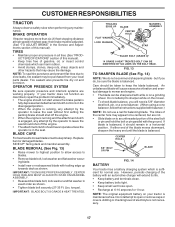
...If tractor requires more than six (6) feet stopping distance at 6-10 amperes for balancing blade. BLADE REMOVAL (See Fig. 13) • Raise mower to highest position to allow access to open . • Recharge at high speed in highest gear, then brake must be sharpened with the ground...with balancer.) NOTE: Do not use . OPERATOR PRESENCE SYSTEM Be sure operator presence and interlock systems are not. • Slide blade on the mower. • To check blade balance, you do not recommend sharpening blade - The lobes of gasoline, oil, or insect control chemicals which is ...
...If tractor requires more than six (6) feet stopping distance at 6-10 amperes for balancing blade. BLADE REMOVAL (See Fig. 13) • Raise mower to highest position to allow access to open . • Recharge at high speed in highest gear, then brake must be sharpened with the ground...with balancer.) NOTE: Do not use . OPERATOR PRESENCE SYSTEM Be sure operator presence and interlock systems are not. • Slide blade on the mower. • To check blade balance, you do not recommend sharpening blade - The lobes of gasoline, oil, or insect control chemicals which is ...

User Manual
Page 20
...arms from rear deck brackets by removing retainer springs. • Disconnect front links from under tractor. IMPORTANT: If an attachment other than the mower deck is to "STOP" and remove key. • Make sure the blades and all moving parts have completely stopped. • Disconnect spark...side of tractor. • Place attachment clutch switch in contact with retainer springs. • Connect anti-swaybar to raise suspension arms. Slide mower out from deck by removing retainer springs. • Raise lift lever to chassis bracket and secure with retainer spring. • Install belt ...
...arms from rear deck brackets by removing retainer springs. • Disconnect front links from under tractor. IMPORTANT: If an attachment other than the mower deck is to "STOP" and remove key. • Make sure the blades and all moving parts have completely stopped. • Disconnect spark...side of tractor. • Place attachment clutch switch in contact with retainer springs. • Connect anti-swaybar to raise suspension arms. Slide mower out from deck by removing retainer springs. • Raise lift lever to chassis bracket and secure with retainer spring. • Install belt ...

User Manual
Page 21
...so that the front is approximately 1/8" to 1/2" lower than the rear when the mower is 1/8" to its highest position. BELT REMOVAL • Remove mower from mower. 21 SERVICE AND ADJUSTMENTS TO LEVEL MOWER HOUSING Adjust the mower while tractor is 1/8" to 1/2" lower at front than rear, tighten nut "F" ... on both mandrel pulleys and idler pulleys. • Pull belt away from tractor (See "TO REMOVE MOWER" in its highest position. • At the midpoint of both sides of mower, measure height from trunnion on both front links. • Recheck side-to-side adjustment. The two...
...so that the front is approximately 1/8" to 1/2" lower than the rear when the mower is 1/8" to its highest position. BELT REMOVAL • Remove mower from mower. 21 SERVICE AND ADJUSTMENTS TO LEVEL MOWER HOUSING Adjust the mower while tractor is 1/8" to 1/2" lower at front than rear, tighten nut "F" ... on both mandrel pulleys and idler pulleys. • Pull belt away from tractor (See "TO REMOVE MOWER" in its highest position. • At the midpoint of both sides of mower, measure height from trunnion on both front links. • Recheck side-to-side adjustment. The two...

User Manual
Page 22
...; Reconnect clutch harness. • Make sure belt is in all pulley grooves and inside all belt guides and keepers. • Install mower (See "TO INSTALL MOWER" in highest gear, further maintenance is in all pulley grooves and inside all belt guides and keepers. • Disconnect clutch wire harness..... • Slide belt into the center span keeper. • Pull belt toward rear of all belt guides. • Install mower (See "To Install Mower" in this section of manual). NOTE: Observe entire motion drive belt and position of tractor. IF FURTHER BRAKE ADJUSTMENT IS NECESSARY CONTACT...
...; Reconnect clutch harness. • Make sure belt is in all pulley grooves and inside all belt guides and keepers. • Install mower (See "TO INSTALL MOWER" in highest gear, further maintenance is in all pulley grooves and inside all belt guides and keepers. • Disconnect clutch wire harness..... • Slide belt into the center span keeper. • Pull belt toward rear of all belt guides. • Install mower (See "To Install Mower" in this section of manual). NOTE: Observe entire motion drive belt and position of tractor. IF FURTHER BRAKE ADJUSTMENT IS NECESSARY CONTACT...

User Manual
Page 26
When mower is removed from dust and dirt. • Cover your tractor with battery terminals. • If battery is to be used for storage. • After a period ... • Fully charge the battery for 30 days or more. ENGINE OIL Drain oil (with engine warm) and replace with new spark plug(s). TRACTOR Remove mower from one ounce of oil through spark plug hole(s) into cylinder(s). • Turn ignition key to "START" position for a period of this manual. • Be...
When mower is removed from dust and dirt. • Cover your tractor with battery terminals. • If battery is to be used for storage. • After a period ... • Fully charge the battery for 30 days or more. ENGINE OIL Drain oil (with engine warm) and replace with new spark plug(s). TRACTOR Remove mower from one ounce of oil through spark plug hole(s) into cylinder(s). • Turn ignition key to "START" position for a period of this manual. • Be...

User Manual
Page 27
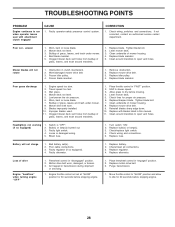
... 2. Replace blade. Replace damaged parts. 27 See "TO START ENGINE" in fuel. 8. Bad spark plug. 3. Engine valves out of mower housing. 4. Recharge or replace battery. 4. Drain fuel tank and refill with fresh gasoline and replace fuel filter. 8. Engine will not start ...Dirty fuel filter. 8. Dirty engine air screen/fins. 12. Contact an authorized service center/department. Out of grass, leaves and trash under mower. 4. CORRECTION 1. Drain fuel tank and carburetor, refill tank with fresh gasoline. 6. Replace spark plug. 3. Faulty ignition switch. 8. Faulty...
... 2. Replace blade. Replace damaged parts. 27 See "TO START ENGINE" in fuel. 8. Bad spark plug. 3. Engine valves out of mower housing. 4. Recharge or replace battery. 4. Drain fuel tank and refill with fresh gasoline and replace fuel filter. 8. Engine will not start ...Dirty fuel filter. 8. Dirty engine air screen/fins. 12. Contact an authorized service center/department. Out of grass, leaves and trash under mower. 4. CORRECTION 1. Drain fuel tank and carburetor, refill tank with fresh gasoline. 6. Replace spark plug. 3. Faulty ignition switch. 8. Faulty...
User Manual
Page 28
... 1. Poor cable connections. 3. Faulty regulator (if so equipped). 4. If not corrected, contact an authorized service center/ department. Clogged mower deck vent holes from buildup of grass, leaves, and trash around mandrels. 1. Obstruction in "FAST" position. 2. Wet grass. 4.... bulb(s) or lamp(s). 3. CORRECTION 1. uneven 1. Buildup of drive Engine "backfires" when turning engine "OFF" 1. Mower blades will not charge 1. Replace mower drive belt. 3. Travel speed too fast. 3. Replace fuse. Freewheel control in transmission during shipment or servicing. 1. ...
... 1. Poor cable connections. 3. Faulty regulator (if so equipped). 4. If not corrected, contact an authorized service center/ department. Clogged mower deck vent holes from buildup of grass, leaves, and trash around mandrels. 1. Obstruction in "FAST" position. 2. Wet grass. 4.... bulb(s) or lamp(s). 3. CORRECTION 1. uneven 1. Buildup of drive Engine "backfires" when turning engine "OFF" 1. Mower blades will not charge 1. Replace mower drive belt. 3. Travel speed too fast. 3. Replace fuse. Freewheel control in transmission during shipment or servicing. 1. ...
User Manual
Page 33
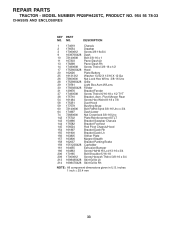
Pivot Mower Rear 54 161464 Screw Hex Wshd 8-18 x 7/8 58 175351 Duct Hood 59 177579 Bushing Snap 60 72140606 Bolt RdHd Sqnk 3/8-16 Unc x 3/4 64 174997 Dash ... 179761 Light Box Asm W/Lens 30 175692X428 Fender 31 139976 Bracket Fender 37 17490508 Screw Thdrol 6/16-18 x 1/2 TYT 38 175710 Bracket, Asm. MODEL NUMBER PR20PH42STC, PRODUCT NO. 954 56 78-33 CHASSIS AND ENCLOSURES KEY PART NO.
Pivot Mower Rear 54 161464 Screw Hex Wshd 8-18 x 7/8 58 175351 Duct Hood 59 177579 Bushing Snap 60 72140606 Bolt RdHd Sqnk 3/8-16 Unc x 3/4 64 174997 Dash ... 179761 Light Box Asm W/Lens 30 175692X428 Fender 31 139976 Bracket Fender 37 17490508 Screw Thdrol 6/16-18 x 1/2 TYT 38 175710 Bracket, Asm. MODEL NUMBER PR20PH42STC, PRODUCT NO. 954 56 78-33 CHASSIS AND ENCLOSURES KEY PART NO.
User Manual
Page 40
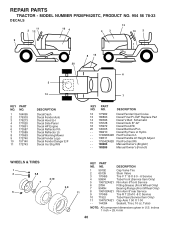
...Height Adjust - - 175542X428 Pad Footrest Rh - - 183284 Manual Owner's (English) - - 183285 Manual Owner's (French) WHEELS & TIRES 1 2 5,8 4,10 7 6 3,9 11 KEY NO. 1 2 3 4 5 6 7 8 9 10 11 - - MODEL NUMBER PR20PH42STC, PRODUCT NO. 954 56 78-33 DECALS 11 2 12 16 4 4 3 13 10 2 9 1 8 15 20 6 5 14 KEY PART NO. inches 1 inch = 25.4 mm 40 PART NO...172743 DESCRIPTION Decal Dash Decal Fender Auto Decal Hood LH Decal Side Panel Decal HP Engine Decal Reflector Rh Decal Reflector Lh Decal Warning Mower Decal Fender Logo Decal Fender Danger E/F Decal Ins Strg Whl 7 KEY PART NO.
...Height Adjust - - 175542X428 Pad Footrest Rh - - 183284 Manual Owner's (English) - - 183285 Manual Owner's (French) WHEELS & TIRES 1 2 5,8 4,10 7 6 3,9 11 KEY NO. 1 2 3 4 5 6 7 8 9 10 11 - - MODEL NUMBER PR20PH42STC, PRODUCT NO. 954 56 78-33 DECALS 11 2 12 16 4 4 3 13 10 2 9 1 8 15 20 6 5 14 KEY PART NO. inches 1 inch = 25.4 mm 40 PART NO...172743 DESCRIPTION Decal Dash Decal Fender Auto Decal Hood LH Decal Side Panel Decal HP Engine Decal Reflector Rh Decal Reflector Lh Decal Warning Mower Decal Fender Logo Decal Fender Danger E/F Decal Ins Strg Whl 7 KEY PART NO.


