
User Manual
Page 2
... on steep slopes. Do not make adjustments or repairs with safe machine operation. • Watch for wheel parts, when necessary. FAILURE TO OBSERVE THE FOLLOWING SAFETY INSTRUCTIONS COULD RESULT IN SERIOUS INJURY OR DEATH. GENERAL OPERATION • Avoid starting . Never assume that may fall off blades when not mowing. • Stop engine before removing grass catcher or unclogging chute. • Mow only in daylight...
... on steep slopes. Do not make adjustments or repairs with safe machine operation. • Watch for wheel parts, when necessary. FAILURE TO OBSERVE THE FOLLOWING SAFETY INSTRUCTIONS COULD RESULT IN SERIOUS INJURY OR DEATH. GENERAL OPERATION • Avoid starting . Never assume that may fall off blades when not mowing. • Stop engine before removing grass catcher or unclogging chute. • Mow only in daylight...
User Manual
Page 4
... SAFETY RULES 2-3 PRODUCT SPECIFICATIONS 4 CUSTOMER RESPONSIBILITIES 4, 16-19 ASSEMBLY 6-9 OPERATION 10-15 MAINTENANCE SCHEDULE 16 SERVICE AND ADJUSTMENTS 20-25 STORAGE 26 TROUBLESHOOTING 27-28 REPAIR PARTS - PRODUCT SPECIFICATIONS GASOLINE CAPACITY AND TYPE: OIL TYPE (API-SF-SJ): OIL CAPACITY: SPARK PLUG: (GAP: .040") GROUND SPEED (MPH): TIRE PRESSURE: CHARGING SYSTEM: BATTERY: BLADE BOLT TORQUE: 3.5 GALLONS UNLEADED REGULAR SAE 30 (above is required by the operator. LBS. Please read and retain this owner's manual. CUSTOMER RESPONSIBILITIES •...
... SAFETY RULES 2-3 PRODUCT SPECIFICATIONS 4 CUSTOMER RESPONSIBILITIES 4, 16-19 ASSEMBLY 6-9 OPERATION 10-15 MAINTENANCE SCHEDULE 16 SERVICE AND ADJUSTMENTS 20-25 STORAGE 26 TROUBLESHOOTING 27-28 REPAIR PARTS - PRODUCT SPECIFICATIONS GASOLINE CAPACITY AND TYPE: OIL TYPE (API-SF-SJ): OIL CAPACITY: SPARK PLUG: (GAP: .040") GROUND SPEED (MPH): TIRE PRESSURE: CHARGING SYSTEM: BATTERY: BLADE BOLT TORQUE: 3.5 GALLONS UNLEADED REGULAR SAE 30 (above is required by the operator. LBS. Please read and retain this owner's manual. CUSTOMER RESPONSIBILITIES •...

User Manual
Page 7
... have been completed. • Check engine oil level and fill fuel tank with the instructions that follow. After engine has started, move throttle control to idle position. • Release parking brake. • Slowly depress forward drive pedal and drive tractor off the skid. ASSEMBLY INSTALL SEAT (See Fig. 3) Adjust seat before tightening adjustment knob. • Remove adjustment knob and flat washer securing seat to cardboard packing and set aside for assembly of seat to tractor. • Pivot seat...
... have been completed. • Check engine oil level and fill fuel tank with the instructions that follow. After engine has started, move throttle control to idle position. • Release parking brake. • Slowly depress forward drive pedal and drive tractor off the skid. ASSEMBLY INSTALL SEAT (See Fig. 3) Adjust seat before tightening adjustment knob. • Remove adjustment knob and flat washer securing seat to cardboard packing and set aside for assembly of seat to tractor. • Pivot seat...

User Manual
Page 9
... time. Follow proper starting and transmission purging instructions (See "TO START ENGINE" and "PURGE TRANSMISSION" in the Service and Adjustments section of this manual. ✓CHECKLIST BEFORE YOU OPERATE AND ENJOY YOUR NEW TRACTOR, WE WISH TO ASSURE THAT YOU RECEIVE THE BEST PERFORMANCE AND SATISFACTION FROM THIS QUALITY PRODUCT. CHECK MOWER LEVELNESS For best cutting results, mower should be properly inflated for leveling). ✓ Check mower and drive belts. CHECK BRAKE SYSTEM After you start...
... time. Follow proper starting and transmission purging instructions (See "TO START ENGINE" and "PURGE TRANSMISSION" in the Service and Adjustments section of this manual. ✓CHECKLIST BEFORE YOU OPERATE AND ENJOY YOUR NEW TRACTOR, WE WISH TO ASSURE THAT YOU RECEIVE THE BEST PERFORMANCE AND SATISFACTION FROM THIS QUALITY PRODUCT. CHECK MOWER LEVELNESS For best cutting results, mower should be properly inflated for leveling). ✓ Check mower and drive belts. CHECK BRAKE SYSTEM After you start...

User Manual
Page 11
...Locks clutch/brake pedal into the brake position. LIFT LEVER PLUNGER - FORWARD DRIVE PEDAL - FREE WHEEL CONTROL - BRAKE PEDAL - Used for reverse movement of tractor at desired speed without holding the forward drive pedal. 11 Used for forward movement of battery. CRUISE CONTROL LEVER - THROTTLE CONTROL: Used to control engine speed. ATTACHMENT CLUTCH SWITCH: Used to engage the mower blades, or other attachments mounted to your tractor. Used to set forward movement of tractor. HEIGHT ADJUSTMENT KNOB - ATTACHMENT LIFT LEVER - IGNITION SWITCH - Save this manual...
...Locks clutch/brake pedal into the brake position. LIFT LEVER PLUNGER - FORWARD DRIVE PEDAL - FREE WHEEL CONTROL - BRAKE PEDAL - Used for reverse movement of tractor at desired speed without holding the forward drive pedal. 11 Used for forward movement of battery. CRUISE CONTROL LEVER - THROTTLE CONTROL: Used to control engine speed. ATTACHMENT CLUTCH SWITCH: Used to engage the mower blades, or other attachments mounted to your tractor. Used to set forward movement of tractor. HEIGHT ADJUSTMENT KNOB - ATTACHMENT LIFT LEVER - IGNITION SWITCH - Save this manual...
User Manual
Page 13
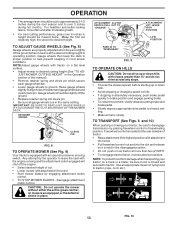
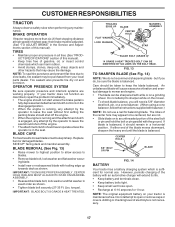
... operating position. IMPORTANT: BE SURE TO READJUST GAUGE WHEELS IF YOU CHANGE THE CUTTING HEIGHT OF THE MOWER DECK. ATTACHMENT CLUTCH SWITCH PULL OUT TO "ENGAGE" PUSH IN TO "DISENGAGE" ATTACHMENT LIFT LEVER HIGH POSITION LOW POSITION FIG. 9 TO OPERATE ON HILLS CAUTION: Do not drive up or down hills with attachment lift control. • Start mower blades by placing freewheel control in freewheeling position. ting. • Make all gauge wheels are slightly off the ground. • Replace retainer spring...
... operating position. IMPORTANT: BE SURE TO READJUST GAUGE WHEELS IF YOU CHANGE THE CUTTING HEIGHT OF THE MOWER DECK. ATTACHMENT CLUTCH SWITCH PULL OUT TO "ENGAGE" PUSH IN TO "DISENGAGE" ATTACHMENT LIFT LEVER HIGH POSITION LOW POSITION FIG. 9 TO OPERATE ON HILLS CAUTION: Do not drive up or down hills with attachment lift control. • Start mower blades by placing freewheel control in freewheeling position. ting. • Make all gauge wheels are slightly off the ground. • Replace retainer spring...
User Manual
Page 14
... in operating position, depress brake pedal and set parking brake. • Move attachment clutch to "DISENGAGED" position. • Move throttle control to fast position • Pull choke control out for a few seconds and then continue to assure fuel freshness. Use fresh, clean, regular unleaded gasoline with a minimum of 87 octane. (Use of filler neck. CAUTION: Wipe off any spilled oil or fuel. Drain the gas tank, start the engine and let it run until the fuel lines and carburetor...
... in operating position, depress brake pedal and set parking brake. • Move attachment clutch to "DISENGAGED" position. • Move throttle control to fast position • Pull choke control out for a few seconds and then continue to assure fuel freshness. Use fresh, clean, regular unleaded gasoline with a minimum of 87 octane. (Use of filler neck. CAUTION: Wipe off any spilled oil or fuel. Drain the gas tank, start the engine and let it run until the fuel lines and carburetor...
User Manual
Page 15
...: Never engage or disengage freewheel lever while the engine is running , move throttle control to half (1/2) speed. NOTE: During this time the grass has dried and the newly cut desired. • When operating attachments, select a ground speed that the mower cuts off engine and set . • Disengage transmission by selecting a low enough gear to give best performance of manual). • Sitting in the tractor seat, start engine. off only the top one...
...: Never engage or disengage freewheel lever while the engine is running , move throttle control to half (1/2) speed. NOTE: During this time the grass has dried and the newly cut desired. • When operating attachments, select a ground speed that the mower cuts off engine and set . • Disengage transmission by selecting a low enough gear to give best performance of manual). • Sitting in the tractor seat, start engine. off only the top one...

User Manual
Page 16
... Check Tire Pressure Check Operator Presence and T Interlock Systems R Check for Loose Fasteners A Sharpen/Replace Mower Blades C T Lubrication Chart 0 Check Battery Level R Clean Battery and Terminals Check Transaxle Cooling Check V-Belts BEFOREEEVAECRHYU8ESVHEEORUYRS2E5VHEROYUR5E0SVEHROYUR1E0SV0EHROYUBSREESFAOSROEN STORAGE SERVICE DATES 5 3 4 Check Engine Oil Level Change Engine Oil (with maintenance-free battery. 5 - Not required if equipped with oil filter) E Change Engine Oil (without oil filter) N Clean Air Filter G Clean Air Screen I N Inspect Muffler/Spark...
... Check Tire Pressure Check Operator Presence and T Interlock Systems R Check for Loose Fasteners A Sharpen/Replace Mower Blades C T Lubrication Chart 0 Check Battery Level R Clean Battery and Terminals Check Transaxle Cooling Check V-Belts BEFOREEEVAECRHYU8ESVHEEORUYRS2E5VHEROYUR5E0SVEHROYUR1E0SV0EHROYUBSREESFAOSROEN STORAGE SERVICE DATES 5 3 4 Check Engine Oil Level Change Engine Oil (with maintenance-free battery. 5 - Not required if equipped with oil filter) E Change Engine Oil (without oil filter) N Clean Air Filter G Clean Air Screen I N Inspect Muffler/Spark...
User Manual
Page 17
... covers. Lbs. If blade is balanced. If either end of gasoline, oil, or insect control chemicals which is sufficient for normal use a nail for 1 hour. Do not attempt to open . • Recharge at high speed in a horizontal position. If your tractor does not function as described, repair the problem immediately. • The engine should not start unless the brake pedal is fully depressed and attachement clutch control...
... covers. Lbs. If blade is balanced. If either end of gasoline, oil, or insect control chemicals which is sufficient for normal use a nail for 1 hour. Do not attempt to open . • Recharge at high speed in a horizontal position. If your tractor does not function as described, repair the problem immediately. • The engine should not start unless the brake pedal is fully depressed and attachement clutch control...

User Manual
Page 18
... engine when changing oil. • Remove drain plug. • After oil has drained completely, replace oil drain plug and tighten securely. • Refill engine with a wire brush or compressed air to overheating. 18 AIR SCREEN OIL FILL CAP¦DIPSTSICK OIL DRAIN PLUG FIG. 15 CLEAN AIR SCREEN Air screen must meet API service classification SF-SJ. • Be sure tractor is not required for dirt, grass clippings and other materials. V-BELTS Check V-belts for accurate reading. To prevent damage to seals, do not use high pressure...
... engine when changing oil. • Remove drain plug. • After oil has drained completely, replace oil drain plug and tighten securely. • Refill engine with a wire brush or compressed air to overheating. 18 AIR SCREEN OIL FILL CAP¦DIPSTSICK OIL DRAIN PLUG FIG. 15 CLEAN AIR SCREEN Air screen must meet API service classification SF-SJ. • Be sure tractor is not required for dirt, grass clippings and other materials. V-BELTS Check V-belts for accurate reading. To prevent damage to seals, do not use high pressure...

User Manual
Page 19
... "PRODUCT SPECIFICATIONS" section of operation or every season. CUSTOMER RESPONSIBILITIES AIR FILTER (See Fig. 16) Your engine will not run properly using a garden hose to clean your tractor unless the electrical system, muffler, air filter and carburetor are covered to remove excess oil. • If very dirty or damaged, replace pre-cleaner. If fuel filter becomes clogged, obstructing fuel flow to carburetor, replacement is used more often under dusty conditions. • Remove knobs and cover. SPARK PLUGS Replace spark plugs at the...
... "PRODUCT SPECIFICATIONS" section of operation or every season. CUSTOMER RESPONSIBILITIES AIR FILTER (See Fig. 16) Your engine will not run properly using a garden hose to clean your tractor unless the electrical system, muffler, air filter and carburetor are covered to remove excess oil. • If very dirty or damaged, replace pre-cleaner. If fuel filter becomes clogged, obstructing fuel flow to carburetor, replacement is used more often under dusty conditions. • Remove knobs and cover. SPARK PLUGS Replace spark plugs at the...

User Manual
Page 20
... and set parking brake. • Place attachment clutch in "DISENGAGED" position. • Turn ignition key to "STOP" and remove key. • Make sure the blades and all moving parts have completely stopped. • Disconnect spark plug wire from under tractor with deflector shield to right side of tractor. • Place attachment clutch switch in "DISENGAGED" position. • Move attachment lift lever forward to lower mower to its lowest position. • Roll belt off electric clutch pulley. •...
... and set parking brake. • Place attachment clutch in "DISENGAGED" position. • Turn ignition key to "STOP" and remove key. • Make sure the blades and all moving parts have completely stopped. • Disconnect spark plug wire from under tractor with deflector shield to right side of tractor. • Place attachment clutch switch in "DISENGAGED" position. • Move attachment lift lever forward to lower mower to its lowest position. • Roll belt off electric clutch pulley. •...

User Manual
Page 22
Engage parking brake. BELT REMOVAL • Remove mower (See "TO REMOVE MOWER" in highest gear, further maintenance is still greater than 1-3/4", loosen jam nut and turn nut "A" until distance becomes 1-3/4". Carefully remove belt upwards from transmission input pulley and over cooling fan blades. • Remove belt from center span keeper and pull belt away from engine pulley and around electric clutch. • Pull belt slack toward front of tractor and roll belt around electric clutch and onto engine pulley. • Install belt through stationary idler and...
Engage parking brake. BELT REMOVAL • Remove mower (See "TO REMOVE MOWER" in highest gear, further maintenance is still greater than 1-3/4", loosen jam nut and turn nut "A" until distance becomes 1-3/4". Carefully remove belt upwards from transmission input pulley and over cooling fan blades. • Remove belt from center span keeper and pull belt away from engine pulley and around electric clutch. • Pull belt slack toward front of tractor and roll belt around electric clutch and onto engine pulley. • Install belt through stationary idler and...

User Manual
Page 24
...; With engine not running , or prevent it from air cleaner. • Choke should not be necessary. If it is not, loosen casing clamp screw and move choke control (located on dash panel) to full choke position. • Loosen knob and remove cover assembly from starting. • Check wiring. SERVICE AND ADJUSTMENTS TERMINAL ACCESS DOOR TERMINAL GUARD KEPS NUT HEX BOLT POSITIVE (RED) CABLE NEGATIVE (BLACK) CABLE FIG. 28 TO REPLACE HEADLIGHT BULB • Raise hood. • Pull bulb holder...
...; With engine not running , or prevent it from air cleaner. • Choke should not be necessary. If it is not, loosen casing clamp screw and move choke control (located on dash panel) to full choke position. • Loosen knob and remove cover assembly from starting. • Check wiring. SERVICE AND ADJUSTMENTS TERMINAL ACCESS DOOR TERMINAL GUARD KEPS NUT HEX BOLT POSITIVE (RED) CABLE NEGATIVE (BLACK) CABLE FIG. 28 TO REPLACE HEADLIGHT BULB • Raise hood. • Pull bulb holder...

User Manual
Page 26
... cause your tractor to be used for 30 days or more. Replace if necessary. • Touch up all nuts, bolts and screws are empty. • Never use plastic. ENGINE OIL Drain oil (with engine warm) and replace with clean engine oil. (See "ENGINE" in the Customer Responsibilities section of oil through spark plug hole(s) into cylinder(s). • Turn ignition key to "START" position for a few seconds to cool before painting. IMPORTANT: NEVER COVER TRACTOR WHILE ENGINE AND...
... cause your tractor to be used for 30 days or more. Replace if necessary. • Touch up all nuts, bolts and screws are empty. • Never use plastic. ENGINE OIL Drain oil (with engine warm) and replace with clean engine oil. (See "ENGINE" in the Customer Responsibilities section of oil through spark plug hole(s) into cylinder(s). • Turn ignition key to "START" position for a few seconds to cool before painting. IMPORTANT: NEVER COVER TRACTOR WHILE ENGINE AND...

User Manual
Page 27
..." in Operation section. 3. Check/replace ignition switch. 8. Loss of adjustment. 1. Engine valves out of power 1. Clean/replace air filter. 5. Out of mower housing. 4. See "To Adjust Carburetor" in fuel. 8. Weak or dead battery. 4. Loose or damaged wiring. 7. Clean/replace air filter. 2. Loose or damaged wiring. 4. Replace fuel filter. 8. Clean/replace muffler. 13. Bad spark plug. 5. Dirty fuel filter. 5. Replace spark plug. 3. Replace fuel filter. 5. Weak or dead battery. 2. Clean underside of fuel. 2. Check oil level/change spark plug. 7. Clean and...
..." in Operation section. 3. Check/replace ignition switch. 8. Loss of adjustment. 1. Engine valves out of power 1. Clean/replace air filter. 5. Out of mower housing. 4. See "To Adjust Carburetor" in fuel. 8. Weak or dead battery. 4. Loose or damaged wiring. 7. Clean/replace air filter. 2. Loose or damaged wiring. 4. Replace fuel filter. 8. Clean/replace muffler. 13. Bad spark plug. 5. Dirty fuel filter. 5. Replace spark plug. 3. Replace fuel filter. 5. Weak or dead battery. 2. Clean underside of fuel. 2. Check oil level/change spark plug. 7. Clean and...
User Manual
Page 28
... air pressure. 6. Worn, bent or loose blade. 7. Mower drive belt worn. 9. Blades improperly installed. 10. Improper blades used. 11. Place throttle control in clutch mechanism. 2. Level mower deck. 5. Check tires for 30 seconds before stopping engine. 1. Tighten blade bolt. 7. Reinstall blades sharp edge down. 10. Clean around mandrels to idle for 30 seconds before mowing. 4. Headlight(s) not working (if so equipped) 1. Switch is "OFF". 2. Bulb(s) or lamp(s) burned out. 3. Faulty light switch. 4. Loose or damaged wiring. 5. Turn switch "ON". 2. Replace...
... air pressure. 6. Worn, bent or loose blade. 7. Mower drive belt worn. 9. Blades improperly installed. 10. Improper blades used. 11. Place throttle control in clutch mechanism. 2. Level mower deck. 5. Check tires for 30 seconds before stopping engine. 1. Tighten blade bolt. 7. Reinstall blades sharp edge down. 10. Clean around mandrels to idle for 30 seconds before mowing. 4. Headlight(s) not working (if so equipped) 1. Switch is "OFF". 2. Bulb(s) or lamp(s) burned out. 3. Faulty light switch. 4. Loose or damaged wiring. 5. Turn switch "ON". 2. Replace...
User Manual
Page 40
... Replace Part 14 160396 Decal V-Belt Schematic 15 179128 Decal Deck B" 42" 16 176272 Decal Hood Rh 20 145005 Decal Bat Dan/Psn - - 169210 Decal By Pass Lt Hydro - - 174998X428 Pad Footrest Lh - - 138311 Decal Handle Lft Height Adjust - - 175542X428 Pad Footrest Rh - - 183284 Manual Owner's (English) - - 183285 Manual Owner's (French) WHEELS & TIRES 1 2 5,8 4,10 7 6 3,9 11 KEY NO. 1 2 3 4 5 6 7 8 9 10 11 - - inches 1 inch = 25.4 mm 40 MODEL NUMBER PR20PH42STC...
... Replace Part 14 160396 Decal V-Belt Schematic 15 179128 Decal Deck B" 42" 16 176272 Decal Hood Rh 20 145005 Decal Bat Dan/Psn - - 169210 Decal By Pass Lt Hydro - - 174998X428 Pad Footrest Lh - - 138311 Decal Handle Lft Height Adjust - - 175542X428 Pad Footrest Rh - - 183284 Manual Owner's (English) - - 183285 Manual Owner's (French) WHEELS & TIRES 1 2 5,8 4,10 7 6 3,9 11 KEY NO. 1 2 3 4 5 6 7 8 9 10 11 - - inches 1 inch = 25.4 mm 40 MODEL NUMBER PR20PH42STC...
User Manual
Page 43
... x 1 Gr. 5 131 72140608 Bolt RDHD 3/8-16unc x 1 132 17060612 Screw 3/8-16 x .75 134 156941 Pin Head Pivet 135 159765X421 Brkt Asm Whl Ga. RH 139 159767X421 Brkt Asm Whl Ga. Pulley Not Included) - - 179942 Replacement Mower, Complete NOTE: All component dimensions given in U.S. NO. DESCRIPTION 1 182032X421 Mower Deck Assembly, 42" 2 72140506 Bolt 3 138017 Bracket Asm Fr. R.LH 136 155986 Bar Adjusting Gauge Wheel 137 72110505 Bolt Carr. 5/16-18...
... x 1 Gr. 5 131 72140608 Bolt RDHD 3/8-16unc x 1 132 17060612 Screw 3/8-16 x .75 134 156941 Pin Head Pivet 135 159765X421 Brkt Asm Whl Ga. RH 139 159767X421 Brkt Asm Whl Ga. Pulley Not Included) - - 179942 Replacement Mower, Complete NOTE: All component dimensions given in U.S. NO. DESCRIPTION 1 182032X421 Mower Deck Assembly, 42" 2 72140506 Bolt 3 138017 Bracket Asm Fr. R.LH 136 155986 Bar Adjusting Gauge Wheel 137 72110505 Bolt Carr. 5/16-18...


