
User Manual
Page 2
.... Tall grass can occur if the operator is clear of objects such as a water heater. weights or counterweights to improve stability. • Mower blades are subject to the machine and the mowing activity. traction, disengage the blades and proceed slowly straight down for small children. •...off if children enter the area. • Before and when backing, look down and behind and down the slope. • Only allow the mower deck to operate the machine. • Clear the area of other people before restarting. • Never make sudden changes in handling gasoline and ...
.... Tall grass can occur if the operator is clear of objects such as a water heater. weights or counterweights to improve stability. • Mower blades are subject to the machine and the mowing activity. traction, disengage the blades and proceed slowly straight down for small children. •...off if children enter the area. • Before and when backing, look down and behind and down the slope. • Only allow the mower deck to operate the machine. • Clear the area of other people before restarting. • Never make sudden changes in handling gasoline and ...

User Manual
Page 3
... plug wire and place wire where it cannot contact spark plug. Uneven terrain could overturn the machine. SAFETY RULES Safe Operation Practices for Ride-On Mowers • Be sure the area is dangerous. If tires lose traction, disengage the blades and proceed slowly straight down the slope. • If machine stops...
... plug wire and place wire where it cannot contact spark plug. Uneven terrain could overturn the machine. SAFETY RULES Safe Operation Practices for Ride-On Mowers • Be sure the area is dangerous. If tires lose traction, disengage the blades and proceed slowly straight down the slope. • If machine stops...
User Manual
Page 6
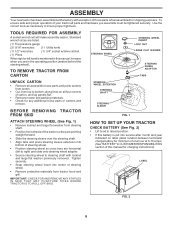
ASSEMBLY Your new tractor has been assembled at 6-10 amps. (See "BATTERY" in CUSTOMER RESPONSIBILITIES section of carton, and lay panels flat. • Remove mower and packing materials. • Check for any additional loose parts or cartons and remove. TOOLS REQUIRED FOR ASSEMBLY A socket wrench set will make assembly easier. ...
ASSEMBLY Your new tractor has been assembled at 6-10 amps. (See "BATTERY" in CUSTOMER RESPONSIBILITIES section of carton, and lay panels flat. • Remove mower and packing materials. • Check for any additional loose parts or cartons and remove. TOOLS REQUIRED FOR ASSEMBLY A socket wrench set will make assembly easier. ...

User Manual
Page 8
...blades will need to install the mulcher plate. • Raise and hold shield when attaching mulcher plate and allow it to rest on back of mower deck. • Hook rear latch into hole on plate while in a safe place. ASSEMBLY IMPORTANT: FOR SHIPPING PURPOSES, THE MULCHER PLATE WAS ...PREATTACHED TO YOUR MOWER. INSTALL MULCHER PLATE (See Fig. 4) NOTE: If you installed the mulching blades you will discharge and bag grass, but for discharging or installation of...
...blades will need to install the mulcher plate. • Raise and hold shield when attaching mulcher plate and allow it to rest on back of mower deck. • Hook rear latch into hole on plate while in a safe place. ASSEMBLY IMPORTANT: FOR SHIPPING PURPOSES, THE MULCHER PLATE WAS ...PREATTACHED TO YOUR MOWER. INSTALL MULCHER PLATE (See Fig. 4) NOTE: If you installed the mulching blades you will discharge and bag grass, but for discharging or installation of...
User Manual
Page 9
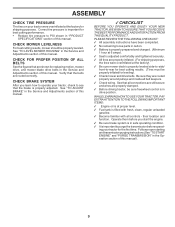
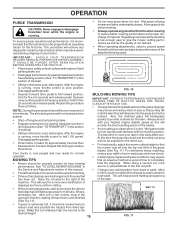
... their location and function. Verify that are properly inflated. (For shipping purposes, the tires were overinflated at the factory). 3 Be sure mower deck is important to purge the transmission before you learn how to operate your tractor, check to see that all connections are still secure ... Operation section of this manual. ASSEMBLY CHECK TIRE PRESSURE The tires on your tractor were overinflated at the factory for replacing motion, mower drive, and mower blade drive belts in the Service and Adjustments section of this manual. See that the brake is filled with fresh, clean, regular...
... their location and function. Verify that are properly inflated. (For shipping purposes, the tires were overinflated at the factory). 3 Be sure mower deck is important to purge the transmission before you learn how to operate your tractor, check to see that all connections are still secure ... Operation section of this manual. ASSEMBLY CHECK TIRE PRESSURE The tires on your tractor were overinflated at the factory for replacing motion, mower drive, and mower blade drive belts in the Service and Adjustments section of this manual. See that the brake is filled with fresh, clean, regular...

User Manual
Page 10
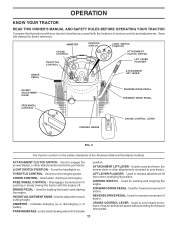
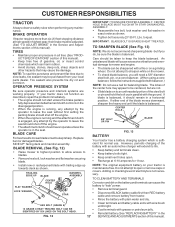
BATTERY CAUTION OR WARNING REVERSE FORWARD FAST SLOW ENGINE ON ENGINE OFF OIL PRESSURE LIGHTS ON OVER TEMP LIGHT FUEL CHOKE MOWER HEIGHT PARKING BRAKE LOCKED UNLOCKED MOWER LIFT ATTACHMENT REVERSE CLUTCH ENGAGED NEUTRAL HIGH P LOW PARKING BRAKE 15 15 15 IGNITION ATTACHMENT CLUTCH DISENGAGED KEEP AREA CLEAR SLOPE HAZARDS (SEE SAFETY RULES SECTION) DANGER, KEEP HANDS AND FEET AWAY 10 FREE WHEEL (Automatic Models only) Learn and understand their meaning. OPERATION These symbols may appear on your tractor or in literature supplied with the product.
BATTERY CAUTION OR WARNING REVERSE FORWARD FAST SLOW ENGINE ON ENGINE OFF OIL PRESSURE LIGHTS ON OVER TEMP LIGHT FUEL CHOKE MOWER HEIGHT PARKING BRAKE LOCKED UNLOCKED MOWER LIFT ATTACHMENT REVERSE CLUTCH ENGAGED NEUTRAL HIGH P LOW PARKING BRAKE 15 15 15 IGNITION ATTACHMENT CLUTCH DISENGAGED KEEP AREA CLEAR SLOPE HAZARDS (SEE SAFETY RULES SECTION) DANGER, KEEP HANDS AND FEET AWAY 10 FREE WHEEL (Automatic Models only) Learn and understand their meaning. OPERATION These symbols may appear on your tractor or in literature supplied with the product.
User Manual
Page 11
...for braking the tractor and starting the engine. Turns the headlights on. Used to control engine speed. Used to raise and lower the mower deck or other attachments mounted to your tractor. IGNITION SWITCH - REVERSE DRIVE PEDAL- HEIGHT ADJUSTMENT KNOB - PARKING BRAKE - Used for... its position. CHOKE CONTROL: Used when starting and stopping the engine. LIFT LEVER PLUNGER - ATTACHMENT CLUTCH SWITCH: Used to engage the mower blades, or other attachments mounted to your tractor. FREE WHEEL CONTROL - Used for future reference. ATTACHMENT LIFT LEVER - Used for pushing...
...for braking the tractor and starting the engine. Turns the headlights on. Used to control engine speed. Used to raise and lower the mower deck or other attachments mounted to your tractor. IGNITION SWITCH - REVERSE DRIVE PEDAL- HEIGHT ADJUSTMENT KNOB - PARKING BRAKE - Used for... its position. CHOKE CONTROL: Used when starting and stopping the engine. LIFT LEVER PLUNGER - ATTACHMENT CLUTCH SWITCH: Used to engage the mower blades, or other attachments mounted to your tractor. FREE WHEEL CONTROL - Used for future reference. ATTACHMENT LIFT LEVER - Used for pushing...

User Manual
Page 12
... Make the first cut to approximately 2-1/2 inches during the cool season and to over 3 inches during hot months. mance. TO ADJUST MOWER CUTTING HEIGHT (See Fig. 6) IMPORTANT: FORWARD AND REVERSE DRIVE PEDALS RETURN TO NEUTRAL POSITION WHEN NOT DEPRESSED. OPERATION The operation of .... Always remove key when leaving tractor to 4". The cutting height range is approximately 1-1/2" to prevent unauthorized use choke to stop mower blades,move cruise control lever forward to "SET" position and hold while lifting your tractor or performing any adjustments or repairs. ...
... Make the first cut to approximately 2-1/2 inches during the cool season and to over 3 inches during hot months. mance. TO ADJUST MOWER CUTTING HEIGHT (See Fig. 6) IMPORTANT: FORWARD AND REVERSE DRIVE PEDALS RETURN TO NEUTRAL POSITION WHEN NOT DEPRESSED. OPERATION The operation of .... Always remove key when leaving tractor to 4". The cutting height range is approximately 1-1/2" to prevent unauthorized use choke to stop mower blades,move cruise control lever forward to "SET" position and hold while lifting your tractor or performing any adjustments or repairs. ...

User Manual
Page 13
... bracket and gauge wheel bar and insert clevis pin. IMPORTANT: BE SURE TO READJUST GAUGE WHEELS IF YOU CHANGE THE CUTTING HEIGHT OF THE MOWER DECK. FIG. 9 TOWING CARTS AND OTHER ATTACHMENTS Tow only the attachments that are recommended by and comply with slopes greater than two (2) MPH...not push or tow tractor at the desired cutting height in operating position. Gauge wheels then keep the deck in proper position to ground. JUST MOWER CUTTING HEIGHT" in the Operation section of your tractor on a truck or a trailer, be slightly off the ground. • Replace retainer ...
... bracket and gauge wheel bar and insert clevis pin. IMPORTANT: BE SURE TO READJUST GAUGE WHEELS IF YOU CHANGE THE CUTTING HEIGHT OF THE MOWER DECK. FIG. 9 TOWING CARTS AND OTHER ATTACHMENTS Tow only the attachments that are recommended by and comply with slopes greater than two (2) MPH...not push or tow tractor at the desired cutting height in operating position. Gauge wheels then keep the deck in proper position to ground. JUST MOWER CUTTING HEIGHT" in the Operation section of your tractor on a truck or a trailer, be slightly off the ground. • Replace retainer ...
User Manual
Page 15
...Repeat this driving procedure three times. The air is running, move throttle control to mow your cutting pattern from dried clippings. See "TO LEVEL MOWER HOUSING" in the tractor seat, start by selecting a low enough gear to give best performance of the blades. • Avoid cutting your highest... This will help prevent matting and graining of grass and grass conditions may have developed during shipping of this procedure there will plug mower and leave undesirable clumps. Wet grass tends to south one or two rounds, mow in size so that has been cut on level...
...Repeat this driving procedure three times. The air is running, move throttle control to mow your cutting pattern from dried clippings. See "TO LEVEL MOWER HOUSING" in the tractor seat, start by selecting a low enough gear to give best performance of the blades. • Avoid cutting your highest... This will help prevent matting and graining of grass and grass conditions may have developed during shipping of this procedure there will plug mower and leave undesirable clumps. Wet grass tends to south one or two rounds, mow in size so that has been cut on level...
User Manual
Page 16
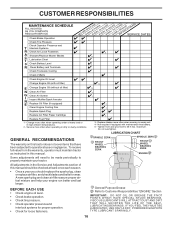
... IN DATES AS YOU COMPLETE REGULAR SERVICE Check Brake Operation Check Tire Pressure Check Operator Presence and T Interlock Systems R Check for Loose Fasteners A Sharpen/Replace Mower Blades C T Lubrication Chart 0 Check Battery Level R Clean Battery and Terminals Check Transaxle Cooling Check V-Belts BEFOREEEVAECRHYU8ESVHEEORUYRS2E5VHEROYUR5E0SVEHROYUR1E0SV0EHROYUBSREESFAOSROENSSTEORRAVGEICE DATES 5 3 4 Check Engine Oil Level Change Engine Oil (with...
... IN DATES AS YOU COMPLETE REGULAR SERVICE Check Brake Operation Check Tire Pressure Check Operator Presence and T Interlock Systems R Check for Loose Fasteners A Sharpen/Replace Mower Blades C T Lubrication Chart 0 Check Battery Level R Clean Battery and Terminals Check Transaxle Cooling Check V-Belts BEFOREEEVAECRHYU8ESVHEEORUYRS2E5VHEROYUR5E0SVEHROYUR1E0SV0EHROYUBSREESFAOSROENSSTEORRAVGEICE DATES 5 3 4 Check Engine Oil Level Change Engine Oil (with...
User Manual
Page 17
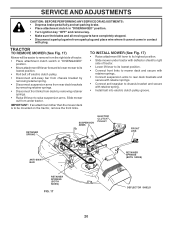
...resharpened blade with wire brush until the blade is balanced. If your local parts dealer. BLADE REMOVAL (See Fig. 12) • Raise mower to highest position to allow access to slow leaks, tire sealant may be sharpened with the ground. If either end of electrolyte is maintenance...Care should be kept sharp. TRAILING EDGE UP BLADE MANDREL ASSEMBLY CENTER HOLE FLAT WASHER LOCK WASHER STAR NOTE: The original equipment battery on the mower. • To check blade balance, you do not recommend sharpening blade - TO SHARPEN BLADE (See Fig. 13) TIRES • Maintain proper...
...resharpened blade with wire brush until the blade is balanced. If your local parts dealer. BLADE REMOVAL (See Fig. 12) • Raise mower to highest position to allow access to slow leaks, tire sealant may be sharpened with the ground. If either end of electrolyte is maintenance...Care should be kept sharp. TRAILING EDGE UP BLADE MANDREL ASSEMBLY CENTER HOLE FLAT WASHER LOCK WASHER STAR NOTE: The original equipment battery on the mower. • To check blade balance, you do not recommend sharpening blade - TO SHARPEN BLADE (See Fig. 13) TIRES • Maintain proper...
User Manual
Page 20
...spark plug wire from spark plug and place wire where it cannot come in "DISENGAGED" position. • Move attachment lift lever forward to lower mower to its lowest position. • Roll belt off electric clutch pulley. • Disconnect anti-sway bar from chassis bracket by removing retainer spring. ... from the right side of tractor. • Lower lift lever to its highest position. • Slide mower under tractor. IMPORTANT: If an attachment other than the mower deck is to be easier to remove from under tractor with deflector shield to chassis bracket and secure with plug. ...
...spark plug wire from spark plug and place wire where it cannot come in "DISENGAGED" position. • Move attachment lift lever forward to lower mower to its lowest position. • Roll belt off electric clutch pulley. • Disconnect anti-sway bar from chassis bracket by removing retainer spring. ... from the right side of tractor. • Lower lift lever to its highest position. • Slide mower under tractor. IMPORTANT: If an attachment other than the mower deck is to be easier to remove from under tractor with deflector shield to chassis bracket and secure with plug. ...

User Manual
Page 21
...of turns. • When distance "D" is 1/8" to ground. BELT REMOVAL • Remove mower from bottom edge of mower, loosen nut "F" from mower. 21 If tires are over or underinflated, you will change mower height about 1/8". • Recheck measurements after adjusting. IF THE FOLLOWING FRONT-TO-BACK ADJUSTMENT IS... NECESSARY, BE SURE TO ADJUST BOTH FRONT LINKS EQUALLY SO MOWER WILL STAY LEVEL SIDE-TOSIDE. Make sure tires are not equal in front and behind the mandrel at front than rear, tighten nuts...
...of turns. • When distance "D" is 1/8" to ground. BELT REMOVAL • Remove mower from bottom edge of mower, loosen nut "F" from mower. 21 If tires are over or underinflated, you will change mower height about 1/8". • Recheck measurements after adjusting. IF THE FOLLOWING FRONT-TO-BACK ADJUSTMENT IS... NECESSARY, BE SURE TO ADJUST BOTH FRONT LINKS EQUALLY SO MOWER WILL STAY LEVEL SIDE-TOSIDE. Make sure tires are not equal in front and behind the mandrel at front than rear, tighten nuts...

User Manual
Page 22
... "A" until distance becomes 1-3/4". TO ADJUST STEERING WHEEL ALIGNMENT If steering wheel crossbars are not horizontal (left footrest. • Remove mower (See "TO REMOVE MOWER" in this manual. SERVICE AND ADJUSTMENTS BELT INSTALLATION • Work belt around electric clutch. • Install new belt by reversing... pulleys and idler pulleys. • Make sure belt is in all pulley grooves and inside all belt guides. • Install mower (See "To Install Mower" in this section of this manual.) • Disconnect clutch wire harness. • Remove clutch locator. • Remove belt...
... "A" until distance becomes 1-3/4". TO ADJUST STEERING WHEEL ALIGNMENT If steering wheel crossbars are not horizontal (left footrest. • Remove mower (See "TO REMOVE MOWER" in this manual. SERVICE AND ADJUSTMENTS BELT INSTALLATION • Work belt around electric clutch. • Install new belt by reversing... pulleys and idler pulleys. • Make sure belt is in all pulley grooves and inside all belt guides. • Install mower (See "To Install Mower" in this section of this manual.) • Disconnect clutch wire harness. • Remove clutch locator. • Remove belt...
User Manual
Page 26
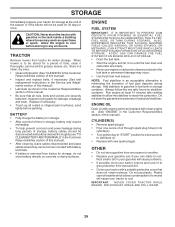
...do not store battery directly on stabilizer container. IMPORTANT: NEVER COVER TRACTOR WHILE ENGINE AND EXHAUST AREAS ARE STILL WARM. 26 TRACTOR Remove mower from dust and dirt. • Cover your tractor indoors and cover it run until the fuel lines and carburetor are securely fastened.... the tractor with a suitable protective cover that all rusted or chipped paint surfaces; Inspect moving parts for 30 days or more. When mower is to rust. Plastic cannot breathe which allows condensation to form and will not be disconnected and battery cleaned thoroughly (see "TO CLEAN...
...do not store battery directly on stabilizer container. IMPORTANT: NEVER COVER TRACTOR WHILE ENGINE AND EXHAUST AREAS ARE STILL WARM. 26 TRACTOR Remove mower from dust and dirt. • Cover your tractor indoors and cover it run until the fuel lines and carburetor are securely fastened.... the tractor with a suitable protective cover that all rusted or chipped paint surfaces; Inspect moving parts for 30 days or more. When mower is to rust. Plastic cannot breathe which allows condensation to form and will not be disconnected and battery cleaned thoroughly (see "TO CLEAN...

User Manual
Page 27
...of adjustment. Clean/replace muffler. 13. Excessive vibration 1. Bad spark plug. 5. Loose or damaged wiring. 9. Engine valves out of mower housing. 4. Weak or dead battery. 4. Check/replace ignition switch. 8. Check/replace solenoid or starter. Build-up of adjustment. 8.... Adjust Carburetor" in Operation section. 3. Hard to start 1. Dirty fuel filter. 5. Carburetor out of grass, leaves and trash under mower. 4. Recharge or replace battery. 4. Contact an authorized service center/department. Engine will not start CAUSE 1. Faulty operator presence switch(es...
...of adjustment. Clean/replace muffler. 13. Excessive vibration 1. Bad spark plug. 5. Loose or damaged wiring. 9. Engine valves out of mower housing. 4. Weak or dead battery. 4. Check/replace ignition switch. 8. Check/replace solenoid or starter. Build-up of adjustment. 8.... Adjust Carburetor" in Operation section. 3. Hard to start 1. Dirty fuel filter. 5. Carburetor out of grass, leaves and trash under mower. 4. Recharge or replace battery. 4. Contact an authorized service center/department. Engine will not start CAUSE 1. Faulty operator presence switch(es...
User Manual
Page 28
... contact an authorized service center/ department. Worn, bent or loose blade. 2. Replace blade mandrel. 5. Level mower deck. 5. Tighten blade bolt. 7. Replace mower drive belt. 9. Replace with attachment clutch engaged CAUSE 1. Check wiring and connections. 5. Freewheel control in "... mowing. 4. Check/replace light switch. 4. Place freewheel control in "disengaged" position. 2. Buildup of grass, leaves and trash under mower. 4. Purge transmission. 1. Faulty light switch. 4. Bad battery cell(s). 2. Faulty alternator. 1. Engine throttle control not set at "...
... contact an authorized service center/ department. Worn, bent or loose blade. 2. Replace blade mandrel. 5. Level mower deck. 5. Tighten blade bolt. 7. Replace mower drive belt. 9. Replace with attachment clutch engaged CAUSE 1. Check wiring and connections. 5. Freewheel control in "... mowing. 4. Check/replace light switch. 4. Place freewheel control in "disengaged" position. 2. Buildup of grass, leaves and trash under mower. 4. Purge transmission. 1. Faulty light switch. 4. Bad battery cell(s). 2. Faulty alternator. 1. Engine throttle control not set at "...

User Manual
Page 33
... W/Lens 30 175692X428 Fender 31 139976 Bracket Fender 37 17490508 Screw Thdrol 6/16-18 x 1/2 TYT 38 175710 Bracket, Asm. inches 1 inch = 25.4 mm 33 Pivot Mower Rear 54 161464 Screw Hex Wshd 8-18 x 7/8 58 175351 Duct Hood 59 177579 Bushing Snap 60 72140606 Bolt RdHd Sqnk 3/8-16 Unc x 3/4 64 174997 Dash...-18 209 17000612 Screw Hexwsh Thdrol 3/8-16 x 3/4 213 169848X428 Skirt Grille Lh 214 169847X428 Skirt Grille Rh NOTE: All component dimensions given in U.S. MODEL NUMBER PR20PH42STB CHASSIS AND ENCLOSURES KEY PART NO.
... W/Lens 30 175692X428 Fender 31 139976 Bracket Fender 37 17490508 Screw Thdrol 6/16-18 x 1/2 TYT 38 175710 Bracket, Asm. inches 1 inch = 25.4 mm 33 Pivot Mower Rear 54 161464 Screw Hex Wshd 8-18 x 7/8 58 175351 Duct Hood 59 177579 Bushing Snap 60 72140606 Bolt RdHd Sqnk 3/8-16 Unc x 3/4 64 174997 Dash...-18 209 17000612 Screw Hexwsh Thdrol 3/8-16 x 3/4 213 169848X428 Skirt Grille Lh 214 169847X428 Skirt Grille Rh NOTE: All component dimensions given in U.S. MODEL NUMBER PR20PH42STB CHASSIS AND ENCLOSURES KEY PART NO.

User Manual
Page 40
... NUMBER PR20PH42STB 11 2 12 16 4 4 3 13 10 2 9 1 8 15 20 6 5 14 KEY PART NO. NO. 1 164095 2 176303 3 176273 4 177020 5 170851 6 173587 7 173589 8 170563 9 172740 10 157140 11 172743 DESCRIPTION Decal Dash Decal Fender Auto Decal Hood LH Decal Side Panel Decal HP Engine Decal Reflector Rh Decal Reflector Lh Decal Warning Mower Decal...
... NUMBER PR20PH42STB 11 2 12 16 4 4 3 13 10 2 9 1 8 15 20 6 5 14 KEY PART NO. NO. 1 164095 2 176303 3 176273 4 177020 5 170851 6 173587 7 173589 8 170563 9 172740 10 157140 11 172743 DESCRIPTION Decal Dash Decal Fender Auto Decal Hood LH Decal Side Panel Decal HP Engine Decal Reflector Rh Decal Reflector Lh Decal Warning Mower Decal...


