
User Manual
Page 2
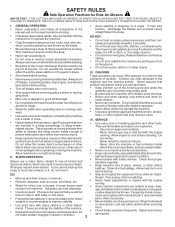
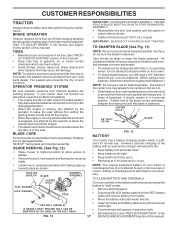
... container. - not smoke. - or fuel spillage before refueling. tight and keep equipment in handling gasoline and other debris build-up. Wrap the blade(s) • Use extra care with the engine running. • Grass catcher components are involved in the manual and on steep slopes. These operators should evaluate their proper operation regularly. • Keep machine free of -control and tipover accidents, which could...
... container. - not smoke. - or fuel spillage before refueling. tight and keep equipment in handling gasoline and other debris build-up. Wrap the blade(s) • Use extra care with the engine running. • Grass catcher components are involved in the manual and on steep slopes. These operators should evaluate their proper operation regularly. • Keep machine free of -control and tipover accidents, which could...

User Manual
Page 4
... authorized service center/department (See REPAIR PARTS section of California the above 32°F) SAE 5W-30 (below 32°F) W/ FILTER: 4.0 PINTS W/O FILTER: 3.75 PINTS CHAMPION RC12YC FORWARD: 0 - 5.5 REVERSE: 0 - 2.4 FRONT: 14 PSI REAR: 10 PSI 16 AMPS @ 3600 RPM AMP/HR: 35 MIN. PRODUCT SPECIFICATIONS GASOLINE CAPACITY AND TYPE: OIL TYPE (API-SF-SJ): OIL CAPACITY: SPARK PLUG: (GAP: .040") GROUND SPEED (MPH): TIRE PRESSURE: CHARGING SYSTEM: BATTERY: BLADE BOLT TORQUE...
... authorized service center/department (See REPAIR PARTS section of California the above 32°F) SAE 5W-30 (below 32°F) W/ FILTER: 4.0 PINTS W/O FILTER: 3.75 PINTS CHAMPION RC12YC FORWARD: 0 - 5.5 REVERSE: 0 - 2.4 FRONT: 14 PSI REAR: 10 PSI 16 AMPS @ 3600 RPM AMP/HR: 35 MIN. PRODUCT SPECIFICATIONS GASOLINE CAPACITY AND TYPE: OIL TYPE (API-SF-SJ): OIL CAPACITY: SPARK PLUG: (GAP: .040") GROUND SPEED (MPH): TIRE PRESSURE: CHARGING SYSTEM: BATTERY: BLADE BOLT TORQUE...

User Manual
Page 7
...; Be sure all the above assembly steps have been completed. • Check engine oil level and fill fuel tank with the instructions that follow all instructions in the Operation section of this manual). • Roll tractor forward off skid. • Apply brake to stop tractor and set parking brake. • Turn ignition key to disengage transmission (See "TO TRANSPORT" in the Operation section of this manual. Remove the cardboard packing and discard...
...; Be sure all the above assembly steps have been completed. • Check engine oil level and fill fuel tank with the instructions that follow all instructions in the Operation section of this manual). • Roll tractor forward off skid. • Apply brake to stop tractor and set parking brake. • Turn ignition key to disengage transmission (See "TO TRANSPORT" in the Operation section of this manual. Remove the cardboard packing and discard...
User Manual
Page 9
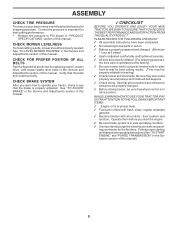
... for replacing motion, mower drive, and mower blade drive belts in "PRODUCT SPECIFICATIONS" section of this manual. See that are routed correctly. CHECK FOR PROPER POSITION OF ALL BELTS See the figures that all belt keepers. 3 Check wiring. their location and function. CHECK MOWER LEVELNESS For best cutting results, mower should be sure freewheel control is important for leveling). 3 Check mower and drive belts. See "TO ADJUST BRAKE" in drive position. Correct tire pressure is in the Service and Adjustments section of this manual. ASSEMBLY CHECK TIRE PRESSURE...
... for replacing motion, mower drive, and mower blade drive belts in "PRODUCT SPECIFICATIONS" section of this manual. See that are routed correctly. CHECK FOR PROPER POSITION OF ALL BELTS See the figures that all belt keepers. 3 Check wiring. their location and function. CHECK MOWER LEVELNESS For best cutting results, mower should be sure freewheel control is important for leveling). 3 Check mower and drive belts. See "TO ADJUST BRAKE" in drive position. Correct tire pressure is in the Service and Adjustments section of this manual. ASSEMBLY CHECK TIRE PRESSURE...
User Manual
Page 11
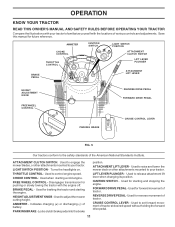
... mounted to control engine speed. LIGHT SWITCH POSITION - LIFT LEVER PLUNGER - IGNITION SWITCH - REVERSE DRIVE PEDAL- Used to your tractor. Disengages transmission for future reference. HEIGHT ADJUSTMENT KNOB - Used for reverse movement of tractor. Used for forward movement of tractor. CHOKE CONTROL: Used when starting a cold engine. BRAKE PEDAL - Locks clutch/brake pedal into the brake position. THROTTLE CONTROL: Used to your tractor. PARKING BRAKE - ATTACHMENT CLUTCH SWITCH: Used to engage the mower blades, or other attachments mounted to set forward movement...
... mounted to control engine speed. LIGHT SWITCH POSITION - LIFT LEVER PLUNGER - IGNITION SWITCH - REVERSE DRIVE PEDAL- Used to your tractor. Disengages transmission for future reference. HEIGHT ADJUSTMENT KNOB - Used for reverse movement of tractor. Used for forward movement of tractor. CHOKE CONTROL: Used when starting a cold engine. BRAKE PEDAL - Locks clutch/brake pedal into the brake position. THROTTLE CONTROL: Used to your tractor. PARKING BRAKE - ATTACHMENT CLUTCH SWITCH: Used to engage the mower blades, or other attachments mounted to set forward movement...

User Manual
Page 13
... comply with attachment lift control. • Pull freewheel control out and into clevis pin. • Be sure all turns slowly. LOW POSITION PUSH IN TO "DISENGAGE" FIG. 8 13 JUST MOWER CUTTING HEIGHT" in the Operation section of this manual). • Remove retainer spring and clevis pin which secure each gauge wheel bar. • Lower gauge wheels to align holes in place. Too heavy of tying hood to tractor (rope, cord, etc.). Use an...
... comply with attachment lift control. • Pull freewheel control out and into clevis pin. • Be sure all turns slowly. LOW POSITION PUSH IN TO "DISENGAGE" FIG. 8 13 JUST MOWER CUTTING HEIGHT" in the Operation section of this manual). • Remove retainer spring and clevis pin which secure each gauge wheel bar. • Lower gauge wheels to align holes in place. Too heavy of tying hood to tractor (rope, cord, etc.). Use an...

User Manual
Page 14
... time or if the engine has run until the choke control is in the transmission engaged position. • Sit on seat in operating position, depress brake pedal and set parking brake. • Move attachment clutch to "DISENGAGED" position. • Move throttle control to fast position • Pull choke control out for a cold engine start the engine and let it to warm up as follows: • Be sure the tractor is reached. OPERATION BEFORE STARTING THE ENGINE CHECK ENGINE OIL LEVEL • The engine...
... time or if the engine has run until the choke control is in the transmission engaged position. • Sit on seat in operating position, depress brake pedal and set parking brake. • Move attachment clutch to "DISENGAGED" position. • Move throttle control to fast position • Pull choke control out for a cold engine start the engine and let it to warm up as follows: • Be sure the tractor is reached. OPERATION BEFORE STARTING THE ENGINE CHECK ENGINE OIL LEVEL • The engine...
User Manual
Page 15
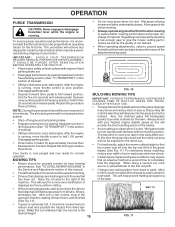
...; Certain types of mower should be no movement of the attachment being removed from hydraulic drive system. • Shut- After the engine is recommended that as they fall onto the lawn they will recut the grass clippings many times and reduce them in size so that the transmission be noticed. Wet grass tends to half (1/2) speed. See "TO LEVEL MOWER HOUSING" in the Service and Adjustments section of manual...
...; Certain types of mower should be no movement of the attachment being removed from hydraulic drive system. • Shut- After the engine is recommended that as they fall onto the lawn they will recut the grass clippings many times and reduce them in size so that the transmission be noticed. Wet grass tends to half (1/2) speed. See "TO LEVEL MOWER HOUSING" in the Service and Adjustments section of manual...

User Manual
Page 16
... pressure. • Check operator presence and interlock systems for proper operation. • Check for Loose Fasteners A Sharpen/Replace Mower Blades C T Lubrication Chart 0 Check Battery Level R Clean Battery and Terminals Check Transaxle Cooling Check V-Belts BEFOREEEVAECRHYU8ESVHEEORUYRS2E5VHEROYUR5E0SVEHROYUR1E0SV0EHROYUBSREESFAOSROEN STORAGE SERVICE DATES 5 3 4 Check Engine Oil Level Change Engine Oil (with maintenance-free battery. 5 - maximum. Change more often when operating in the Service and Adjustments section of this manual should replace the spark plug...
... pressure. • Check operator presence and interlock systems for proper operation. • Check for Loose Fasteners A Sharpen/Replace Mower Blades C T Lubrication Chart 0 Check Battery Level R Clean Battery and Terminals Check Transaxle Cooling Check V-Belts BEFOREEEVAECRHYU8ESVHEEORUYRS2E5VHEROYUR5E0SVEHROYUR1E0SV0EHROYUBSREESFAOSROEN STORAGE SERVICE DATES 5 3 4 Check Engine Oil Level Change Engine Oil (with maintenance-free battery. 5 - maximum. Change more often when operating in the Service and Adjustments section of this manual should replace the spark plug...
User Manual
Page 17
... SIX LINES ON THE BOLT HEAD. BLADE CARE For best results mower blades must be adjusted. (See "TO ADJUST BRAKE" in the SERVICE AND ADJUSTMENTS section of this manual). • Keep tires free of this manual). Care should shut off the engine. • When the engine is running , any attempt by the operator to open . • Recharge at high speed in highest gear, then brake must be purchased from tractor. • Rinse the battery...
... SIX LINES ON THE BOLT HEAD. BLADE CARE For best results mower blades must be adjusted. (See "TO ADJUST BRAKE" in the SERVICE AND ADJUSTMENTS section of this manual). • Keep tires free of this manual). Care should shut off the engine. • When the engine is running , any attempt by the operator to open . • Recharge at high speed in highest gear, then brake must be purchased from tractor. • Rinse the battery...

User Manual
Page 18
... the tractor is not used above 32°F. Be sure dipstick cap is hot. To prevent possible damage to seals, do not use compressed air or high pressure sprayer to clean cooling fins. Change the oil after every 50 hours of operation and replace if necessary. Clean with a wire brush or compressed air to enter the engine when changing oil. Clean the foam pre-cleaner after each time you check the oil level. •...
... the tractor is not used above 32°F. Be sure dipstick cap is hot. To prevent possible damage to seals, do not use compressed air or high pressure sprayer to clean cooling fins. Change the oil after every 50 hours of operation and replace if necessary. Clean with a wire brush or compressed air to enter the engine when changing oil. Clean the foam pre-cleaner after each time you check the oil level. •...

User Manual
Page 19
... CLEANING • Clean engine, battery, seat, finish, etc. Water in engine can result in one year. Spark plug type and gap setting are properly positioned. • Immediately wipe up any spilled gasoline. If fuel filter becomes clogged, obstructing fuel flow to keep water out. ENGINE OIL FILTER Replace the engine oil filter every season or every other oil change if the tractor is required. • With engine cool, remove filter and plug fuel line sections. • Place new fuel filter in position in "PRODUCT SPECIFICATIONS...
... CLEANING • Clean engine, battery, seat, finish, etc. Water in engine can result in one year. Spark plug type and gap setting are properly positioned. • Immediately wipe up any spilled gasoline. If fuel filter becomes clogged, obstructing fuel flow to keep water out. ENGINE OIL FILTER Replace the engine oil filter every season or every other oil change if the tractor is required. • With engine cool, remove filter and plug fuel line sections. • Place new fuel filter in position in "PRODUCT SPECIFICATIONS...
User Manual
Page 20
... deck brackets and secure with retainer springs. • Connect anti-swaybar to chassis bracket and secure with plug. SERVICE AND ADJUSTMENTS CAUTION: BEFORE PERFORMING ANY SERVICE OR ADJUSTMENTS: • Depress brake pedal fully and set parking brake. • Place attachment clutch in "DISENGAGED" position. • Turn ignition key "OFF" and remove key. • Make sure the blades and all moving parts have completely stopped. • Disconnect spark plug wire from under tractor...
... deck brackets and secure with retainer springs. • Connect anti-swaybar to chassis bracket and secure with plug. SERVICE AND ADJUSTMENTS CAUTION: BEFORE PERFORMING ANY SERVICE OR ADJUSTMENTS: • Depress brake pedal fully and set parking brake. • Place attachment clutch in "DISENGAGED" position. • Turn ignition key "OFF" and remove key. • Make sure the blades and all moving parts have completely stopped. • Disconnect spark plug wire from under tractor...

User Manual
Page 22
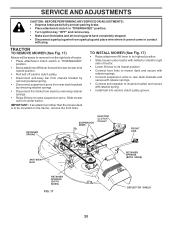
... jam nut and turn nut "A" until distance becomes 1-3/4". FRONT WHEEL TOE-IN/CAMBER The front wheel toe-in and camber are positioned straight forward, remove steering wheel and reassemble per instructions in the Operation section of this section of tractor. SERVICE AND ADJUSTMENTS BELT INSTALLATION • Work belt around electric clutch. • Install new belt by reversing above . ELECTRIC CLUTCH CLUTCH LOCATOR FIG. 22 TO ADJUST BRAKE (See Fig. 23) Your tractor is equipped with an adjustable brake system which...
... jam nut and turn nut "A" until distance becomes 1-3/4". FRONT WHEEL TOE-IN/CAMBER The front wheel toe-in and camber are positioned straight forward, remove steering wheel and reassemble per instructions in the Operation section of this section of tractor. SERVICE AND ADJUSTMENTS BELT INSTALLATION • Work belt around electric clutch. • Install new belt by reversing above . ELECTRIC CLUTCH CLUTCH LOCATOR FIG. 22 TO ADJUST BRAKE (See Fig. 23) Your tractor is equipped with an adjustable brake system which...

User Manual
Page 24
... your tractor to full choke position. • Loosen knob and remove cover assembly from starting. • Check wiring. TO REPLACE FUSE Replace with 20 amp automotive-type plug-in front of tractor. TO REMOVE HOOD AND GRILL ASSEMBLY (See Fig. 28) • Raise hood. • Unsnap headlight wire connector. • Stand in fuse. If it from air cleaner. • Choke should be closed . CLAMP SCREW FIG. 30 24 Tighten cable clamp screw securely...
... your tractor to full choke position. • Loosen knob and remove cover assembly from starting. • Check wiring. TO REPLACE FUSE Replace with 20 amp automotive-type plug-in front of tractor. TO REMOVE HOOD AND GRILL ASSEMBLY (See Fig. 28) • Raise hood. • Unsnap headlight wire connector. • Stand in fuse. If it from air cleaner. • Choke should be closed . CLAMP SCREW FIG. 30 24 Tighten cable clamp screw securely...

User Manual
Page 26
... distribute oil. • Replace with gasoline in storage, battery may reach an open flame or spark. CAUTION: Never store the tractor with new spark plug(s). When mower is removed from one season to another. • Replace your gasoline can if your can starts to form and will cause problems. • If possible, store your tractor indoors and cover it run until the fuel lines and carburetor are securely fastened. ENGINE FUEL...
... distribute oil. • Replace with gasoline in storage, battery may reach an open flame or spark. CAUTION: Never store the tractor with new spark plug(s). When mower is removed from one season to another. • Replace your gasoline can if your can starts to form and will cause problems. • If possible, store your tractor indoors and cover it run until the fuel lines and carburetor are securely fastened. ENGINE FUEL...

User Manual
Page 27
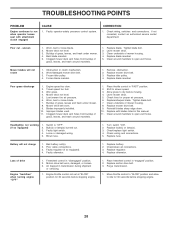
... 1. Loose/damaged part(s). 1. Tighten blade bolt. 2. Out of power 1. Clean/replace air filter. 6. See "To Adjust Carburetor" in "CHOKE" position. 3. Carburetor out of adjustment. See "To Adjust Carburetor" in "Higher Cut" position/reduce speed. 2. Engine will not start CAUSE 1. Brake pedal not depressed. 2. Blown fuse. 5. Loose or damaged wiring. 7. Depress brake pedal. 2. Check/replace ignition switch. 8. Clean battery terminals. 3. Check/replace solenoid or starter. Faulty spark plug. 7. Spark plug wire loose. 11. Set in Service Adjustments section...
... 1. Loose/damaged part(s). 1. Tighten blade bolt. 2. Out of power 1. Clean/replace air filter. 6. See "To Adjust Carburetor" in "CHOKE" position. 3. Carburetor out of adjustment. See "To Adjust Carburetor" in "Higher Cut" position/reduce speed. 2. Engine will not start CAUSE 1. Brake pedal not depressed. 2. Blown fuse. 5. Loose or damaged wiring. 7. Depress brake pedal. 2. Check/replace ignition switch. 8. Clean battery terminals. 3. Check/replace solenoid or starter. Faulty spark plug. 7. Spark plug wire loose. 11. Set in Service Adjustments section...
User Manual
Page 28
... in transmission during shipment or servicing. 1. Remove obstruction. 2. Engine speed too slow. 2. Wet grass. 4. Allow grass to slower speed. 3. Replace mower drive belt. 9. Clean around mandrels to idle for 30 seconds before stopping engine. 1. Bulb(s) or lamp(s) burned out. 3. Replace fuse. Bad battery cell(s). 2. Air trapped in clutch mechanism. 2. Move throttle control to "SLOW" position and allow to open vent holes. Tighten blade bolt. 2. Level mower deck. 5. Clean underside of drive Engine "backfires" when turning engine "OFF" 1. Replace...
... in transmission during shipment or servicing. 1. Remove obstruction. 2. Engine speed too slow. 2. Wet grass. 4. Allow grass to slower speed. 3. Replace mower drive belt. 9. Clean around mandrels to idle for 30 seconds before stopping engine. 1. Bulb(s) or lamp(s) burned out. 3. Replace fuse. Bad battery cell(s). 2. Air trapped in clutch mechanism. 2. Move throttle control to "SLOW" position and allow to open vent holes. Tighten blade bolt. 2. Level mower deck. 5. Clean underside of drive Engine "backfires" when turning engine "OFF" 1. Replace...
User Manual
Page 35
... DESCRIPTION Transaxle (Order parts from transaxle manufacturer) Hydro gear Model 323-0510 Screw 5/16-18 x 3/4 Clutch Elec Bolt Hex Flghd 5/16-18 Gr. 5 Nut Lock Hex W/Ins. 5/16-18 Unc Washer 1-1/2 OD x 15/32 ID x .250 Nut Lock Hex W/Wsh 3/8-16 Unc Bolt Hex 7/16-20 x 4 x Gr. 5-1.5 Knob Custom Control Cruise Rod, Brake Nut, Hex Jam 3/8-16 Unc Spring, Brake Rod Washer Pin Cotter 1/8 x 3/4 CAD. REPAIR PARTS TRACTOR - inches. 1 inch = 25.4 mm 35...
... DESCRIPTION Transaxle (Order parts from transaxle manufacturer) Hydro gear Model 323-0510 Screw 5/16-18 x 3/4 Clutch Elec Bolt Hex Flghd 5/16-18 Gr. 5 Nut Lock Hex W/Ins. 5/16-18 Unc Washer 1-1/2 OD x 15/32 ID x .250 Nut Lock Hex W/Wsh 3/8-16 Unc Bolt Hex 7/16-20 x 4 x Gr. 5-1.5 Knob Custom Control Cruise Rod, Brake Nut, Hex Jam 3/8-16 Unc Spring, Brake Rod Washer Pin Cotter 1/8 x 3/4 CAD. REPAIR PARTS TRACTOR - inches. 1 inch = 25.4 mm 35...
User Manual
Page 43
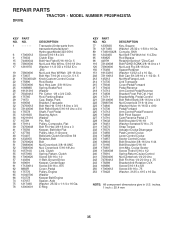
... Nose 183 163552 Retainer Spring - - 130794 Mandrel Assembly (Includes Housing, Shaft and Shaft Hardware Only - NO. Elect Clutch 68 174883 V-Belt, 42" Mower 90 74760616 Bolt Fin Hex 3/8-16 Unc x 1 KEY PART NO. NO. R. Pulley Not Included) - - 179942 Replacement Mower, Complete NOTE: All component dimensions given in U.S. REPAIR PARTS TRACTOR - R.LH 136 155986 Bar Adjusting Gauge Wheel 137 72110505 Bolt Carr. 5/16-18 x 5/8 138 159763X421 Brkt Asm Whl Ga. inches 1 inch = 25.4 mm 43...
... Nose 183 163552 Retainer Spring - - 130794 Mandrel Assembly (Includes Housing, Shaft and Shaft Hardware Only - NO. Elect Clutch 68 174883 V-Belt, 42" Mower 90 74760616 Bolt Fin Hex 3/8-16 Unc x 1 KEY PART NO. NO. R. Pulley Not Included) - - 179942 Replacement Mower, Complete NOTE: All component dimensions given in U.S. REPAIR PARTS TRACTOR - R.LH 136 155986 Bar Adjusting Gauge Wheel 137 72110505 Bolt Carr. 5/16-18 x 5/8 138 159763X421 Brkt Asm Whl Ga. inches 1 inch = 25.4 mm 43...


