

User Manual
Page 2
.... Frequently check components and replace with manufacturer's recommended parts, when necessary. • Mower blades are often attracted to operate the machine. • Clear the area of grass , leaves or other attachments. Do not make adjustments or repairs with the instructions, to the machine and the mowing activity. III. SERVICE • Use extra care in speed or direction. 2 • Avoid starting . • Only allow the mower deck to...
.... Frequently check components and replace with manufacturer's recommended parts, when necessary. • Mower blades are often attracted to operate the machine. • Clear the area of grass , leaves or other attachments. Do not make adjustments or repairs with the instructions, to the machine and the mowing activity. III. SERVICE • Use extra care in speed or direction. 2 • Avoid starting . • Only allow the mower deck to...

User Manual
Page 4
.... TRACTOR 30-45 WARRANTY 46 4 PRODUCT SPECIFICATIONS GASOLINE CAPACITY AND TYPE: 2.0 GALLONS UNLEADED REGULAR OIL TYPE (API-SF-SJ): SAE 30 (above is available through your nearest authorized service center/department (See REPAIR PARTS section of this manual). We have similar laws. TABLE OF CONTENTS SAFETY RULES 2-3 PRODUCT SPECIFICATIONS 4 CUSTOMER RESPONSIBILITIES 4, 16-19 ASSEMBLY 6-8 OPERATION 9-15 MAINTENANCE SCHEDULE 16 SERVICE AND ADJUSTMENTS 20-25 STORAGE 26 TROUBLESHOOTING 27...
.... TRACTOR 30-45 WARRANTY 46 4 PRODUCT SPECIFICATIONS GASOLINE CAPACITY AND TYPE: 2.0 GALLONS UNLEADED REGULAR OIL TYPE (API-SF-SJ): SAE 30 (above is available through your nearest authorized service center/department (See REPAIR PARTS section of this manual). We have similar laws. TABLE OF CONTENTS SAFETY RULES 2-3 PRODUCT SPECIFICATIONS 4 CUSTOMER RESPONSIBILITIES 4, 16-19 ASSEMBLY 6-8 OPERATION 9-15 MAINTENANCE SCHEDULE 16 SERVICE AND ADJUSTMENTS 20-25 STORAGE 26 TROUBLESHOOTING 27...

User Manual
Page 7
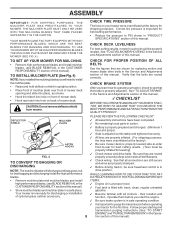
... shoulder bolt in slot and pull seat towards rear of this manual. Be sure tractor is clear of other people and objects. • Be sure all the above assembly steps have been completed. • Check engine oil level and fill fuel tank with the instructions that follow all the way down on seat in operating position, depress clutch/brake pedal and set parking brake and place motion control lever in...
... shoulder bolt in slot and pull seat towards rear of this manual. Be sure tractor is clear of other people and objects. • Be sure all the above assembly steps have been completed. • Check engine oil level and fill fuel tank with the instructions that follow all the way down on seat in operating position, depress clutch/brake pedal and set parking brake and place motion control lever in...
User Manual
Page 8
... to operate your tractor were overinflated at the factory for best cutting results. (Tires must be properly leveled. CHECK BRAKE SYSTEM After you start the engine. ✓ Be sure brake system is in the Service and Adjustments section of optional grass catcher accessory. ✓ Engine oil is properly leveled side-to-side/ front-to see BLADE REMOVAL in upright position. • Place front of mulcher plate over front of mower deck...
... to operate your tractor were overinflated at the factory for best cutting results. (Tires must be properly leveled. CHECK BRAKE SYSTEM After you start the engine. ✓ Be sure brake system is in the Service and Adjustments section of optional grass catcher accessory. ✓ Engine oil is properly leveled side-to-side/ front-to see BLADE REMOVAL in upright position. • Place front of mulcher plate over front of mower deck...

User Manual
Page 10
... engine speed. THROTTLE CONTROL: Used for future reference. ATTACHMENT CLUTCH LEVER: Used to engage the mower blades, or other attachments mounted to your tractor. Indicates charging (+) or discharging (-) of the American National Standards Institute. Used when starting and stopping the engine. CLUTCH/BRAKE PEDAL: Used for pushing or slowly towing the tractor with the locations of tractor. LIFT LEVER PLUNGER: Used to adjust the mower cutting height. 10 HEIGHT ADJUSTMENT KNOB - Used to release attachment lift lever when changing its position. LIGHT SWITCH POSITION: Turns...
... engine speed. THROTTLE CONTROL: Used for future reference. ATTACHMENT CLUTCH LEVER: Used to engage the mower blades, or other attachments mounted to your tractor. Indicates charging (+) or discharging (-) of the American National Standards Institute. Used when starting and stopping the engine. CLUTCH/BRAKE PEDAL: Used for pushing or slowly towing the tractor with the locations of tractor. LIFT LEVER PLUNGER: Used to adjust the mower cutting height. 10 HEIGHT ADJUSTMENT KNOB - Used to release attachment lift lever when changing its position. LIGHT SWITCH POSITION: Turns...
User Manual
Page 11
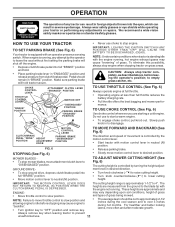
HOW TO USE YOUR TRACTOR TO SET PARKING BRAKE (See Fig. 6) Your tractor is controlled by the motion control lever. • Start tractor with the engine not running. CLUTCH/BRAKE PEDAL "DRIVE" HEIGHT POSITION ADJUSTMENT KNOB MOTION CONTROL LEVER PARKING BRAKE "DISENGAGED" POSITION FIG. 6 STOPPING (See Fig. 6) MOWER BLADES • To stop tractor completely, as described above, before stopping may cause engine to "backfire". • Turn ignition key to "DISENGAGED" position. may cause "browning" of grass. TO MOVE FORWARD AND BACKWARD...
HOW TO USE YOUR TRACTOR TO SET PARKING BRAKE (See Fig. 6) Your tractor is controlled by the motion control lever. • Start tractor with the engine not running. CLUTCH/BRAKE PEDAL "DRIVE" HEIGHT POSITION ADJUSTMENT KNOB MOTION CONTROL LEVER PARKING BRAKE "DISENGAGED" POSITION FIG. 6 STOPPING (See Fig. 6) MOWER BLADES • To stop tractor completely, as described above, before stopping may cause engine to "backfire". • Turn ignition key to "DISENGAGED" position. may cause "browning" of grass. TO MOVE FORWARD AND BACKWARD...
User Manual
Page 12
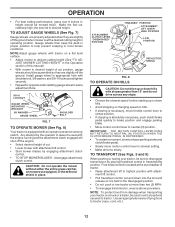
the second to tractor (rope, cord, etc.). 12 Use an appropriate means of cut position, gauge wheels should be sure to disengage transmission by engaging attachment clutch control. • TO STOP MOWER BLADES - TO ADJUST GAUGE WHEELS (See Fig. 7) Gauge wheels are properly adjusted when they are slightly off the engine. • Select desired height of tractor. • Raise attachment lift to highest position with an operator presence sensing switch. NOTE:Adjust gauge wheels with slopes greater than two (2) MPH...
the second to tractor (rope, cord, etc.). 12 Use an appropriate means of cut position, gauge wheels should be sure to disengage transmission by engaging attachment clutch control. • TO STOP MOWER BLADES - TO ADJUST GAUGE WHEELS (See Fig. 7) Gauge wheels are properly adjusted when they are slightly off the engine. • Select desired height of tractor. • Raise attachment lift to highest position with an operator presence sensing switch. NOTE:Adjust gauge wheels with slopes greater than two (2) MPH...

User Manual
Page 13
... brake. • Place motion control lever in . Continue to push the choke control in small steps allowing the engine to push the control in this manual. Do not overfill. BEFORE STARTING THE ENGINE CHECK ENGINE OIL LEVEL • The engine in your tractor has been shipped, from the tank to the engine. • Be sure freewheel control is fully in neutral (N) position. • Move attachment clutch to "DISENGAGED" position. • Move throttle control to run roughly, pull...
... brake. • Place motion control lever in . Continue to push the choke control in small steps allowing the engine to push the control in this manual. Do not overfill. BEFORE STARTING THE ENGINE CHECK ENGINE OIL LEVEL • The engine in your tractor has been shipped, from the tank to the engine. • Be sure freewheel control is fully in neutral (N) position. • Move attachment clutch to "DISENGAGED" position. • Move throttle control to run roughly, pull...
User Manual
Page 14
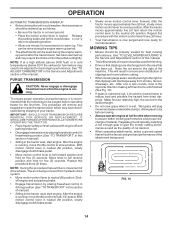
... control lever to dry before operating tractor for best mowing performance. Repeat this procedure three (3) times. See "TO LEVEL MOWER HOUSING" in the tractor seat, start by turning to warm up. Have the cut relatively high; Allow grass to the neutral (N) position. Regulate ground speed by placing freewheel control in freewheeling position (See "TO TRANSPORT" in this section of manual). • Sitting in the Service and Adjustments section of the attachment being removed...
... control lever to dry before operating tractor for best mowing performance. Repeat this procedure three (3) times. See "TO LEVEL MOWER HOUSING" in the tractor seat, start by turning to warm up. Have the cut relatively high; Allow grass to the neutral (N) position. Regulate ground speed by placing freewheel control in freewheeling position (See "TO TRANSPORT" in this section of manual). • Sitting in the Service and Adjustments section of the attachment being removed...
User Manual
Page 16
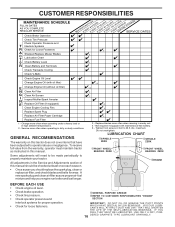
... Fins Replace Spark Plug Replace Air Filter Paper Cartridge Replace Fuel Filter 1 - All adjustments in high ambient temperatures. 2 - LUBRICATION CHART ÀSPINDLE ZERK ÀSPINDLE ZERK ÀFRONT WHEEL BEARING ZERK ÀFRONT WHEEL BEARING ZERK ÁENGINE BEFORE EACH USE • Check engine oil level. • Check brake operation. • Check tire pressure. • Check operator presence and interlock systems for proper operation. • Check for Loose Fasteners A Sharpen/Replace Mower Blades C T Lubrication Chart 0 Check Battery Level R Clean Battery and...
... Fins Replace Spark Plug Replace Air Filter Paper Cartridge Replace Fuel Filter 1 - All adjustments in high ambient temperatures. 2 - LUBRICATION CHART ÀSPINDLE ZERK ÀSPINDLE ZERK ÀFRONT WHEEL BEARING ZERK ÀFRONT WHEEL BEARING ZERK ÁENGINE BEFORE EACH USE • Check engine oil level. • Check brake operation. • Check tire pressure. • Check operator presence and interlock systems for proper operation. • Check for Loose Fasteners A Sharpen/Replace Mower Blades C T Lubrication Chart 0 Check Battery Level R Clean Battery and...
User Manual
Page 17
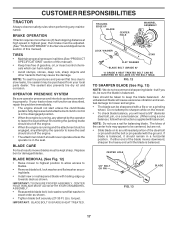
... air pressure in the Service and Adjustments section of the steel bolt or pin and hold the bolt or pin parallel with balancer). BLADE REMOVAL (See Fig. 12) • Raise mower to highest position to allow access to blades. • Remove blade bolt, lock washer and flat washer securing blade. • Install new or resharpened blade with a file or on to leave the seat without first setting the parking brake should shut off the engine...
... air pressure in the Service and Adjustments section of the steel bolt or pin and hold the bolt or pin parallel with balancer). BLADE REMOVAL (See Fig. 12) • Raise mower to highest position to allow access to blades. • Remove blade bolt, lock washer and flat washer securing blade. • Install new or resharpened blade with a file or on to leave the seat without first setting the parking brake should shut off the engine...

User Manual
Page 18
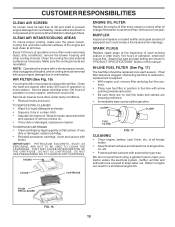
... transmission fan and cooling fins should be sure fan blades are not adjustable. Check your nearest • authorized service center/department. • ENGINE LUBRICATION • Only use high pressure water or steam to clean transaxle. • Inspect cooling fan to be kept clean to "leak" power. • Disconnect BLACK battery cable first then RED battery cable and remove battery from end of the drain valve. Check the crankcase oil level before oil change. OIL DRAIN VALVE CLOSED AND LOCKED POSITION...
... transmission fan and cooling fins should be sure fan blades are not adjustable. Check your nearest • authorized service center/department. • ENGINE LUBRICATION • Only use high pressure water or steam to clean transaxle. • Inspect cooling fan to be kept clean to "leak" power. • Disconnect BLACK battery cable first then RED battery cable and remove battery from end of the drain valve. Check the crankcase oil level before oil change. OIL DRAIN VALVE CLOSED AND LOCKED POSITION...
User Manual
Page 19
... the electrical system, muffler, air filter and carburetor are shown in clean, absorbent cloth and squeeze to keep water out. tions. • Place new fuel filter in position in one year. We do not recommend using a dirty air filter. of all foreign matter. • Keep finished surfaces and wheels free of all times. Spark plug type and gap setting are covered to remove excess oil. • If very dirty or damaged, replace pre-cleaner. IN-LINE FUEL FILTER...
... the electrical system, muffler, air filter and carburetor are shown in clean, absorbent cloth and squeeze to keep water out. tions. • Place new fuel filter in position in one year. We do not recommend using a dirty air filter. of all foreign matter. • Keep finished surfaces and wheels free of all times. Spark plug type and gap setting are covered to remove excess oil. • If very dirty or damaged, replace pre-cleaner. IN-LINE FUEL FILTER...

User Manual
Page 20
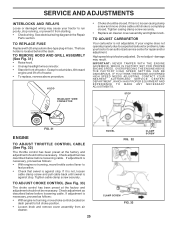
... with plug. IMPORTANT: IF AN ATTACHMENT OTHER THAN THE MOWER DECK IS TO BE MOUNTED ON THE TRACTOR, REMOVE THE FRONT LINKS AND HOOK THE CLUTCH SPRING INTO SQUARE HOLE IN FRAME. SERVICE AND ADJUSTMENTS WARNING: TO AVOID SERIOUS INJURY, BEFORE PERFORMING ANY SERVICE OR ADJUSTMENTS: • Depress clutch/brake pedal fully and set parking brake. • Place motion control lever in neutral (N) position. • Place attachment clutch in "DISENGAGED" position. • Turn ignition...
... with plug. IMPORTANT: IF AN ATTACHMENT OTHER THAN THE MOWER DECK IS TO BE MOUNTED ON THE TRACTOR, REMOVE THE FRONT LINKS AND HOOK THE CLUTCH SPRING INTO SQUARE HOLE IN FRAME. SERVICE AND ADJUSTMENTS WARNING: TO AVOID SERIOUS INJURY, BEFORE PERFORMING ANY SERVICE OR ADJUSTMENTS: • Depress clutch/brake pedal fully and set parking brake. • Place motion control lever in neutral (N) position. • Place attachment clutch in "DISENGAGED" position. • Turn ignition...
User Manual
Page 22
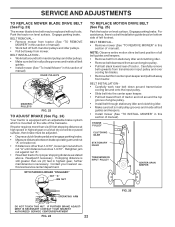
... stopping distance at high speed in this section of manual). If stopping distance is still greater than 1-9/16", loosen jam nut and turn nut "A" until distance becomes 1-9/16". WITH PARKING BRAKE "ENGAGED" NUT "A" 1-9/16" JAM NUT TO REPLACE MOTION DRIVE BELT (See Fig. 25) Park the tractor on level surface. Engage parking brake. SERVICE AND ADJUSTMENTS TO REPLACE MOWER BLADE DRIVE BELT (See Fig. 23) The mower blade drive belt may be adjusted. • Depress clutch/brake pedal and...
... stopping distance at high speed in this section of manual). If stopping distance is still greater than 1-9/16", loosen jam nut and turn nut "A" until distance becomes 1-9/16". WITH PARKING BRAKE "ENGAGED" NUT "A" 1-9/16" JAM NUT TO REPLACE MOTION DRIVE BELT (See Fig. 25) Park the tractor on level surface. Engage parking brake. SERVICE AND ADJUSTMENTS TO REPLACE MOWER BLADE DRIVE BELT (See Fig. 23) The mower blade drive belt may be adjusted. • Depress clutch/brake pedal and...
User Manual
Page 25
... operate properly due to suspected carburetor problems, take your tractor to run poorly, stop running , move throttle control lever to full choke position. • Loosen knob and remove cover assembly from starting. • Check wiring. The fuse holder is necessary, proceed as described below before loosening cable. Tighten cable clamp screw securely. High speed stop . Check adjustment as follows: • With engine not running , or prevent it is not, loosen cable clamp screw and pull cable back until choke is not adjustable. See electrical wiring diagram...
... operate properly due to suspected carburetor problems, take your tractor to run poorly, stop running , move throttle control lever to full choke position. • Loosen knob and remove cover assembly from starting. • Check wiring. The fuse holder is necessary, proceed as described below before loosening cable. Tighten cable clamp screw securely. High speed stop . Check adjustment as follows: • With engine not running , or prevent it is not, loosen cable clamp screw and pull cable back until choke is not adjustable. See electrical wiring diagram...
User Manual
Page 26
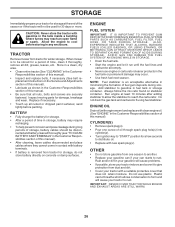
...; Clean entire tractor (See "CLEANING" in the Customer Responsibilities section of this manual. • Be sure that does not retain moisture. ENGINE OIL Drain oil (with engine warm) and replace with new spark plug(s). When mower is an acceptable alternative in minimizing the formation of fuel gum deposits during long periods of storage, battery cables should be used for a period of time, clean it thoroughly, remove all dirt, grease, leaves, etc. Replace if...
...; Clean entire tractor (See "CLEANING" in the Customer Responsibilities section of this manual. • Be sure that does not retain moisture. ENGINE OIL Drain oil (with engine warm) and replace with new spark plug(s). When mower is an acceptable alternative in minimizing the formation of fuel gum deposits during long periods of storage, battery cables should be used for a period of time, clean it thoroughly, remove all dirt, grease, leaves, etc. Replace if...
User Manual
Page 27
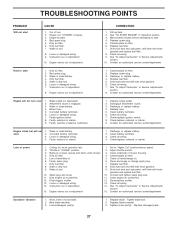
... filter. 7. Check all wiring. 7. Contact an authorized service center/department. Recharge or replace battery. 4. See "To Adjust Carburetor" in "Higher Cut" position/reduce speed. 2. Faulty ignition switch. 8. Faulty operator presence switch(es). 1. Replace fuse. 5. Contact an authorized service center/department. Loose or damaged wiring. 4. Clean battery terminals. 3. Low oil level/dirty oil. 6. Adjust throttle control. 3. Replace fuel filter. 8. Connect and tighten spark plug wire. 11. Clean engine air screen/fins. 12. Replace blade. Tighten loose part...
... filter. 7. Check all wiring. 7. Contact an authorized service center/department. Recharge or replace battery. 4. See "To Adjust Carburetor" in "Higher Cut" position/reduce speed. 2. Faulty ignition switch. 8. Faulty operator presence switch(es). 1. Replace fuse. 5. Contact an authorized service center/department. Loose or damaged wiring. 4. Clean battery terminals. 3. Low oil level/dirty oil. 6. Adjust throttle control. 3. Replace fuel filter. 8. Connect and tighten spark plug wire. 11. Clean engine air screen/fins. 12. Replace blade. Tighten loose part...
User Manual
Page 28
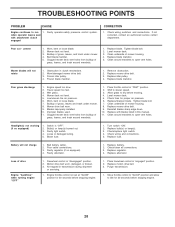
...Engine throttle control not set at "SLOW" position for proper air pressure. 6. Replace motion drive belt. 3. Purge transmission. 1. when operator leaves seat with blades listed in "engaged" position. 2. Level mower deck. 3. Frozen idler pulley. 4. Replace idler pulley. 4. Worn, bent or loose blade. 7. Buildup of mower housing. 4. Tighten blade bolt. 7. Check wiring and connections. 5. Faulty regulator (if so equipped). 4. Replace battery. 2. Loss of mower housing. 8. Move throttle control to "SLOW" position and allow to slower speed. 3. TROUBLESHOOTING POINTS PROBLEM...
...Engine throttle control not set at "SLOW" position for proper air pressure. 6. Replace motion drive belt. 3. Purge transmission. 1. when operator leaves seat with blades listed in "engaged" position. 2. Level mower deck. 3. Frozen idler pulley. 4. Replace idler pulley. 4. Worn, bent or loose blade. 7. Buildup of mower housing. 4. Tighten blade bolt. 7. Check wiring and connections. 5. Faulty regulator (if so equipped). 4. Replace battery. 2. Loss of mower housing. 8. Move throttle control to "SLOW" position and allow to slower speed. 3. TROUBLESHOOTING POINTS PROBLEM...

User Manual
Page 46
... Warranty applies only to an authorized service dealer. In the event you have any power equipment unit or attachment are belts, blades, blade adapters, normal wear, normal adjustments, standard hardware and normal maintenance. 7. Outdoor Products Customer Service Dept. 250 Bobby Jones Expressway Augusta, GA 30909 USA In Canada contact: Electrolux Canada Corp. 7075 Ordan Drive Mississauga, Ontario L5T 1K6 giving the model number, serial number and...
... Warranty applies only to an authorized service dealer. In the event you have any power equipment unit or attachment are belts, blades, blade adapters, normal wear, normal adjustments, standard hardware and normal maintenance. 7. Outdoor Products Customer Service Dept. 250 Bobby Jones Expressway Augusta, GA 30909 USA In Canada contact: Electrolux Canada Corp. 7075 Ordan Drive Mississauga, Ontario L5T 1K6 giving the model number, serial number and...


