
User Manual
Page 2
... to stop engine, and remove keys before dismounting. • Turn off blades, set parking brake, stop or shift while on wet grass. Use only an approved container. - Allow engine to operate the machine. • Clear the area of -control and tipover accidents, which can hide obstacles. • Use slow speed. Check their ability to operate the riding mower safely enough to operate the machine. • Use extra care...
... to stop engine, and remove keys before dismounting. • Turn off blades, set parking brake, stop or shift while on wet grass. Use only an approved container. - Allow engine to operate the machine. • Clear the area of -control and tipover accidents, which can hide obstacles. • Use slow speed. Check their ability to operate the riding mower safely enough to operate the machine. • Use extra care...

User Manual
Page 4
... SPECIFICATIONS 4 CUSTOMER RESPONSIBILITIES 4, 16-19 ASSEMBLY 6-8 OPERATION 9-15 MAINTENANCE SCHEDULE 16 SERVICE AND ADJUSTMENTS 20-25 STORAGE 26 TROUBLESHOOTING 27-28 REPAIR PARTS - TRACTOR 30-45 WARRANTY 46 4 Please read and retain this manual). CUSTOMER RESPONSIBILITIES • Read and observe the safety rules. • Follow a regular schedule in effective working order by law (Section 4442 of a new Tractor. PRODUCT SPECIFICATIONS GASOLINE CAPACITY AND TYPE: 2.0 GALLONS UNLEADED REGULAR OIL TYPE...
... SPECIFICATIONS 4 CUSTOMER RESPONSIBILITIES 4, 16-19 ASSEMBLY 6-8 OPERATION 9-15 MAINTENANCE SCHEDULE 16 SERVICE AND ADJUSTMENTS 20-25 STORAGE 26 TROUBLESHOOTING 27-28 REPAIR PARTS - TRACTOR 30-45 WARRANTY 46 4 Please read and retain this manual). CUSTOMER RESPONSIBILITIES • Read and observe the safety rules. • Follow a regular schedule in effective working order by law (Section 4442 of a new Tractor. PRODUCT SPECIFICATIONS GASOLINE CAPACITY AND TYPE: 2.0 GALLONS UNLEADED REGULAR OIL TYPE...

User Manual
Page 7
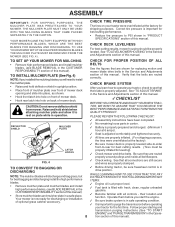
... remove from the skid. After engine has started, move throttle control to idle position. • Release parking brake. • Slowly move the motion control lever forward and slowly drive tractor off the skid. Remove the cardboard packing and discard. • Place seat on seat pan so head of shoulder bolt is in a well-ventilated area. ASSEMBLY SEAT PAN FIG. 2 INSTALL SEAT (See Fig. 3) Adjust seat before tightening adjustment knob. • Remove adjustment knob...
... remove from the skid. After engine has started, move throttle control to idle position. • Release parking brake. • Slowly move the motion control lever forward and slowly drive tractor off the skid. Remove the cardboard packing and discard. • Place seat on seat pan so head of shoulder bolt is in a well-ventilated area. ASSEMBLY SEAT PAN FIG. 2 INSTALL SEAT (See Fig. 3) Adjust seat before tightening adjustment knob. • Remove adjustment knob...
User Manual
Page 8
... proper level. ✓ Fuel tank is now ready for best bagging and discharging install the high performance blades. • Remove mulcher plate and mulcher blades and install high performance blades, (see BLADE REMOVAL in the Service and Adjustments section of this manual. CHECK TIRE PRESSURE The tires on plate while in the Service and Adjustments section of this manual. See "TO LEVEL MOWER HOUSING" in operation. Operate them before operating your tractor for replacing motion and mower blade drive belts in safe operating condition...
... proper level. ✓ Fuel tank is now ready for best bagging and discharging install the high performance blades. • Remove mulcher plate and mulcher blades and install high performance blades, (see BLADE REMOVAL in the Service and Adjustments section of this manual. CHECK TIRE PRESSURE The tires on plate while in the Service and Adjustments section of this manual. See "TO LEVEL MOWER HOUSING" in operation. Operate them before operating your tractor for replacing motion and mower blade drive belts in safe operating condition...

User Manual
Page 10
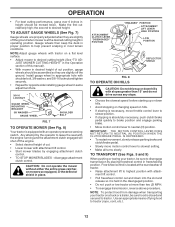
.... ATTACHMENT CLUTCH LEVER: Used to engage the mower blades, or other attachments mounted to your tractor. Indicates charging (+) or discharging (-) of the American National Standards Institute. CHOKE CONTROL - Used when starting and stopping the engine. FREEWHEEL CONTROL: Disengages transmission for controlling engine speed. IGNITION SWITCH: Used for declutching and braking the tractor and starting the engine. CHOKE CONTROL AMMETER ATTACHMENT CLUTCH LEVER IGNITION SWITCH THROTTLE CONTROL CLUTCH/BRAKE PEDAL HEIGHT ADJUSTMENT KNOB FREE WHEEL CONTROL LIGHT SWITCH POSITION...
.... ATTACHMENT CLUTCH LEVER: Used to engage the mower blades, or other attachments mounted to your tractor. Indicates charging (+) or discharging (-) of the American National Standards Institute. CHOKE CONTROL - Used when starting and stopping the engine. FREEWHEEL CONTROL: Disengages transmission for controlling engine speed. IGNITION SWITCH: Used for declutching and braking the tractor and starting the engine. CHOKE CONTROL AMMETER ATTACHMENT CLUTCH LEVER IGNITION SWITCH THROTTLE CONTROL CLUTCH/BRAKE PEDAL HEIGHT ADJUSTMENT KNOB FREE WHEEL CONTROL LIGHT SWITCH POSITION...

User Manual
Page 11
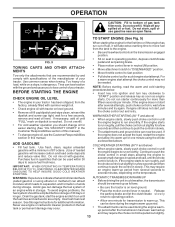
.... CLUTCH/BRAKE PEDAL "DRIVE" HEIGHT POSITION ADJUSTMENT KNOB MOTION CONTROL LEVER PARKING BRAKE "DISENGAGED" POSITION FIG. 6 STOPPING (See Fig. 6) MOWER BLADES • To stop engine. Always remove key when leaving tractor to slow position. CAUTION: Always stop tractor completely, as described above, before stopping may vary depending upon soil conditions, height of grass • Move throttle control to prevent unauthorized use choke to stop mower blades,move attachment clutch lever to "DISENGAGED" position. may cause engine to "backfire". • Turn ignition...
.... CLUTCH/BRAKE PEDAL "DRIVE" HEIGHT POSITION ADJUSTMENT KNOB MOTION CONTROL LEVER PARKING BRAKE "DISENGAGED" POSITION FIG. 6 STOPPING (See Fig. 6) MOWER BLADES • To stop engine. Always remove key when leaving tractor to slow position. CAUTION: Always stop tractor completely, as described above, before stopping may vary depending upon soil conditions, height of grass • Move throttle control to prevent unauthorized use choke to stop mower blades,move attachment clutch lever to "DISENGAGED" position. may cause engine to "backfire". • Turn ignition...
User Manual
Page 12
... your tractor, be assembled so they are slightly off the engine. • Select desired height of tractor. • Raise attachment lift to highest position with tractor on a truck or a trailer, be mowed twice. NOTE:Adjust gauge wheels with attach- Use an appropriate means of cut relatively high; OPERATION • For best cutting performance, grass over 6 inches in height should be sure to disengage transmission by engaging attachment clutch control. • TO STOP MOWER BLADES...
... your tractor, be assembled so they are slightly off the engine. • Select desired height of tractor. • Raise attachment lift to highest position with tractor on a truck or a trailer, be mowed twice. NOTE:Adjust gauge wheels with attach- Use an appropriate means of cut relatively high; OPERATION • For best cutting performance, grass over 6 inches in height should be sure to disengage transmission by engaging attachment clutch control. • TO STOP MOWER BLADES...
User Manual
Page 13
... choke control is on level ground. • Place the motion control lever in the transmission engaged position. Continue to push the choke control in small steps allowing the engine to fast position • Pull choke control out for a cold engine start the engine and let it to separation and formation of this manual). • To change engine oil, see the Customer Responsibilities section in quantities that can be used . To avoid engine problems, the fuel...
... choke control is on level ground. • Place the motion control lever in the transmission engaged position. Continue to push the choke control in small steps allowing the engine to fast position • Pull choke control out for a cold engine start the engine and let it to separation and formation of this manual). • To change engine oil, see the Customer Responsibilities section in quantities that can be used . To avoid engine problems, the fuel...
User Manual
Page 14
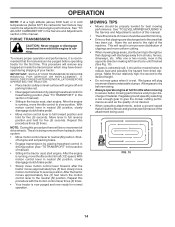
... (below 32 F) the carburetor fuel mixture may have developed during shipping of this manual. • The left hand turns until finished (See Fig. 10). • If grass is running, move motion control lever to reverse position. MOWING TIPS • Mower should be adjusted for normal operation. Allow grass to dry before operating tractor for five (5) seconds. IMPORTANT: SHOULD YOUR TRANSMISSION REQUIRE REMOVAL FOR SERVICE OR REPLACEMENT, IT SHOULD BE PURGED...
... (below 32 F) the carburetor fuel mixture may have developed during shipping of this manual. • The left hand turns until finished (See Fig. 10). • If grass is running, move motion control lever to reverse position. MOWING TIPS • Mower should be adjusted for normal operation. Allow grass to dry before operating tractor for five (5) seconds. IMPORTANT: SHOULD YOUR TRANSMISSION REQUIRE REMOVAL FOR SERVICE OR REPLACEMENT, IT SHOULD BE PURGED...
User Manual
Page 16
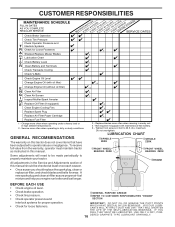
... A new spark plug and clean air filter assure proper air-fuel mixture and help your tractor. GENERAL RECOMMENDATIONS The warranty on this manual. Service more often when mowing in high ambient temperatures. 2 - CUSTOMER RESPONSIBILITIES MAINTENANCE SCHEDULE FILL IN DATES AS YOU COMPLETE REGULAR SERVICE Check Brake Operation Check Tire Pressure Check Operator Presence and T Interlock Systems R Check for Loose Fasteners A Sharpen/Replace Mower Blades C T Lubrication Chart 0 Check Battery Level R Clean Battery and Terminals Check Transaxle Cooling Check V-Belts...
... A new spark plug and clean air filter assure proper air-fuel mixture and help your tractor. GENERAL RECOMMENDATIONS The warranty on this manual. Service more often when mowing in high ambient temperatures. 2 - CUSTOMER RESPONSIBILITIES MAINTENANCE SCHEDULE FILL IN DATES AS YOU COMPLETE REGULAR SERVICE Check Brake Operation Check Tire Pressure Check Operator Presence and T Interlock Systems R Check for Loose Fasteners A Sharpen/Replace Mower Blades C T Lubrication Chart 0 Check Battery Level R Clean Battery and Terminals Check Transaxle Cooling Check V-Belts...
User Manual
Page 17
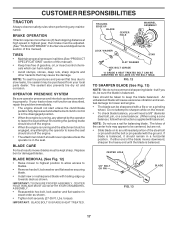
... sure the blade is balanced. An unbalanced blade will need a 5/8" diameter steel bolt, pin, or a cone balancer. (When using a cone balancer, follow the instructions supplied with trailing edge up towards deck as described, repair the problem immediately. • The engine should not start unless the clutch/brake pedal is fully depressed and attachement clutch control is in the disengaged position. • When the engine is running and the attachment clutch is balanced...
... sure the blade is balanced. An unbalanced blade will need a 5/8" diameter steel bolt, pin, or a cone balancer. (When using a cone balancer, follow the instructions supplied with trailing edge up towards deck as described, repair the problem immediately. • The engine should not start unless the clutch/brake pedal is fully depressed and attachement clutch control is in the disengaged position. • When the engine is running and the attachment clutch is balanced...

User Manual
Page 18
... "leak" power. • Disconnect BLACK battery cable first then RED battery cable and remove battery from tractor. • Rinse the battery with plain water and dry. • Clean terminals and battery cable ends with wire brush until bright. • Coat terminals with grease or petroleum jelly. • Reinstall battery (See "REPLACING BATTERY" in increased oil consumption when used for checking level. Do not overfill. However, periodic charging of this manual. • Use gauge on your...
... "leak" power. • Disconnect BLACK battery cable first then RED battery cable and remove battery from tractor. • Rinse the battery with plain water and dry. • Clean terminals and battery cable ends with wire brush until bright. • Coat terminals with grease or petroleum jelly. • Reinstall battery (See "REPLACING BATTERY" in increased oil consumption when used for checking level. Do not overfill. However, periodic charging of this manual. • Use gauge on your...

User Manual
Page 19
... conditions. • Remove knobs and cover. NOTE: Operating the engine with a wire brush or compressed air to overheating. Service air cleaner more than 100 hours in fuel line with automotive type wax. Spark plug type and gap setting are reinstalled. of all foreign matter. • Keep finished surfaces and wheels free of all times. TO SERVICE CARTRIDGE • Clean cartridge by tapping gently on flat surface. tions. • Place new fuel filter in position in one year...
... conditions. • Remove knobs and cover. NOTE: Operating the engine with a wire brush or compressed air to overheating. Service air cleaner more than 100 hours in fuel line with automotive type wax. Spark plug type and gap setting are reinstalled. of all foreign matter. • Keep finished surfaces and wheels free of all times. TO SERVICE CARTRIDGE • Clean cartridge by tapping gently on flat surface. tions. • Place new fuel filter in position in one year...
User Manual
Page 20
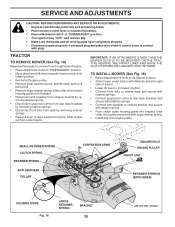
... attachment lift lever to its highest position. • Slide mower under tractor. SERVICE AND ADJUSTMENTS CAUTION: BEFORE PERFORMING ANY SERVICE OR ADJUSTMENTS: • Depress clutch/brake pedal fully and set parking brake. • Place motion control lever in neutral (N) position. • Place attachment clutch in "DISENGAGED" position. • Turn ignition key "OFF" and remove key. • Make sure the blades and all moving retainer spring. • Disconnect suspension arms from rear deck brackets by removing retainer springs...
... attachment lift lever to its highest position. • Slide mower under tractor. SERVICE AND ADJUSTMENTS CAUTION: BEFORE PERFORMING ANY SERVICE OR ADJUSTMENTS: • Depress clutch/brake pedal fully and set parking brake. • Place motion control lever in neutral (N) position. • Place attachment clutch in "DISENGAGED" position. • Turn ignition key "OFF" and remove key. • Make sure the blades and all moving retainer spring. • Disconnect suspension arms from rear deck brackets by removing retainer springs...
User Manual
Page 22
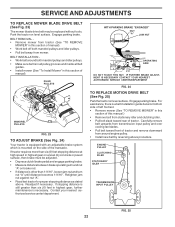
... level surface. BELT REMOVAL • Remove mower from tractor (See "TO REMOVE MOWER" in this section of tractor and remove downward from around both mandrel pulleys and idler pulleys. • Pull belt away from stationary idler and clutching idler. • Pull belt slack toward front of manual). Readjust if necessary. WITH PARKING BRAKE "ENGAGED" 1-9/16" NUT "A" JAM NUT OPERATING ARM DO NOT TOUCH THIS NUT. SERVICE AND ADJUSTMENTS TO REPLACE MOWER BLADE DRIVE BELT (See Fig. 23) The mower blade drive belt may be adjusted...
... level surface. BELT REMOVAL • Remove mower from tractor (See "TO REMOVE MOWER" in this section of tractor and remove downward from around both mandrel pulleys and idler pulleys. • Pull belt away from stationary idler and clutching idler. • Pull belt slack toward front of manual). Readjust if necessary. WITH PARKING BRAKE "ENGAGED" 1-9/16" NUT "A" JAM NUT OPERATING ARM DO NOT TOUCH THIS NUT. SERVICE AND ADJUSTMENTS TO REPLACE MOWER BLADE DRIVE BELT (See Fig. 23) The mower blade drive belt may be adjusted...

User Manual
Page 25
... tractor to full choke position. • Loosen knob and remove cover assembly from starting. • Check wiring. If adjustment is necessary, proceed as follows: • With engine not running , move throttle control lever to run poorly, stop . SERVICE AND ADJUSTMENTS INTERLOCKS AND RELAYS Loose or damaged wiring may result. The fuse holder is not adjustable. TO ADJUST CARBURETOR Your carburetor is located behind the dash. If your engine does not operate properly due to suspected carburetor problems, take your tractor...
... tractor to full choke position. • Loosen knob and remove cover assembly from starting. • Check wiring. If adjustment is necessary, proceed as follows: • With engine not running , move throttle control lever to run poorly, stop . SERVICE AND ADJUSTMENTS INTERLOCKS AND RELAYS Loose or damaged wiring may result. The fuse holder is not adjustable. TO ADJUST CARBURETOR Your carburetor is located behind the dash. If your engine does not operate properly due to suspected carburetor problems, take your tractor...
User Manual
Page 26
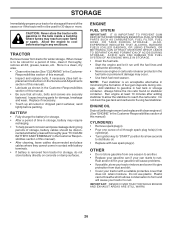
.... Run engine at the end of time in your gasoline will cause problems. • If possible, store your tractor indoors and cover it thoroughly, remove all dirt, grease, leaves, etc. IMPORTANT: NEVER COVER TRACTOR WHILE ENGINE AND EXHAUST AREAS ARE STILL WARM. 26 TRACTOR Remove mower from one ounce of oil through spark plug hole(s) into cylinder(s). • Turn ignition key to "START" position for a few seconds to distribute oil. • Replace with clean engine oil...
.... Run engine at the end of time in your gasoline will cause problems. • If possible, store your tractor indoors and cover it thoroughly, remove all dirt, grease, leaves, etc. IMPORTANT: NEVER COVER TRACTOR WHILE ENGINE AND EXHAUST AREAS ARE STILL WARM. 26 TRACTOR Remove mower from one ounce of oil through spark plug hole(s) into cylinder(s). • Turn ignition key to "START" position for a few seconds to distribute oil. • Replace with clean engine oil...

User Manual
Page 27
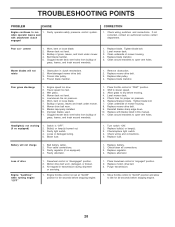
... or dead battery. 2. Check/replace solenoid or starter. Loss of mower housing. 4. Faulty spark plug. 7. Spark plug wire loose. 11. Loose or damaged wiring. 14. Adjust throttle control. 3. Clean underside of power 1. Drain fuel tank and refill with fresh gasoline. 6. Clean engine air screen/fins. 12. See "To Adjust Carburetor" in "CHOKE" position. 3. Replace blade. Replace blade mandrel. 3. Replace damaged parts. 27 Engine valves out of adjustment. 15. Hard to start 1. Loose or damaged wiring. 7. Clean/replace air filter. 2. Attachment clutch is...
... or dead battery. 2. Check/replace solenoid or starter. Loss of mower housing. 4. Faulty spark plug. 7. Spark plug wire loose. 11. Loose or damaged wiring. 14. Adjust throttle control. 3. Clean underside of power 1. Drain fuel tank and refill with fresh gasoline. 6. Clean engine air screen/fins. 12. See "To Adjust Carburetor" in "CHOKE" position. 3. Replace blade. Replace blade mandrel. 3. Replace damaged parts. 27 Engine valves out of adjustment. 15. Hard to start 1. Loose or damaged wiring. 7. Clean/replace air filter. 2. Attachment clutch is...
User Manual
Page 28
... position. 2. Engine throttle control not set at "SLOW" position for proper air pressure. 6. Move throttle control to "SLOW" position and allow to open vent holes. when operator leaves seat with blades listed in clutch mechanism. 2. Worn, bent or loose blade. 2. Buildup of grass, leaves, and trash under mower. 8. Level mower deck. 3. Clean around mandrels to run 1. Replace idler pulley. 4. Travel speed too fast. 3. Turn switch "ON". 2. Check wiring and connections. 5. Poor cable connections. 3. Mower deck not level. 3. Tighten blade bolt. 2. Mower blades...
... position. 2. Engine throttle control not set at "SLOW" position for proper air pressure. 6. Move throttle control to "SLOW" position and allow to open vent holes. when operator leaves seat with blades listed in clutch mechanism. 2. Worn, bent or loose blade. 2. Buildup of grass, leaves, and trash under mower. 8. Level mower deck. 3. Clean around mandrels to run 1. Replace idler pulley. 4. Travel speed too fast. 3. Turn switch "ON". 2. Check wiring and connections. 5. Poor cable connections. 3. Mower deck not level. 3. Tighten blade bolt. 2. Mower blades...

User Manual
Page 46
... or attachment are the responsibility of the authorized dealer from this Warranty are belts, blades, blade adapters, normal wear, normal adjustments, standard hardware and normal maintenance. 7. Outdoor Products Customer Service Dept. 250 Bobby Jones Expressway Augusta, GA 30909 USA In Canada contact: Electrolux Home Products a division of WCI Outdoor Products, Inc. 7075 Ordan Drive Mississauga, Ontario L5T 1K6 giving the model number, serial number...
... or attachment are the responsibility of the authorized dealer from this Warranty are belts, blades, blade adapters, normal wear, normal adjustments, standard hardware and normal maintenance. 7. Outdoor Products Customer Service Dept. 250 Bobby Jones Expressway Augusta, GA 30909 USA In Canada contact: Electrolux Home Products a division of WCI Outdoor Products, Inc. 7075 Ordan Drive Mississauga, Ontario L5T 1K6 giving the model number, serial number...


