

User Manual
Page 6
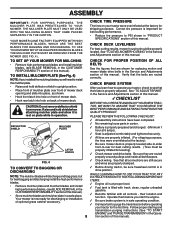
... insert into service after month and year indicated on all four corners of carton, and lay panels flat. • Check for shipping purposes. INSTALL STEERING WHEEL • Position front wheels of the tractor so they are pointing straight forward. • Remove steering wheel adapter from tractor hood...extension shaft onto lower steering shaft. Tighten securely. • Place tabs of steering boot over tab slots in extension and lower shafts and install 5/16 hex bolt and locknut. IMPORTANT: CHECK FOR AND REMOVE ANY STAPLES IN SKID THAT MAY PUNCTURE TIRES WHERE TRACTOR IS TO ROLL OFF...
... insert into service after month and year indicated on all four corners of carton, and lay panels flat. • Check for shipping purposes. INSTALL STEERING WHEEL • Position front wheels of the tractor so they are pointing straight forward. • Remove steering wheel adapter from tractor hood...extension shaft onto lower steering shaft. Tighten securely. • Place tabs of steering boot over tab slots in extension and lower shafts and install 5/16 hex bolt and locknut. IMPORTANT: CHECK FOR AND REMOVE ANY STAPLES IN SKID THAT MAY PUNCTURE TIRES WHERE TRACTOR IS TO ROLL OFF...

User Manual
Page 7
ASSEMBLY SEAT PAN BATTERY BOX DOOR TERMINAL LABEL TERMINAL FIG. 2 INSTALL SEAT (See Fig. 4) Adjust seat before tightening adjustment knob. • Remove adjustment knob and flat washer securing seat to cardboard packing and set aside for ...
ASSEMBLY SEAT PAN BATTERY BOX DOOR TERMINAL LABEL TERMINAL FIG. 2 INSTALL SEAT (See Fig. 4) Adjust seat before tightening adjustment knob. • Remove adjustment knob and flat washer securing seat to cardboard packing and set aside for ...
User Manual
Page 8
...PACKED SEPARATELY IN THE CARTON. TO SET UP YOUR MOWER FOR MULCHING CHECK FOR PROPER POSITION OF ALL • Remove high performance blades and install mulcher BELTS blades, (see BLADE REMOVAL in safe operating condition. ! After you learn how to operate your tractor were overinflated at 6 amps...inflated. (For shipping purposes, the tires were overinflated at proper level. ! Your mower is properly leveled side-to-side/ front-to install section of this manual. properly around pulleys and inside all connections are still secure and wires are properly clamped. ! See that the ...
...PACKED SEPARATELY IN THE CARTON. TO SET UP YOUR MOWER FOR MULCHING CHECK FOR PROPER POSITION OF ALL • Remove high performance blades and install mulcher BELTS blades, (see BLADE REMOVAL in safe operating condition. ! After you learn how to operate your tractor were overinflated at 6 amps...inflated. (For shipping purposes, the tires were overinflated at proper level. ! Your mower is properly leveled side-to-side/ front-to install section of this manual. properly around pulleys and inside all connections are still secure and wires are properly clamped. ! See that the ...

User Manual
Page 12
...trailer, be sure hood is equipped with shoulder bolt, 3/8 washer, and 3/8-16 locknut and tighten securely. • Repeat for opposite side installing gauge wheel in same adjustment hole. 3/8-16 LOCKNUT GUAGE WHEEL MOUNTING BRACKET 3/8 WASHER GAUGE WHEEL SHOULDER BOLT FIG. 7 TO OPERATE MOWER (...8) Your tractor is closed and secured to slower position. • If stopping is at the desired cutting height in operating position. Install gauge wheel in appropriate hole with an operator presence sensing switch. disengage attachment clutch control. TO TRANSPORT (See Figs. 5 and ...
...trailer, be sure hood is equipped with shoulder bolt, 3/8 washer, and 3/8-16 locknut and tighten securely. • Repeat for opposite side installing gauge wheel in same adjustment hole. 3/8-16 LOCKNUT GUAGE WHEEL MOUNTING BRACKET 3/8 WASHER GAUGE WHEEL SHOULDER BOLT FIG. 7 TO OPERATE MOWER (...8) Your tractor is closed and secured to slower position. • If stopping is at the desired cutting height in operating position. Install gauge wheel in appropriate hole with an operator presence sensing switch. disengage attachment clutch control. TO TRANSPORT (See Figs. 5 and ...
User Manual
Page 17
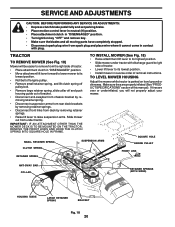
... Fig. 12) • Raise mower to highest position to allow access to blades. • Remove hex bolt, lock washer and flat washer securing blade. • Install new or resharpened blade with the ground. torque). The lobes of this manual). Replace bent or damaged blades. Care should be purchased from your tractor...
... Fig. 12) • Raise mower to highest position to allow access to blades. • Remove hex bolt, lock washer and flat washer securing blade. • Install new or resharpened blade with the ground. torque). The lobes of this manual). Replace bent or damaged blades. Care should be purchased from your tractor...

User Manual
Page 18
... a year if the tractor is not used above 32°F. Select the oil's SAE viscosity grade according to the bottom fitting of drain valve and install the drain tube onto the fitting. • Unlock drain valve by pushing inward and turning clockwise until bright. • Coat terminals with oil through oil...
... a year if the tractor is not used above 32°F. Select the oil's SAE viscosity grade according to the bottom fitting of drain valve and install the drain tube onto the fitting. • Unlock drain valve by pushing inward and turning clockwise until bright. • Coat terminals with oil through oil...
User Manual
Page 20
...remove from the right side of removal instructions. Make sure tires are over or underinflated, you will be easier to its lowest position. • Install mower in reverse order of tractor. • Place attachment clutch in contact with discharge guard to right side of tractor. • Lower lift lever... FRONT LINK RETAINER SPRING ANTI-SWAY BAR COLLAR RETAINER SPRINGS (BOTH SIDES) HOUSING GUIDE LARGE RETAINER SPRING BRACKET Fig. 18 20 TO INSTALL MOWER (See Fig. 18) • Raise attachment lift lever to its highest position. • Slide mower under tractor with plug.
...remove from the right side of removal instructions. Make sure tires are over or underinflated, you will be easier to its lowest position. • Install mower in reverse order of tractor. • Place attachment clutch in contact with discharge guard to right side of tractor. • Lower lift lever... FRONT LINK RETAINER SPRING ANTI-SWAY BAR COLLAR RETAINER SPRINGS (BOTH SIDES) HOUSING GUIDE LARGE RETAINER SPRING BRACKET Fig. 18 20 TO INSTALL MOWER (See Fig. 18) • Raise attachment lift lever to its highest position. • Slide mower under tractor with plug.
User Manual
Page 22
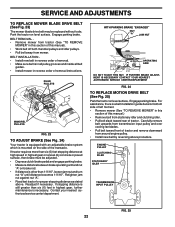
...with an adjustable brake system which is in all pulley grooves and inside all belt guides. • Install mower in this section of this manual.) • Remove belt from around engine pulley. • Install new belt by reversing above . Readjust if necessary. WITH PARKING BRAKE "ENGAGED" 1-9/16" NUT ...16", loosen jam nut and turn nut "A" until distance becomes 1-9/16". Park the tractor on brake rod. • If distance is a belt installation guide decal on bottom side of tractor. For assistance, there is other than six (6) feet in this section of this manual). • Work belt...
...with an adjustable brake system which is in all pulley grooves and inside all belt guides. • Install mower in this section of this manual.) • Remove belt from around engine pulley. • Install new belt by reversing above . Readjust if necessary. WITH PARKING BRAKE "ENGAGED" 1-9/16" NUT ...16", loosen jam nut and turn nut "A" until distance becomes 1-9/16". Park the tractor on brake rod. • If distance is a belt installation guide decal on bottom side of tractor. For assistance, there is other than six (6) feet in this section of this manual). • Work belt...

User Manual
Page 24
.... TO REMOVE CABLES, REVERSE ORDER - • BLACK cable first from chassis and then from the fully charged battery. • RED cable last from tractor. • Install new battery with terminals in the CUSTOMER RESPONSIBILITIES section of the BLACK cable to the NEGATIVE (-) terminal of the grill. • Close hood. 24 SERVICE...
.... TO REMOVE CABLES, REVERSE ORDER - • BLACK cable first from chassis and then from the fully charged battery. • RED cable last from tractor. • Install new battery with terminals in the CUSTOMER RESPONSIBILITIES section of the BLACK cable to the NEGATIVE (-) terminal of the grill. • Close hood. 24 SERVICE...

User Manual
Page 28
..." when turning engine "OFF" 1. Obstruction in "FAST" position. 2. Remove obstruction. 2. Worn, bent or loose blade. 7. Buildup of grass, leaves, and trash around mandrels. 1. Blades improperly installed. 10. Clogged mower deck vent holes from buildup of mower housing. 8. Place throttle control in clutch mechanism. 2. Loss of mower housing. 4. Purge transmission. 1. CORRECTION 1. Poor...
..." when turning engine "OFF" 1. Obstruction in "FAST" position. 2. Remove obstruction. 2. Worn, bent or loose blade. 7. Buildup of grass, leaves, and trash around mandrels. 1. Blades improperly installed. 10. Clogged mower deck vent holes from buildup of mower housing. 8. Place throttle control in clutch mechanism. 2. Loss of mower housing. 4. Purge transmission. 1. CORRECTION 1. Poor...

User Manual
Page 46
... is subject to you 1/12 of the price of a new Battery for any part which has been subjected to alteration, misuse, abuse, improper assembly or installation, delivery damage, or to be maintained in accordance with the instructions furnished. 4. LIMITED WARRANTY The Manufacturer warrants to the original consumer purchaser that term as...
... is subject to you 1/12 of the price of a new Battery for any part which has been subjected to alteration, misuse, abuse, improper assembly or installation, delivery damage, or to be maintained in accordance with the instructions furnished. 4. LIMITED WARRANTY The Manufacturer warrants to the original consumer purchaser that term as...


