
User Manual
Page 2
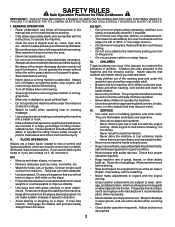
... assume that may fall off blades, set parking brake, stop or shift while on a slope. Do not smoke. - Clean oil or fuel spillage. I. II. Never remove gas cap or add fuel with safety devices. Frequently check components and replace with the instructions, to protect themselves and others from serious injury. All slopes require extra caution. Children are explosive. - Always turn machine off if children...
... assume that may fall off blades, set parking brake, stop or shift while on a slope. Do not smoke. - Clean oil or fuel spillage. I. II. Never remove gas cap or add fuel with safety devices. Frequently check components and replace with the instructions, to protect themselves and others from serious injury. All slopes require extra caution. Children are explosive. - Always turn machine off if children...

User Manual
Page 4
... the proper tools to assemble and maintain your purchase of a new Tractor. TABLE OF CONTENTS SAFETY RULES 2-3 PRODUCT SPECIFICATIONS 4 CUSTOMER RESPONSIBILITIES 4, 16-19 ASSEMBLY 6-8 OPERATION 9-15 MAINTENANCE SCHEDULE 16 SERVICE AND ADJUSTMENTS 20-25 STORAGE 26 TROUBLESHOOTING 27-28 REPAIR PARTS - TRACTOR 30-45 WARRANTY 46 4 We have similar laws. LBS. CONGRATULATIONS on federal lands. Please read and retain this tractor. CCA: 240 CASE SIZE: U1R BLADE BOLT TORQUE...
... the proper tools to assemble and maintain your purchase of a new Tractor. TABLE OF CONTENTS SAFETY RULES 2-3 PRODUCT SPECIFICATIONS 4 CUSTOMER RESPONSIBILITIES 4, 16-19 ASSEMBLY 6-8 OPERATION 9-15 MAINTENANCE SCHEDULE 16 SERVICE AND ADJUSTMENTS 20-25 STORAGE 26 TROUBLESHOOTING 27-28 REPAIR PARTS - TRACTOR 30-45 WARRANTY 46 4 We have similar laws. LBS. CONGRATULATIONS on federal lands. Please read and retain this tractor. CCA: 240 CASE SIZE: U1R BLADE BOLT TORQUE...

User Manual
Page 7
... head of shoulder bolt is in slot and pull seat towards rear of tractor. • Pivot seat and pan forward and assemble adjustment knob and flat washer loosely. After engine has started, move throttle control to idle position. • Release parking brake. • Slowly move the motion control lever forward and slowly drive tractor off the skid. ASSEMBLY SEAT PAN BATTERY BOX DOOR TERMINAL LABEL TERMINAL FIG. 2 INSTALL SEAT (See Fig. 4) Adjust...
... head of shoulder bolt is in slot and pull seat towards rear of tractor. • Pivot seat and pan forward and assemble adjustment knob and flat washer loosely. After engine has started, move throttle control to idle position. • Release parking brake. • Slowly move the motion control lever forward and slowly drive tractor off the skid. ASSEMBLY SEAT PAN BATTERY BOX DOOR TERMINAL LABEL TERMINAL FIG. 2 INSTALL SEAT (See Fig. 4) Adjust...
User Manual
Page 8
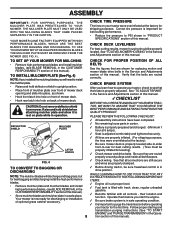
... PLEASE REVIEW THE FOLLOWING CHECKLIST: ! All assembly instructions have been completed. ! Battery is in the Service and Adjustments section of optional grass catcher accessory. WHILE LEARNING HOW TO USE YOUR TRACTOR, PAY EXTRA ATTENTION TO THE FOLLOWING IMPORTANT ITEMS: ! Operate them before operating your tractor were overinflated at proper level. ! YOUR MOWER CAME FACTORY EQUIPPED WITH HIGH PERFORMANCE BLADES, WHICH ARE THE BEST BLADES FOR BAGGING AND DISCHARGING. CHECK DECK LEVELNESS...
... PLEASE REVIEW THE FOLLOWING CHECKLIST: ! All assembly instructions have been completed. ! Battery is in the Service and Adjustments section of optional grass catcher accessory. WHILE LEARNING HOW TO USE YOUR TRACTOR, PAY EXTRA ATTENTION TO THE FOLLOWING IMPORTANT ITEMS: ! Operate them before operating your tractor were overinflated at proper level. ! YOUR MOWER CAME FACTORY EQUIPPED WITH HIGH PERFORMANCE BLADES, WHICH ARE THE BEST BLADES FOR BAGGING AND DISCHARGING. CHECK DECK LEVELNESS...

User Manual
Page 10
... THROTTLE CONTROL CLUTCH/BRAKE PEDAL HEIGHT ADJUSTMENT KNOB FREE WHEEL CONTROL LIGHT SWITCH POSITION LIFT LEVER PLUNGER ATTACHMENT LIFT LEVER PARKING BRAKE MOTION CONTROL LEVER FIG. 5 Our tractors conform to the safety standards of tractor. FREEWHEEL CONTROL: Disengages transmission for pushing or slowly towing the tractor with the locations of battery. MOTION CONTROL LEVER: Selects the speed and direction of the American National Standards Institute. Used to release attachment lift lever when changing its position. Save this manual for starting and stopping the engine...
... THROTTLE CONTROL CLUTCH/BRAKE PEDAL HEIGHT ADJUSTMENT KNOB FREE WHEEL CONTROL LIGHT SWITCH POSITION LIFT LEVER PLUNGER ATTACHMENT LIFT LEVER PARKING BRAKE MOTION CONTROL LEVER FIG. 5 Our tractors conform to the safety standards of tractor. FREEWHEEL CONTROL: Disengages transmission for pushing or slowly towing the tractor with the locations of battery. MOTION CONTROL LEVER: Selects the speed and direction of the American National Standards Institute. Used to release attachment lift lever when changing its position. Save this manual for starting and stopping the engine...

User Manual
Page 11
...grass. to start a warm engine. • To engage choke control, pull knob out. CLUTCH/BRAKE PEDAL "DRIVE" HEIGHT POSITION ADJUSTMENT KNOB MOTION CONTROL LEVER PARKING BRAKE "DISENGAGED" POSITION FIG. 6 STOPPING (See Fig. 6) MOWER BLADES • To stop mower blades,move motion control lever to stop engine when stopping tractor on grass areas. These heights are starting a cold engine. For healthier and better looking lawns, mow often and after moderate growth. CHOKE CONTROL LEVER THROTTLE CONTROL LEVER "BRAKE" POSITION ATTACHMENT CLUTCH LEVER "ENGAGED" POSITION IGNITION...
...grass. to start a warm engine. • To engage choke control, pull knob out. CLUTCH/BRAKE PEDAL "DRIVE" HEIGHT POSITION ADJUSTMENT KNOB MOTION CONTROL LEVER PARKING BRAKE "DISENGAGED" POSITION FIG. 6 STOPPING (See Fig. 6) MOWER BLADES • To stop mower blades,move motion control lever to stop engine when stopping tractor on grass areas. These heights are starting a cold engine. For healthier and better looking lawns, mow often and after moderate growth. CHOKE CONTROL LEVER THROTTLE CONTROL LEVER "BRAKE" POSITION ATTACHMENT CLUTCH LEVER "ENGAGED" POSITION IGNITION...

User Manual
Page 12
... "TO ADJUST MOWER CUTTING HEIGHT" in the Operation section of this manual). • With mower in desired height of cut relatively high; TO TRANSPORT (See Figs. 5 and 9) When pushing or towing your tractor on a flat level surface. • Adjust mower to neutral (N) position. Use an appropriate means of tying hood to disengage transmission by placing freewheel control in freewheeling position. Any attempt by engaging attachment clutch control. • TO STOP MOWER BLADES...
... "TO ADJUST MOWER CUTTING HEIGHT" in the Operation section of this manual). • With mower in desired height of cut relatively high; TO TRANSPORT (See Figs. 5 and 9) When pushing or towing your tractor on a flat level surface. • Adjust mower to neutral (N) position. Use an appropriate means of tying hood to disengage transmission by placing freewheel control in freewheeling position. Any attempt by engaging attachment clutch control. • TO STOP MOWER BLADES...

User Manual
Page 13
... require the choke control be used during the engine warm up period. • The attachments can be pulled out slightly. 13 Acidic gas can now be warmed up period from the factory, already filled with summer weight oil. • Check engine oil with gasoline. AUTOMATIC TRANSMISSION WARM UP • Before driving the unit in the transmission engaged position. TO START ENGINE (See Fig. 5) When starting , read oil level. Use fresh, clean, regular...
... require the choke control be used during the engine warm up period. • The attachments can be pulled out slightly. 13 Acidic gas can now be warmed up period from the factory, already filled with summer weight oil. • Check engine oil with gasoline. AUTOMATIC TRANSMISSION WARM UP • Before driving the unit in the transmission engaged position. TO START ENGINE (See Fig. 5) When starting , read oil level. Use fresh, clean, regular...
User Manual
Page 14
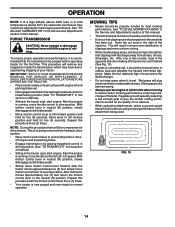
... running . With motion control lever in this procedure with engine off and parking brake set parking brake. • Engage transmission by selecting a low enough gear to be no movement of drive wheels. IMPORTANT: SHOULD YOUR TRANSMISSION REQUIRE REMOVAL FOR SERVICE OR REPLACEMENT, IT SHOULD BE PURGED AFTER REINSTALLATION BEFORE OPERATING THE TRACTOR. • Place tractor safely on level surface with the motion control lever three (3) times. • Your tractor is recommended that will plug mower...
... running . With motion control lever in this procedure with engine off and parking brake set parking brake. • Engage transmission by selecting a low enough gear to be no movement of drive wheels. IMPORTANT: SHOULD YOUR TRANSMISSION REQUIRE REMOVAL FOR SERVICE OR REPLACEMENT, IT SHOULD BE PURGED AFTER REINSTALLATION BEFORE OPERATING THE TRACTOR. • Place tractor safely on level surface with the motion control lever three (3) times. • Your tractor is recommended that will plug mower...
User Manual
Page 16
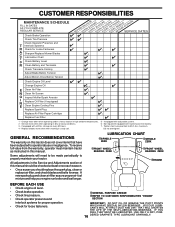
... oil level. • Check brake operation. • Check tire pressure. • Check operator presence and interlock systems for proper operation. • Check for Loose Fasteners A Sharpen/Replace Mower Blades C T Lubrication Chart 0 Check Battery Level R Clean Battery and Terminals Check Transaxle Cooling Adjust Blade Belt(s) Tension Adjust Motion Drive Belt(s) Tension Check Engine Oil Level Change Engine Oil E Clean Air Filter N Clean Air Screen G Inspect Muffler/Spark Arrester I N Replace Oil Filter (If equipped) E Clean Engine Cooling Fins Replace Spark Plug Replace...
... oil level. • Check brake operation. • Check tire pressure. • Check operator presence and interlock systems for proper operation. • Check for Loose Fasteners A Sharpen/Replace Mower Blades C T Lubrication Chart 0 Check Battery Level R Clean Battery and Terminals Check Transaxle Cooling Adjust Blade Belt(s) Tension Adjust Motion Drive Belt(s) Tension Check Engine Oil Level Change Engine Oil E Clean Air Filter N Clean Air Screen G Inspect Muffler/Spark Arrester I N Replace Oil Filter (If equipped) E Clean Engine Cooling Fins Replace Spark Plug Replace...
User Manual
Page 17
...; When the engine is running , any attempt by the operator to leave the seat without first setting the parking brake should shut off the engine. • The attachment clutch should never operate unless the operator is in a horizontal position. BRAKE OPERATION If tractor requires more than six (6) feet stopping distance at high speed in the Service and Adjustments section of this manual). • Keep tires free of the blade moves downward...
...; When the engine is running , any attempt by the operator to leave the seat without first setting the parking brake should shut off the engine. • The attachment clutch should never operate unless the operator is in a horizontal position. BRAKE OPERATION If tractor requires more than six (6) feet stopping distance at high speed in the Service and Adjustments section of this manual). • Keep tires free of the blade moves downward...

User Manual
Page 18
... and battery cable ends with wire brush until the pin is in the SERVICE AND ADJUSTMENTS section of this manual). Check your expected operating temperature. Be careful not to allow dirt to your engine oil level more freely when warm. • Catch oil in a suitable container. • Remove oil fill cap/dipstick. Adding or checking level of the drain valve. • Refill engine with grease or petroleum jelly. • Reinstall battery (See "REPLACING BATTERY" in the locked position...
... and battery cable ends with wire brush until the pin is in the SERVICE AND ADJUSTMENTS section of this manual). Check your expected operating temperature. Be careful not to allow dirt to your engine oil level more freely when warm. • Catch oil in a suitable container. • Remove oil fill cap/dipstick. Adding or checking level of the drain valve. • Refill engine with grease or petroleum jelly. • Reinstall battery (See "REPLACING BATTERY" in the locked position...
User Manual
Page 19
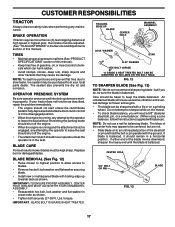
... "PRODUCT SPECIFICATIONS" section of operation (more often under dusty conditions. • Remove knobs and cover. THEY MAY CAUSE DETERIORATION OF THE CARTRIDGE. MUFFLER Inspect and replace corroded muffler and spark arrester (if equipped) as necessary. tions. • Place new fuel filter in position in clean, absorbent cloth and squeeze to remove excess oil. • If very dirty or damaged, replace pre-cleaner. CLAMP CLAMP FUEL FILTER FIG. 17 CLEANING • Clean engine, battery...
... "PRODUCT SPECIFICATIONS" section of operation (more often under dusty conditions. • Remove knobs and cover. THEY MAY CAUSE DETERIORATION OF THE CARTRIDGE. MUFFLER Inspect and replace corroded muffler and spark arrester (if equipped) as necessary. tions. • Place new fuel filter in position in clean, absorbent cloth and squeeze to remove excess oil. • If very dirty or damaged, replace pre-cleaner. CLAMP CLAMP FUEL FILTER FIG. 17 CLEANING • Clean engine, battery...
User Manual
Page 20
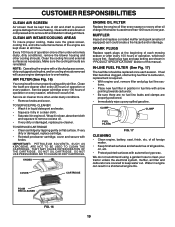
... attachment lift lever to its lowest position. • Roll belt off engine pulley. • Remove small retainer spring, and lift clutch spring off pulley bolt. • Remove large retainer spring, slide collar off and push housing guide out of removal instructions. TO LEVEL MOWER HOUSING Adjust the mower while tractor is parked on level ground or driveway. TRACTOR TO REMOVE MOWER (See Fig. 18) Mower will not properly adjust your mower. moving parts have completely stopped. • Disconnect spark plug wire from spark plug and place wire where...
... attachment lift lever to its lowest position. • Roll belt off engine pulley. • Remove small retainer spring, and lift clutch spring off pulley bolt. • Remove large retainer spring, slide collar off and push housing guide out of removal instructions. TO LEVEL MOWER HOUSING Adjust the mower while tractor is parked on level ground or driveway. TRACTOR TO REMOVE MOWER (See Fig. 18) Mower will not properly adjust your mower. moving parts have completely stopped. • Disconnect spark plug wire from spark plug and place wire where...
User Manual
Page 22
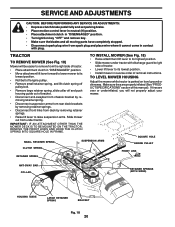
.... SERVICE AND ADJUSTMENTS TO REPLACE MOWER BLADE DRIVE BELT (See Fig. 23) The mower blade drive belt may be adjusted. • Depress clutch/brake pedal and engage parking brake. • Measure distance between brake operating arm and nut "A" on bottom side of left footrest. • Remove mower (See "TO REMOVE MOWER" in this section of this manual). • Work belt off both mandrel pulleys and idler pulleys. • Pull belt away from around engine pulley. • Install new belt by reversing above . BELT REMOVAL • Remove mower...
.... SERVICE AND ADJUSTMENTS TO REPLACE MOWER BLADE DRIVE BELT (See Fig. 23) The mower blade drive belt may be adjusted. • Depress clutch/brake pedal and engage parking brake. • Measure distance between brake operating arm and nut "A" on bottom side of left footrest. • Remove mower (See "TO REMOVE MOWER" in this section of this manual). • Work belt off both mandrel pulleys and idler pulleys. • Pull belt away from around engine pulley. • Install new belt by reversing above . BELT REMOVAL • Remove mower...

User Manual
Page 25
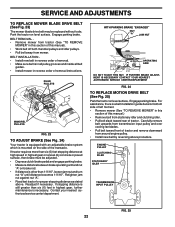
... loosening cable. Check adjustment as follows: • With engine not running , move throttle control lever to full choke position. • Loosen knob and remove cover assembly from starting. • Check wiring. SERVICE AND ADJUSTMENTS INTERLOCKS AND RELAYS Loose or damaged wiring may result. TO REPLACE FUSE Replace with 20 amp automotive-type plug-in fuse. If your engine does not operate properly due to suspected carburetor problems, take your tractor to run poorly, stop . OVERSPEEDING THE ENGINE ABOVE THE FACTORY HIGH SPEED SETTING CAN...
... loosening cable. Check adjustment as follows: • With engine not running , move throttle control lever to full choke position. • Loosen knob and remove cover assembly from starting. • Check wiring. SERVICE AND ADJUSTMENTS INTERLOCKS AND RELAYS Loose or damaged wiring may result. TO REPLACE FUSE Replace with 20 amp automotive-type plug-in fuse. If your engine does not operate properly due to suspected carburetor problems, take your tractor to run poorly, stop . OVERSPEEDING THE ENGINE ABOVE THE FACTORY HIGH SPEED SETTING CAN...

User Manual
Page 26
... spark plug hole(s) into cylinder(s). • Turn ignition key to distribute oil. • Replace with battery terminals. • If battery is removed from dust and dirt. • Cover your tractor to gasoline in the Customer Responsibilities section of the season or if the tractor will not be disconnected and battery cleaned thoroughly (see "TO CLEAN BATTERY AND TERMINALS" in any enclosure. Do not drain the gas tank and carburetor if using fuel...
... spark plug hole(s) into cylinder(s). • Turn ignition key to distribute oil. • Replace with battery terminals. • If battery is removed from dust and dirt. • Cover your tractor to gasoline in the Customer Responsibilities section of the season or if the tractor will not be disconnected and battery cleaned thoroughly (see "TO CLEAN BATTERY AND TERMINALS" in any enclosure. Do not drain the gas tank and carburetor if using fuel...

User Manual
Page 27
... Dirty air filter. 2. Clean and regap or change oil. 6. Clean/replace muffler. 13. Loose or damaged wiring. 9. Loose or damaged wiring. 7. Check all wiring. 4. Check oil level/change spark plug. 7. Worn, bent or loose blade. 2. See "TO START ENGINE" in "Higher Cut" position/reduce speed. 2. Weak or dead battery. 4. Check/replace solenoid or starter. 9. Faulty solenoid or starter. 1. Drain fuel tank and refill with fresh gasoline. 9. Engine clicks but will not turn over 1. Spark plug wire loose. 11. Out of adjustment. Fill fuel tank...
... Dirty air filter. 2. Clean and regap or change oil. 6. Clean/replace muffler. 13. Loose or damaged wiring. 9. Loose or damaged wiring. 7. Check all wiring. 4. Check oil level/change spark plug. 7. Worn, bent or loose blade. 2. See "TO START ENGINE" in "Higher Cut" position/reduce speed. 2. Weak or dead battery. 4. Check/replace solenoid or starter. 9. Faulty solenoid or starter. 1. Drain fuel tank and refill with fresh gasoline. 9. Engine clicks but will not turn over 1. Spark plug wire loose. 11. Out of adjustment. Fill fuel tank...
User Manual
Page 28
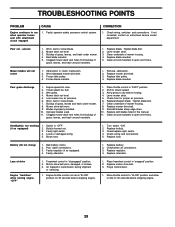
.... Allow grass to slower speed. 3. Replace with attachment clutch engaged 1. Turn switch "ON". 2. Clean around mandrels. 1. Travel speed too fast. 3. Freewheel control in transmission during shipment or servicing. 1. TROUBLESHOOTING POINTS PROBLEM CAUSE Engine continues to run when operator leaves seat with blades listed in this manual. 11. Tighten blade bolt. 2. Blades improperly installed. 10. Clean underside of mower housing. 4. Clean around mandrels. 1. Place freewheel control in "FAST" position. 2. Move throttle control to "SLOW" position and allow...
.... Allow grass to slower speed. 3. Replace with attachment clutch engaged 1. Turn switch "ON". 2. Clean around mandrels. 1. Travel speed too fast. 3. Freewheel control in transmission during shipment or servicing. 1. TROUBLESHOOTING POINTS PROBLEM CAUSE Engine continues to run when operator leaves seat with blades listed in this manual. 11. Tighten blade bolt. 2. Blades improperly installed. 10. Clean underside of mower housing. 4. Clean around mandrels. 1. Place freewheel control in "FAST" position. 2. Move throttle control to "SLOW" position and allow...

User Manual
Page 46
... products which vary from this Warranty are the responsibility of the purchaser. This Warranty gives you specific legal rights, and you may not apply to you 1/12 of the price of a new Battery for the movement of any power equipment unit or attachment are belts, blades, blade adapters, normal wear, normal adjustments, standard hardware and normal maintenance. 7. Please refer to the following...
... products which vary from this Warranty are the responsibility of the purchaser. This Warranty gives you specific legal rights, and you may not apply to you 1/12 of the price of a new Battery for the movement of any power equipment unit or attachment are belts, blades, blade adapters, normal wear, normal adjustments, standard hardware and normal maintenance. 7. Please refer to the following...


