
User Manual
Page 2
...gradual. SLOPE OPERATION Slopes are a major factor related to wear, damage, and deterioration, which could suddenly turn over the edge of the mower discharge direction and do not mow it at anyone enters the area. • Never carry passengers. • Do not mow in handling...FOLLOWING SAFETY INSTRUCTIONS COULD RESULT IN SERIOUS INJURY OR DEATH. I. If you last saw them . • Check brake operation frequently. The mower could be thrown. They may obscure vision. Clean oil or fuel spillage. They are flammable and vapors are sharp and can change the ...
...gradual. SLOPE OPERATION Slopes are a major factor related to wear, damage, and deterioration, which could suddenly turn over the edge of the mower discharge direction and do not mow it at anyone enters the area. • Never carry passengers. • Do not mow in handling...FOLLOWING SAFETY INSTRUCTIONS COULD RESULT IN SERIOUS INJURY OR DEATH. I. If you last saw them . • Check brake operation frequently. The mower could be thrown. They may obscure vision. Clean oil or fuel spillage. They are flammable and vapors are sharp and can change the ...

User Manual
Page 3
..., some of its constituents, and certain vehicle components contain or emit chemicals known to the State of a load, while on a slope. Look for Ride-On Mowers • Be sure the area is dangerous. Too heavy of California to cause cancer and birth defects or other reproductive harm. Always look behind before...
..., some of its constituents, and certain vehicle components contain or emit chemicals known to the State of a load, while on a slope. Look for Ride-On Mowers • Be sure the area is dangerous. Too heavy of California to cause cancer and birth defects or other reproductive harm. Always look behind before...
User Manual
Page 8
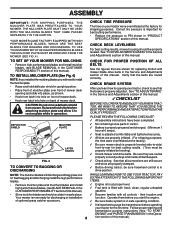
...BEST BLADES FOR BAGGING AND DISCHARGING. CHECK TIRE PRESSURE The tires on your tractor for leveling). ! CHECK DECK LEVELNESS For best cutting results, mower housing should be sure freewheel control is important to rest on back of this manual). TO INSTALL MULCHER PLATE (See Fig. 4) NOTE:... It is in the Opera- 8 tion section of this manual. ASSEMBLY IMPORTANT: FOR SHIPPING PURPOSES, THE MULCHER PLATE WAS PREATTACHED TO YOUR MOWER. DEFLECTOR SHIELD MULCHER PLATE LATCH HOOKS FIG. 4 TO CONVERT TO BAGGING OR DISCHARGING CHECK FOR PROPER POSITION OF ALL BELTS See the figures ...
...BEST BLADES FOR BAGGING AND DISCHARGING. CHECK TIRE PRESSURE The tires on your tractor for leveling). ! CHECK DECK LEVELNESS For best cutting results, mower housing should be sure freewheel control is important to rest on back of this manual). TO INSTALL MULCHER PLATE (See Fig. 4) NOTE:... It is in the Opera- 8 tion section of this manual. ASSEMBLY IMPORTANT: FOR SHIPPING PURPOSES, THE MULCHER PLATE WAS PREATTACHED TO YOUR MOWER. DEFLECTOR SHIELD MULCHER PLATE LATCH HOOKS FIG. 4 TO CONVERT TO BAGGING OR DISCHARGING CHECK FOR PROPER POSITION OF ALL BELTS See the figures ...

User Manual
Page 9
OPERATION These symbols may appear on your tractor or in literature supplied with the product. BATTERY CAUTION OR WARNING REVERSE FORWARD FAST SLOW ENGINE ON ENGINE OFF OIL PRESSURE LIGHTS ON OVER TEMP LIGHT FUEL CHOKE MOWER HEIGHT PARKING BRAKE LOCKED UNLOCKED MOWER LIFT ATTACHMENT REVERSE CLUTCH ENGAGED NEUTRAL HIGH P LOW PARKING BRAKE 15 15 15 IGNITION ATTACHMENT CLUTCH DISENGAGED KEEP AREA CLEAR SLOPE HAZARDS (SEE SAFETY RULES SECTION) DANGER, KEEP HANDS AND FEET AWAY 9 FREE WHEEL (Automatic Models only) Learn and understand their meaning.
OPERATION These symbols may appear on your tractor or in literature supplied with the product. BATTERY CAUTION OR WARNING REVERSE FORWARD FAST SLOW ENGINE ON ENGINE OFF OIL PRESSURE LIGHTS ON OVER TEMP LIGHT FUEL CHOKE MOWER HEIGHT PARKING BRAKE LOCKED UNLOCKED MOWER LIFT ATTACHMENT REVERSE CLUTCH ENGAGED NEUTRAL HIGH P LOW PARKING BRAKE 15 15 15 IGNITION ATTACHMENT CLUTCH DISENGAGED KEEP AREA CLEAR SLOPE HAZARDS (SEE SAFETY RULES SECTION) DANGER, KEEP HANDS AND FEET AWAY 9 FREE WHEEL (Automatic Models only) Learn and understand their meaning.

User Manual
Page 10
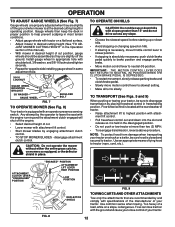
...BEFORE OPERATING YOUR TRACTOR Compare the illustrations with your tractor to adjust the mower cutting height. 10 LIFT LEVER PLUNGER: Used to your tractor. ATTACHMENT CLUTCH LEVER: Used to engage the mower blades, or other attachments mounted to the safety standards of various controls and... adjustments. ATTACHMENT LIFT LEVER: Used to raise, lower, and adjust the mower deck or other attachments mounted to release attachment lift lever when changing its position. AMMETER - THROTTLE CONTROL: Used for controlling engine...
...BEFORE OPERATING YOUR TRACTOR Compare the illustrations with your tractor to adjust the mower cutting height. 10 LIFT LEVER PLUNGER: Used to your tractor. ATTACHMENT CLUTCH LEVER: Used to engage the mower blades, or other attachments mounted to the safety standards of various controls and... adjustments. ATTACHMENT LIFT LEVER: Used to raise, lower, and adjust the mower deck or other attachments mounted to release attachment lift lever when changing its position. AMMETER - THROTTLE CONTROL: Used for controlling engine...

User Manual
Page 11
...full throttle. • Operating engine at less than full throttle reduces the battery charging rate. • Full throttle offers the best bagging and mower perfor- TO USE CHOKE CONTROL (See Fig. 6) Use choke control whenever you are approximate and ENGINE • Move throttle control to "...position. FIG. 6 • Release parking brake and clutch/brake pedal. • Slowly move attachment clutch lever to slow position. TO ADJUST MOWER CUTTING HEIGHT (See Fig. 6) The cutting height is controlled by the motion control lever. • Start tractor with the engine not running ,...
...full throttle. • Operating engine at less than full throttle reduces the battery charging rate. • Full throttle offers the best bagging and mower perfor- TO USE CHOKE CONTROL (See Fig. 6) Use choke control whenever you are approximate and ENGINE • Move throttle control to "...position. FIG. 6 • Release parking brake and clutch/brake pedal. • Slowly move attachment clutch lever to slow position. TO ADJUST MOWER CUTTING HEIGHT (See Fig. 6) The cutting height is controlled by the motion control lever. • Start tractor with the engine not running ,...
User Manual
Page 12
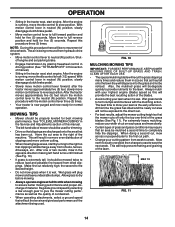
... highest position with attach- TO TRANSPORT (See Figs. 5 and 9) When pushing or towing your tractor on a flat level surface. • Adjust mower to desired cutting height (See "TO AD- Too heavy of a load, while on hills. • If slowing is necessary, move motion control lever... SHIELD FIG. 9 TOWING CARTS AND OTHER ATTACHMENTS Tow only the attachments that are recommended by engaging attachment clutch control. • TO STOP MOWER BLADES - Tires can lose traction with specifications of the manufacturer of tying hood to slowest setting. • Make all turns slowly. Use common...
... highest position with attach- TO TRANSPORT (See Figs. 5 and 9) When pushing or towing your tractor on a flat level surface. • Adjust mower to desired cutting height (See "TO AD- Too heavy of a load, while on hills. • If slowing is necessary, move motion control lever... SHIELD FIG. 9 TOWING CARTS AND OTHER ATTACHMENTS Tow only the attachments that are recommended by engaging attachment clutch control. • TO STOP MOWER BLADES - Tires can lose traction with specifications of the manufacturer of tying hood to slowest setting. • Make all turns slowly. Use common...
User Manual
Page 14
... of manual). • Sitting in the tractor seat, start engine. FIG. 10 MULCHING MOWING TIPS IMPORTANT: FOR BEST PERFORMANCE, KEEP MOWER HOUSING FREE OF BUILT-UP GRASS AND TRASH. Also, the mulched grass will biodegrade quickly to full reverse position and hold for normal operation...quality of clippings and more uniform cutting. • When mowing large areas, start engine. Wet grass will help prevent matting and graining of mower should be noticed. After the engine is wet. Have the cut desired. • When operating attachments, select a ground speed that clippings ...
... of manual). • Sitting in the tractor seat, start engine. FIG. 10 MULCHING MOWING TIPS IMPORTANT: FOR BEST PERFORMANCE, KEEP MOWER HOUSING FREE OF BUILT-UP GRASS AND TRASH. Also, the mulched grass will biodegrade quickly to full reverse position and hold for normal operation...quality of clippings and more uniform cutting. • When mowing large areas, start engine. Wet grass will help prevent matting and graining of mower should be noticed. After the engine is wet. Have the cut desired. • When operating attachments, select a ground speed that clippings ...
User Manual
Page 15
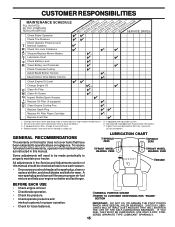
.... • Check brake operation. • Check tire pressure. • Check operator presence and interlock systems for proper operation. • Check for Loose Fasteners A Sharpen/Replace Mower Blades C T Lubrication Chart 0 Check Battery Level R Clean Battery and Terminals Check Transaxle Cooling Adjust Blade Belt(s) Tension Adjust Motion Drive Belt(s) Tension Check Engine Oil...
.... • Check brake operation. • Check tire pressure. • Check operator presence and interlock systems for proper operation. • Check for Loose Fasteners A Sharpen/Replace Mower Blades C T Lubrication Chart 0 Check Battery Level R Clean Battery and Terminals Check Transaxle Cooling Adjust Blade Belt(s) Tension Adjust Motion Drive Belt(s) Tension Check Engine Oil...

User Manual
Page 16
...GRADE 8 HEAT TREATED BOLT CAN BE IDENTIFIED BY SIX LINES ON THE BOLT HEAD. An unbalanced blade will cause excessive vibration and eventual damage to mower and engine. • The blade can harm rubber. • Avoid stumps, stones, deep ruts, sharp objects and other hazards that may cause .... Do not attempt to an unthreaded portion of gasoline, oil, or insect control chemicals which is balanced. torque). BLADE CARE For best results mower blades must be sharpened with the ground. Care should remain in the seat. The lobes of this manual). but are working properly. IMPORTANT:...
...GRADE 8 HEAT TREATED BOLT CAN BE IDENTIFIED BY SIX LINES ON THE BOLT HEAD. An unbalanced blade will cause excessive vibration and eventual damage to mower and engine. • The blade can harm rubber. • Avoid stumps, stones, deep ruts, sharp objects and other hazards that may cause .... Do not attempt to an unthreaded portion of gasoline, oil, or insect control chemicals which is balanced. torque). BLADE CARE For best results mower blades must be sharpened with the ground. Care should remain in the seat. The lobes of this manual). but are working properly. IMPORTANT:...

User Manual
Page 19
...ON THE TRACTOR, REMOVE THE FRONT LINKS AND HOOK THE CLUTCH SPRING INTO SQUARE HOLE IN FRAME. TRACTOR TO REMOVE MOWER (See Fig. 18) Mower will not properly adjust your mower. If tires are properly inflated (See "PRODUCT SPECIFICATIONS" section of removal instructions. SMALL RETAINER SPRING SUSPENSION ARMS SQUARE..., you will be easier to remove from chassis bracket by removing retainer springs. • Raise lift lever to raise suspension arms. Slide mower out from spark plug and place wire where it cannot come in contact with discharge guard to right side of tractor. • Lower...
...ON THE TRACTOR, REMOVE THE FRONT LINKS AND HOOK THE CLUTCH SPRING INTO SQUARE HOLE IN FRAME. TRACTOR TO REMOVE MOWER (See Fig. 18) Mower will not properly adjust your mower. If tires are properly inflated (See "PRODUCT SPECIFICATIONS" section of removal instructions. SMALL RETAINER SPRING SUSPENSION ARMS SQUARE..., you will be easier to remove from chassis bracket by removing retainer springs. • Raise lift lever to raise suspension arms. Slide mower out from spark plug and place wire where it cannot come in contact with discharge guard to right side of tractor. • Lower...

User Manual
Page 20
.... Both links should be approximately 10-3/8". • If links are equal in its highest position. • At the midpoint of both sides of mower, measure height from trunnion on both front links. 20 FRONT LINKS FIG. 22 NUT "E" NOTE: Three full turns of tractor. Measure distance "D" ...directly in front and behind the mandrel at front than the rear when the mower is 1/8" to 1/2" lower than rear, tighten nuts "F" against trunnion on both front links. IF THE FOLLOWING FRONT-TO-BACK ADJUSTMENT IS NECESSARY, ...
.... Both links should be approximately 10-3/8". • If links are equal in its highest position. • At the midpoint of both sides of mower, measure height from trunnion on both front links. 20 FRONT LINKS FIG. 22 NUT "E" NOTE: Three full turns of tractor. Measure distance "D" ...directly in front and behind the mandrel at front than the rear when the mower is 1/8" to 1/2" lower than rear, tighten nuts "F" against trunnion on both front links. IF THE FOLLOWING FRONT-TO-BACK ADJUSTMENT IS NECESSARY, ...
User Manual
Page 21
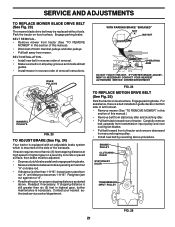
... than six (6) feet in highest gear, further maintenance is a belt installation guide decal on bottom side of left footrest. • Remove mower (See "TO REMOVE MOWER" in highest gear on a level dry concrete or paved surface, then brake must be replaced without tools. Retighten jam nut against nut ...and over cooling fan blades. • Pull belt toward rear of this section of tractor. SERVICE AND ADJUSTMENTS TO REPLACE MOWER BLADE DRIVE BELT (See Fig. 23) The mower blade drive belt may be adjusted. • Depress clutch/brake pedal and engage parking brake. • Measure distance ...
... than six (6) feet in highest gear, further maintenance is a belt installation guide decal on bottom side of left footrest. • Remove mower (See "TO REMOVE MOWER" in highest gear on a level dry concrete or paved surface, then brake must be replaced without tools. Retighten jam nut against nut ...and over cooling fan blades. • Pull belt toward rear of this section of tractor. SERVICE AND ADJUSTMENTS TO REPLACE MOWER BLADE DRIVE BELT (See Fig. 23) The mower blade drive belt may be adjusted. • Depress clutch/brake pedal and engage parking brake. • Measure distance ...

User Manual
Page 22
... direction it should not be necessary. • Loosen adjustment bolt in front of the right rear wheel, and lightly tighten. • Start engine and move mower deck height to affect the front wheel toein or camber, contact your nearest authorized service center/department.
... direction it should not be necessary. • Loosen adjustment bolt in front of the right rear wheel, and lightly tighten. • Start engine and move mower deck height to affect the front wheel toein or camber, contact your nearest authorized service center/department.
User Manual
Page 25
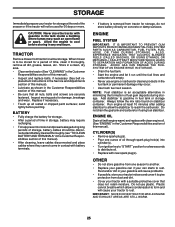
... Remove spark plug(s). • Pour one season to another. • Replace your gasoline can if your can starts to reach the carburetor. When mower is removed from tractor for winter storage. sand lightly before storing in the tank inside a building where fumes may reach an open flame or spark.... Do not drain the gas tank and carburetor if using fuel stabilizer. Rust and/or dirt in fuel tank or storage container. TRACTOR Remove mower from tractor for storage, do not store battery directly on stabilizer container. BATTERY • Fully charge the battery for storage. • After ...
... Remove spark plug(s). • Pour one season to another. • Replace your gasoline can if your can starts to reach the carburetor. When mower is removed from tractor for winter storage. sand lightly before storing in the tank inside a building where fumes may reach an open flame or spark.... Do not drain the gas tank and carburetor if using fuel stabilizer. Rust and/or dirt in fuel tank or storage container. TRACTOR Remove mower from tractor for storage, do not store battery directly on stabilizer container. BATTERY • Fully charge the battery for storage. • After ...

User Manual
Page 26
... Wait several minutes before attempting to start CAUSE 1. Clean/replace air filter. 6. Carburetor out of grass, leaves and trash under mower. 4. Clean/replace air filter. 2. Drain fuel tank and refill with fresh gasoline and replace fuel filter. 10. Faulty operator...Engine valves out of fuel. 2. Replace blade. Tighten loose part(s). Engine not "CHOKED" properly. 3. Dirty air filter. 6. Engine valves out of mower housing. 4. start . 4. Recharge or replace battery. 2. Clean/replace air filter. 5. Replace fuel filter. 8. TROUBLESHOOTING POINTS PROBLEM Will not start...
... Wait several minutes before attempting to start CAUSE 1. Clean/replace air filter. 6. Carburetor out of grass, leaves and trash under mower. 4. Clean/replace air filter. 2. Drain fuel tank and refill with fresh gasoline and replace fuel filter. 10. Faulty operator...Engine valves out of fuel. 2. Replace blade. Tighten loose part(s). Engine not "CHOKED" properly. 3. Dirty air filter. 6. Engine valves out of mower housing. 4. start . 4. Recharge or replace battery. 2. Clean/replace air filter. 5. Replace fuel filter. 8. TROUBLESHOOTING POINTS PROBLEM Will not start...
User Manual
Page 27
.... 2. Move throttle control to "SLOW" position and allow to idle for 30 seconds before stopping engine. 1. Mower deck not level. 3. Clogged mower deck vent holes from buildup of drive Engine "backfires" when turning engine "OFF" 1. Clean around mandrels to ...Check wiring and connections. 5. Loss of grass, leaves, and trash around mandrels. 1. Freewheel control in "disengaged" position. 2. Replace mower drive belt. 3. Replace mower drive belt. 9. Headlight(s) not working (if so equipped) 1. Replace blade mandrel. 5. Replace idler pulley. 4. Shift to dry before...
.... 2. Move throttle control to "SLOW" position and allow to idle for 30 seconds before stopping engine. 1. Mower deck not level. 3. Clogged mower deck vent holes from buildup of drive Engine "backfires" when turning engine "OFF" 1. Clean around mandrels to ...Check wiring and connections. 5. Loss of grass, leaves, and trash around mandrels. 1. Freewheel control in "disengaged" position. 2. Replace mower drive belt. 3. Replace mower drive belt. 9. Headlight(s) not working (if so equipped) 1. Replace blade mandrel. 5. Replace idler pulley. 4. Shift to dry before...

User Manual
Page 33
... Lh 34 145243X428 Footrest Pnt Rh 35 72110606 Bolt Rdhd Sht Sqnk 3/8-16 x 3/4 37 17490508 Screw Thdrol 6/16-18 x 1/2 TYT 38 169834 Bracket Asm Pivot Mower Rear 51 73800400 Nut Lock Hex W/Ins 1/4-20 52 19091416 Washer 9/32 x 7/8 x 16 Ga. 53 144697 Bracjet Grukke Lh 54 161464 Screw Hex Wshd 8-18...-18 207 17670508 Screw Thdrol 5/16-18 x 1/2 208 17670608 Screw Thdrol 3/8-16 x 1/2 212 156229 Insert Lens Relect NOTE: All component dimensions given in U.S. MODEL NUMBER PR185H42STC KEY PART NO. CHASSIS TRACTOR - -
... Lh 34 145243X428 Footrest Pnt Rh 35 72110606 Bolt Rdhd Sht Sqnk 3/8-16 x 3/4 37 17490508 Screw Thdrol 6/16-18 x 1/2 TYT 38 169834 Bracket Asm Pivot Mower Rear 51 73800400 Nut Lock Hex W/Ins 1/4-20 52 19091416 Washer 9/32 x 7/8 x 16 Ga. 53 144697 Bracjet Grukke Lh 54 161464 Screw Hex Wshd 8-18...-18 207 17670508 Screw Thdrol 5/16-18 x 1/2 208 17670608 Screw Thdrol 3/8-16 x 1/2 212 156229 Insert Lens Relect NOTE: All component dimensions given in U.S. MODEL NUMBER PR185H42STC KEY PART NO. CHASSIS TRACTOR - -

User Manual
Page 39
....4 mm 39 MODEL NUMBER PR185H42STC 2 11 9 6 16 4 43 8 10 2 20 1 5 14 KEY NO. 1 2 3 4 5 6 8 PART NO. 157032 176303 176308 176309 174410 169210 170563 9 172740 10 157140 DESCRIPTION Decal Oper Decal Fender Auto Decal Hood LH Decal Side Panel Logo Decal HP Engine Decal By Pass Lt Hydro Decal Mower Warn Keep Hand Away...
....4 mm 39 MODEL NUMBER PR185H42STC 2 11 9 6 16 4 43 8 10 2 20 1 5 14 KEY NO. 1 2 3 4 5 6 8 PART NO. 157032 176303 176308 176309 174410 169210 170563 9 172740 10 157140 DESCRIPTION Decal Oper Decal Fender Auto Decal Hood LH Decal Side Panel Logo Decal HP Engine Decal By Pass Lt Hydro Decal Mower Warn Keep Hand Away...

User Manual
Page 43
... 19121414 173986 165890X421 157109X421 173441 173437 173443 131335 169022 165898 19091216 169670 169676 169674 169675 169671 169672 169669 17720410 72140614 130794 172559 DESCRIPTION V-Belt, 42" Mower Bolt Fin Hex 3/8-16 Unc x 1 Bracket Asm Noseroller LH Nut, Lock, Hex W/Ins 3/8-16 UNC Washer 17/3 x 7/8 x 6 Ga. Roller Nose 38 &...18 Nut, Keps 5/16 - 18 UNC Bolt, Carriage 5/16-18 x 1/2 Bolt, Shoulder Wheel, Gauge Nut Centerlock 3/8-16 Washer 3/8 x 7/8 x 14 Ga. TRACTOR - - MODEL NUMBER PR185H42STC MOWER DECK KEY NO. 1 2 3 4 5 6 8 9 10 11 13 14 15 16 18 19 20 21 22 23 24 25 26 27 28 29 30 31 32 33...
... 19121414 173986 165890X421 157109X421 173441 173437 173443 131335 169022 165898 19091216 169670 169676 169674 169675 169671 169672 169669 17720410 72140614 130794 172559 DESCRIPTION V-Belt, 42" Mower Bolt Fin Hex 3/8-16 Unc x 1 Bracket Asm Noseroller LH Nut, Lock, Hex W/Ins 3/8-16 UNC Washer 17/3 x 7/8 x 6 Ga. Roller Nose 38 &...18 Nut, Keps 5/16 - 18 UNC Bolt, Carriage 5/16-18 x 1/2 Bolt, Shoulder Wheel, Gauge Nut Centerlock 3/8-16 Washer 3/8 x 7/8 x 14 Ga. TRACTOR - - MODEL NUMBER PR185H42STC MOWER DECK KEY NO. 1 2 3 4 5 6 8 9 10 11 13 14 15 16 18 19 20 21 22 23 24 25 26 27 28 29 30 31 32 33...


