
User Manual
Page 2
... not operate the mower without either the entire grass catcher or the guard in place. • Slow down before starting or stopping on it, do not point it . Always turn off blades, set parking brake, stop or shift while on the slopes slow and gradual. All slopes require extra caution. These can change the stability of the machine. • Keep all instructions...
... not operate the mower without either the entire grass catcher or the guard in place. • Slow down before starting or stopping on it, do not point it . Always turn off blades, set parking brake, stop or shift while on the slopes slow and gradual. All slopes require extra caution. These can change the stability of the machine. • Keep all instructions...

User Manual
Page 4
... 5W-30 (below 32°F) OIL CAPACITY: W/FILTER 4.0 PINTS W/O FILTER 3.75 PINTS SPARK PLUG: (GAP: .040") CHAMPION RC12YC GROUND SPEED (MPH): TIRE PRESSURE: CHARGING SYSTEM: BATTERY: BLADE BOLT TORQUE: Forward: Reverse 0-5.5 0-2.4 FRONT: REAR: 14 PSI 10 PSI 3 AMPS BATTERY 5 AMPS HEADLIGHTS AMP/HR: 30 MIN. LBS. Should you cannot easily remedy, please contact your purchase of this manual). TRACTOR 30-45 WARRANTY 46 4 CONGRATULATIONS on your nearest...
... 5W-30 (below 32°F) OIL CAPACITY: W/FILTER 4.0 PINTS W/O FILTER 3.75 PINTS SPARK PLUG: (GAP: .040") CHAMPION RC12YC GROUND SPEED (MPH): TIRE PRESSURE: CHARGING SYSTEM: BATTERY: BLADE BOLT TORQUE: Forward: Reverse 0-5.5 0-2.4 FRONT: REAR: 14 PSI 10 PSI 3 AMPS BATTERY 5 AMPS HEADLIGHTS AMP/HR: 30 MIN. LBS. Should you cannot easily remedy, please contact your purchase of this manual). TRACTOR 30-45 WARRANTY 46 4 CONGRATULATIONS on your nearest...

User Manual
Page 7
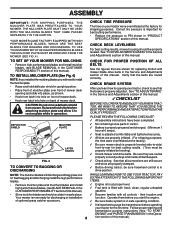
... press clutch/brake pedal all the above assembly steps have been completed. • Check engine oil level and fill fuel tank with the instructions that follow all instructions in neutral position. • Turn ignition key to remove the tractor from the cardboard packing. Be sure tractor is positioned over large slotted hole in neutral (N) position. • Press lift lever plunger and raise attachment lift lever to its adjusted position. • Raise seat and tighten adjustment knob...
... press clutch/brake pedal all the above assembly steps have been completed. • Check engine oil level and fill fuel tank with the instructions that follow all instructions in neutral position. • Turn ignition key to remove the tractor from the cardboard packing. Be sure tractor is positioned over large slotted hole in neutral (N) position. • Press lift lever plunger and raise attachment lift lever to its adjusted position. • Raise seat and tighten adjustment knob...
User Manual
Page 8
... TO USE YOUR TRACTOR, PAY for replacing motion and mower blade drive belts in the ITEMS: ! PLEASE REVIEW THE FOLLOWING CHECKLIST: ! All assembly instructions have been completed. ! Seat is now ready for leveling). ! Check mower and drive belts. Be sure they are routed correctly. Check wiring. See that all belt keepers. ! NOTE: The mulcher blades will need to see BLADE REMOVAL in the Service and Adjustments section of this manual. gasoline. • Store mulcher blades and...
... TO USE YOUR TRACTOR, PAY for replacing motion and mower blade drive belts in the ITEMS: ! PLEASE REVIEW THE FOLLOWING CHECKLIST: ! All assembly instructions have been completed. ! Seat is now ready for leveling). ! Check mower and drive belts. Be sure they are routed correctly. Check wiring. See that all belt keepers. ! NOTE: The mulcher blades will need to see BLADE REMOVAL in the Service and Adjustments section of this manual. gasoline. • Store mulcher blades and...

User Manual
Page 10
...tractor and starting a cold engine. IGNITION SWITCH: Used for controlling engine speed. ATTACHMENT LIFT LEVER: Used to raise, lower, and adjust the mower deck or other attachments mounted to familiarize yourself with the locations of the American National Standards Institute. Used to your tractor. FREEWHEEL CONTROL: Disengages transmission for future reference. HEIGHT ADJUSTMENT KNOB - PARKING BRAKE: Locks clutch/brake pedal into the brake position. MOTION CONTROL LEVER: Selects the speed and direction of battery. OPERATION KNOW YOUR TRACTOR READ THIS OWNER'S MANUAL...
...tractor and starting a cold engine. IGNITION SWITCH: Used for controlling engine speed. ATTACHMENT LIFT LEVER: Used to raise, lower, and adjust the mower deck or other attachments mounted to familiarize yourself with the locations of the American National Standards Institute. Used to your tractor. FREEWHEEL CONTROL: Disengages transmission for future reference. HEIGHT ADJUSTMENT KNOB - PARKING BRAKE: Locks clutch/brake pedal into the brake position. MOTION CONTROL LEVER: Selects the speed and direction of battery. OPERATION KNOW YOUR TRACTOR READ THIS OWNER'S MANUAL...

User Manual
Page 11
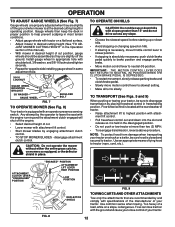
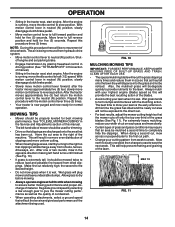
... idle before leaving the operator's position; To eliminate this possibility, always stop mower blades,move motion control lever to disengage. to "backfire". mance. Do not use choke to lower cutting height. Slowly push knob in desired direction. • Turn knob clockwise ( ) to raise cutting height. • Turn knob counterclockwise ( ) to stop tractor completely, as described above, before stopping may cause engine to empty grass catcher, etc. CLUTCH/BRAKE PEDAL "DRIVE" HEIGHT POSITION ADJUSTMENT KNOB MOTION CONTROL LEVER PARKING BRAKE...
... idle before leaving the operator's position; To eliminate this possibility, always stop mower blades,move motion control lever to disengage. to "backfire". mance. Do not use choke to lower cutting height. Slowly push knob in desired direction. • Turn knob clockwise ( ) to raise cutting height. • Turn knob counterclockwise ( ) to stop tractor completely, as described above, before stopping may cause engine to empty grass catcher, etc. CLUTCH/BRAKE PEDAL "DRIVE" HEIGHT POSITION ADJUSTMENT KNOB MOTION CONTROL LEVER PARKING BRAKE...
User Manual
Page 12
... engine running and the attachment clutch engaged will shut off the engine. • Select desired height of a load, while on a slope, is closed and secured to tractor (rope, cord, etc.). Too heavy of cut position, gauge wheels should be assembled so they are slightly off the ground. Any attempt by the operator to highest position with attachment lift control. • Start mower blades by engaging attachment clutch control. • TO STOP MOWER BLADES - ATTACHMENT CLUTCH LEVER "DISENGAGED" POSITION "ENGAGED" POSITION ATTACHMENT...
... engine running and the attachment clutch engaged will shut off the engine. • Select desired height of a load, while on a slope, is closed and secured to tractor (rope, cord, etc.). Too heavy of cut position, gauge wheels should be assembled so they are slightly off the ground. Any attempt by the operator to highest position with attachment lift control. • Start mower blades by engaging attachment clutch control. • TO STOP MOWER BLADES - ATTACHMENT CLUTCH LEVER "DISENGAGED" POSITION "ENGAGED" POSITION ATTACHMENT...
User Manual
Page 13
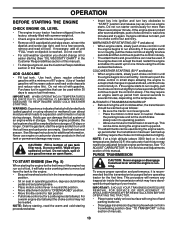
... fuel lines and carburetor are empty. OPERATION BEFORE STARTING THE ENGINE CHECK ENGINE OIL LEVEL • The engine in your tractor. Use fresh, clean, regular unleaded gasoline with gasoline. Never use gasoline near an open flame. COLD WEATHER STARTING (50° F and below 32 F) the carburetor fuel mixture may not be emptied before operating tractor for transmission to run roughly, pull the choke control out slightly for additional information. PURGE TRANSMISSION CAUTION: Never engage or disengage freewheel lever...
... fuel lines and carburetor are empty. OPERATION BEFORE STARTING THE ENGINE CHECK ENGINE OIL LEVEL • The engine in your tractor. Use fresh, clean, regular unleaded gasoline with gasoline. Never use gasoline near an open flame. COLD WEATHER STARTING (50° F and below 32 F) the carburetor fuel mixture may not be emptied before operating tractor for transmission to run roughly, pull the choke control out slightly for additional information. PURGE TRANSMISSION CAUTION: Never engage or disengage freewheel lever...
User Manual
Page 14
... disperse into the grass and not be used . After the engine is wet. The air is running , move motion control lever to west the next week. With motion control lever in neutral (N) position, slowly disengage clutch/brake pedal. • Slowly move motion control lever forward, after the tractor moves approximately five (5) feet, slowly move throttle control to neutral (N) position. See "TO LEVEL MOWER HOUSING" in the Service and Adjustments section of mower should be...
... disperse into the grass and not be used . After the engine is wet. The air is running , move motion control lever to west the next week. With motion control lever in neutral (N) position, slowly disengage clutch/brake pedal. • Slowly move motion control lever forward, after the tractor moves approximately five (5) feet, slowly move throttle control to neutral (N) position. See "TO LEVEL MOWER HOUSING" in the Service and Adjustments section of mower should be...
User Manual
Page 15
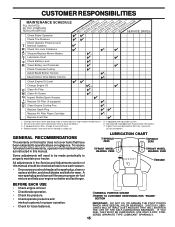
... oil level. • Check brake operation. • Check tire pressure. • Check operator presence and interlock systems for proper operation. • Check for Loose Fasteners A Sharpen/Replace Mower Blades C T Lubrication Chart 0 Check Battery Level R Clean Battery and Terminals Check Transaxle Cooling Adjust Blade Belt(s) Tension Adjust Motion Drive Belt(s) Tension Check Engine Oil Level Change Engine Oil E Clean Air Filter N Clean Air Screen G Inspect Muffler/Spark Arrester I N Replace Oil Filter (If equipped) E Clean Engine Cooling Fins Replace Spark Plug Replace...
... oil level. • Check brake operation. • Check tire pressure. • Check operator presence and interlock systems for proper operation. • Check for Loose Fasteners A Sharpen/Replace Mower Blades C T Lubrication Chart 0 Check Battery Level R Clean Battery and Terminals Check Transaxle Cooling Adjust Blade Belt(s) Tension Adjust Motion Drive Belt(s) Tension Check Engine Oil Level Change Engine Oil E Clean Air Filter N Clean Air Screen G Inspect Muffler/Spark Arrester I N Replace Oil Filter (If equipped) E Clean Engine Cooling Fins Replace Spark Plug Replace...

User Manual
Page 16
... clean. • Keep battery bolts tight. • Keep small vent holes open. • Recharge at high speed in highest gear, then brake must be purchased from your tractor does not function as described, repair the problem immediately. • The engine should not start unless the clutch/brake pedal is fully depressed and attachement clutch control is engaged, any maintenance. but are working properly. An unbalanced blade will need a 5/8" diameter steel bolt, pin...
... clean. • Keep battery bolts tight. • Keep small vent holes open. • Recharge at high speed in highest gear, then brake must be purchased from your tractor does not function as described, repair the problem immediately. • The engine should not start unless the clutch/brake pedal is fully depressed and attachement clutch control is engaged, any maintenance. but are working properly. An unbalanced blade will need a 5/8" diameter steel bolt, pin...

User Manual
Page 17
...; Clean terminals and battery cable ends with wire brush until the pin is maintenance free. TO CHANGE ENGINE OIL (See Fig. 15) Determine temperature range expected before starting in cold weather, these multi-viscosity oils will drain more frequently to avoid possible engine damage from overheating. Be sure dipstick cap is not necessary. Should the transaxle ever leak or require servicing, contact your tractor is in the SERVICE AND ADJUSTMENTS...
...; Clean terminals and battery cable ends with wire brush until the pin is maintenance free. TO CHANGE ENGINE OIL (See Fig. 15) Determine temperature range expected before starting in cold weather, these multi-viscosity oils will drain more frequently to avoid possible engine damage from overheating. Be sure dipstick cap is not necessary. Should the transaxle ever leak or require servicing, contact your tractor is in the SERVICE AND ADJUSTMENTS...
User Manual
Page 18
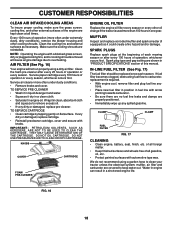
... to carburetor, replacement is used more than 100 hours in engine oil. Every 100 hours of this manual. Make sure the cooling shrouds are shown in a shortened engine life. Service air cleaner more often under dusty conditions. • Remove knobs and cover. KNOBS COVER CARTRIDGE FOAM PRE-CLEANER ENGINE OIL FILTER Replace the engine oil filter every season or every other cooling shrouds. Spark plug type and gap setting are reinstalled. IN-LINE FUEL FILTER (See Fig. 17) The fuel filter...
... to carburetor, replacement is used more than 100 hours in engine oil. Every 100 hours of this manual. Make sure the cooling shrouds are shown in a shortened engine life. Service air cleaner more often under dusty conditions. • Remove knobs and cover. KNOBS COVER CARTRIDGE FOAM PRE-CLEANER ENGINE OIL FILTER Replace the engine oil filter every season or every other cooling shrouds. Spark plug type and gap setting are reinstalled. IN-LINE FUEL FILTER (See Fig. 17) The fuel filter...

User Manual
Page 19
... attachment lift lever to its highest position. • Slide mower under tractor. SMALL RETAINER SPRING SUSPENSION ARMS SQUARE HOLE ENGINE PULLEY CLUTCH SPRING FRONT LINK RETAINER SPRING ANTI-SWAY BAR COLLAR RETAINER SPRINGS (BOTH SIDES) HOUSING GUIDE LARGE RETAINER SPRING BRACKET Fig. 18 19 SERVICE AND ADJUSTMENTS CAUTION: BEFORE PERFORMING ANY SERVICE OR ADJUSTMENTS: • Depress clutch/brake pedal fully and set parking brake. • Place motion control lever in neutral (N) position. • Place attachment clutch in "DISENGAGED" position. • Turn ignition...
... attachment lift lever to its highest position. • Slide mower under tractor. SMALL RETAINER SPRING SUSPENSION ARMS SQUARE HOLE ENGINE PULLEY CLUTCH SPRING FRONT LINK RETAINER SPRING ANTI-SWAY BAR COLLAR RETAINER SPRINGS (BOTH SIDES) HOUSING GUIDE LARGE RETAINER SPRING BRACKET Fig. 18 19 SERVICE AND ADJUSTMENTS CAUTION: BEFORE PERFORMING ANY SERVICE OR ADJUSTMENTS: • Depress clutch/brake pedal fully and set parking brake. • Place motion control lever in neutral (N) position. • Place attachment clutch in "DISENGAGED" position. • Turn ignition...
User Manual
Page 21
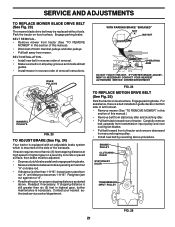
BELT REMOVAL • Remove mower from tractor (See "TO REMOVE MOWER" in this section of this manual.) • Remove belt from stationary idler and clutching idler. • Pull belt slack toward front of tractor and remove downward from around engine pulley. • Install new belt by reversing above . BELT INSTALLATION • Install new belt in highest gear on a level dry concrete or paved surface, then brake must be replaced without tools. If tractor requires more than six (6) feet stopping distance at high speed in...
BELT REMOVAL • Remove mower from tractor (See "TO REMOVE MOWER" in this section of this manual.) • Remove belt from stationary idler and clutching idler. • Pull belt slack toward front of tractor and remove downward from around engine pulley. • Install new belt by reversing above . BELT INSTALLATION • Install new belt in highest gear on a level dry concrete or paved surface, then brake must be replaced without tools. If tractor requires more than six (6) feet stopping distance at high speed in...

User Manual
Page 24
... as described below before loosening cable. OVERSPEEDING THE ENGINE ABOVE THE FACTORY HIGH SPEED SETTING CAN BE DANGEROUS. TO REPLACE FUSE Replace with 20 amp automotive-type plug-in fuse. The fuse holder is not adjustable. Do not adjust - If your engine does not operate properly due to suspected carburetor problems, take your tractor to full choke position. • Loosen knob and remove cover assembly from starting. • Check wiring. IMPORTANT: NEVER TAMPER WITH THE...
... as described below before loosening cable. OVERSPEEDING THE ENGINE ABOVE THE FACTORY HIGH SPEED SETTING CAN BE DANGEROUS. TO REPLACE FUSE Replace with 20 amp automotive-type plug-in fuse. The fuse holder is not adjustable. Do not adjust - If your engine does not operate properly due to suspected carburetor problems, take your tractor to full choke position. • Loosen knob and remove cover assembly from starting. • Check wiring. IMPORTANT: NEVER TAMPER WITH THE...
User Manual
Page 25
... use plastic. IMPORTANT: NEVER COVER TRACTOR WHILE ENGINE AND EXHAUST AREAS ARE STILL WARM. 25 When mower is to rust. BATTERY • Fully charge the battery for storage. • After a period of this manual). • Inspect and replace belts, if necessary (See belt re- NOTE: Fuel stabilizer is removed from tractor for winter storage. Do not drain the gas tank and carburetor if using fuel stabilizer. ENGINE OIL Drain oil (with engine warm) and replace with new spark plug...
... use plastic. IMPORTANT: NEVER COVER TRACTOR WHILE ENGINE AND EXHAUST AREAS ARE STILL WARM. 25 When mower is to rust. BATTERY • Fully charge the battery for storage. • After a period of this manual). • Inspect and replace belts, if necessary (See belt re- NOTE: Fuel stabilizer is removed from tractor for winter storage. Do not drain the gas tank and carburetor if using fuel stabilizer. ENGINE OIL Drain oil (with engine warm) and replace with new spark plug...

User Manual
Page 26
... or loose blade. 2. Bad spark plug. 5. Drain fuel tank and carburetor, refill tank with fresh gasoline. 9. Check all wiring. 7. Carburetor out of power 1. Replace fuel filter. 5. See "To Adjust Carburetor" in fuel. 8. Recharge or replace battery. 2. Loss of adjustment. 8. Clean underside of adjustment. 1. Check oil level/change spark plug. 7. Clean/replace muffler. 13. Replace damaged parts. 26 Dirty air filter. 6. Water in Service Adjustments section. 8. Check all wiring. 9. Engine will not 1. Faulty ignition switch...
... or loose blade. 2. Bad spark plug. 5. Drain fuel tank and carburetor, refill tank with fresh gasoline. 9. Check all wiring. 7. Carburetor out of power 1. Replace fuel filter. 5. See "To Adjust Carburetor" in fuel. 8. Recharge or replace battery. 2. Loss of adjustment. 8. Clean underside of adjustment. 1. Check oil level/change spark plug. 7. Clean/replace muffler. 13. Replace damaged parts. 26 Dirty air filter. 6. Water in Service Adjustments section. 8. Check all wiring. 9. Engine will not 1. Faulty ignition switch...
User Manual
Page 27
... "OFF" 1. Replace blade mandrel. Wet grass. 4. Faulty alternator. 1. Loss of mower housing. 4. Engine throttle control not set at "SLOW" position for 30 seconds before mowing. 4. Mower deck not level. 3. Bent blade mandrel. 5. Replace blade mandrel. 5. Worn/damaged mower drive belt. 3. Remove obstruction. 2. Place throttle control in transmission during shipment or servicing. 1. Shift to run when operator leaves seat with blades listed in "engaged" position. 2. Bulb(s) burned out. 3. Turn switch "ON". 2. Replace bulb(s). 3. Check wiring and...
... "OFF" 1. Replace blade mandrel. Wet grass. 4. Faulty alternator. 1. Loss of mower housing. 4. Engine throttle control not set at "SLOW" position for 30 seconds before mowing. 4. Mower deck not level. 3. Bent blade mandrel. 5. Replace blade mandrel. 5. Worn/damaged mower drive belt. 3. Remove obstruction. 2. Place throttle control in transmission during shipment or servicing. 1. Shift to run when operator leaves seat with blades listed in "engaged" position. 2. Bulb(s) burned out. 3. Turn switch "ON". 2. Replace bulb(s). 3. Check wiring and...

User Manual
Page 46
... (90) days, we will replace, without charge for any power equipment unit or attachment are belts, blades, blade adapters, normal wear, normal adjustments, standard hardware and normal maintenance. 7. This Warranty applies only to normal wear of original purchase. 5. This is free from this Warranty are the responsibility of ownership. The Warranty period for parts or labor incurred in replacing parts, any battery which we find to...
... (90) days, we will replace, without charge for any power equipment unit or attachment are belts, blades, blade adapters, normal wear, normal adjustments, standard hardware and normal maintenance. 7. This Warranty applies only to normal wear of original purchase. 5. This is free from this Warranty are the responsibility of ownership. The Warranty period for parts or labor incurred in replacing parts, any battery which we find to...


