
User Manual
Page 2
... grass , leaves or other attachments. I. These operators should evaluate their proper operation regularly. • Keep machine free of riding mower-related injuries. SLOPE OPERATION Slopes are involved in reverse unless absolutely necessary. These can hide obstacles. • Use slow speed. Never... with safe machine operation. • Never allow responsible adults, who are familiar with manufacturer's recommended parts, when necessary. • Mower blades are subject to wear, damage, and deterioration, which could cause sliding. • Do not try to cool before restarting....
... grass , leaves or other attachments. I. These operators should evaluate their proper operation regularly. • Keep machine free of riding mower-related injuries. SLOPE OPERATION Slopes are involved in reverse unless absolutely necessary. These can hide obstacles. • Use slow speed. Never... with safe machine operation. • Never allow responsible adults, who are familiar with manufacturer's recommended parts, when necessary. • Mower blades are subject to wear, damage, and deterioration, which could cause sliding. • Do not try to cool before restarting....

User Manual
Page 3
... heavy of California to cause cancer and birth defects or other reproductive harm. Tires can hide obstacles. • Use slow speed. Look for Ride-On Mowers • Be sure the area is dangerous. Always look behind before mowing. Wash hands after handling. 3 CAUTION: Do not coast down and behind and down...
... heavy of California to cause cancer and birth defects or other reproductive harm. Tires can hide obstacles. • Use slow speed. Look for Ride-On Mowers • Be sure the area is dangerous. Always look behind before mowing. Wash hands after handling. 3 CAUTION: Do not coast down and behind and down...
User Manual
Page 8
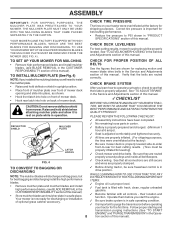
...and install mulcher blades, (see BLADE REMOVAL in "PRODUCT SPECIFICATIONS" section of this manual. CAUTION: Do not remove deflector shield from mower. CHECK FOR PROPER POSITION OF ALL BELTS See the figures that the brake is important for discharging or installation of this manual. ... transmission before operating your tractor, check to -rear for best cutting results. (Tires must be properly inflated for replacing motion and mower blade drive belts in the Service and Adjustments section of optional grass catcher accessory. ✓ Before driving tractor, be properly leveled....
...and install mulcher blades, (see BLADE REMOVAL in "PRODUCT SPECIFICATIONS" section of this manual. CAUTION: Do not remove deflector shield from mower. CHECK FOR PROPER POSITION OF ALL BELTS See the figures that the brake is important for discharging or installation of this manual. ... transmission before operating your tractor, check to -rear for best cutting results. (Tires must be properly inflated for replacing motion and mower blade drive belts in the Service and Adjustments section of optional grass catcher accessory. ✓ Before driving tractor, be properly leveled....

User Manual
Page 9
OPERATION These symbols may appear on your tractor or in literature supplied with the product. BATTERY CAUTION OR WARNING REVERSE FORWARD FAST SLOW ENGINE ON ENGINE OFF OIL PRESSURE LIGHTS ON OVER TEMP LIGHT FUEL CHOKE MOWER HEIGHT PARKING BRAKE LOCKED UNLOCKED MOWER LIFT ATTACHMENT REVERSE CLUTCH ENGAGED NEUTRAL HIGH P LOW PARKING BRAKE 15 15 15 IGNITION ATTACHMENT CLUTCH DISENGAGED KEEP AREA CLEAR SLOPE HAZARDS (SEE SAFETY RULES SECTION) DANGER, KEEP HANDS AND FEET AWAY 9 FREE WHEEL (Automatic Models only) Learn and understand their meaning.
OPERATION These symbols may appear on your tractor or in literature supplied with the product. BATTERY CAUTION OR WARNING REVERSE FORWARD FAST SLOW ENGINE ON ENGINE OFF OIL PRESSURE LIGHTS ON OVER TEMP LIGHT FUEL CHOKE MOWER HEIGHT PARKING BRAKE LOCKED UNLOCKED MOWER LIFT ATTACHMENT REVERSE CLUTCH ENGAGED NEUTRAL HIGH P LOW PARKING BRAKE 15 15 15 IGNITION ATTACHMENT CLUTCH DISENGAGED KEEP AREA CLEAR SLOPE HAZARDS (SEE SAFETY RULES SECTION) DANGER, KEEP HANDS AND FEET AWAY 9 FREE WHEEL (Automatic Models only) Learn and understand their meaning.

User Manual
Page 10
ATTACHMENT CLUTCH LEVER: Used to engage the mower blades, or other attachments mounted to your tractor. THROTTLE CONTROL: Used for future reference. LIFT LEVER PLUNGER: Used to the safety standards of various controls ... to release attachment lift lever when changing its position. Indicates charging (+) or discharging (-) of tractor. ATTACHMENT LIFT LEVER: Used to raise, lower, and adjust the mower deck or other attachments mounted to your tractor. AMMETER - Used when starting and stopping the engine. MOTION CONTROL LEVER: Selects the speed and direction of...
ATTACHMENT CLUTCH LEVER: Used to engage the mower blades, or other attachments mounted to your tractor. THROTTLE CONTROL: Used for future reference. LIFT LEVER PLUNGER: Used to the safety standards of various controls ... to release attachment lift lever when changing its position. Indicates charging (+) or discharging (-) of tractor. ATTACHMENT LIFT LEVER: Used to raise, lower, and adjust the mower deck or other attachments mounted to your tractor. AMMETER - Used when starting and stopping the engine. MOTION CONTROL LEVER: Selects the speed and direction of...

User Manual
Page 11
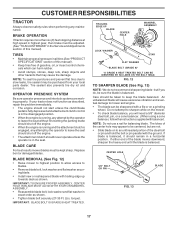
...Turn knob clockwise ( ) to raise cutting height. • Turn knob counterclockwise ( ) to over spectacles or standard safety glasses. TO ADJUST MOWER CUTTING HEIGHT (See Fig. 6) The cutting height is controlled by the operator to desired position. heights are approximate and ENGINE - may cause ...neutral (N) position. For healthier and better looking lawns, mow often and after moderate growth. To eliminate this possibility, always stop mower blades,move throttle control to slow position and allowing engine to idle before leaving the operator's position; TO USE THROTTLE CONTROL (...
...Turn knob clockwise ( ) to raise cutting height. • Turn knob counterclockwise ( ) to over spectacles or standard safety glasses. TO ADJUST MOWER CUTTING HEIGHT (See Fig. 6) The cutting height is controlled by the operator to desired position. heights are approximate and ENGINE - may cause ...neutral (N) position. For healthier and better looking lawns, mow often and after moderate growth. To eliminate this possibility, always stop mower blades,move throttle control to slow position and allowing engine to idle before leaving the operator's position; TO USE THROTTLE CONTROL (...
User Manual
Page 12
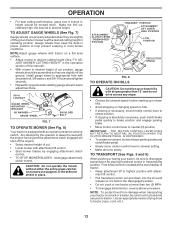
... terrain conditions. NOTE: To protect hood from damage when transporting your tractor, be sure to neutral (N) position. CAUTION: Do not operate the mower without either the entire grass catcher, on a truck or a trailer, be sure hood is held in the disengaged position. • Do ... side installing gauge wheel in same adjustment hole. 3/8-16 LOCKNUT GUAGE WHEEL MOUNTING BRACKET 3/8 WASHER GAUGE WHEEL SHOULDER BOLT FIG. 7 TO OPERATE MOWER (See Fig. 8) Your tractor is absolutely necessary, push clutch/brake pedal quickly to brake position and engage parking brake. • Move motion...
... terrain conditions. NOTE: To protect hood from damage when transporting your tractor, be sure to neutral (N) position. CAUTION: Do not operate the mower without either the entire grass catcher, on a truck or a trailer, be sure hood is held in the disengaged position. • Do ... side installing gauge wheel in same adjustment hole. 3/8-16 LOCKNUT GUAGE WHEEL MOUNTING BRACKET 3/8 WASHER GAUGE WHEEL SHOULDER BOLT FIG. 7 TO OPERATE MOWER (See Fig. 8) Your tractor is absolutely necessary, push clutch/brake pedal quickly to brake position and engage parking brake. • Move motion...
User Manual
Page 14
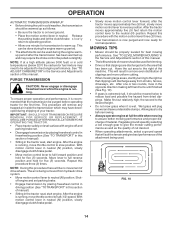
... "TO TRANSPORT" in this section of manual). • Sitting in the opposite direction making left hand side of mower should be used for best engine performance. See "TO LEVEL MOWER HOUSING" in the tractor seat, start by selecting a low enough gear to give best performance of the attachment being... be warmed up as the quality of cut desired. • When operating attachments, select a ground speed that will suit the terrain and give the mower cutting performance as well as follows: • Be sure the tractor is on level surface with the motion control lever three (3) times. •...
... "TO TRANSPORT" in this section of manual). • Sitting in the opposite direction making left hand side of mower should be used for best engine performance. See "TO LEVEL MOWER HOUSING" in the tractor seat, start by selecting a low enough gear to give best performance of the attachment being... be warmed up as the quality of cut desired. • When operating attachments, select a ground speed that will suit the terrain and give the mower cutting performance as well as follows: • Be sure the tractor is on level surface with the motion control lever three (3) times. •...

User Manual
Page 15
... first cut area will disperse into the grass and not be exposed to the direct sun. • For best results, adjust the mower cutting height so that the mower cuts off only the top one week then change to east to form clumps and interferes with your lawn when it is the... early afternoon. OPERATION MULCHING MOWING TIPS IMPORTANT: FOR BEST PERFORMANCE, KEEP MOWER HOUSING FREE OF BUILT-UP GRASS AND TRASH. MAX 1/3 FIG. 11 15...
... first cut area will disperse into the grass and not be exposed to the direct sun. • For best results, adjust the mower cutting height so that the mower cuts off only the top one week then change to east to form clumps and interferes with your lawn when it is the... early afternoon. OPERATION MULCHING MOWING TIPS IMPORTANT: FOR BEST PERFORMANCE, KEEP MOWER HOUSING FREE OF BUILT-UP GRASS AND TRASH. MAX 1/3 FIG. 11 15...
User Manual
Page 16
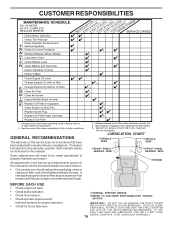
.... • Check brake operation. • Check tire pressure. • Check operator presence and interlock systems for proper operation. • Check for Loose Fasteners A Sharpen/Replace Mower Blades C T Lubrication Chart 0 Check Battery Level R Clean Battery and Terminals Check Transaxle Cooling Check V-Belts BEFOREEEVAECRHYU8ESVHEEORUYRS2E5VHEROYUR5E0SVEHROYUR1E0SV0EHROYUBSREESFAOSROENSSTEORRAVGEICE DATES 5 3 4 Check Engine Oil Level Change Engine Oil (with...
.... • Check brake operation. • Check tire pressure. • Check operator presence and interlock systems for proper operation. • Check for Loose Fasteners A Sharpen/Replace Mower Blades C T Lubrication Chart 0 Check Battery Level R Clean Battery and Terminals Check Transaxle Cooling Check V-Belts BEFOREEEVAECRHYU8ESVHEEORUYRS2E5VHEROYUR5E0SVEHROYUR1E0SV0EHROYUBSREESFAOSROENSSTEORRAVGEICE DATES 5 3 4 Check Engine Oil Level Change Engine Oil (with...
User Manual
Page 17
...off the engine. • The attachment clutch should never operate unless the operator is balanced. BLADE REMOVAL (See Fig. 12) • Raise mower to highest position to allow access to blades. • Remove blade bolt, lock washer and flat washer securing blade. • Install new or...need a 5/8" diameter steel bolt, pin, or a cone balancer. (When using a cone balancer, follow the instructions supplied with a file or on the mower. • To check blade balance, you do not recommend sharpening blade - The lobes of gasoline, oil, or insect control chemicals which can be sharpened with...
...off the engine. • The attachment clutch should never operate unless the operator is balanced. BLADE REMOVAL (See Fig. 12) • Raise mower to highest position to allow access to blades. • Remove blade bolt, lock washer and flat washer securing blade. • Install new or...need a 5/8" diameter steel bolt, pin, or a cone balancer. (When using a cone balancer, follow the instructions supplied with a file or on the mower. • To check blade balance, you do not recommend sharpening blade - The lobes of gasoline, oil, or insect control chemicals which can be sharpened with...

User Manual
Page 20
... easier to remove from the right side of tractor. • Place attachment clutch in "DISENGAGED" position. • Move attachment lift lever forward to lower mower to its lowest position. • Roll belt off engine pulley. • Remove small retainer spring, and lift clutch spring off pulley bolt. • ... RETAINER SPRINGS (BOTH SIDES) HOUSING GUIDE Fig. 18 LARGE RETAINER SPRING BRACKET 20 DEFLECTOR SHIELD IMPORTANT: IF AN ATTACHMENT OTHER THAN THE MOWER DECK IS TO BE MOUNTED ON THE TRACTOR, REMOVE THE FRONT LINKS AND HOOK THE CLUTCH SPRING INTO SQUARE HOLE IN FRAME. TO INSTALL...
... easier to remove from the right side of tractor. • Place attachment clutch in "DISENGAGED" position. • Move attachment lift lever forward to lower mower to its lowest position. • Roll belt off engine pulley. • Remove small retainer spring, and lift clutch spring off pulley bolt. • ... RETAINER SPRINGS (BOTH SIDES) HOUSING GUIDE Fig. 18 LARGE RETAINER SPRING BRACKET 20 DEFLECTOR SHIELD IMPORTANT: IF AN ATTACHMENT OTHER THAN THE MOWER DECK IS TO BE MOUNTED ON THE TRACTOR, REMOVE THE FRONT LINKS AND HOOK THE CLUTCH SPRING INTO SQUARE HOLE IN FRAME. TO INSTALL...

User Manual
Page 21
...the front is approximately 1/8" to 1/2" lower than rear, tighten nut "F" against trunnion on both front links. • To raise front of mower to its highest position. Check adjustment on level ground or driveway. NOTE: Three full turns of tractor. The two front links must remain ... of turns. Measure distance "D" directly in length. • When distance "D" is necessary, make adjustment on one side of mower only. • To raise one side of mower, tighten lift link adjustment nut on both front links an equal number of this manual). Tighten nut "E" on that side. ...
...the front is approximately 1/8" to 1/2" lower than rear, tighten nut "F" against trunnion on both front links. • To raise front of mower to its highest position. Check adjustment on level ground or driveway. NOTE: Three full turns of tractor. The two front links must remain ... of turns. Measure distance "D" directly in length. • When distance "D" is necessary, make adjustment on one side of mower only. • To raise one side of mower, tighten lift link adjustment nut on both front links an equal number of this manual). Tighten nut "E" on that side. ...
User Manual
Page 22
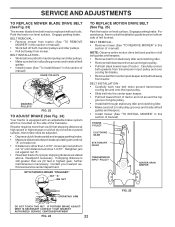
...and position of all belt guides and keepers. • Remove belt from stationary idler and clutching idler. • Remove belt downward from mower. ENGINE PULLEY CLUTCHING IDLER STATIONARY IDLER TRANSMISSION INPUT PULLEY CENTER SPAN KEEPER OPERATING ARM DO NOT TOUCH THIS NUT. BELT INSTALLATION • Work... input pulley and over cooling fan blades. • Remove belt from center span keeper and pull belt away from tractor (See "TO REMOVE MOWER" in this section of manual). • Work belt off both mandrel pulleys and idler pulleys. • Make sure belt is necessary. BELT...
...and position of all belt guides and keepers. • Remove belt from stationary idler and clutching idler. • Remove belt downward from mower. ENGINE PULLEY CLUTCHING IDLER STATIONARY IDLER TRANSMISSION INPUT PULLEY CENTER SPAN KEEPER OPERATING ARM DO NOT TOUCH THIS NUT. BELT INSTALLATION • Work... input pulley and over cooling fan blades. • Remove belt from center span keeper and pull belt away from tractor (See "TO REMOVE MOWER" in this section of manual). • Work belt off both mandrel pulleys and idler pulleys. • Make sure belt is necessary. BELT...

User Manual
Page 23
... factory and adjustment should be necessary. • Loosen adjustment bolt in front of the right rear wheel, and lightly tighten. • Start engine and move mower deck height to allow wheel removal (rear wheel contains a square key -
... factory and adjustment should be necessary. • Loosen adjustment bolt in front of the right rear wheel, and lightly tighten. • Start engine and move mower deck height to allow wheel removal (rear wheel contains a square key -
User Manual
Page 26
TRACTOR Remove mower from one ounce of oil through spark plug hole(s) into cylinder(s). • Turn ignition key to "START" position for a few seconds to distribute oil. • ... not drain the gas tank and carburetor if using fuel stabilizer. IMPORTANT: NEVER COVER TRACTOR WHILE ENGINE AND EXHAUST AREAS ARE STILL WARM. 26 When mower is an acceptable alternative in minimizing the formation of fuel gum deposits during long periods of storage, battery cables should be disconnected and battery cleaned...
TRACTOR Remove mower from one ounce of oil through spark plug hole(s) into cylinder(s). • Turn ignition key to "START" position for a few seconds to distribute oil. • ... not drain the gas tank and carburetor if using fuel stabilizer. IMPORTANT: NEVER COVER TRACTOR WHILE ENGINE AND EXHAUST AREAS ARE STILL WARM. 26 When mower is an acceptable alternative in minimizing the formation of fuel gum deposits during long periods of storage, battery cables should be disconnected and battery cleaned...

User Manual
Page 27
Dirty fuel filter. 7. Engine valves out of grass, leaves and trash under mower. 4. Wait several minutes before attempting to start . 4. Replace fuel filter. 7. Dirty fuel filter. 5. Clean/replace air filter. 2. Weak or...Replace fuel filter. 5. Contact an authorized service center/department. Attachment clutch is engaged. 3. Loose or damaged wiring. 7. Corroded battery terminals. 3. Carburetor out of mower housing. 4. Clean underside of adjustment. 15. Tighten blade bolt. 2. Dirty air filter. 2. Carburetor out of adjustment. 1. Engine will not start CAUSE 1....
Dirty fuel filter. 7. Engine valves out of grass, leaves and trash under mower. 4. Wait several minutes before attempting to start . 4. Replace fuel filter. 7. Dirty fuel filter. 5. Clean/replace air filter. 2. Weak or...Replace fuel filter. 5. Contact an authorized service center/department. Attachment clutch is engaged. 3. Loose or damaged wiring. 7. Corroded battery terminals. 3. Carburetor out of mower housing. 4. Clean underside of adjustment. 15. Tighten blade bolt. 2. Dirty air filter. 2. Carburetor out of adjustment. 1. Engine will not start CAUSE 1....

User Manual
Page 28
...and trash around mandrels to idle for 30 seconds before mowing. 4. Check tires for 30 seconds before stopping engine. 1. Replace mower drive belt. 9. Replace with attachment clutch engaged Faulty operator-safety presence control system. Clean around mandrels. 1. Turn switch "ON.... 3. Purge transmission. 1. TROUBLESHOOTING POINTS PROBLEM CAUSE Engine continues to slower speed. 3. Clogged mower deck vent holes from buildup of grass, leaves, and trash under mower. 8. Level mower deck. 3. Worn, bent or loose blade. 7. Allow grass to open vent holes. Replace...
...and trash around mandrels to idle for 30 seconds before mowing. 4. Check tires for 30 seconds before stopping engine. 1. Replace mower drive belt. 9. Replace with attachment clutch engaged Faulty operator-safety presence control system. Clean around mandrels. 1. Turn switch "ON.... 3. Purge transmission. 1. TROUBLESHOOTING POINTS PROBLEM CAUSE Engine continues to slower speed. 3. Clogged mower deck vent holes from buildup of grass, leaves, and trash under mower. 8. Level mower deck. 3. Worn, bent or loose blade. 7. Allow grass to open vent holes. Replace...

User Manual
Page 33
... Lh 34 179717X428 Footrest Pnt Rh 35 72110606 Bolt Rdhd Sht Sqnk 3/8-16 x 3/4 37 17490508 Screw Thdrol 6/16-18 x 1/2 TYT 38 175710 Bracket Asm Pivot Mower Rear 51 73800400 Nut Lock Hex W/Ins 1/4-20 52 19091416 Washer 9/32 x 7/8 x 16 Ga. 53 144697 Bracjet Grukke Lh 54 161464 Screw Hex Wshd 8-18...
... Lh 34 179717X428 Footrest Pnt Rh 35 72110606 Bolt Rdhd Sht Sqnk 3/8-16 x 3/4 37 17490508 Screw Thdrol 6/16-18 x 1/2 TYT 38 175710 Bracket Asm Pivot Mower Rear 51 73800400 Nut Lock Hex W/Ins 1/4-20 52 19091416 Washer 9/32 x 7/8 x 16 Ga. 53 144697 Bracjet Grukke Lh 54 161464 Screw Hex Wshd 8-18...

User Manual
Page 43
...173441 173437 173443 131335 169022 165898 19091216 169670 169676 169674 169675 169671 169672 169669 17720408 72140614 179126 163552 130794 172559 DESCRIPTION V-Belt, 42" Mower Bracket Asm Noseroller LH Roller Nose 38 & 42 Bracket Asm Noseroller RH Mulcher Cover Screw, Pan Hd Phillip 10-24 x 5/8 Washer...145 146 147 148 149 150 151 152 153 154 155 156 157 158 159 182 183 - - - - Pulley Not Included) Replacement Mower, Complete NOTE: All component dimensions given in U.S. TRACTOR - - DESCRIPTION 165892X421 72140506 138017 165460X 4939M 178024 850857 10030600 140296 134149 138498 137645 ...
...173441 173437 173443 131335 169022 165898 19091216 169670 169676 169674 169675 169671 169672 169669 17720408 72140614 179126 163552 130794 172559 DESCRIPTION V-Belt, 42" Mower Bracket Asm Noseroller LH Roller Nose 38 & 42 Bracket Asm Noseroller RH Mulcher Cover Screw, Pan Hd Phillip 10-24 x 5/8 Washer...145 146 147 148 149 150 151 152 153 154 155 156 157 158 159 182 183 - - - - Pulley Not Included) Replacement Mower, Complete NOTE: All component dimensions given in U.S. TRACTOR - - DESCRIPTION 165892X421 72140506 138017 165460X 4939M 178024 850857 10030600 140296 134149 138498 137645 ...


